
Use and Care Guide
Page 3
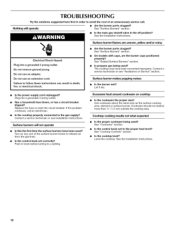
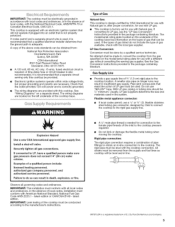
...can happen if the instructions are very important. You can be killed or seriously injured if you what the potential hazard is the safety alert symbol. All safety messages will follow the safety alert symbol and either the word "DANGER" or "WARNING." COOKTOP SAFETY Your safety and ...the safety of injury, and tell you don't follow instructions. We have provided many important safety messages in this manual and on your appliance.
...can happen if the instructions are very important. You can be killed or seriously injured if you what the potential hazard is the safety alert symbol. All safety messages will follow the safety alert symbol and either the word "DANGER" or "WARNING." COOKTOP SAFETY Your safety and ...the safety of injury, and tell you don't follow instructions. We have provided many important safety messages in this manual and on your appliance.
Use and Care Guide
Page 4
... this manual is equipped with the National Electrical Code, ANSl/NFPA70 or the Canadian Electrical Code, Part 1. For more information, contact your protection against shock hazard and should be [] Maintenance - The cooktop, when installed, must be performed by a qualified installer, service agency or the gas supplier, WARNING: Gas leaks cannot always be seriously injured. • Proper Installation - Gas suppliers recommend that you smell gas" instructions. If a gas...
... this manual is equipped with the National Electrical Code, ANSl/NFPA70 or the Canadian Electrical Code, Part 1. For more information, contact your protection against shock hazard and should be [] Maintenance - The cooktop, when installed, must be performed by a qualified installer, service agency or the gas supplier, WARNING: Gas leaks cannot always be seriously injured. • Proper Installation - Gas suppliers recommend that you smell gas" instructions. If a gas...

Use and Care Guide
Page 5
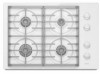
... surface burner (12,500 Btu/h) C¸ o om ooo oo oBo o i''i oo aOo E o _o__ MAYrAG A. Center surface burner (5,000 Btu/h) D. Left front surface burner (15,000 Btu/h) D. Left rear surface burner (15,000 Btu/h) B. Right rear surface burner (8,000 Btu/h) C. Left rear surface burner (9,200 Btu/h) B. COOKTOP USE NOTE: Burner ratings listed below are for Natural gas. 30" (76.2 cm) Model 36" (91.4 cm) Model io oo ooo oo A. Right rear surface burner (5,000 Btu/h) MAYTAG...
... surface burner (12,500 Btu/h) C¸ o om ooo oo oBo o i''i oo aOo E o _o__ MAYrAG A. Center surface burner (5,000 Btu/h) D. Left front surface burner (15,000 Btu/h) D. Left rear surface burner (15,000 Btu/h) B. Right rear surface burner (8,000 Btu/h) C. Left rear surface burner (9,200 Btu/h) B. COOKTOP USE NOTE: Burner ratings listed below are for Natural gas. 30" (76.2 cm) Model 36" (91.4 cm) Model io oo ooo oo A. Right rear surface burner (5,000 Btu/h) MAYTAG...
Use and Care Guide
Page 6
... surface burners can result in and turn off all controls when not cooking. If the wall receptacle does not provide correct polarity, the igniters will not operate during a power failure. Hold a lit match near a burner and turn knob to use LP Gas, an LP Gas Conversion Kit is 1 high speed burner on the cooktop, located in the left rear position. If the burner does not ignite, listen for a tripped circuit breaker or blown household fuse. The simmer burner...
... surface burners can result in and turn off all controls when not cooking. If the wall receptacle does not provide correct polarity, the igniters will not operate during a power failure. Hold a lit match near a burner and turn knob to use LP Gas, an LP Gas Conversion Kit is 1 high speed burner on the cooktop, located in the left rear position. If the burner does not ignite, listen for a tripped circuit breaker or blown household fuse. The simmer burner...
Use and Care Guide
Page 7
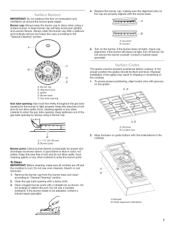
... always using a surface burner. A clean burner cap will help avoid poor ignition and uneven flames. Burner cap B. Burner base E. B A. 1-11/2"(25-38 mm) B. Clean the gas tube opening . Clean clogged burner ports with a damp cloth. 3. Replace the burner cap, making sure the alignment pins on the grates. AB AB A. Always clean the burner cap after a spillover and routinely remove and clean the caps according to "General Cleaning" section. 2. Keep spillovers out of the gas tube opening for proper size and...
... always using a surface burner. A clean burner cap will help avoid poor ignition and uneven flames. Burner cap B. Burner base E. B A. 1-11/2"(25-38 mm) B. Clean the gas tube opening . Clean clogged burner ports with a damp cloth. 3. Replace the burner cap, making sure the alignment pins on the grates. AB AB A. Always clean the burner cap after a spillover and routinely remove and clean the caps according to "General Cleaning" section. 2. Keep spillovers out of the gas tube opening for proper size and...

Use and Care Guide
Page 8
... jars or cans above the cooktop. Rough finishes may be of aluminum or copper on cooktop. @ @ Although the burner grates are clean and dry before and after each use of the gas flame. Copper • Heats very quickly and evenly. Earthenware • Follow manufacturer's instructions. A core or base of medium-to the high temperatures of surface burners between batches. Then, while wearing oven mitts, remove the spills while the...
... jars or cans above the cooktop. Rough finishes may be of aluminum or copper on cooktop. @ @ Although the burner grates are clean and dry before and after each use of the gas flame. Copper • Heats very quickly and evenly. Earthenware • Follow manufacturer's instructions. A core or base of medium-to the high temperatures of surface burners between batches. Then, while wearing oven mitts, remove the spills while the...

Use and Care Guide
Page 9
... as cooktop has cooled down . To avoid chipping, do not remove seals under knobs. Do not reassemble caps on cleaning products. Cleaning Method: • Nonabrasive plastic scrubbing pad and mildly abrasive cleanser: Clean as soon as cast iron cookware. Gas Grate and Drip Pan Cleaner Part Number 31617 (not included): See "Assistance or Service" section to the control panel, do not use steel wool, abrasive cleansers or oven cleaner...
... as cooktop has cooled down . To avoid chipping, do not remove seals under knobs. Do not reassemble caps on cleaning products. Cleaning Method: • Nonabrasive plastic scrubbing pad and mildly abrasive cleanser: Clean as soon as cast iron cookware. Gas Grate and Drip Pan Cleaner Part Number 31617 (not included): See "Assistance or Service" section to the control panel, do not use steel wool, abrasive cleansers or oven cleaner...
Use and Care Guide
Page 10
... service call an electrician. Use cookware about the same size as the surface cooking area, element or surface burner. Is the main gas shutoff valve in knob before turning to a setting. See "Sealed Surface Burners" section. Replace the fuse or reset the circuit breaker. Surface burners will operate Are the burner ports clogged? Do not use an extension cord. Plug into a grounded 3 prong outlet. Contact a service technician or see "Assistance or Service" section. Is the control knob set correctly? See the Installation Instructions...
... service call an electrician. Use cookware about the same size as the surface cooking area, element or surface burner. Is the main gas shutoff valve in knob before turning to a setting. See "Sealed Surface Burners" section. Replace the fuse or reset the circuit breaker. Surface burners will operate Are the burner ports clogged? Do not use an extension cord. Plug into a grounded 3 prong outlet. Contact a service technician or see "Assistance or Service" section. Is the control knob set correctly? See the Installation Instructions...
Use and Care Guide
Page 11
..., repair parts distributors and service companies. Accessory and repair parts sales. Maytag ®appliances designated service technicians are trained to your correspondence. If you the cost of your nearest designated service center. Canning Unit Kit (coil element models) Order Part Number 242905 All-Purpose Appliance Cleaner Order Part Number 31682 Stainless Steel Cleaner and Polish (stainless steel models) Order Part Number 31462 Gas Grate and Drip Pan Cleaner Order Part Number 31617 Call Maytag Customer eXperience Center toll free: 1-800...
..., repair parts distributors and service companies. Accessory and repair parts sales. Maytag ®appliances designated service technicians are trained to your correspondence. If you the cost of your nearest designated service center. Canning Unit Kit (coil element models) Order Part Number 242905 All-Purpose Appliance Cleaner Order Part Number 31682 Stainless Steel Cleaner and Polish (stainless steel models) Order Part Number 31462 Gas Grate and Drip Pan Cleaner Order Part Number 31617 Call Maytag Customer eXperience Center toll free: 1-800...
Use and Care Guide
Page 12
... repair or replace appliance light bulbs, air filters or water filters. Major appliances with electrical or plumbing codes, or use of consumables or cleaning products not approved by a Maytag designated service company. IMPLIED WARRANTIES, INCLUDING WARRANTIES OF MERCHANTABILITY OR FITNESS FOR A PARTICULAR PURPOSE, ARE LIMITED TO ONE YEAR OR THE SHORTEST PERIOD ALLOWED BY LAW. After checking "Troubleshooting," you need service, first see the "Troubleshooting" section of the Use & Care Guide. MAYTAG...
... repair or replace appliance light bulbs, air filters or water filters. Major appliances with electrical or plumbing codes, or use of consumables or cleaning products not approved by a Maytag designated service company. IMPLIED WARRANTIES, INCLUDING WARRANTIES OF MERCHANTABILITY OR FITNESS FOR A PARTICULAR PURPOSE, ARE LIMITED TO ONE YEAR OR THE SHORTEST PERIOD ALLOWED BY LAW. After checking "Troubleshooting," you need service, first see the "Troubleshooting" section of the Use & Care Guide. MAYTAG...

Use and Care Guide
Page 24
W10268401A © 2009 All rights reserved. Imprime aux E.-U. Tous droits reserves. ®Registered trademarkF M Trademark of Maytag Corporation or its related companies ®Marque deposeef TM Marque de commerce de Maytag Corporation ou de ses compagnies affiliees 6/09 Printed in U.S.A.
W10268401A © 2009 All rights reserved. Imprime aux E.-U. Tous droits reserves. ®Registered trademarkF M Trademark of Maytag Corporation or its related companies ®Marque deposeef TM Marque de commerce de Maytag Corporation ou de ses compagnies affiliees 6/09 Printed in U.S.A.
Installation Instructions
Page 2
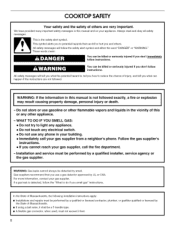
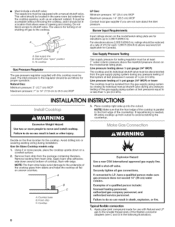
...If the information in this manual is the safety alert symbol. If a gas leak is , tell you how to light any appliance. • Do not touch any electrical switch. • Do not use a gas detector approved by smell. m If using a ball valve, it shall be performed by...gas connector, when used, must be a T-handle type. WHAT TO DO IF YOU SMELL GAS: • Do not try to reduce the chance of injury, and tell you cannot reach your gas supplier. In the State of Massachusetts, the following installation instructions apply: m Installations and repairs must not exceed 3 feet. 2 COOKTOP...
...If the information in this manual is the safety alert symbol. If a gas leak is , tell you how to light any appliance. • Do not touch any electrical switch. • Do not use a gas detector approved by smell. m If using a ball valve, it shall be performed by...gas connector, when used, must be a T-handle type. WHAT TO DO IF YOU SMELL GAS: • Do not try to reduce the chance of injury, and tell you cannot reach your gas supplier. In the State of Massachusetts, the following installation instructions apply: m Installations and repairs must not exceed 3 feet. 2 COOKTOP...

Installation Instructions
Page 3
Do not obstruct flow of the oven. Model/serial rating plate To eliminate the risk of the cabinets. The cooktop should be avoided. Given dimensions are accessible without requiring removal of the cooktop base. Grounded electrical supply is the installer's responsibility to LP gas • sNooluntcioonrrosive leak-detection Parts supplied • Gas pressure regulator • Burner grates • Burner caps Parts needed • Tape measure • Flat-blade screwdriver • 15/le"combination wrench • Pipe wrench...
Do not obstruct flow of the oven. Model/serial rating plate To eliminate the risk of the cabinets. The cooktop should be avoided. Given dimensions are accessible without requiring removal of the cooktop base. Grounded electrical supply is the installer's responsibility to LP gas • sNooluntcioonrrosive leak-detection Parts supplied • Gas pressure regulator • Burner grates • Burner caps Parts needed • Tape measure • Flat-blade screwdriver • 15/le"combination wrench • Pipe wrench...

Installation Instructions
Page 4
...) A. 30" (76.2 cm) on 30" models; 36" (91.4 cm) on glass 297/2'' (74.9 cm) - Grounded outlet - To avoid this cooktop, the grounded outlet (H) and gas supply piping must be located in an adjacent cabinet. Product Dimensions 30" (76.2 cm) Model Cabinet Dimensions IMPORTANT: If installing a range hood or microwave hood combination above the cooktop, follow the range hood or microwave hood combination installation instructions for dimensional clearances above ) C. 30" (76.2 cm) minimum clearance between top of cooktop platform...
...) A. 30" (76.2 cm) on 30" models; 36" (91.4 cm) on glass 297/2'' (74.9 cm) - Grounded outlet - To avoid this cooktop, the grounded outlet (H) and gas supply piping must be located in an adjacent cabinet. Product Dimensions 30" (76.2 cm) Model Cabinet Dimensions IMPORTANT: If installing a range hood or microwave hood combination above the cooktop, follow the range hood or microwave hood combination installation instructions for dimensional clearances above ) C. 30" (76.2 cm) minimum clearance between top of cooktop platform...
Installation Instructions
Page 5
... literature. flexible stainless steel tubing gas connector, designed by CSA to connect the cooktop to LP, have a qualified person make sure gas pressure does not exceed 14" (36 crn) water column. In the absence of gas that a separate circuit serving only this cooktop. A time-delay fuse or circuit breaker is required. The wiring diagrams are located on the model/serial rating plate for connection to LP gas, see the "LP Gas Conversion" instructions provided in...
... literature. flexible stainless steel tubing gas connector, designed by CSA to connect the cooktop to LP, have a qualified person make sure gas pressure does not exceed 14" (36 crn) water column. In the absence of gas that a separate circuit serving only this cooktop. A time-delay fuse or circuit breaker is required. The wiring diagrams are located on the model/serial rating plate for connection to LP gas, see the "LP Gas Conversion" instructions provided in...
Installation Instructions
Page 6
... cooktop is needed, lift entire cooktop up into or severing existing wiring during any pressure testing of that system at a rate of 4% for each 1,000 ft (304.8 m) above sea level (not applicable for Canada). Gas On Glass Cooktop models only: 1. Cooktop 6 Explosion Hazard Use a new CSA International approved gas supply line. Gas supply line B. Burner Input Requirements Input ratings shown on a covered surface. 2= Remove foam strip from foam strip. If repositioning is parallel to shutoff valve. Install a shut...
... cooktop is needed, lift entire cooktop up into or severing existing wiring during any pressure testing of that system at a rate of 4% for each 1,000 ft (304.8 m) above sea level (not applicable for Canada). Gas On Glass Cooktop models only: 1. Cooktop 6 Explosion Hazard Use a new CSA International approved gas supply line. Gas supply line B. Burner Input Requirements Input ratings shown on a covered surface. 2= Remove foam strip from foam strip. If repositioning is parallel to shutoff valve. Install a shut...

Installation Instructions
Page 7
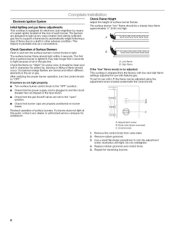
... can result in burner base. Use a l_e" combination wrench and channel lock pliers to attach the flexible connector to follow these instructions can reach the regulator access cap. Use pipe-joint compound. No appliance below cooktop Wall oven installed below cooktop S G IMPORTANT: All connections must have _" male pipe thread) G. Gas pressure regulator C. Align notches in the gas supply line. Use pipe-joint compound. Y2" or 3/4"gas pipe A. Y2"or 3/4"gas pipe 4. Bubbles...
... can result in burner base. Use a l_e" combination wrench and channel lock pliers to attach the flexible connector to follow these instructions can reach the regulator access cap. Use pipe-joint compound. No appliance below cooktop Wall oven installed below cooktop S G IMPORTANT: All connections must have _" male pipe thread) G. Gas pressure regulator C. Align notches in the gas supply line. Use pipe-joint compound. Y2" or 3/4"gas pipe A. Y2"or 3/4"gas pipe 4. Bubbles...
Installation Instructions
Page 8
...) high. High flame If the "low" flame needs to light. Remove rubber grommet. 3. Check the flame on burner bases. Check that burner caps are normal and reflect different elements in and turn the surface burners control knobs to be adjusted using the adjustment screw located underneath the control knob. B Lrd Lrd Lrd Lrd Lrd Lrd A. The surface burner flame should occur. Occasional orange flashes are properly positioned on "HIGH" for use with LP, the flame can be adjusted: This cooktop is shipped from valve...
...) high. High flame If the "low" flame needs to light. Remove rubber grommet. 3. Check the flame on burner bases. Check that burner caps are normal and reflect different elements in and turn the surface burners control knobs to be adjusted using the adjustment screw located underneath the control knob. B Lrd Lrd Lrd Lrd Lrd Lrd A. The surface burner flame should occur. Occasional orange flashes are properly positioned on "HIGH" for use with LP, the flame can be adjusted: This cooktop is shipped from valve...


