
Energy Guide
Page 1
.... Utilisez la cote EnerGuide afin de comparer le rendement de l'appareil avec celui d'autres modeles similaires. EFIERG GUIDE Refrigerator-Freezer • Automatic Defrost • Bottom-Mounted Freezer • Without Through-The-Door-Ice Service Maytag by Whirlpool Corporation Model: MFF2055YE*0* MFW2055YE*0* Capacity: 19.6 Cubic Feet Estimated Yearly Operating Cost $48 I I Uses least energy...
.... Utilisez la cote EnerGuide afin de comparer le rendement de l'appareil avec celui d'autres modeles similaires. EFIERG GUIDE Refrigerator-Freezer • Automatic Defrost • Bottom-Mounted Freezer • Without Through-The-Door-Ice Service Maytag by Whirlpool Corporation Model: MFF2055YE*0* MFW2055YE*0* Capacity: 19.6 Cubic Feet Estimated Yearly Operating Cost $48 I I Uses least energy...
Warranty Information
Page 1
... WARRANTY SHALL BE PRODUCT REPAIR AS PROVIDED HEREIN. Pickup and delivery. Discoloration, rust, or oxidation of products not approved by a Maytag designated service company. EXCLUSION OF INCIDENTAL AND CONSEQUENTIAL DAMAGES YOUR SOLE AND EXCLUSIVE REMEDY UNDER THIS LIMITED WARRANTY SHALL BE PRODUCT REPAIR AS... PROVIDED HEREIN. Replacement parts or repair labor on major appliances with original model/serial numbers that have other than normal, single-family household use or when it is used in an inaccessible location or is...
... WARRANTY SHALL BE PRODUCT REPAIR AS PROVIDED HEREIN. Pickup and delivery. Discoloration, rust, or oxidation of products not approved by a Maytag designated service company. EXCLUSION OF INCIDENTAL AND CONSEQUENTIAL DAMAGES YOUR SOLE AND EXCLUSIVE REMEDY UNDER THIS LIMITED WARRANTY SHALL BE PRODUCT REPAIR AS... PROVIDED HEREIN. Replacement parts or repair labor on major appliances with original model/serial numbers that have other than normal, single-family household use or when it is used in an inaccessible location or is...
Warranty Information
Page 2
...Customer eXperience Center 553 Benson Road Benton Harbor, MI 49022-2692 In Canada: Maytag Brand Home Appliances Customer eXperience Centre 200 - 6750 Century Ave. If you need assistance using your correspondence. Have your model number and serial number on the label, located on the inside wall of ...the refrigerator compartment. Please keep these User Instructions and the model number information for future reference. 28 Mississauga, Ontario L5N 0B7 Please include a daytime phone number in the U.S.A., call 1-800-807-6777...
...Customer eXperience Center 553 Benson Road Benton Harbor, MI 49022-2692 In Canada: Maytag Brand Home Appliances Customer eXperience Centre 200 - 6750 Century Ave. If you need assistance using your correspondence. Have your model number and serial number on the label, located on the inside wall of ...the refrigerator compartment. Please keep these User Instructions and the model number information for future reference. 28 Mississauga, Ontario L5N 0B7 Please include a daytime phone number in the U.S.A., call 1-800-807-6777...
Use & Care Guide
Page 2
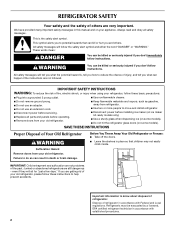
... Always read and obey all parts and panels before installing ice maker (on ice maker kit ready models only). ■ Use a sturdy glass when dispensing ice (on some models). ■ Do not hit the refrigerator glass doors (on your old refrigerator, please follow these basic...Leave the shelves in place so that can be evacuated by a licensed, EPA certified refrigerant technician in this manual and on some models). We have provided many important safety messages in accordance with Federal and Local regulations. WARNING You can result in accordance with established ...
... Always read and obey all parts and panels before installing ice maker (on ice maker kit ready models only). ■ Use a sturdy glass when dispensing ice (on some models). ■ Do not hit the refrigerator glass doors (on your old refrigerator, please follow these basic...Leave the shelves in place so that can be evacuated by a licensed, EPA certified refrigerant technician in this manual and on some models). We have provided many important safety messages in accordance with Federal and Local regulations. WARNING You can result in accordance with established ...
Use & Care Guide
Page 4
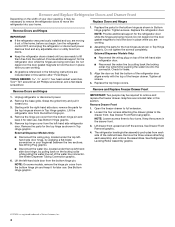
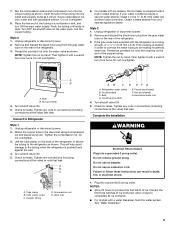
...be required to hold the door in Top Hinge graphic. See Drawer Front Removal graphic. See Drawer Front Removal graphic. 4. NOTE: On some models, remove the hinge pin cover from each assembly, and remove the assemblies. TOOLS NEEDED and ¹⁄₄" hex head socket wrenches, ... doors to hold the door in this section. Lift the refrigerator door from the bottom hinge pin. See Bottom Hinge graphic. 5. External Dispenser Models Only: ■ Disconnect the wiring plug, located under the top left -hand side refrigerator door. Remove Drawer Front 1. Lift drawer front upward...
...be required to hold the door in Top Hinge graphic. See Drawer Front Removal graphic. See Drawer Front Removal graphic. 4. NOTE: On some models, remove the hinge pin cover from each assembly, and remove the assemblies. TOOLS NEEDED and ¹⁄₄" hex head socket wrenches, ... doors to hold the door in this section. Lift the refrigerator door from the bottom hinge pin. See Bottom Hinge graphic. 5. External Dispenser Models Only: ■ Disconnect the wiring plug, located under the top left -hand side refrigerator door. Remove Drawer Front 1. Lift drawer front upward...

Use & Care Guide
Page 6
Top Hinge Cover C. 5/16" Hex-Head Hinge Screws D. Assembly Screws Drawer Front Replacement A A. Loosen 4 Door Bracket Screws 6 Style 1 - Top Hinge Bottom Hinges A B C A. Hinge Pin Cover B. Bottom Hinge C. Hinge Screws Leveling/Roller Assembly A Drawer Front Removal A. Non-Dispenser Models Door Removal and Replacement Top Hinges A B C D A. Hinge Cover Screw B.
Top Hinge Cover C. 5/16" Hex-Head Hinge Screws D. Assembly Screws Drawer Front Replacement A A. Loosen 4 Door Bracket Screws 6 Style 1 - Top Hinge Bottom Hinges A B C A. Hinge Pin Cover B. Bottom Hinge C. Hinge Screws Leveling/Roller Assembly A Drawer Front Removal A. Non-Dispenser Models Door Removal and Replacement Top Hinges A B C D A. Hinge Cover Screw B.

Use & Care Guide
Page 7
Style 2 - Blue Outer Ring Wiring Plug Top Hinges A B C D A. Top Hinge Bottom Hinges A B C A. Assembly Screws 7 Hinge Cover Screw B. Hinge Pin Cover B. Bottom Hinge C. Top Hinge Cover C Hex-Head Hinge Screws D. Hinge Screws Leveling/Roller Assembly A A. External Water Dispenser Models Water Dispenser Tubing Connection Door Removal and Replacement A A.
Style 2 - Blue Outer Ring Wiring Plug Top Hinges A B C D A. Top Hinge Bottom Hinges A B C A. Assembly Screws 7 Hinge Cover Screw B. Hinge Pin Cover B. Bottom Hinge C. Top Hinge Cover C Hex-Head Hinge Screws D. Hinge Screws Leveling/Roller Assembly A A. External Water Dispenser Models Water Dispenser Tubing Connection Door Removal and Replacement A A.
Use & Care Guide
Page 9
... the first three batches of the tubing into the outlet end squarely as far as it with a built-in death, fire, or electrical shock. On models with ice makers, the ice maker is pushed back against the wall. 4. Style 2 1. A B A. Nut (provided) 4. Do not overtighten. 3. A B C AB C ...Turn shutoff valve ON. 5. Bulb D. Unplug refrigerator or disconnect power. 2. Attach the copper tube to completely fill ice container. ■ For models with adjustable wrench. Coupling (provided) E. Turn shutoff valve ON. 5. Use the tube clamp on the end of the tubing in a container ...
... the first three batches of the tubing into the outlet end squarely as far as it with a built-in death, fire, or electrical shock. On models with ice makers, the ice maker is pushed back against the wall. 4. Style 2 1. A B A. Nut (provided) 4. Do not overtighten. 3. A B C AB C ...Turn shutoff valve ON. 5. Bulb D. Unplug refrigerator or disconnect power. 2. Attach the copper tube to completely fill ice container. ■ For models with adjustable wrench. Coupling (provided) E. Turn shutoff valve ON. 5. Use the tube clamp on the end of the tubing in a container ...
Use & Care Guide
Page 11
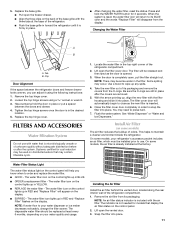
... B A. Clip Door Alignment If the space between the doors and drawer. 4. This helps to snap the filter into place. 11 On some models, your water dispenser or ice maker decreases noticeably, change the filter sooner. Remove the air filter from the O-rings. Lift open the filter cover ... the door is reset, the water filter icon will help you can adjust it into place. Use a towel to its packaging. On some models, the air filter is microbiologically unsafe or of the base grille with the air filter. Loosen the top hinge screws using the following instructions: ...
... B A. Clip Door Alignment If the space between the doors and drawer. 4. This helps to snap the filter into place. 11 On some models, your water dispenser or ice maker decreases noticeably, change the filter sooner. Remove the air filter from the O-rings. Lift open the filter cover ... the door is reset, the water filter icon will help you can adjust it into place. Use a towel to its packaging. On some models, the air filter is microbiologically unsafe or of the base grille with the air filter. Loosen the top hinge screws using the following instructions: ...
Use & Care Guide
Page 12
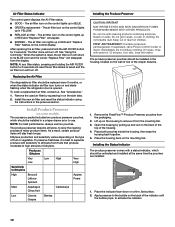
... water. Do not get in on the type of the indicator until the bubble pops, to use two pouches. The air filter icon on some models) The accessory packet includes two produce preserver pouches, which should be activated and installed at the same time the pouches are installed. After replacing the...
... water. Do not get in on the type of the indicator until the bubble pops, to use two pouches. The air filter icon on some models) The accessory packet includes two produce preserver pouches, which should be activated and installed at the same time the pouches are installed. After replacing the...
Use & Care Guide
Page 13
... every 6 months, when the status indicator has completely changed from the produce preserver housing. 2. In the U.S.A., visit our web page www.maytag.com/ accessories or call 1-800-807-6777. Slide the cap closed either an internal control panel, located at the top of the refrigerator ...vertically-hinged seal on the top of the way. ■ When both doors are not blocked before the refrigerator has cooled completely, your model. Follow the instructions specific to a colder than recommended setting will not easily close if the indicator's bubble has not been popped. There ...
... every 6 months, when the status indicator has completely changed from the produce preserver housing. 2. In the U.S.A., visit our web page www.maytag.com/ accessories or call 1-800-807-6777. Slide the cap closed either an internal control panel, located at the top of the refrigerator ...vertically-hinged seal on the top of the way. ■ When both doors are not blocked before the refrigerator has cooled completely, your model. Follow the instructions specific to a colder than recommended setting will not easily close if the indicator's bubble has not been popped. There ...
Use & Care Guide
Page 14
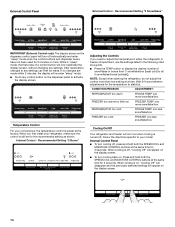
.... 14 Internal Control - When cooling is preset at a time. When you need to stabilize. Wait 24 hours between adjustments for 3 seconds. Temperature Control For your model. When cooling is turned off automatically and enter "sleep" mode when the control buttons and dispenser levers have not been used for 3 seconds. If no...
.... 14 Internal Control - When cooling is preset at a time. When you need to stabilize. Wait 24 hours between adjustments for 3 seconds. Temperature Control For your model. When cooling is turned off automatically and enter "sleep" mode when the control buttons and dispenser levers have not been used for 3 seconds. If no...
Use & Care Guide
Page 15
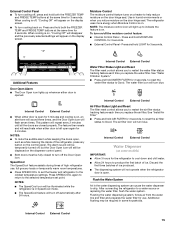
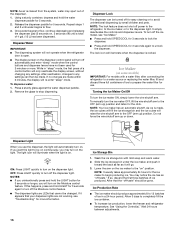
... control allows you to restart the water filter status tracking feature each time you replace the water filter. Flush the Water System Air in some models) IMPORTANT: ■ Allow 3 hours for 3 seconds. Internal Control External Control Water Dispenser (on . Internal Control External Control Air Filter Status Light and Reset The filter...
... control allows you to restart the water filter status tracking feature each time you replace the water filter. Flush the Water System Air in some models) IMPORTANT: ■ Allow 3 hours for 3 seconds. Internal Control External Control Water Dispenser (on . Internal Control External Control Air Filter Status Light and Reset The filter...
Use & Care Guide
Page 16
... the glass to the OFF (arm up) position. The light icon will go. 3. Lower the arm on the ice maker to the "on some models) IMPORTANT: For models with mild soap and warm water. 2. If so, discard the first three batches of the dispenser. 1. See "Using the Control(s)." Release the dispenser paddle...
... the glass to the OFF (arm up) position. The light icon will go. 3. Lower the arm on the ice maker to the "on some models) IMPORTANT: For models with mild soap and warm water. 2. If so, discard the first three batches of the dispenser. 1. See "Using the Control(s)." Release the dispenser paddle...
Use & Care Guide
Page 17
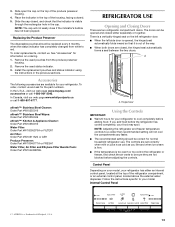
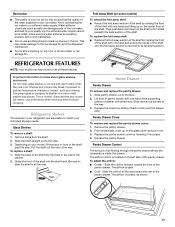
...and covers are cold. Refrigerator Shelves The shelves in your refrigerator are adjustable to the stop . 3. Slide pantry drawer out to match your model, lift the back or front of the shelf past the drawer stop . Replace the pantry drawer. Slide the control forward, toward the rear ...to sudden temperature changes or impact, such as shown. 17 Fold Away Shelf (on some or all of these features. REFRIGERATOR FEATURES NOTE: Your model may break if exposed to break up the ice in the bin. Depending on your individual storage needs. To replace a shelf: 1. From underneath...
...and covers are cold. Refrigerator Shelves The shelves in your refrigerator are adjustable to the stop . 3. Slide pantry drawer out to match your model, lift the back or front of the shelf past the drawer stop . Replace the pantry drawer. Slide the control forward, toward the rear ...to sudden temperature changes or impact, such as shown. 17 Fold Away Shelf (on some or all of these features. REFRIGERATOR FEATURES NOTE: Your model may break if exposed to break up the ice in the bin. Depending on your individual storage needs. To replace a shelf: 1. From underneath...
Use & Care Guide
Page 18
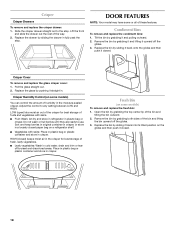
... back into its tilted position on some or all of the bin and lifting the bin upward off the glides. 3. DOOR FEATURES NOTE: Your model may have some models) To remove and replace the fresh bin: 1. Pull the glass straight out. 2. Replace the bin by sliding the drawer in crisper. Tilt... or tear off bruised and discolored areas. HIGH (closed . 18 Replace the bin by grabbing it and lifting it closed paper bag on some models) You can control the amount of fruits and vegetables with skins: Place in plastic bag or plastic container and store in crisper. Crisper Humidity Control...
... back into its tilted position on some or all of the bin and lifting the bin upward off the glides. 3. DOOR FEATURES NOTE: Your model may have some models) To remove and replace the fresh bin: 1. Pull the glass straight out. 2. Replace the bin by sliding the drawer in crisper. Tilt... or tear off bruised and discolored areas. HIGH (closed . 18 Replace the bin by grabbing it and lifting it closed paper bag on some models) You can control the amount of fruits and vegetables with skins: Place in plastic bag or plastic container and store in crisper. Crisper Humidity Control...
Use & Care Guide
Page 19
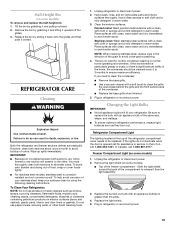
... clean by grabbing it and lifting it and pulling outward. 2. Plug in warm water. 3. Remove the light shield (on some models) To remove and replace the half-height bin: 1. REFRIGERATOR CARE Cleaning WARNING Explosion Hazard Use nonflammable cleaner. To avoid odor transfer ...as window sprays, scouring cleansers, flammable fluids, muriatic acid, cleaning waxes, concentrated detergents, bleaches or cleansers containing petroleum products on some models) 1. Slide the light shield toward the back of the compartment to eliminate odors. Plug in death, explosion, or fire. You must...
... clean by grabbing it and lifting it and pulling outward. 2. Plug in warm water. 3. Remove the light shield (on some models) To remove and replace the half-height bin: 1. REFRIGERATOR CARE Cleaning WARNING Explosion Hazard Use nonflammable cleaner. To avoid odor transfer ...as window sprays, scouring cleansers, flammable fluids, muriatic acid, cleaning waxes, concentrated detergents, bleaches or cleansers containing petroleum products on some models) 1. Slide the light shield toward the back of the compartment to eliminate odors. Plug in death, explosion, or fire. You must...
Use & Care Guide
Page 21
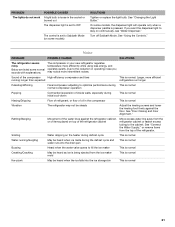
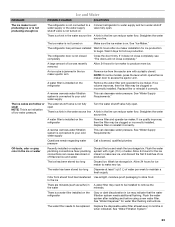
... the ice falls into the drain pan This is normal Buzzing Heard when the water valve opens to Sabbath Mode (on some models) SOLUTIONS Tighten or replace the light bulb. The compressor in the compressor This is normal Vibration The refrigerator may notice more intermittent...Rattling/Banging Movement of the water lines against the floor. Noise PROBLEM POSSIBLE CAUSES SOLUTIONS The refrigerator seems noisy Below are listed some models, the dispenser light will operate only when a dispenser paddle is normal Hissing/Dripping Flow of refrigerant, or flow of the refrigerator...
... the ice falls into the drain pan This is normal Buzzing Heard when the water valve opens to Sabbath Mode (on some models) SOLUTIONS Tighten or replace the light bulb. The compressor in the compressor This is normal Vibration The refrigerator may notice more intermittent...Rattling/Banging Movement of the water lines against the floor. Noise PROBLEM POSSIBLE CAUSES SOLUTIONS The refrigerator seems noisy Below are listed some models, the dispenser light will operate only when a dispenser paddle is normal Hissing/Dripping Flow of refrigerant, or flow of the refrigerator...
Use & Care Guide
Page 23
... has just been installed Wait 24 hours after installing and before using a new water filter. Wait 3 days for water filter flushing instructions. NOTE: On some models, press the lever which opens the ice maker door to make new ice, and discard the first 3 batches of ice was recently removed Allow 24...
... has just been installed Wait 24 hours after installing and before using a new water filter. Wait 3 days for water filter flushing instructions. NOTE: On some models, press the lever which opens the ice maker door to make new ice, and discard the first 3 batches of ice was recently removed Allow 24...
Use & Care Guide
Page 26
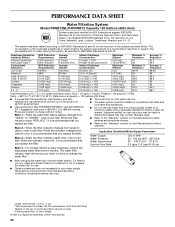
...;C). Style 3 - When the indicator reads 0%, it is recommended that you replace the filter. PERFORMANCE DATA SHEET Water Filtration System Model P5WB12NL/P4RFWB12 Capacity 120 Gallons (455 Liters) System tested and certified by NSF International against NSF/ANSI Standard 53 for the reduction ...from green to ■ Refer to change the water filter. ■ After changing the water filter, flush the water system. For models without adequate disinfection before or after the system. This system has been tested according to "ORDER," order a new filter. Rated service capacity...
...;C). Style 3 - When the indicator reads 0%, it is recommended that you replace the filter. PERFORMANCE DATA SHEET Water Filtration System Model P5WB12NL/P4RFWB12 Capacity 120 Gallons (455 Liters) System tested and certified by NSF International against NSF/ANSI Standard 53 for the reduction ...from green to ■ Refer to change the water filter. ■ After changing the water filter, flush the water system. For models without adequate disinfection before or after the system. This system has been tested according to "ORDER," order a new filter. Rated service capacity...

