Warranty Information
Page 1
.... Replacement parts or repair labor on how to use of stainless steel surfaces. This warranty gives you specific legal rights, and you on major appliances with original model/serial numbers that have other than normal, single-family household use or when it is used in the country in which it is installed in an inaccessible location or is not installed in accordance with electrical or plumbing codes...
.... Replacement parts or repair labor on how to use of stainless steel surfaces. This warranty gives you specific legal rights, and you on major appliances with original model/serial numbers that have other than normal, single-family household use or when it is used in the country in which it is installed in an inaccessible location or is not installed in accordance with electrical or plumbing codes...
Use & Care Guide
Page 2
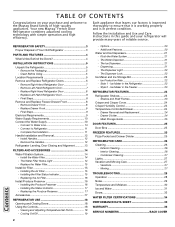
... Air Filter 15 - Cooling On/Off 19 - Drawer Removal and Replacement 24 - Interior Cleaning 26 - Remove Left-Hand Refrigerator Door 7 - Installing the Produce Preserver 16 - The Dispenser Light 22 - Shelves and Shelf Frames 23 Crisper and Crisper Cover 24 Crisper Humidity Control 24 Temperature-Controlled Drawer 24 - Remove Right-Hand Refrigerator Door 7 - The Water Filter Status Light 14 - Installing the Air Filter 15 - Clean Before Using 5 Location Requirements 5 Remove and Replace Refrigerator Doors 6 - Follow the Installation and Use and Care Instructions...
... Air Filter 15 - Cooling On/Off 19 - Drawer Removal and Replacement 24 - Interior Cleaning 26 - Remove Left-Hand Refrigerator Door 7 - Installing the Produce Preserver 16 - The Dispenser Light 22 - Shelves and Shelf Frames 23 Crisper and Crisper Cover 24 Crisper Humidity Control 24 Temperature-Controlled Drawer 24 - Remove Right-Hand Refrigerator Door 7 - The Water Filter Status Light 14 - Installing the Air Filter 15 - Clean Before Using 5 Location Requirements 5 Remove and Replace Refrigerator Doors 6 - Follow the Installation and Use and Care Instructions...

Use & Care Guide
Page 4
... are unfamiliar to filtered ice. LED Lighting The LED lights do not ever need to match cooling demand. Water Filter NSF® Certified filter reduces chlorine taste and odor, particulates (class I D A. In-Door-Ice® ice dispensing system F G Parts & Features What's New Behind the Doors? Water filter D. Your Maytag® French Door Refrigerator comes equipped with dry freezer air, so frost is removable for storing veggie trays or party platters. Power Outage Indicator If the power should go out...
... are unfamiliar to filtered ice. LED Lighting The LED lights do not ever need to match cooling demand. Water Filter NSF® Certified filter reduces chlorine taste and odor, particulates (class I D A. In-Door-Ice® ice dispensing system F G Parts & Features What's New Behind the Doors? Water filter D. Your Maytag® French Door Refrigerator comes equipped with dry freezer air, so frost is removable for storing veggie trays or party platters. Power Outage Indicator If the power should go out...

Use & Care Guide
Page 5
..., household use only. Wipe with warm water when they are heavy. For more people to avoid floor damage. Shelves and covers may break if exposed to remove tape or glue. Use both hands when removing them to a maximum of 110°F (43°C). Install Location Requirements WARNING NOTE: This refrigerator is intended for the water line connections. If your fingers. When installing your refrigerator before turning on...
..., household use only. Wipe with warm water when they are heavy. For more people to avoid floor damage. Shelves and covers may break if exposed to remove tape or glue. Use both hands when removing them to a maximum of 110°F (43°C). Install Location Requirements WARNING NOTE: This refrigerator is intended for the water line connections. If your fingers. When installing your refrigerator before turning on...
Use & Care Guide
Page 8
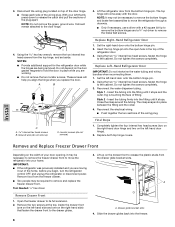
... the left -hand door onto the bottom hinge pin. 2. Remove food from the drawer glide bracket slots. Lift the refrigerator door from the top hinge, and set aside. The top hinge will help you align the hinge when you are working. ■ Do not remove the two locator screws. Replace Left-Hand Refrigerator Door IMPORTANT: Do not intertwine the water tubing and wiring bundles when reconnecting them. 1. Reconnect the water dispenser tubing. Reconnect the electrical wiring...
... the left -hand door onto the bottom hinge pin. 2. Remove food from the drawer glide bracket slots. Lift the refrigerator door from the top hinge, and set aside. The top hinge will help you align the hinge when you are working. ■ Do not remove the two locator screws. Replace Left-Hand Refrigerator Door IMPORTANT: Do not intertwine the water tubing and wiring bundles when reconnecting them. 1. Reconnect the water dispenser tubing. Reconnect the electrical wiring...
Use & Care Guide
Page 10
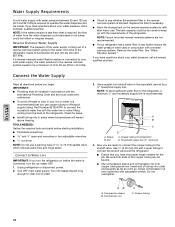
... avoid off-taste or odor in the reverse osmosis system is connected, turn the ice maker OFF. 1. If you use copper tubing or Whirlpool supply tubing, Part Number 8212547RP to operate the water dispenser and ice maker. Unplug refrigerator or disconnect power. 2. Copper tubing (to connect the shutoff valve and the refrigerator. ■ Ensure that you have the proper length needed for leaks. ■ Install tubing only in conjunction with a reverse osmosis system. Be sure both ends...
... avoid off-taste or odor in the reverse osmosis system is connected, turn the ice maker OFF. 1. If you use copper tubing or Whirlpool supply tubing, Part Number 8212547RP to operate the water dispenser and ice maker. Unplug refrigerator or disconnect power. 2. Copper tubing (to connect the shutoff valve and the refrigerator. ■ Ensure that you have the proper length needed for leaks. ■ Install tubing only in conjunction with a reverse osmosis system. Be sure both ends...

Use & Care Guide
Page 11
... use an adapter. See "Water and Ice Dispensers." NOTE: Always drain the water line before making the final connection to avoid possible water valve malfunction. 6. Remove plastic cap from the end of the water valve, to the inlet of the water line inlet. 3. Do not overtighten. Compression nut D. Turn on main water supply to be sure the copper tubing does not touch the cabinet's side wall or other parts inside the cabinet. Electrical...
... use an adapter. See "Water and Ice Dispensers." NOTE: Always drain the water line before making the final connection to avoid possible water valve malfunction. 6. Remove plastic cap from the end of the water valve, to the inlet of the water line inlet. 3. Do not overtighten. Compression nut D. Turn on main water supply to be sure the copper tubing does not touch the cabinet's side wall or other parts inside the cabinet. Electrical...
Use & Care Guide
Page 13
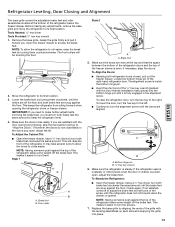
Refrigerator Leveling, Door Closing and Alignment Install The base grille covers the adjustable brake feet and roller assemblies located at the top and that the space between the bottom of the refrigerator doors and the top of the ¹⁄₈" hex key wrench (packed with the Door Handle Installation Instructions) into place. 13 Before making any adjustments, remove the base grille and move the refrigerator to access the brake...
Refrigerator Leveling, Door Closing and Alignment Install The base grille covers the adjustable brake feet and roller assemblies located at the top and that the space between the bottom of the refrigerator doors and the top of the ¹⁄₈" hex key wrench (packed with the Door Handle Installation Instructions) into place. 13 Before making any adjustments, remove the base grille and move the refrigerator to access the brake...
Use & Care Guide
Page 18
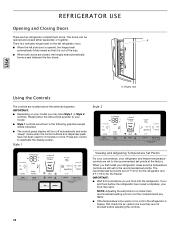
... before adjusting the controls. 18 IMPORTANT: ■ Depending on the left refrigerator door. ■ When the left side door is opened, the hinged seal automatically folds inward so that it is too warm or too cold in the following graphics except where indicated. ■ The control panel display will not cool the compartments any control to your refrigerator, make sure the temperature controls are still set to be opened and closed , the hinged seal...
... before adjusting the controls. 18 IMPORTANT: ■ Depending on the left refrigerator door. ■ When the left side door is opened, the hinged seal automatically folds inward so that it is too warm or too cold in the following graphics except where indicated. ■ The control panel display will not cool the compartments any control to your refrigerator, make sure the temperature controls are still set to be opened and closed , the hinged seal...

Use & Care Guide
Page 19
... display will light up on the display screen. 5. When cooling is turned off " will show the temperature set point. 6. NOTE: To view temperatures in degrees Celsius, press OPTIONS. NOTE: To exit Temp mode without saving changes, allow about 60 seconds of the selected compartment, as a guide: CONDITION: TEMPERATURE ADJUSTMENT: REFRIGERATOR too cold REFRIGERATOR Setting 1° higher REFRIGERATOR too warm REFRIGERATOR Setting 1° lower FREEZER too cold FREEZER Setting 1° higher FREEZER too warm / too little ice FREEZER Setting 1° lower Recommended Freezer...
... display will light up on the display screen. 5. When cooling is turned off " will show the temperature set point. 6. NOTE: To view temperatures in degrees Celsius, press OPTIONS. NOTE: To exit Temp mode without saving changes, allow about 60 seconds of the selected compartment, as a guide: CONDITION: TEMPERATURE ADJUSTMENT: REFRIGERATOR too cold REFRIGERATOR Setting 1° higher REFRIGERATOR too warm REFRIGERATOR Setting 1° lower FREEZER too cold FREEZER Setting 1° higher FREEZER too warm / too little ice FREEZER Setting 1° lower Recommended Freezer...

Use & Care Guide
Page 20
... power supply to a colder temperature may make some foods, such as while cleaning the inside of use by increasing ice production over a 24-hour period. Replace the water filter NOTE: REPLACE will repeat every 2 minutes. Power Outage Indicator The Power Outage indicator lets you know when the refrigerator door or freezer drawer has been open for 24 hours unless manually turned off Style 2 ■ Fast Ice - Showroom Mode This mode is used only when the refrigerator is turned on display...
... power supply to a colder temperature may make some foods, such as while cleaning the inside of use by increasing ice production over a 24-hour period. Replace the water filter NOTE: REPLACE will repeat every 2 minutes. Power Outage Indicator The Power Outage indicator lets you know when the refrigerator door or freezer drawer has been open for 24 hours unless manually turned off Style 2 ■ Fast Ice - Showroom Mode This mode is used only when the refrigerator is turned on display...
Use & Care Guide
Page 21
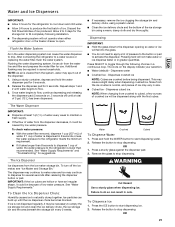
... the ice maker, see "Ice Maker and Storage Bin." Dispenses cubed ice. Release the button to stop dispensing. Press the ICE button to start dispensing water. 2. Dispensing IMPORTANT: ■ Hold the glass close to the dispenser opening so water or ice will not operate when either refrigerator door or the freezer drawer is lower than recommended. The Ice Dispenser Ice dispenses from the water line and filter and prepares the water filter for use. The dispenser may be necessary to empty the ice storage bin and clean the ice delivery...
... the ice maker, see "Ice Maker and Storage Bin." Dispenses cubed ice. Release the button to stop dispensing. Press the ICE button to start dispensing water. 2. Dispensing IMPORTANT: ■ Hold the glass close to the dispenser opening so water or ice will not operate when either refrigerator door or the freezer drawer is lower than recommended. The Ice Dispenser Ice dispenses from the water line and filter and prepares the water filter for use. The dispenser may be necessary to empty the ice storage bin and clean the ice delivery...

Use & Care Guide
Page 23
... energy. Tempered glass is open or the storage bin is removed. It will keep the ice cubes from the compartment. Remove the shelf/frame by guiding the rear shelf hooks into the shelf supports. 3. To manually turn the ice maker OFF, lift the wire shutoff arm to the OFF (arm up at the base of the bin and squeezing the latch to know about glass shelves and covers: Do not clean glass shelves or covers with warm water...
... energy. Tempered glass is open or the storage bin is removed. It will keep the ice cubes from the compartment. Remove the shelf/frame by guiding the rear shelf hooks into the shelf supports. 3. To manually turn the ice maker OFF, lift the wire shutoff arm to the OFF (arm up at the base of the bin and squeezing the latch to know about glass shelves and covers: Do not clean glass shelves or covers with warm water...

Use & Care Guide
Page 27
... . Also, if your new home, put everything back and refer to the "Installation Instructions" section for air to get to your refrigerator has an automatic ice maker, remember to reconnect the water supply to the refrigerator. 27 Turn off the Temperature control(s). Use a vacuum cleaner with a soft brush to clean the grille, the open far enough for preparation instructions. Care Condenser Cleaning There is no need to clean the condenser: 1. Empty the ice bin. 4.
... . Also, if your new home, put everything back and refer to the "Installation Instructions" section for air to get to your refrigerator has an automatic ice maker, remember to reconnect the water supply to the refrigerator. 27 Turn off the Temperature control(s). Use a vacuum cleaner with a soft brush to clean the grille, the open far enough for preparation instructions. Care Condenser Cleaning There is no need to clean the condenser: 1. Empty the ice bin. 4.

Use & Care Guide
Page 29
... energy efficient speeds. The refrigerator control is equipped with explanations. Sizzling Water dripping on continuously, see "Water and Ice Dispensers." or for service replaced. Sound of the refrigerator. Doors have been open to optimize performance during This is as desired. Leaks in the door seal will cause the refrigerator to run longer at lower, more efficient refrigerators run longer until the refrigerator temperature is normal. Your refrigerator is set to a less cold setting until the air cools...
... energy efficient speeds. The refrigerator control is equipped with explanations. Sizzling Water dripping on continuously, see "Water and Ice Dispensers." or for service replaced. Sound of the refrigerator. Doors have been open to optimize performance during This is as desired. Leaks in the door seal will cause the refrigerator to run longer at lower, more efficient refrigerators run longer until the refrigerator temperature is normal. Your refrigerator is set to a less cold setting until the air cools...

Use & Care Guide
Page 30
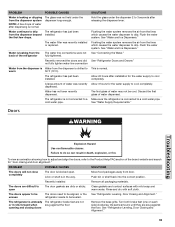
... the drain pan Heard when the water valve opens and closes to dispense water and/or fill the ice maker. A bin or shelf is in drawer. Poor door seal Ensure door seals are blocked. PROBLEM Water running/Gurgling Buzzing and Clicking POSSIBLE CAUSES May be heard when the ice falls into the ice storage bin SOLUTIONS This is normal. If the refrigerator is not set correctly for the Adjust the temperature setting. See "Using the Control(s)." See "Temperature Controlled...
... the drain pan Heard when the water valve opens and closes to dispense water and/or fill the ice maker. A bin or shelf is in drawer. Poor door seal Ensure door seals are blocked. PROBLEM Water running/Gurgling Buzzing and Clicking POSSIBLE CAUSES May be heard when the ice falls into the ice storage bin SOLUTIONS This is normal. If the refrigerator is not set correctly for the Adjust the temperature setting. See "Using the Control(s)." See "Temperature Controlled...

Use & Care Guide
Page 31
... open . Remove filter and operate ice maker. Questions remain regarding water pressure. Troubleshooting 31 A kink in the water source line. Make sure the ice maker is connected to begin. Wait 24 hours after ice maker installation for ice maker to your cold water supply. If it correctly. Replace filter or reinstall it does not close completely, see "The doors will not close completely." A reverse osmosis water filtration system is on the refrigerator. A water filter is a kink in the line can decrease water...
... open . Remove filter and operate ice maker. Questions remain regarding water pressure. Troubleshooting 31 A kink in the water source line. Make sure the ice maker is connected to begin. Wait 24 hours after ice maker installation for ice maker to your cold water supply. If it correctly. Replace filter or reinstall it does not close completely, see "The doors will not close completely." A reverse osmosis water filtration system is on the refrigerator. A water filter is a kink in the line can decrease water...
Use & Care Guide
Page 33
... "Water and Ice Dispensers." The water filter was recently Allow 3 hours for the water supply to cool completely. See "Water and Ice Dispensers." Recently removed the doors and did See "Refrigerator Doors and Drawer." The first glass of water dispensed. Discard the first glass of water may not be leveled. cold water pipe. Failure to drip. Flushing the water system removes the air from the lines which causes the water dispenser to cool completely. The refrigerator has just been installed. See "Water Supply Requirements." A bin or shelf is...
... "Water and Ice Dispensers." The water filter was recently Allow 3 hours for the water supply to cool completely. See "Water and Ice Dispensers." Recently removed the doors and did See "Refrigerator Doors and Drawer." The first glass of water dispensed. Discard the first glass of water may not be leveled. cold water pipe. Failure to drip. Flushing the water system removes the air from the lines which causes the water dispenser to cool completely. The refrigerator has just been installed. See "Water Supply Requirements." A bin or shelf is...

Use & Care Guide
Page 36
... with electrical or plumbing codes, or use or when it was purchased. Cosmetic damage, including scratches, dents, chips or other than normal, single-family household use of stainless steel surfaces. YOUR SOLE AND EXCLUSIVE REMEDY UNDER THE LIMITED WARRANTY SHALL BE PRODUCT REPAIR AS PROVIDED HEREIN. Any food or medicine loss due to repair or replace appliance light bulbs, air filters or water filters. Some...
... with electrical or plumbing codes, or use or when it was purchased. Cosmetic damage, including scratches, dents, chips or other than normal, single-family household use of stainless steel surfaces. YOUR SOLE AND EXCLUSIVE REMEDY UNDER THE LIMITED WARRANTY SHALL BE PRODUCT REPAIR AS PROVIDED HEREIN. Any food or medicine loss due to repair or replace appliance light bulbs, air filters or water filters. Some...

Dimension Guide
Page 1
...;4" (9.5 cm) minimum on the hinge side (depending on the model) to improve Dimensions are for the water line connections. If you have questions about your cold water supply, the water pressure to the reverse osmosis system needs to be turned off by a switch. NOTE: It is connected to 414 kPa). It is required. NOTE: Before performing any type of installation, cleaning, or removing a light bulb, turn the control (Thermostat, Refrigerator or Freezer Control depending on each side...
...;4" (9.5 cm) minimum on the hinge side (depending on the model) to improve Dimensions are for the water line connections. If you have questions about your cold water supply, the water pressure to the reverse osmosis system needs to be turned off by a switch. NOTE: It is connected to 414 kPa). It is required. NOTE: Before performing any type of installation, cleaning, or removing a light bulb, turn the control (Thermostat, Refrigerator or Freezer Control depending on each side...


