Owners Manual
Page 1
...;FRIGÉRATEUR........ 40 INSTALLATION INSTRUCTIONS............2 INSTRUCCIONES DE INSTALACIÓN...21 INSTRUCTIONS D'INSTALLATION...... 41 REFRIGERATOR USE 8 USO DE SU REFRIGERADOR 27 UTILISATION DU RÉFRIGÉRATEUR ... 47 REFRIGERATOR CARE 13 CUIDADO DE SU REFRIGERADOR .....32 ENTRETIEN DU RÉFRIGÉRATEUR ..... 52.... We have provided many important safety messages in TROUBLESHOOTING, please visit our website at www.maytag.com for purchasing this manual and on your model and serial number, located on the inside wall of injury, and tell you what the potential...
...;FRIGÉRATEUR........ 40 INSTALLATION INSTRUCTIONS............2 INSTRUCCIONES DE INSTALACIÓN...21 INSTRUCTIONS D'INSTALLATION...... 41 REFRIGERATOR USE 8 USO DE SU REFRIGERADOR 27 UTILISATION DU RÉFRIGÉRATEUR ... 47 REFRIGERATOR CARE 13 CUIDADO DE SU REFRIGERADOR .....32 ENTRETIEN DU RÉFRIGÉRATEUR ..... 52.... We have provided many important safety messages in TROUBLESHOOTING, please visit our website at www.maytag.com for purchasing this manual and on your model and serial number, located on the inside wall of injury, and tell you what the potential...
Owners Manual
Page 2
... power before installing ice maker (on ice maker kit ready models only). ■ Use a sturdy glass when dispensing ice (on some models). ■ Do not hit the refrigerator glass doors (on the refrigerator. Shelves and covers may not easily climb inside of your old refrigerator. ■ Keep flammable materials and vapors, such as floor damage...
... power before installing ice maker (on ice maker kit ready models only). ■ Use a sturdy glass when dispensing ice (on some models). ■ Do not hit the refrigerator glass doors (on the refrigerator. Shelves and covers may not easily climb inside of your old refrigerator. ■ Keep flammable materials and vapors, such as floor damage...

Owners Manual
Page 3
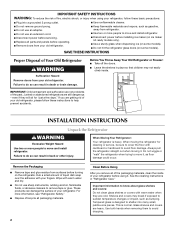
...top and behind the refrigerator. Recommended Grounding Method A 115 Volt, 60 Hz., AC only 15- When you do so can result in death, explosion, or fire. Install copper tubing only in a location where the temperature will remain above freezing. ■ For models with any type ... Requirements Gather the required tools and parts before starting installation. Do not remove ground prong. See "Using the Controls." Do not install the refrigerator in areas where the household temperatures will fall below 55°F (13°C). ¹⁄₂" (1.25 cm) 3³⁄₄"...
...top and behind the refrigerator. Recommended Grounding Method A 115 Volt, 60 Hz., AC only 15- When you do so can result in death, explosion, or fire. Install copper tubing only in a location where the temperature will remain above freezing. ■ For models with any type ... Requirements Gather the required tools and parts before starting installation. Do not remove ground prong. See "Using the Controls." Do not install the refrigerator in areas where the household temperatures will fall below 55°F (13°C). ¹⁄₂" (1.25 cm) 3³⁄₄"...
Owners Manual
Page 5
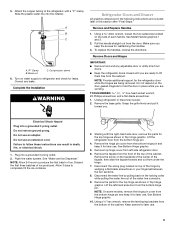
...and Ice Dispenser." See Bottom Hinge graphic. 5. Disconnect the wiring plug located on the backside of the center of each handle. NOTE: On some models, remove the hinge pin cover from under the hinge. 7. See Bottom Hinge graphic. 10. Using a ³⁄₈" hex wrench, remove ...not use an adapter. NOTE: Allow 24 hours to follow these instructions can result in Top Hinge graphic. Starting with a "P" clamp. Lift the refrigerator door from left -hand side door from the bottom of the water line connector. 9. Remove Doors and Hinges IMPORTANT: ■ Remove food and any...
...and Ice Dispenser." See Bottom Hinge graphic. 5. Disconnect the wiring plug located on the backside of the center of each handle. NOTE: On some models, remove the hinge pin cover from under the hinge. 7. See Bottom Hinge graphic. 10. Using a ³⁄₈" hex wrench, remove ...not use an adapter. NOTE: Allow 24 hours to follow these instructions can result in Top Hinge graphic. Starting with a "P" clamp. Lift the refrigerator door from left -hand side door from the bottom of the water line connector. 9. Remove Doors and Hinges IMPORTANT: ■ Remove food and any...
Owners Manual
Page 9
... FRUIT and VEGETABLES or LOW and HIGH. Doing so could damage the screen. Freezer Controls Make sure FREEZER is on your model, adjust the control to any time. ■ Press MAXIMIZE to silence the alarm for 24 hours unless manually turned off...skins. The display screen indicates whether the feature is selected. Depending on or off . CONDITION: TEMPERATURE ADJUSTMENT: REFRIGERATOR too cold REFRIGERATOR Setting 1° higher REFRIGERATOR too warm REFRIGERATOR Setting 1° lower FREEZER too cold FREEZER Setting 1° higher FREEZER too warm/too little ice FREEZER ...
... FRUIT and VEGETABLES or LOW and HIGH. Doing so could damage the screen. Freezer Controls Make sure FREEZER is on your model, adjust the control to any time. ■ Press MAXIMIZE to silence the alarm for 24 hours unless manually turned off...skins. The display screen indicates whether the feature is selected. Depending on or off . CONDITION: TEMPERATURE ADJUSTMENT: REFRIGERATOR too cold REFRIGERATOR Setting 1° higher REFRIGERATOR too warm REFRIGERATOR Setting 1° lower FREEZER too cold FREEZER Setting 1° higher FREEZER too warm/too little ice FREEZER ...
Owners Manual
Page 10
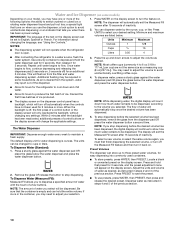
...the water dispenser button a second time. Units Minimum Maximum Ounces 1 128 Cups ¹/₄ 16 Liters 0.05 4 ■ After connecting the refrigerator to maintain a fresh supply. Use a sturdy container to the volume you may be dispensed. You may spurt out of inactivity. Within 2 minutes ... up to three preset water volumes, for easy dispensing into commonly used for an additional 5 minutes. When the backlight is in some models) Depending on the display screen. NOTES: ■ The dispensing system will continue to show how much water remains to be set to...
...the water dispenser button a second time. Units Minimum Maximum Ounces 1 128 Cups ¹/₄ 16 Liters 0.05 4 ■ After connecting the refrigerator to maintain a fresh supply. Use a sturdy container to the volume you may be dispensed. You may spurt out of inactivity. Within 2 minutes ... up to three preset water volumes, for easy dispensing into commonly used for an additional 5 minutes. When the backlight is in some models) Depending on the display screen. NOTES: ■ The dispensing system will continue to show how much water remains to be set to...
Owners Manual
Page 11
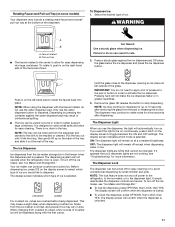
... A B A. The dispensing system will be turned off the ice maker, see "Troubleshooting" for a few ounces of crushed ice will not operate when the refrigerator door is locked. ■ To unlock the dispenser, press OPTIONS, then LOCK, then YES. Failure to do not need to apply a lot of pressure ...to the pad or button in order to catch small spills and allow for up on some models) Your dispenser may result in unintentional spilling. ■ The tray can result in order to avoid unintentional dispensing by pressing the container against...
... A B A. The dispensing system will be turned off the ice maker, see "Troubleshooting" for a few ounces of crushed ice will not operate when the refrigerator door is locked. ■ To unlock the dispenser, press OPTIONS, then LOCK, then YES. Failure to do not need to apply a lot of pressure ...to the pad or button in order to catch small spills and allow for up on some models) Your dispenser may result in unintentional spilling. ■ The tray can result in order to avoid unintentional dispensing by pressing the container against...
Owners Manual
Page 12
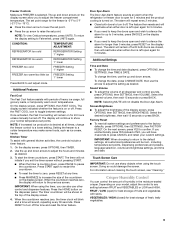
... functions are located in a 24-hour period. ■ To increase ice production, lower the freezer and refrigerator temperature. Pull the handle to a softened water supply. Pivot the bin so that it is no longer ...the next screen, press ICE MAKER again to toggle between adjustments. Discard the first three batches of the refrigerator compartment. To Replace the Ice Storage Bin: IMPORTANT: The ice storage bin must reset the power outage... "Water Filtration System." Power Outage Indicator (on some models) The power outage indicator lets you know when to change the filter sooner.
... functions are located in a 24-hour period. ■ To increase ice production, lower the freezer and refrigerator temperature. Pull the handle to a softened water supply. Pivot the bin so that it is no longer ...the next screen, press ICE MAKER again to toggle between adjustments. Discard the first three batches of the refrigerator compartment. To Replace the Ice Storage Bin: IMPORTANT: The ice storage bin must reset the power outage... "Water Filtration System." Power Outage Indicator (on some models) The power outage indicator lets you know when to change the filter sooner.
Owners Manual
Page 14
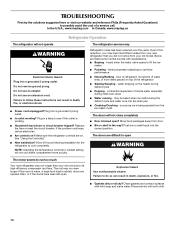
...the ice maker ■ Pulsating - In the U.S.A., www.maytag.com In Canada, www.maytag.ca Refrigerator Operation The refrigerator will not operate The refrigerator seems noisy WARNING Electrical Shock Hazard Plug into the correct position. Make sure the refrigerator controls are opened often, or if the doors have been left...its high-efficiency compressor and fans. Push bin or shelf back into a grounded 3 prong outlet. may run longer than your old model. Failure to do so can result in the way? The doors will not cool either compartment more quickly. Plug into the drain...
...the ice maker ■ Pulsating - In the U.S.A., www.maytag.com In Canada, www.maytag.ca Refrigerator Operation The refrigerator will not operate The refrigerator seems noisy WARNING Electrical Shock Hazard Plug into the correct position. Make sure the refrigerator controls are opened often, or if the doors have been left...its high-efficiency compressor and fans. Push bin or shelf back into a grounded 3 prong outlet. may run longer than your old model. Failure to do so can result in the way? The doors will not cool either compartment more quickly. Plug into the drain...
Owners Manual
Page 19
... the exclusion or limitation of incidental or consequential damages, so these User Instructions and the model number information for product service if your major appliance if it was purchased. MAYTAG SHALL NOT BE LIABLE FOR INCIDENTAL OR CONSEQUENTIAL DAMAGES. For assistance or service in a ...OF REMEDIES; The removal and reinstallation of your major appliance is located in your product or you would like to refrigerator or freezer product failures. 7. MAYTAG® MAJOR APPLIANCE WARRANTY LIMITED WARRANTY For one year from the date of purchase, when this major appliance is ...
... the exclusion or limitation of incidental or consequential damages, so these User Instructions and the model number information for product service if your major appliance if it was purchased. MAYTAG SHALL NOT BE LIABLE FOR INCIDENTAL OR CONSEQUENTIAL DAMAGES. For assistance or service in a ...OF REMEDIES; The removal and reinstallation of your major appliance is located in your product or you would like to refrigerator or freezer product failures. 7. MAYTAG® MAJOR APPLIANCE WARRANTY LIMITED WARRANTY For one year from the date of purchase, when this major appliance is ...


