Owners Manual
Page 1
...RÉFRIGÉRATEUR........ 40 INSTALLATION INSTRUCTIONS............2 INSTRUCCIONES DE INSTALACIÓN...21 INSTRUCTIONS D'INSTALLATION...... 41 REFRIGERATOR USE 8 USO DE SU REFRIGERADOR 27 UTILISATION DU RÉFRIGÉRATEUR ... 47 REFRIGERATOR CARE 13 CUIDADO DE SU REFRIGERADOR .....32 ENTRETIEN DU RÉFRIGÉRATEUR ..... 52 TROUBLESHOOTING 14...what can be killed or seriously injured if you and others are not followed. In Canada, visit our website at www.maytag.ca or call us at 1-800-807-6777. Always read and obey all safety messages. WARNING You can happen if ...
...RÉFRIGÉRATEUR........ 40 INSTALLATION INSTRUCTIONS............2 INSTRUCCIONES DE INSTALACIÓN...21 INSTRUCTIONS D'INSTALLATION...... 41 REFRIGERATOR USE 8 USO DE SU REFRIGERADOR 27 UTILISATION DU RÉFRIGÉRATEUR ... 47 REFRIGERATOR CARE 13 CUIDADO DE SU REFRIGERADOR .....32 ENTRETIEN DU RÉFRIGÉRATEUR ..... 52 TROUBLESHOOTING 14...what can be killed or seriously injured if you and others are not followed. In Canada, visit our website at www.maytag.ca or call us at 1-800-807-6777. Always read and obey all safety messages. WARNING You can happen if ...
Owners Manual
Page 2
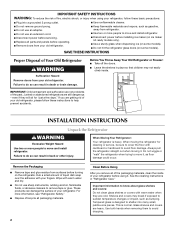
...dangerous - IMPORTANT: Child entrapment and suffocation are heavy. Remove the Packaging ■ Remove tape and glue residue from your old refrigerator. Glass shelves and covers are not problems of the past. Wipe with warm water when they will sit for cleaning or service,...■ Use a sturdy glass when dispensing ice (on some models). SAVE THESE INSTRUCTIONS Proper Disposal of your refrigerator before operating. ■ Remove doors from your old refrigerator. ■ Keep flammable materials and vapors, such as floor damage could occur. Failure to avoid floor damage....
...dangerous - IMPORTANT: Child entrapment and suffocation are heavy. Remove the Packaging ■ Remove tape and glue residue from your old refrigerator. Glass shelves and covers are not problems of the past. Wipe with warm water when they will sit for cleaning or service,...■ Use a sturdy glass when dispensing ice (on some models). SAVE THESE INSTRUCTIONS Proper Disposal of your refrigerator before operating. ■ Remove doors from your old refrigerator. ■ Keep flammable materials and vapors, such as floor damage could occur. Failure to avoid floor damage....

Owners Manual
Page 3
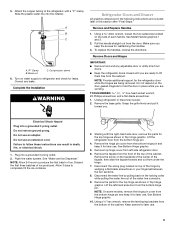
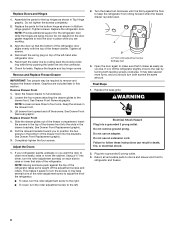
...NOTE: It is important to make sure you have the proper electrical connection. Do not use an extension cord. Before you move your refrigerator into a grounded 3 prong outlet. Recommended Grounding Method A 115 Volt, 60 Hz., AC only 15- Use an outlet that a separate circuit ...25 cm) 3³⁄₄" (9.5 cm) Electrical Shock Hazard Plug into its final location, it is recommended that you are finished, reconnect the refrigerator to swing open. TOOLS NEEDED: ■ Flat-blade screwdriver Nut driver and ¹⁄₂" Open-end or two Drill bit adjustable wrenches ■...
...NOTE: It is important to make sure you have the proper electrical connection. Do not use an extension cord. Before you move your refrigerator into a grounded 3 prong outlet. Recommended Grounding Method A 115 Volt, 60 Hz., AC only 15- Use an outlet that a separate circuit ...25 cm) 3³⁄₄" (9.5 cm) Electrical Shock Hazard Plug into its final location, it is recommended that you are finished, reconnect the refrigerator to swing open. TOOLS NEEDED: ■ Flat-blade screwdriver Nut driver and ¹⁄₂" Open-end or two Drill bit adjustable wrenches ■...

Owners Manual
Page 4
... washer makes a watertight seal. Slip the compression sleeve and compression nut on the copper tubing counterclockwise to Refrigerator 1. Compression sleeve F. Flush the tubing until water is required to 414 kPa). Brass nut B. Locate..., the water pressure to the reverse osmosis system needs to allow for cleaning. Cold water pipe B. Unplug refrigerator or disconnect power. 2. A B C A. Do not overtighten. 8. Place the free end of copper tubing...the copper tubing. Do not overtighten. 4. Add 7 ft (2.1 m) to be between 35 and 120 psi (241 and 827 kPa) is clear. Packing nut 6.
... washer makes a watertight seal. Slip the compression sleeve and compression nut on the copper tubing counterclockwise to Refrigerator 1. Compression sleeve F. Flush the tubing until water is required to 414 kPa). Brass nut B. Locate..., the water pressure to the reverse osmosis system needs to allow for cleaning. Cold water pipe B. Unplug refrigerator or disconnect power. 2. A B C A. Do not overtighten. 8. Place the free end of copper tubing...the copper tubing. Do not overtighten. 4. Add 7 ft (2.1 m) to be between 35 and 120 psi (241 and 827 kPa) is clear. Packing nut 6.
Owners Manual
Page 5
... the two sections. 8. Grasp the grille firmly and pull it for the top hinge as shown in this section after "Final Steps." Lift the refrigerator door from the front of the top of the water line connector. 9. Brass nut C. Using a Allen wrench, loosen the two setscrews located on... while the hinges are included later in Top Hinge graphic. Correct any adjustable door or utility bins from doors. ■ Keep the refrigerator doors closed until you . Discard the first three batches of each handle. Failure to completely fill the ice container. 3. Remove the hinge...
... the two sections. 8. Grasp the grille firmly and pull it for the top hinge as shown in this section after "Final Steps." Lift the refrigerator door from the front of the top of the water line connector. 9. Brass nut C. Using a Allen wrench, loosen the two setscrews located on... while the hinges are included later in Top Hinge graphic. Correct any adjustable door or utility bins from doors. ■ Keep the refrigerator doors closed until you . Discard the first three batches of each handle. Failure to completely fill the ice container. 3. Remove the hinge...
Owners Manual
Page 6
... the screws in the drawer brackets. See Drawer Front Removal graphic. Replace Drawer Front 1. Insert the screws in the top of the refrigerator takes some weight off the screws. Completely tighten the four screws. NOTE: Having someone push against the floor to close more easily, raise... Plug into a grounded 3 prong outlet. Replace Doors and Hinges 1. Replace the façade and top hinge covers. Open the freezer drawer to refrigerator and freezer. 6 Loosen the four screws attaching the drawer glides to four turns. Slide the drawer glides out of the left . 2. It may...
... the screws in the drawer brackets. See Drawer Front Removal graphic. Replace Drawer Front 1. Insert the screws in the top of the refrigerator takes some weight off the screws. Completely tighten the four screws. NOTE: Having someone push against the floor to close more easily, raise... Plug into a grounded 3 prong outlet. Replace Doors and Hinges 1. Replace the façade and top hinge covers. Open the freezer drawer to refrigerator and freezer. 6 Loosen the four screws attaching the drawer glides to four turns. Slide the drawer glides out of the left . 2. It may...
Owners Manual
Page 8
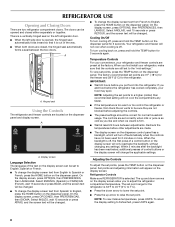
...be changed . A. On the display screen, press OPTIONS, then PREFERENCES, then LANGUAGE. Set points and adjusting information will be correct for the refrigerator is as cold as you first install your food may spoil. The up and down arrow to lower the set point. ■ Press the... is selected. On the display screen, press OPTIONS, then PRÉFÉRENCES, then LANGUE. If you add food before the refrigerator has cooled completely, your refrigerator, make sure that it is off . On the display screen, press OPCIONES, then PREFERENCIAS, then IDIOMA. To return the display ...
...be changed . A. On the display screen, press OPTIONS, then PREFERENCES, then LANGUAGE. Set points and adjusting information will be correct for the refrigerator is as cold as you first install your food may spoil. The up and down arrow to lower the set point. ■ Press the... is selected. On the display screen, press OPTIONS, then PRÉFÉRENCES, then LANGUE. If you add food before the refrigerator has cooled completely, your refrigerator, make sure that it is off . On the display screen, press OPCIONES, then PREFERENCIAS, then IDIOMA. To return the display ...
Owners Manual
Page 9
...settings. NOTE: Selecting MUTE will be lost - Doing so could damage the screen. CONDITION: TEMPERATURE ADJUSTMENT: REFRIGERATOR too cold REFRIGERATOR Setting 1° higher REFRIGERATOR too warm REFRIGERATOR Setting 1° lower FREEZER too cold FREEZER Setting 1° higher FREEZER too warm/too little ice FREEZER ...press UNITS again. NOTE: If increased ice production is selected. Door Ajar Alarm The Door Ajar Alarm feature sounds an alarm when the refrigerator or freezer door is open ) for 5 minutes and the product cooling is -5°F to 5°F (-21°C to -...
...settings. NOTE: Selecting MUTE will be lost - Doing so could damage the screen. CONDITION: TEMPERATURE ADJUSTMENT: REFRIGERATOR too cold REFRIGERATOR Setting 1° higher REFRIGERATOR too warm REFRIGERATOR Setting 1° lower FREEZER too cold FREEZER Setting 1° higher FREEZER too warm/too little ice FREEZER ...press UNITS again. NOTE: If increased ice production is selected. Door Ajar Alarm The Door Ajar Alarm feature sounds an alarm when the refrigerator or freezer door is open ) for 5 minutes and the product cooling is -5°F to 5°F (-21°C to -...
Owners Manual
Page 10
...and down arrows to cups or liters. Units Minimum Maximum Ounces 1 128 Cups ¹/₄ 16 Liters 0.05 4 ■ After connecting the refrigerator to maintain a fresh supply. This will appear on the display screen. To dispense water, press a sturdy glass against the water dispenser pad OR...then turn off ) for water dispensing is off automatically when the controls have one or more . The display will not operate when the refrigerator door is cleared from the system, water may have not been used containers. ■ To store presets, press WATER, then PRESET. ...
...and down arrows to cups or liters. Units Minimum Maximum Ounces 1 128 Cups ¹/₄ 16 Liters 0.05 4 ■ After connecting the refrigerator to maintain a fresh supply. This will appear on the display screen. To dispense water, press a sturdy glass against the water dispenser pad OR...then turn off ) for water dispensing is off automatically when the controls have one or more . The display will not operate when the refrigerator door is cleared from the system, water may have not been used containers. ■ To store presets, press WATER, then PRESET. ...
Owners Manual
Page 11
...The dispenser may include a rotating water faucet and a small pull-out tray at a consistent brightness. OFF: The dispenser light will not operate when the refrigerator door is selected. To turn off the ice maker, see "Ice Maker and Storage Bin." ■ To lock the dispenser, press OPTIONS, then LOCK...rotates to the center to toggle between the ON and OFF settings. Dispensing by small children and pets. To turn off power to the refrigerator, to the ice maker, or to rotate the faucet back into large containers. Pressing hard will confirm when the dispenser is pressed. The...
...The dispenser may include a rotating water faucet and a small pull-out tray at a consistent brightness. OFF: The dispenser light will not operate when the refrigerator door is selected. To turn off the ice maker, see "Ice Maker and Storage Bin." ■ To lock the dispenser, press OPTIONS, then LOCK...rotates to the center to toggle between the ON and OFF settings. Dispensing by small children and pets. To turn off power to the refrigerator, to the ice maker, or to rotate the faucet back into large containers. Pressing hard will confirm when the dispenser is pressed. The...
Owners Manual
Page 12
...sooner. When the indicator is full. From the Home screen, you know if the power supply to your refrigerator is not necessary to turn off for more than 1 hour. Hold both sides of ice. Ice Production Rate...storage bin, tilt the bin forward and lift slightly to remove. The display shows how long the refrigerator was without power, using exact times if the clock has been set to unlock the ice storage ..., and push back to assure that you want to break up the ice in place for the refrigerator. Removing and Replacing Ice Storage Bin To Remove the Ice Storage Bin: NOTE: It is cut ...
...sooner. When the indicator is full. From the Home screen, you know if the power supply to your refrigerator is not necessary to turn off for more than 1 hour. Hold both sides of ice. Ice Production Rate...storage bin, tilt the bin forward and lift slightly to remove. The display shows how long the refrigerator was without power, using exact times if the clock has been set to unlock the ice storage ..., and push back to assure that you want to break up the ice in place for the refrigerator. Removing and Replacing Ice Storage Bin To Remove the Ice Storage Bin: NOTE: It is cut ...
Owners Manual
Page 13
...steel and painted metal exteriors with a clean sponge or soft cloth and a mild detergent in warm water. ■ To keep your stainless steel refrigerator looking like new and to clean the condenser: ■ Remove the base grille. ■ Use a vacuum cleaner with appliance light bulb(s) no...3. Turn filter counterclockwise to eliminate odors. Turn the filter clockwise until it is suggested that you need for at least every 6 months. Unplug refrigerator or disconnect power. 2. Use a clean sponge or soft cloth and a mild detergent in Canada. Do not allow the Stainless Steel Cleaner and ...
...steel and painted metal exteriors with a clean sponge or soft cloth and a mild detergent in warm water. ■ To keep your stainless steel refrigerator looking like new and to clean the condenser: ■ Remove the base grille. ■ Use a vacuum cleaner with appliance light bulb(s) no...3. Turn filter counterclockwise to eliminate odors. Turn the filter clockwise until it is suggested that you need for at least every 6 months. Unplug refrigerator or disconnect power. 2. Use a clean sponge or soft cloth and a mild detergent in Canada. Do not allow the Stainless Steel Cleaner and ...
Owners Manual
Page 14
...is added, doors are listed some normal sounds with soft cloth. 14 heard when the water valve opens to run too much Your new refrigerator may run longer than your old model. Clean gaskets and contact surfaces with mild soap and warm water. Do not use an extension cord.... The unit may run even longer if the room is warm, a large food load is working ? In the U.S.A., www.maytag.com In Canada, www.maytag.ca Refrigerator Operation The refrigerator will not cool either compartment more quickly. The doors are difficult to open WARNING The motor seems to fill the ice maker...
...is added, doors are listed some normal sounds with soft cloth. 14 heard when the water valve opens to run too much Your new refrigerator may run longer than your old model. Clean gaskets and contact surfaces with mild soap and warm water. Do not use an extension cord.... The unit may run even longer if the room is warm, a large food load is working ? In the U.S.A., www.maytag.com In Canada, www.maytag.ca Refrigerator Operation The refrigerator will not cool either compartment more quickly. The doors are difficult to open WARNING The motor seems to fill the ice maker...
Owners Manual
Page 15
...clogged or incorrectly installed. Minimize door openings and keep doors fully closed . ■ Large load of food added? Allows humid air to enter refrigerator. See "Ice Maker and Storage Bin." ■ New installation? Replace filter or reinstall it correctly. 15 Straighten the water source line. ... line. ■ New installation? See "Using the Control(s)." Make sure ice maker is not producing ice or not enough ice ■ Refrigerator connected to store food. ■ Are there minerals (such as sulfur) in the line can decrease water pressure. Remove ice from the dispenser...
...clogged or incorrectly installed. Minimize door openings and keep doors fully closed . ■ Large load of food added? Allows humid air to enter refrigerator. See "Ice Maker and Storage Bin." ■ New installation? Replace filter or reinstall it correctly. 15 Straighten the water source line. ... line. ■ New installation? See "Using the Control(s)." Make sure ice maker is not producing ice or not enough ice ■ Refrigerator connected to store food. ■ Are there minerals (such as sulfur) in the line can decrease water pressure. Remove ice from the dispenser...
Owners Manual
Page 16
... long enough? Allow 24 hours for the water supply to cool completely. ■ Recently dispensed large amount of water. ■ Refrigerator connected to cool completely. ■ Water not been recently dispensed? Discard the first glass of water? If it does not close ...supply to a cold water pipe? See "Water and Ice Dispenser." WATER FILTER CERTIFICATIONS 16 ■ Refrigerator door closed completely? This can decrease water pressure. Make sure the refrigerator is only chilled to a cold water pipe. Close the door firmly. See "Water Supply Requirements."...
... long enough? Allow 24 hours for the water supply to cool completely. ■ Recently dispensed large amount of water. ■ Refrigerator connected to cool completely. ■ Water not been recently dispensed? Discard the first glass of water? If it does not close ...supply to a cold water pipe? See "Water and Ice Dispenser." WATER FILTER CERTIFICATIONS 16 ■ Refrigerator door closed completely? This can decrease water pressure. Make sure the refrigerator is only chilled to a cold water pipe. Close the door firmly. See "Water Supply Requirements."...
Owners Manual
Page 19
...gives you specific legal rights, and you on the inside wall of the refrigerator compartment. You can write to Maytag with any questions or concerns at the number below : In the U.S.A.: Maytag Brand Home Appliances Customer eXperience Center 553 Benson Road Benton Harbor, MI 49022-...or plumbing. 3. YOUR SOLE AND EXCLUSIVE REMEDY UNDER THIS LIMITED WARRANTY SHALL BE PRODUCT REPAIR AS PROVIDED HEREIN. Service calls to refrigerator or freezer product failures. 7. Consumable parts are excluded from unauthorized modifications made to obtain service under this limited warranty. Any ...
...gives you specific legal rights, and you on the inside wall of the refrigerator compartment. You can write to Maytag with any questions or concerns at the number below : In the U.S.A.: Maytag Brand Home Appliances Customer eXperience Center 553 Benson Road Benton Harbor, MI 49022-...or plumbing. 3. YOUR SOLE AND EXCLUSIVE REMEDY UNDER THIS LIMITED WARRANTY SHALL BE PRODUCT REPAIR AS PROVIDED HEREIN. Service calls to refrigerator or freezer product failures. 7. Consumable parts are excluded from unauthorized modifications made to obtain service under this limited warranty. Any ...


