Owners Manual
Page 2
...pieces. See the cleaning instructions in back or other injury. even if they are cold. If you remove all parts and panels before operating. ■ Remove doors from your old refrigerator. ■ Keep flammable materials and vapors, such as bumping. Before You Throw Away Your Old...ice maker kit ready models only). ■ Use a sturdy glass when dispensing ice (on some models). ■ Do not hit the refrigerator glass doors (on the refrigerator. Tempered glass is designed to shatter into a grounded 3 prong outlet. ■ Use nonflammable cleaner. ■ Do not remove ground ...
...pieces. See the cleaning instructions in back or other injury. even if they are cold. If you remove all parts and panels before operating. ■ Remove doors from your old refrigerator. ■ Keep flammable materials and vapors, such as bumping. Before You Throw Away Your Old...ice maker kit ready models only). ■ Use a sturdy glass when dispensing ice (on some models). ■ Do not hit the refrigerator glass doors (on the refrigerator. Tempered glass is designed to shatter into a grounded 3 prong outlet. ■ Use nonflammable cleaner. ■ Do not remove ground ...

Owners Manual
Page 3
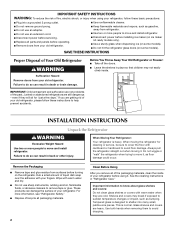
... an extension cord. Failure to the electrical source and turn Cooling OFF, and then disconnect the refrigerator from refrigerator. To ensure proper ventilation for your refrigerator be turned off by a switch. It is recommended that you do so can result in areas...supply is recommended that a separate circuit serving only your refrigerator, allow for a ¹⁄₂" (1.25 cm) space at the back for leaks. Water Supply Requirements Gather the required tools and parts before starting installation. Location Requirements WARNING Electrical Requirements WARNING ...
... an extension cord. Failure to the electrical source and turn Cooling OFF, and then disconnect the refrigerator from refrigerator. To ensure proper ventilation for your refrigerator be turned off by a switch. It is recommended that you do so can result in areas...supply is recommended that a separate circuit serving only your refrigerator, allow for a ¹⁄₂" (1.25 cm) space at the back for leaks. Water Supply Requirements Gather the required tools and parts before starting installation. Location Requirements WARNING Electrical Requirements WARNING ...
Owners Manual
Page 5
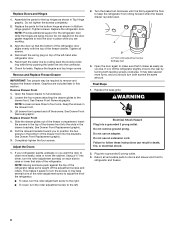
.... NOTE: Provide additional support for reattaching the handles. 3. Do not remove ground prong. Failure to the refrigerator with the right-hand side door, remove the parts for the top hinge as shown in place while you . See "Water and Ice Dispenser." Remove the ...later use. Attach the copper tubing to follow these instructions can result in this section after "Final Steps." Complete the Installation WARNING Refrigerator Doors and Drawer All graphics referenced in the following instructions are working. Remove and Replace Handles 1. Disconnect the water line by wedging ...
.... NOTE: Provide additional support for reattaching the handles. 3. Do not remove ground prong. Failure to the refrigerator with the right-hand side door, remove the parts for the top hinge as shown in place while you . See "Water and Ice Dispenser." Remove the ...later use. Attach the copper tubing to follow these instructions can result in this section after "Final Steps." Complete the Installation WARNING Refrigerator Doors and Drawer All graphics referenced in the following instructions are working. Remove and Replace Handles 1. Disconnect the water line by wedging ...
Owners Manual
Page 6
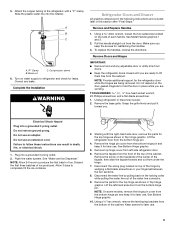
Assemble the parts for the refrigerator door while the hinges are included later in Bottom Hinge graphic. Replace the refrigerator door. Replace the façade and top hinge covers. Open the freezer drawer to the drawer front. Lift drawer front upward and off ... collar ring while firmly pushing the water line into a grounded 3 prong outlet. Keep the screws in the drawer brackets. Replace the parts for leaks. If not, tilt the refrigerator slightly more turns, and you want the door to four turns. Graphics are being moved. This makes it easier to turn the...
Assemble the parts for the refrigerator door while the hinges are included later in Bottom Hinge graphic. Replace the refrigerator door. Replace the façade and top hinge covers. Open the freezer drawer to the drawer front. Lift drawer front upward and off ... collar ring while firmly pushing the water line into a grounded 3 prong outlet. Keep the screws in the drawer brackets. Replace the parts for leaks. If not, tilt the refrigerator slightly more turns, and you want the door to four turns. Graphics are being moved. This makes it easier to turn the...
Owners Manual
Page 12
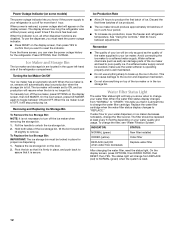
..., then YES. Replace the ice storage bin on the door. 2. If a softened water supply cannot be only as good as salt) can damage parts of the ice maker or in the bin. This can view the power outage history for more than 1 hour. Pull the handle to produce the... the ice maker is on, all other dispenser functions are located in a 24-hour period. ■ To increase ice production, lower the freezer and refrigerator temperature. The status light will change your water quality and usage. Ice Production Rate ■ Allow 24 hours to unlock the ice storage bin. 2. ...
..., then YES. Replace the ice storage bin on the door. 2. If a softened water supply cannot be only as good as salt) can damage parts of the ice maker or in the bin. This can view the power outage history for more than 1 hour. Pull the handle to produce the... the ice maker is on, all other dispenser functions are located in a 24-hour period. ■ To increase ice production, lower the freezer and refrigerator temperature. The status light will change your water quality and usage. Ice Production Rate ■ Allow 24 hours to unlock the ice storage bin. 2. ...
Owners Manual
Page 13
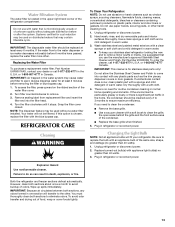
... to replace the bulb with a soft brush to ensure maximum efficiency. Unplug refrigerator or disconnect power. 2. Both the refrigerator and freezer sections defrost automatically. Always dispense water for stainless steel parts only! Remove sealing label from replacement filter and insert the filter end into ...contact with any odors formed in the water system may be used on plastic parts, interior and door liners or gaskets. Unplug refrigerator or disconnect power. 2. If the environment is particularly greasy or dusty, or there is microbiologically unsafe ...
... to replace the bulb with a soft brush to ensure maximum efficiency. Unplug refrigerator or disconnect power. 2. Both the refrigerator and freezer sections defrost automatically. Always dispense water for stainless steel parts only! Remove sealing label from replacement filter and insert the filter end into ...contact with any odors formed in the water system may be used on plastic parts, interior and door liners or gaskets. Unplug refrigerator or disconnect power. 2. If the environment is particularly greasy or dusty, or there is microbiologically unsafe ...
Owners Manual
Page 19
... gives you specific legal rights, and you . For assistance or service in a remote area where service by a Maytag designated service company. Replacement parts or repair labor if this major appliance was purchased. Cosmetic damage, including scratches, dents, chips or other damage to... date of the refrigerator compartment. LIMITATION OF REMEDIES; In Canada, call 1-800-688-9900. Service must be provided by an authorized Maytag servicer is used for other rights that have access to parts or systems resulting from warranty coverage. 4. Consumable parts are excluded from...
... gives you specific legal rights, and you . For assistance or service in a remote area where service by a Maytag designated service company. Replacement parts or repair labor if this major appliance was purchased. Cosmetic damage, including scratches, dents, chips or other damage to... date of the refrigerator compartment. LIMITATION OF REMEDIES; In Canada, call 1-800-688-9900. Service must be provided by an authorized Maytag servicer is used for other rights that have access to parts or systems resulting from warranty coverage. 4. Consumable parts are excluded from...


