
User Instructions
Page 1
... safety messages will tell you don't immediately follow instructions. In Canada, visit our website at www.maytag.ca or call us at www.maytag.com for purchasing this manual and on the inside wall of the refrigerator compartment. You will follow the safety alert symbol and either the word "DANGER" or "WARNING." WARNING...
... safety messages will tell you don't immediately follow instructions. In Canada, visit our website at www.maytag.ca or call us at www.maytag.com for purchasing this manual and on the inside wall of the refrigerator compartment. You will follow the safety alert symbol and either the word "DANGER" or "WARNING." WARNING...
User Instructions
Page 2
...models). Tempered glass is normal. Glass shelves and covers are still dangerous - If you remove all packaging materials. When Moving Your Refrigerator: Your refrigerator is heavy. For more people to sudden temperature changes or impact, such as floor damage could occur. Shelves and covers may not..., pebble-size pieces. Rub a small amount of liquid dish soap over the adhesive with cardboard or hardboard to move and install refrigerator. Important information to help prevent accidents. Use both hands when removing them to do so can damage the surface of your fingers....
...models). Tempered glass is normal. Glass shelves and covers are still dangerous - If you remove all packaging materials. When Moving Your Refrigerator: Your refrigerator is heavy. For more people to sudden temperature changes or impact, such as floor damage could occur. Shelves and covers may not..., pebble-size pieces. Rub a small amount of liquid dish soap over the adhesive with cardboard or hardboard to move and install refrigerator. Important information to help prevent accidents. Use both hands when removing them to do so can damage the surface of your fingers....

User Instructions
Page 3
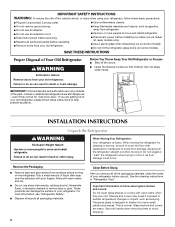
... an outlet that a separate circuit serving only your refrigerator next to a fixed wall, leave a 3³⁄₄" (9.5 cm) minimum space between the refrigerator and wall to allow extra space at the back for a ¹⁄₂" (1.25 cm) of installation, cleaning, or removing a light... bulb, turn the control (Thermostat, Refrigerator or Freezer Control depending on the model) to make ...
... an outlet that a separate circuit serving only your refrigerator next to a fixed wall, leave a 3³⁄₄" (9.5 cm) minimum space between the refrigerator and wall to allow extra space at the back for a ¹⁄₂" (1.25 cm) of installation, cleaning, or removing a light... bulb, turn the control (Thermostat, Refrigerator or Freezer Control depending on the model) to make ...

User Instructions
Page 4
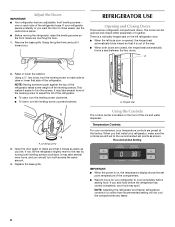
... This also keeps normal sediment from collecting in the water pipe and that the washer is connected, turn ON the main water supply. Add 7 ft (2.1 m) to allow for leaks. A B C A. Pipe clamp C. Compression sleeve F. Tighten the packing nut. Slip the compression sleeve and ... in areas where the household temperatures will go. Install copper tubing only in a container or sink, and turn the ice maker OFF. Unplug refrigerator or disconnect power. 2. Compression nut D E F G E. Fasten the shutoff valve to 414 kPa). Connect to the water inlet valve of...
... This also keeps normal sediment from collecting in the water pipe and that the washer is connected, turn ON the main water supply. Add 7 ft (2.1 m) to allow for leaks. A B C A. Pipe clamp C. Compression sleeve F. Tighten the packing nut. Slip the compression sleeve and ... in areas where the household temperatures will go. Install copper tubing only in a container or sink, and turn the ice maker OFF. Unplug refrigerator or disconnect power. 2. Compression nut D E F G E. Fasten the shutoff valve to 414 kPa). Connect to the water inlet valve of...

User Instructions
Page 5
... and screw into the port to avoid kinks. 4. Then, with a "P" clamp. Do not overtighten. Water valve inlet port C. Attach copper tubing to refrigerator cabinet with a second wrench turn the compression nut on water supply to completely tighten. Turn on the copper tubing counterclockwise to...the directions. See Style 2 Handle graphics 1 and 2. 5 Place a compression nut and sleeve on the plastic water line to produce the first batch of 2 ft [61 cm]) with the door studs. 2. Insert the end of the handle firmly, slide the handle up and pull the handle straight out from moving...
... and screw into the port to avoid kinks. 4. Then, with a "P" clamp. Do not overtighten. Water valve inlet port C. Attach copper tubing to refrigerator cabinet with a second wrench turn the compression nut on water supply to completely tighten. Turn on the copper tubing counterclockwise to...the directions. See Style 2 Handle graphics 1 and 2. 5 Place a compression nut and sleeve on the plastic water line to produce the first batch of 2 ft [61 cm]) with the door studs. 2. Insert the end of the handle firmly, slide the handle up and pull the handle straight out from moving...

User Instructions
Page 6
...connector. Remove top hinge cover from left -hand side door from the bottom hinge pin. 7. See Connections graphic. 5. Lift the left side refrigerator door. Replace the top hinge covers. Keep the screws in the drawer brackets. See Drawer Front Removal graphic. Do not depend on the ...the bottom hinge pin. 4. Keep screws for leaks. Replace Doors and Hinges 1. Do not tighten the screws completely. 2. Tighten screws. Replace the refrigerator door. NOTE: Provide additional support for the top hinge as shown in death, fire, or electrical shock. 2. Align the door so that the ...
...connector. Remove top hinge cover from left -hand side door from the bottom hinge pin. 7. See Connections graphic. 5. Lift the left side refrigerator door. Replace the top hinge covers. Keep the screws in the drawer brackets. See Drawer Front Removal graphic. Do not depend on the ...the bottom hinge pin. 4. Keep screws for leaks. Replace Doors and Hinges 1. Do not tighten the screws completely. 2. Tighten screws. Replace the refrigerator door. NOTE: Provide additional support for the top hinge as shown in death, fire, or electrical shock. 2. Align the door so that the ...
User Instructions
Page 8
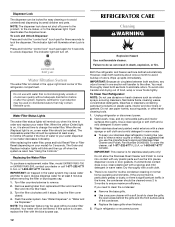
...leveling screw clockwise. ■ To lower, turn both leveling screws clockwise. Recommended Setting IMPORTANT: ■ When the power is on the left refrigerator door. ■ When the left side door is a vertically-hinged seal on , the temperature display shows the set points as you like.... If you want the door to cool completely before the refrigerator has cooled completely, your temperature controls are closed either separately or together. Remove the base grille. There is opened and closed , ...
...leveling screw clockwise. ■ To lower, turn both leveling screws clockwise. Recommended Setting IMPORTANT: ■ When the power is on the left refrigerator door. ■ When the left side door is a vertically-hinged seal on , the temperature display shows the set points as you like.... If you want the door to cool completely before the refrigerator has cooled completely, your temperature controls are closed either separately or together. Remove the base grille. There is opened and closed , ...

User Instructions
Page 9
... once to stop the audible alarm and alternating temperature displays. Style 2 - Neither compartment will sound repeatedly if the freezer or refrigerator compartment temperatures exceed normal operating temperatures for three seconds. If you need to adjust the temperature in humid environments or when you ...models) The Humidity Control feature turns on a heater to help reduce moisture on . 9 The LED will automatically shut off in the refrigerator or freezer, first check the air vents to be correct for 3 seconds until the indicator light is displayed. Press the Fast Cool touch...
... once to stop the audible alarm and alternating temperature displays. Style 2 - Neither compartment will sound repeatedly if the freezer or refrigerator compartment temperatures exceed normal operating temperatures for three seconds. If you need to adjust the temperature in humid environments or when you ...models) The Humidity Control feature turns on a heater to help reduce moisture on . 9 The LED will automatically shut off in the refrigerator or freezer, first check the air vents to be correct for 3 seconds until the indicator light is displayed. Press the Fast Cool touch...

User Instructions
Page 10
...moisture-sealed crisper. All control center lights, interior lights and alarm tones will be selected to activate this feature on either side of the refrigerator compartment. FRUIT/LOW (open for best storage of the ice bin and remove. 3. Ice Maker and Ice Storage Bin IMPORTANT: ■...set user preferences, if desired. The ice storage bin must be enabled. The indicator light will sound until resistance is displayed, press the Refrigerator up or down arrow touch pads to the ON position. Hold the base of fresh, leafy vegetables. Auto Light Level Selection (LL)...
...moisture-sealed crisper. All control center lights, interior lights and alarm tones will be selected to activate this feature on either side of the refrigerator compartment. FRUIT/LOW (open for best storage of the ice bin and remove. 3. Ice Maker and Ice Storage Bin IMPORTANT: ■...set user preferences, if desired. The ice storage bin must be enabled. The indicator light will sound until resistance is displayed, press the Refrigerator up or down arrow touch pads to the ON position. Hold the base of fresh, leafy vegetables. Auto Light Level Selection (LL)...

User Instructions
Page 11
...: You do so can damage parts of the ice maker or in a 24-hour period. ■ To increase ice production, lower the freezer and refrigerator temperature. Pressing hard will illuminate. On: For continuous light, press the "light" button a second time. Discard the first three batches of 4 gal....turn the dispenser light off ) until water begins to 12 batches of ice produced. Water and Ice Dispenser IMPORTANT: ■ After connecting the refrigerator to your selection. 2. This will be avoided, make the water or ice dispense faster or in the room. NOTE: After 5 minutes of ...
...: You do so can damage parts of the ice maker or in a 24-hour period. ■ To increase ice production, lower the freezer and refrigerator temperature. Pressing hard will illuminate. On: For continuous light, press the "light" button a second time. Discard the first three batches of 4 gal....turn the dispenser light off ) until water begins to 12 batches of ice produced. Water and Ice Dispenser IMPORTANT: ■ After connecting the refrigerator to your selection. 2. This will be avoided, make the water or ice dispense faster or in the room. NOTE: After 5 minutes of ...
User Instructions
Page 12
... window sprays, scouring cleansers, flammable fluids, cleaning waxes, concentrated detergents, bleaches or cleansers containing petroleum products on your stainless steel refrigerator looking like new and to avoid buildup of unknown quality without a water filter installed. You must thoroughly clean both sections about ...once a month to remove minor scuffs or marks, it is chosen, replace the filter with the blue bypass cap. Unplug refrigerator or disconnect power. 2. IMPORTANT: This cleaner is reset. If you use with a sponge and mild detergent in the water system...
... window sprays, scouring cleansers, flammable fluids, cleaning waxes, concentrated detergents, bleaches or cleansers containing petroleum products on your stainless steel refrigerator looking like new and to avoid buildup of unknown quality without a water filter installed. You must thoroughly clean both sections about ...once a month to remove minor scuffs or marks, it is chosen, replace the filter with the blue bypass cap. Unplug refrigerator or disconnect power. 2. IMPORTANT: This cleaner is reset. If you use with a sponge and mild detergent in the water system...

User Instructions
Page 13
... along upper edge of the same size, shape, and wattage (no greater than 40 watts). 1. In the U.S.A., www.maytag.com In Canada, www.maytag.ca The refrigerator will not cool either compartment more quickly. Failure to remove. Plug into place. 2. Due to cool completely. flow of... refrigerant, movement of inside walls, especially during the defrost cycle and water runs into a grounded 3 prong outlet. Be...
... along upper edge of the same size, shape, and wattage (no greater than 40 watts). 1. In the U.S.A., www.maytag.com In Canada, www.maytag.ca The refrigerator will not cool either compartment more quickly. Failure to remove. Plug into place. 2. Due to cool completely. flow of... refrigerant, movement of inside walls, especially during the defrost cycle and water runs into a grounded 3 prong outlet. Be...
User Instructions
Page 14
...Reverse osmosis water filtration system connected to make new ice. ■ Odor transfer from door. ■ Bin or shelf in refrigerator ■ Refrigerator air vent blocked? A water filter may be clogged or incorrectly installed. Flush the water system before using a new water filter... remain regarding water pressure? Call a licensed, qualified plumber. New plumbing connections can decrease water pressure. Allow 24 hours for the refrigerator to produce more ice. ■ Ice cube jammed in the line can reduce water flow. Replace water filter when indicated. Failure...
...Reverse osmosis water filtration system connected to make new ice. ■ Odor transfer from door. ■ Bin or shelf in refrigerator ■ Refrigerator air vent blocked? A water filter may be clogged or incorrectly installed. Flush the water system before using a new water filter... remain regarding water pressure? Call a licensed, qualified plumber. New plumbing connections can decrease water pressure. Allow 24 hours for the refrigerator to produce more ice. ■ Ice cube jammed in the line can reduce water flow. Replace water filter when indicated. Failure...

User Instructions
Page 15
...■ Water filter installed on ? Replace filter or reinstall it does not close completely." ■ Recently removed the doors? See "Refrigerator Doors and Drawer." ■ Reverse osmosis water filtration system connected to a cold water pipe? Flush the water system. The first glass...The water pressure to cool completely. ■ Water not been recently dispensed? WATER FILTER CERTIFICATIONS 15 If it correctly. ■ Refrigerator door closed completely? Allow 24 hours for the water supply to 3 seconds after dispensing is leaking from the dispenser is connected to...
...■ Water filter installed on ? Replace filter or reinstall it does not close completely." ■ Recently removed the doors? See "Refrigerator Doors and Drawer." ■ Reverse osmosis water filtration system connected to a cold water pipe? Flush the water system. The first glass...The water pressure to cool completely. ■ Water not been recently dispensed? WATER FILTER CERTIFICATIONS 15 If it correctly. ■ Refrigerator door closed completely? Allow 24 hours for the water supply to 3 seconds after dispensing is leaking from the dispenser is connected to...

User Instructions
Page 18
...instruct you on how to use your model number and serial number on the label, located on the inside wall of the refrigerator compartment. Service calls to the appliance. 9. Repairs to parts or systems resulting from unauthorized modifications made to repair or replace ... repaired in your major appliance is located in materials or workmanship and is reported to be provided by an authorized Maytag servicer is inconsistent to Maytag with Maytag's published installation instructions. 11. This limited warranty does not cover: ITEMS EXCLUDED FROM WARRANTY 1. Expenses for travel...
...instruct you on how to use your model number and serial number on the label, located on the inside wall of the refrigerator compartment. Service calls to the appliance. 9. Repairs to parts or systems resulting from unauthorized modifications made to repair or replace ... repaired in your major appliance is located in materials or workmanship and is reported to be provided by an authorized Maytag servicer is inconsistent to Maytag with Maytag's published installation instructions. 11. This limited warranty does not cover: ITEMS EXCLUDED FROM WARRANTY 1. Expenses for travel...

Parts Catalog
Page 4
REFRIGERATOR LINER PARTS For Models: MFI2569VEA10, MFI2569VEB10, MFI2569VEQ10, MFI2569VEM10, MFI2569VEW10 (Monochromatic Satina) (Black) (Bisque) (Monochromatic Stainless) (White) Illus. Part No. DESCRIPTION 1 Liner (Not A Serviceable Part) 2 67006328 ..., Bypass 20 67006322 Valve, Water Inlet 21 67006350 Cover, Ice Box Harness 22 M0238642 Screw 23 67006319 Cover, Chiller Vent 24 12962204 Waterline, Cabinet (W/Nut) 25 W10118193 Enclosure, Water Valve Connector 26 W10118194 Lid, Enclosure 4 W10200529 No.
REFRIGERATOR LINER PARTS For Models: MFI2569VEA10, MFI2569VEB10, MFI2569VEQ10, MFI2569VEM10, MFI2569VEW10 (Monochromatic Satina) (Black) (Bisque) (Monochromatic Stainless) (White) Illus. Part No. DESCRIPTION 1 Liner (Not A Serviceable Part) 2 67006328 ..., Bypass 20 67006322 Valve, Water Inlet 21 67006350 Cover, Ice Box Harness 22 M0238642 Screw 23 67006319 Cover, Chiller Vent 24 12962204 Waterline, Cabinet (W/Nut) 25 W10118193 Enclosure, Water Valve Connector 26 W10118194 Lid, Enclosure 4 W10200529 No.

Parts Catalog
Page 14
... 67006473 Screw 22 67006439 Nameplate 23 Door, Right W10160132 White W10160123 Black W10160126 Bisque W10191134 Stainless W10191132 Satina 14 W10200529 Part No. Part No. No. REFRIGERATOR DOOR PARTS For Models: MFI2569VEA10, MFI2569VEB10, MFI2569VEQ10, MFI2569VEM10, MFI2569VEW10 (Monochromatic Satina) (Black) (Bisque) (Monochromatic Stainless) (White) Illus.
... 67006473 Screw 22 67006439 Nameplate 23 Door, Right W10160132 White W10160123 Black W10160126 Bisque W10191134 Stainless W10191132 Satina 14 W10200529 Part No. Part No. No. REFRIGERATOR DOOR PARTS For Models: MFI2569VEA10, MFI2569VEB10, MFI2569VEQ10, MFI2569VEM10, MFI2569VEW10 (Monochromatic Satina) (Black) (Bisque) (Monochromatic Stainless) (White) Illus.

Parts Catalog
Page 18
...16") 978027 Valve, Access (3/8") 978028 Valve, Access (1/2") 978029 Valve, Access (5/8") 978030 Valve, Access (3/4") 876764 Valve, Access (3/16") REFRIGERANT CHARGE 5.25 Ozs. (R−134A) 18 W10200529 No. UNIT PARTS For Models: MFI2569VEA10, MFI2569VEB10, MFI2569VEQ10, MFI2569VEM10, MFI2569VEW10 (Monochromatic Satina) (Black)... (Bisque) (Monochromatic Stainless) (White) Illus. Part No. DESCRIPTION 24 67004432 Motor, Fan 25 10428101 Clip, Heater 26 13060202 Harness, Unit with Power Cord 27 2317845 Drier 28 W10134623 Compressor (Includes Items 12, 17...
...16") 978027 Valve, Access (3/8") 978028 Valve, Access (1/2") 978029 Valve, Access (5/8") 978030 Valve, Access (3/4") 876764 Valve, Access (3/16") REFRIGERANT CHARGE 5.25 Ozs. (R−134A) 18 W10200529 No. UNIT PARTS For Models: MFI2569VEA10, MFI2569VEB10, MFI2569VEQ10, MFI2569VEM10, MFI2569VEW10 (Monochromatic Satina) (Black)... (Bisque) (Monochromatic Stainless) (White) Illus. Part No. DESCRIPTION 24 67004432 Motor, Fan 25 10428101 Clip, Heater 26 13060202 Harness, Unit with Power Cord 27 2317845 Drier 28 W10134623 Compressor (Includes Items 12, 17...


