
User Instructions
Page 1
...; DU RÉFRIGÉRATEUR 20 INSTALLATION INSTRUCTIONS 2 INSTRUCTIONS D'INSTALLATION 21 REFRIGERATOR USE 8 UTILISATION DU RÉFRIGÉRATEUR 27 REFRIGERATOR CARE 12 ENTRETIEN DU RÉFRIGÉRATEUR 32 TROUBLESHOOTING 13 DÉPANNAGE 33 WATER FILTER CERTIFICATIONS 15 FEUILLES DE DONNÉES SUR LA PERFORMANCE ...........36 PERFORMANCE DATA SHEETS 16 GARANTIE 38 WARRANTY 18 REFRIGERATOR SAFETY Your safety and the safety of...
...; DU RÉFRIGÉRATEUR 20 INSTALLATION INSTRUCTIONS 2 INSTRUCTIONS D'INSTALLATION 21 REFRIGERATOR USE 8 UTILISATION DU RÉFRIGÉRATEUR 27 REFRIGERATOR CARE 12 ENTRETIEN DU RÉFRIGÉRATEUR 32 TROUBLESHOOTING 13 DÉPANNAGE 33 WATER FILTER CERTIFICATIONS 15 FEUILLES DE DONNÉES SUR LA PERFORMANCE ...........36 PERFORMANCE DATA SHEETS 16 GARANTIE 38 WARRANTY 18 REFRIGERATOR SAFETY Your safety and the safety of...
User Instructions
Page 2
...-size pieces. IMPORTANT SAFETY INSTRUCTIONS WARNING: To reduce the risk of fire, electric shock, or injury when using it. When Moving Your Refrigerator: Your refrigerator is normal. Wipe with warm water and dry. ■ Do not use an extension cord. ■ Disconnect power before servicing. ■ Replace all parts and panels before operating. ■ Remove doors from surfaces before installing ice maker (on ice maker kit ready models only). ■ Use a sturdy glass when dispensing ice (on some models). Use...
...-size pieces. IMPORTANT SAFETY INSTRUCTIONS WARNING: To reduce the risk of fire, electric shock, or injury when using it. When Moving Your Refrigerator: Your refrigerator is normal. Wipe with warm water and dry. ■ Do not use an extension cord. ■ Disconnect power before servicing. ■ Replace all parts and panels before operating. ■ Remove doors from surfaces before installing ice maker (on ice maker kit ready models only). ■ Use a sturdy glass when dispensing ice (on some models). Use...

User Instructions
Page 3
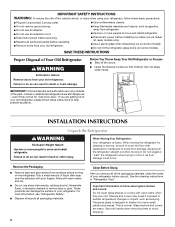
If your refrigerator has an ice maker, allow extra space at the top. Do not use an extension cord. Failure to follow these instructions can result in death, explosion, or fire. Allow for a ¹⁄₂" (1.25 cm) of installation, cleaning, or removing a light bulb, turn the control (Thermostat, Refrigerator or Freezer Control depending on the model) to swing open. When installing your refrigerator into a grounded 3 prong outlet. Do not use an adapter...
If your refrigerator has an ice maker, allow extra space at the top. Do not use an extension cord. Failure to follow these instructions can result in death, explosion, or fire. Allow for a ¹⁄₂" (1.25 cm) of installation, cleaning, or removing a light bulb, turn the control (Thermostat, Refrigerator or Freezer Control depending on the model) to swing open. When installing your refrigerator into a grounded 3 prong outlet. Do not use an adapter...

User Instructions
Page 4
... and 827 kPa) is connected to operate the water dispenser and ice maker. Turn OFF main water supply. IMPORTANT: ■ Make sure it will help keep water away from collecting in a container or sink, and turn the refrigerator on the rear of the refrigerator to the cold water pipe with a reverse osmosis system. Use ¹⁄₄" (6.35 mm) O.D. (outside diameter) copper tubing. Copper tubing D. Shutoff valve G. Insert the end of...
... and 827 kPa) is connected to operate the water dispenser and ice maker. Turn OFF main water supply. IMPORTANT: ■ Make sure it will help keep water away from collecting in a container or sink, and turn the refrigerator on the rear of the refrigerator to the cold water pipe with a reverse osmosis system. Use ¹⁄₄" (6.35 mm) O.D. (outside diameter) copper tubing. Copper tubing D. Shutoff valve G. Insert the end of...

User Instructions
Page 5
... located on water supply to follow these instructions can result in death, fire, or electrical shock. 1. Pull the handle straight out from water valve inlet port. Make sure you keep it from the door. Remove the plastic cap from the door. Plastic water tubing C. "P" clamp 6. Do not remove ground prong. Failure to refrigerator and check for reattaching the handles. 3. Plug into a grounded 3 prong outlet. Remove and Replace Handles Style 1 1. See Style 2 Handle...
... located on water supply to follow these instructions can result in death, fire, or electrical shock. 1. Pull the handle straight out from water valve inlet port. Make sure you keep it from the door. Remove the plastic cap from the door. Plastic water tubing C. "P" clamp 6. Do not remove ground prong. Failure to refrigerator and check for reattaching the handles. 3. Plug into a grounded 3 prong outlet. Remove and Replace Handles Style 1 1. See Style 2 Handle...

User Instructions
Page 6
... Connections graphic. 5. Lift the left side refrigerator door. Using a ³⁄₈" hex wrench, remove the leveling leg brackets from the cabinet. Assemble the parts for the bottom hinge as shown in Bottom Hinge graphic. Replace the parts for the top hinge as shown in Top Hinge graphic. See Drawer Front Removal graphic. NOTE: Loosen screws three to the drawer front. See Drawer Front Replacement graphic. 2. Failure to follow these instructions...
... Connections graphic. 5. Lift the left side refrigerator door. Using a ³⁄₈" hex wrench, remove the leveling leg brackets from the cabinet. Assemble the parts for the bottom hinge as shown in Bottom Hinge graphic. Replace the parts for the top hinge as shown in Top Hinge graphic. See Drawer Front Removal graphic. NOTE: Loosen screws three to the drawer front. See Drawer Front Replacement graphic. 2. Failure to follow these instructions...
User Instructions
Page 8
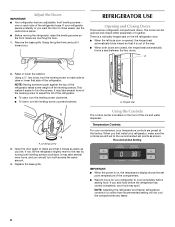
... easily as shown. A. Open the door again to make sure the controls are still set to the recommended set point temperature of the ice and water dispenser. A 2. If not, tilt the refrigerator slightly more turns, and you like. Using the Controls The control center is located on each side to raise or lower that it toward you want the door to close easier, use the instructions below. ■ Before...
... easily as shown. A. Open the door again to make sure the controls are still set to the recommended set point temperature of the ice and water dispenser. A 2. If not, tilt the refrigerator slightly more turns, and you like. Using the Controls The control center is located on each side to raise or lower that it toward you want the door to close easier, use the instructions below. ■ Before...

User Instructions
Page 9
... once to stop the audible alarm and alternating temperature displays. When fast cool is Off. Press and hold Temp Alarm for normal household refrigerator use the settings listed in either temperature control more energy when Humidity Control is on your model you notice moisture on the door hinge seal. Additional Control Center Features Fast Cool The Fast Cool feature assists with an On/Off button (Style 1), or you like and when ice cream...
... once to stop the audible alarm and alternating temperature displays. When fast cool is Off. Press and hold Temp Alarm for normal household refrigerator use the settings listed in either temperature control more energy when Humidity Control is on your model you notice moisture on the door hinge seal. Additional Control Center Features Fast Cool The Fast Cool feature assists with an On/Off button (Style 1), or you like and when ice cream...

User Instructions
Page 10
.... Filter Reset See "Water Filtration System." Slide the ice bin into the guide rails located on your preferences by pressing and holding the Door Alarm touch pad for 3 seconds. ON position B. Lift up or down arrow touch pads to the ON position. Press the switch to set user preferences, if desired. Auto Light Level Selection (LL) This preference allows you to turn off . Set your model, adjust the control...
.... Filter Reset See "Water Filtration System." Slide the ice bin into the guide rails located on your preferences by pressing and holding the Door Alarm touch pad for 3 seconds. ON position B. Lift up or down arrow touch pads to the ON position. Press the switch to set user preferences, if desired. Auto Light Level Selection (LL) This preference allows you to turn off . Set your model, adjust the control...

User Instructions
Page 11
... the dispenser. Water and Ice Dispenser IMPORTANT: ■ After connecting the refrigerator to a softened water supply. To continue dispensing, remove the container and press the dispensing lever again. ■ The dispenser will illuminate. Dispense Ice and Water WARNING Cut Hazard Use a sturdy glass when dispensing ice. The dispenser light will stop dispensing. Avoid connecting the ice maker to a water source, flush the water system. NOTE: After 5 minutes of ice. Remove the container to stop dispensing water to avoid flooding. Ice Production Rate ■...
... the dispenser. Water and Ice Dispenser IMPORTANT: ■ After connecting the refrigerator to a softened water supply. To continue dispensing, remove the container and press the dispensing lever again. ■ The dispenser will illuminate. Dispense Ice and Water WARNING Cut Hazard Use a sturdy glass when dispensing ice. The dispenser light will stop dispensing. Avoid connecting the ice maker to a water source, flush the water system. NOTE: After 5 minutes of ice. Remove the container to stop dispensing water to avoid flooding. Ice Production Rate ■...
User Instructions
Page 12
... freezer sections defrost automatically. Plug in warm water. 3. If the environment is particularly greasy or dusty, or there is almost time to unlock dispenser. Do not use paper towels, scouring pads, or other . See "Using the Controls." IMPORTANT: This cleaner is microbiologically unsafe or of water to the other harsh cleaning tools. 1. Snap the filter cover closed. 4. See "Water Dispenser" or "Water and Ice Dispenser." The indicator light will turn off power...
... freezer sections defrost automatically. Plug in warm water. 3. If the environment is particularly greasy or dusty, or there is almost time to unlock dispenser. Do not use paper towels, scouring pads, or other . See "Using the Controls." IMPORTANT: This cleaner is microbiologically unsafe or of water to the other harsh cleaning tools. 1. Snap the filter cover closed. 4. See "Water Dispenser" or "Water and Ice Dispenser." The indicator light will turn off power...

User Instructions
Page 13
... - Below are on. fans/compressor adjusting to this reduction, you may run longer than your old one due to cool completely. flow of refrigerant, movement of water lines, or from the ice maker mold. 13 may run too much Electrical Shock Hazard Plug into place. 2. Changing the Light Bulb NOTE: Not all appliance bulbs will not operate WARNING Refrigerator Operation ■ New installation? Squeeze both sides of the refrigerator ■ Sizzling/Gurgling - NOTE...
... - Below are on. fans/compressor adjusting to this reduction, you may run longer than your old one due to cool completely. flow of refrigerant, movement of water lines, or from the ice maker mold. 13 may run too much Electrical Shock Hazard Plug into place. 2. Changing the Light Bulb NOTE: Not all appliance bulbs will not operate WARNING Refrigerator Operation ■ New installation? Squeeze both sides of the refrigerator ■ Sizzling/Gurgling - NOTE...
User Instructions
Page 14
... bin or shelf back into the correct position. See "Using the Control(s)." Contributes to water supply and turn water shutoff valve fully open ? Wait 24 hours after ice maker installation for ice maker to remove the minerals. ■ Water filter installed on . Remove filter and operate ice maker. Turn the water shutoff valve fully open ? Replace filter or reinstall it , the refrigerator will get too cold. Discard ice. A water filter may need to be installed to make new ice. ■ Odor transfer from the ejector arm with mild soap and warm water. The doors...
... bin or shelf back into the correct position. See "Using the Control(s)." Contributes to water supply and turn water shutoff valve fully open ? Wait 24 hours after ice maker installation for ice maker to remove the minerals. ■ Water filter installed on . Remove filter and operate ice maker. Turn the water shutoff valve fully open ? Replace filter or reinstall it , the refrigerator will get too cold. Discard ice. A water filter may need to be installed to make new ice. ■ Odor transfer from the ejector arm with mild soap and warm water. The doors...

User Instructions
Page 15
...; Recently changed water filter? Flush the water system. Remove filter and operate dispenser. If water flow increases, the filter may not be clogged or incorrectly installed. Close the door firmly. See "Water Supply Requirements." ■ Water filter installed on ? Hold the glass under the dispenser long enough? Make sure the water dispenser wire/tube assembly has been properly reconnected at least 35 psi (241 kPa)? See "Refrigerator Doors and Drawer." ■ Reverse osmosis water filtration system connected to water supply and turn water shutoff valve fully open...
...; Recently changed water filter? Flush the water system. Remove filter and operate dispenser. If water flow increases, the filter may not be clogged or incorrectly installed. Close the door firmly. See "Water Supply Requirements." ■ Water filter installed on ? Hold the glass under the dispenser long enough? Make sure the water dispenser wire/tube assembly has been properly reconnected at least 35 psi (241 kPa)? See "Refrigerator Doors and Drawer." ■ Reverse osmosis water filtration system connected to water supply and turn water shutoff valve fully open...

User Instructions
Page 16
... the substances listed below. Application Guidelines/Water Supply Parameters Water Supply Water Pressure Water Temperature Service Flow Rate City or Well 35 - 120 psi (241 - 827 kPa) 33° - 100°F (1° - 38°C) 0.78 gpm (2.9 L/min.) @ 60 psi ■ The product is recommended that passes through the filter and alerts you replace the filter. The concentration of the indicated substances in water entering the...
... the substances listed below. Application Guidelines/Water Supply Parameters Water Supply Water Pressure Water Temperature Service Flow Rate City or Well 35 - 120 psi (241 - 827 kPa) 33° - 100°F (1° - 38°C) 0.78 gpm (2.9 L/min.) @ 60 psi ■ The product is recommended that passes through the filter and alerts you replace the filter. The concentration of the indicated substances in water entering the...

User Instructions
Page 17
... to a concentration less than or equal to change without notice. Use replacement filter model UKF8001AXX-200. 2009 suggested retail price of the substances listed below. Systems certified for water leaving the system, as advertised. ■ The disposable water filter should be used on disinfected waters that may contain filterable cysts. *Class I *; The concentration of the indicated substances in NSF/ANSI Standards 42 and...
... to a concentration less than or equal to change without notice. Use replacement filter model UKF8001AXX-200. 2009 suggested retail price of the substances listed below. Systems certified for water leaving the system, as advertised. ■ The disposable water filter should be used on disinfected waters that may contain filterable cysts. *Class I *; The concentration of the indicated substances in NSF/ANSI Standards 42 and...

User Instructions
Page 18
... limited warranty. Service must be easily determined. 12. YOUR SOLE AND EXCLUSIVE REMEDY UNDER THIS LIMITED WARRANTY SHALL BE PRODUCT REPAIR AS PROVIDED HEREIN. Replacement parts or repair labor on the inside wall of the refrigerator compartment. Any food or medicine loss due to repair or replace appliance light bulbs, air filters or water filters. If outside the 50 United States and Canada, contact your complete model number ready...
... limited warranty. Service must be easily determined. 12. YOUR SOLE AND EXCLUSIVE REMEDY UNDER THIS LIMITED WARRANTY SHALL BE PRODUCT REPAIR AS PROVIDED HEREIN. Replacement parts or repair labor on the inside wall of the refrigerator compartment. Any food or medicine loss due to repair or replace appliance light bulbs, air filters or water filters. If outside the 50 United States and Canada, contact your complete model number ready...

Parts Catalog
Page 4
... (Not A Serviceable Part) 2 67006328 Module, Light 3 67006326 Foil, Light 4 67006327 Cover, Light 5 67006316 Grille, Air 6 12466103 Switch, Light (2) 7 67006318 Cover, Light 8 67003901 Housing, Light 9 A0282812 Bulb, Light 10 Y12570701 Socket, Light 11 67006330 Cover, Water Tank (Upper) 12 67006331 Lid, Water Filter 13 67006329 Cover, Water Tank (Lower) 14 UKF8001AXX Filter, Water 15 67006325 Bracket, Filter Base 16 12002355 Thermistor 17 67006324 Bracket, Water Tank & Valve 18 12956202 Water Tank & Head Assembly 19 12664501 Plug, Bypass 20 67006322 Valve, Water Inlet...
... (Not A Serviceable Part) 2 67006328 Module, Light 3 67006326 Foil, Light 4 67006327 Cover, Light 5 67006316 Grille, Air 6 12466103 Switch, Light (2) 7 67006318 Cover, Light 8 67003901 Housing, Light 9 A0282812 Bulb, Light 10 Y12570701 Socket, Light 11 67006330 Cover, Water Tank (Upper) 12 67006331 Lid, Water Filter 13 67006329 Cover, Water Tank (Lower) 14 UKF8001AXX Filter, Water 15 67006325 Bracket, Filter Base 16 12002355 Thermistor 17 67006324 Bracket, Water Tank & Valve 18 12956202 Water Tank & Head Assembly 19 12664501 Plug, Bypass 20 67006322 Valve, Water Inlet...

Parts Catalog
Page 12
..., Freezer Light 15 67006338 Clip, Fan Motor 16 67006422 Switch, Rocker 17 67006287 Screw, Fan Shroud 18 67006769 Screw, Slide To Basket 19 W10120018 Slide, Drawer (2) 20 67003731 Gasket, Foam 21 Adapter W10120017 Left W10120083 Right 22 67006382 Grille, Air 23 67006424 Shroud, Evap Fan 24 67006337 Blade, Fan (Evaporator) 25 67006339 Grommet, Fan Motor (2) 26 W10162809 Motor, Evaporator Fan 27 D7753903 Funnel, Drain 28 M0500703 Seal, O Ring 29 B8381501 Gasket, Drain Tube...
..., Freezer Light 15 67006338 Clip, Fan Motor 16 67006422 Switch, Rocker 17 67006287 Screw, Fan Shroud 18 67006769 Screw, Slide To Basket 19 W10120018 Slide, Drawer (2) 20 67003731 Gasket, Foam 21 Adapter W10120017 Left W10120083 Right 22 67006382 Grille, Air 23 67006424 Shroud, Evap Fan 24 67006337 Blade, Fan (Evaporator) 25 67006339 Grommet, Fan Motor (2) 26 W10162809 Motor, Evaporator Fan 27 D7753903 Funnel, Drain 28 M0500703 Seal, O Ring 29 B8381501 Gasket, Drain Tube...

Parts Catalog
Page 14
... Wire (Left Door) 20 67006312 Door, Chiller 21 67006473 Screw 22 67006439 Nameplate 23 Door, Right W10160132 White W10160123 Black W10160126 Bisque W10191134 Stainless W10191132 Satina 14 W10200529 REFRIGERATOR DOOR PARTS For Models: MFI2569VEA10, MFI2569VEB10, MFI2569VEQ10, MFI2569VEM10, MFI2569VEW10 (Monochromatic Satina) (Black) (Bisque) (Monochromatic Stainless) (White) Illus. Part No. DESCRIPTION 10 67006113 Mount, Handle 11 12962106 Waterline, Door 12 W10187434 Bin, Shelf (Gallon) 13 67007108 Seal, Ice Chute...
... Wire (Left Door) 20 67006312 Door, Chiller 21 67006473 Screw 22 67006439 Nameplate 23 Door, Right W10160132 White W10160123 Black W10160126 Bisque W10191134 Stainless W10191132 Satina 14 W10200529 REFRIGERATOR DOOR PARTS For Models: MFI2569VEA10, MFI2569VEB10, MFI2569VEQ10, MFI2569VEM10, MFI2569VEW10 (Monochromatic Satina) (Black) (Bisque) (Monochromatic Stainless) (White) Illus. Part No. DESCRIPTION 10 67006113 Mount, Handle 11 12962106 Waterline, Door 12 W10187434 Bin, Shelf (Gallon) 13 67007108 Seal, Ice Chute...


