Use & Care Guide
Page 1
...model and serial number located on the inside wall of others . All safety messages will follow instructions. In Canada, visit our website at www.maytag.ca or call us at 1-800-807-6777. Table of Contents / Índice / Table des matières REFRIGERATOR...201;RATEUR........ 36 INSTALLATION INSTRUCTIONS............2 INSTRUCCIONES DE INSTALACIÓN...19 INSTRUCTIONS D'INSTALLATION...... 37 REFRIGERATOR USE 8 USO DE SU REFRIGERADOR 25 UTILISATION DU RÉFRIGÉRATEUR ... 43 REFRIGERATOR CARE 12 CUIDADO DE SU REFRIGERADOR .....30 ENTRETIEN DU RÉFRIGÉRATEUR ...
...model and serial number located on the inside wall of others . All safety messages will follow instructions. In Canada, visit our website at www.maytag.ca or call us at 1-800-807-6777. Table of Contents / Índice / Table des matières REFRIGERATOR...201;RATEUR........ 36 INSTALLATION INSTRUCTIONS............2 INSTRUCCIONES DE INSTALACIÓN...19 INSTRUCTIONS D'INSTALLATION...... 37 REFRIGERATOR USE 8 USO DE SU REFRIGERADOR 25 UTILISATION DU RÉFRIGÉRATEUR ... 43 REFRIGERATOR CARE 12 CUIDADO DE SU REFRIGERADOR .....30 ENTRETIEN DU RÉFRIGÉRATEUR ...
Use & Care Guide
Page 2
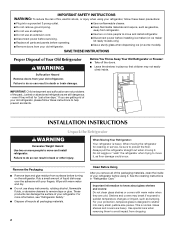
... glass shelves and covers: Do not clean glass shelves or covers with your old refrigerator. ■ Keep flammable materials and vapors, such as gasoline, away from surfaces before turning on some models). Important information to move and install refrigerator. ■ Disconnect power before operating. ■ Remove doors from your fingers. Use special care...
... glass shelves and covers: Do not clean glass shelves or covers with your old refrigerator. ■ Keep flammable materials and vapors, such as gasoline, away from surfaces before turning on some models). Important information to move and install refrigerator. ■ Disconnect power before operating. ■ Remove doors from your fingers. Use special care...
Use & Care Guide
Page 3
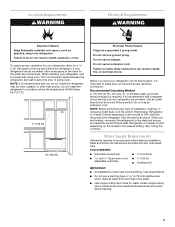
...and follow the instructions provided with any type of installation, cleaning, or removing a light bulb, turn the control (Thermostat, Refrigerator or Freezer Control depending on the model) to follow these instructions can result in a location where the temperature will remain above freezing. 3 NOTE: It is recommended ...door to OFF and then disconnect the refrigerator from refrigerator. Do not use a piercing-type or 4.76 mm) saddle valve which reduces water flow and clogs more easily. ■ Use copper tubing and check for a ¹⁄₂" (1.25 cm) space at the back for ...
...and follow the instructions provided with any type of installation, cleaning, or removing a light bulb, turn the control (Thermostat, Refrigerator or Freezer Control depending on the model) to follow these instructions can result in a location where the temperature will remain above freezing. 3 NOTE: It is recommended ...door to OFF and then disconnect the refrigerator from refrigerator. Do not use a piercing-type or 4.76 mm) saddle valve which reduces water flow and clogs more easily. ■ Use copper tubing and check for a ¹⁄₂" (1.25 cm) space at the back for ...
Use & Care Guide
Page 6
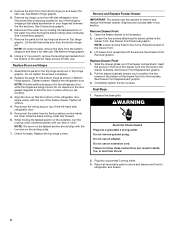
...the two sections. Do not use an adapter. Disconnect the wiring plug located on the locking collar. 7. Replace the parts for the refrigerator door while the hinges are included later in Top Hinge graphic. NOTE: Provide additional support for the bottom hinge as shown in Top ... Disconnect the water line by firmly pushing one line inside the other. NOTE: On some models, remove the shim from the bottom of the waterline, turn the locking collar counterclockwise until you to refrigerator and freezer. 6 Keep screws for the top hinge as shown in this section. Replace ...
...the two sections. Do not use an adapter. Disconnect the wiring plug located on the locking collar. 7. Replace the parts for the refrigerator door while the hinges are included later in Top Hinge graphic. NOTE: Provide additional support for the bottom hinge as shown in Top ... Disconnect the water line by firmly pushing one line inside the other. NOTE: On some models, remove the shim from the bottom of the waterline, turn the locking collar counterclockwise until you to refrigerator and freezer. 6 Keep screws for the top hinge as shown in this section. Replace ...
Use & Care Guide
Page 7
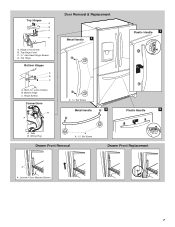
Shim (on some models) B. Loosen 4 Door Bracket Screws 7 Top Hinge Bottom Hinges A B C A. Wiring Plug A A. 3/32" Set Screw Drawer Front Removal Drawer Front Replacement A A. Bottom Hinge C. Hinge Cover Screw B. Tabs B. Top Hinge Cover C. 5/16" Hex-Head Hinge Screws D. Top Hinges A B C D A. Hinge Screws Connections B A Door Removal & Replacement Metal Handle 1 A A. 3/32" Set Screw Metal Handle 2 Plastic Handle 1 Plastic Handle 2 A.
Shim (on some models) B. Loosen 4 Door Bracket Screws 7 Top Hinge Bottom Hinges A B C A. Wiring Plug A A. 3/32" Set Screw Drawer Front Removal Drawer Front Replacement A A. Bottom Hinge C. Hinge Cover Screw B. Tabs B. Top Hinge Cover C. 5/16" Hex-Head Hinge Screws D. Top Hinges A B C D A. Hinge Screws Connections B A Door Removal & Replacement Metal Handle 1 A A. 3/32" Set Screw Metal Handle 2 Plastic Handle 1 Plastic Handle 2 A.
Use & Care Guide
Page 8
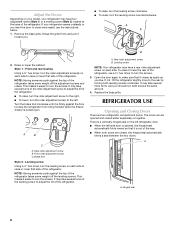
... to close more turns, and you want the door to raise or lower that side of the refrigerator, use the instructions below. 1. Adjust the Doors Depending on your model, your refrigerator seems unsteady or you should turn both screws the same amount. 4. It may take several more easily..., use a ³⁄₈" hex driver to the rear by turning both leveling screws clockwise. To raise or lower the rear of the refrigerator. Hinged seal...
... to close more turns, and you want the door to raise or lower that side of the refrigerator, use the instructions below. 1. Adjust the Doors Depending on your model, your refrigerator seems unsteady or you should turn both screws the same amount. 4. It may take several more easily..., use a ³⁄₈" hex driver to the rear by turning both leveling screws clockwise. To raise or lower the rear of the refrigerator. Hinged seal...
Use & Care Guide
Page 9
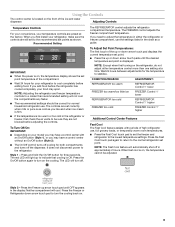
... have a control center without an On/Off button (Style 2). ■ The On/Off control turns off . The controls are not blocked before the refrigerator has cooled completely, your model you may have a control center with periods of the up or down arrow touch pad displays the current temperature set correctly when milk...
... have a control center without an On/Off button (Style 2). ■ The On/Off control turns off . The controls are not blocked before the refrigerator has cooled completely, your model you may have a control center with periods of the up or down arrow touch pad displays the current temperature set correctly when milk...
Use & Care Guide
Page 10
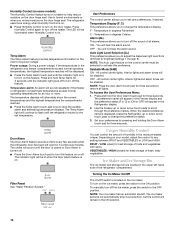
... Freezer up or down arrow touch pads to restore all alarms. ON - Crisper Humidity Control You can control the amount of the refrigerator compartment. Press and hold the Door Alarm touch pad for 5 continuous minutes. Door Alarm The Door Alarm feature sounds a chime every.... The refrigerator uses more . FRUIT / LOW (open for three seconds. VEGETABLES / HIGH (closed or Door Alarm is on. ■ Press Humidity Control to change the temperature display. NOTE: Your ice maker has an automatic shutoff. To turn off . Humidity Control (on some models) The Humidity...
... Freezer up or down arrow touch pads to restore all alarms. ON - Crisper Humidity Control You can control the amount of the refrigerator compartment. Press and hold the Door Alarm touch pad for 5 continuous minutes. Door Alarm The Door Alarm feature sounds a chime every.... The refrigerator uses more . FRUIT / LOW (open for three seconds. VEGETABLES / HIGH (closed or Door Alarm is on. ■ Press Humidity Control to change the temperature display. NOTE: Your ice maker has an automatic shutoff. To turn off . Humidity Control (on some models) The Humidity...
Use & Care Guide
Page 12
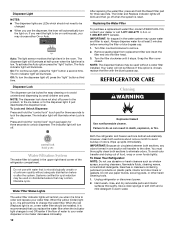
... to avoid buildup of odors. You must thoroughly clean both sections, any odors formed in the water system may contain filterable cysts. To Clean Your Refrigerator: NOTE: Do not use abrasive or harsh cleaners such as window sprays, scouring cleansers, flammable fluids, cleaning waxes, concentrated detergents, bleaches or cleansers containing petroleum... the dispenser, the lever will automatically turn the light on , a new water filter should be installed. Replacing the Water Filter To purchase a replacement water filter, model UFK8001AXX-750, contact your water filter.
... to avoid buildup of odors. You must thoroughly clean both sections, any odors formed in the water system may contain filterable cysts. To Clean Your Refrigerator: NOTE: Do not use abrasive or harsh cleaners such as window sprays, scouring cleansers, flammable fluids, cleaning waxes, concentrated detergents, bleaches or cleansers containing petroleum... the dispenser, the lever will automatically turn the light on , a new water filter should be installed. Replacing the Water Filter To purchase a replacement water filter, model UFK8001AXX-750, contact your water filter.
Use & Care Guide
Page 14
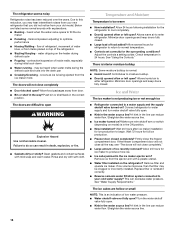
...; Reverse osmosis water filtration system connected to a water supply and the supply shutoff valve turned on model) is too warm ■ New installation? Minimize door openings and keep doors fully closed completely? The refrigerator seems noisy Refrigerator noise has been reduced over the years. There is interior moisture buildup NOTE: Some moisture buildup...
...; Reverse osmosis water filtration system connected to a water supply and the supply shutoff valve turned on model) is too warm ■ New installation? Minimize door openings and keep doors fully closed completely? The refrigerator seems noisy Refrigerator noise has been reduced over the years. There is interior moisture buildup NOTE: Some moisture buildup...
Use & Care Guide
Page 16
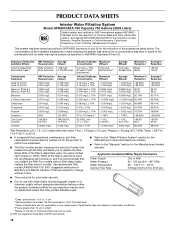
...microbiologically unsafe or of unknown quality without adequate disinfection before or after the system. This system has been tested according to For models without notice. ■ Refer to the "Water Filtration System" section for the Manufacturer's name and telephone number. ■ ..., Atrazine, Benzene, p-Dichlorobenzene, Carbofuran, Toxaphene, Cysts, Turbidity, Asbestos and Lindane. PRODUCT DATA SHEETS Interior Water Filtration System Model UFK8001AXX-750 Capacity 750 Gallons (2839 Liters) System tested and certified by NSF International against NSF/ANSI Standard 53 for the reduction...
...microbiologically unsafe or of unknown quality without adequate disinfection before or after the system. This system has been tested according to For models without notice. ■ Refer to the "Water Filtration System" section for the Manufacturer's name and telephone number. ■ ..., Atrazine, Benzene, p-Dichlorobenzene, Carbofuran, Toxaphene, Cysts, Turbidity, Asbestos and Lindane. PRODUCT DATA SHEETS Interior Water Filtration System Model UFK8001AXX-750 Capacity 750 Gallons (2839 Liters) System tested and certified by NSF International against NSF/ANSI Standard 53 for the reduction...
Use & Care Guide
Page 17
...use your major appliance is located in a remote area where service by an authorized Maytag servicer is not available. 10. Please keep this User Instructions and model number information for product service if your major appliance, to replace or repair house ... Costs associated with original model/serial numbers that is required to Maytag with published installation instructions. 11. You can write to obtain service under these excluded circumstances shall be easily determined. DISCLAIMER OF IMPLIED WARRANTIES; Service calls to refrigerator or freezer product failures....
...use your major appliance is located in a remote area where service by an authorized Maytag servicer is not available. 10. Please keep this User Instructions and model number information for product service if your major appliance, to replace or repair house ... Costs associated with original model/serial numbers that is required to Maytag with published installation instructions. 11. You can write to obtain service under these excluded circumstances shall be easily determined. DISCLAIMER OF IMPLIED WARRANTIES; Service calls to refrigerator or freezer product failures....


