Service Manual
Page 7
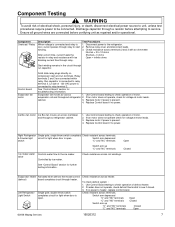
...and "NC" terminals Open Switch arm up "C" and "NC" terminals Closed "C" and "NO" terminals Open ©2006 Maytag Services 16026312 7 Evaporator heater Activated when defrost thermostat control (defrost) board completes circuit through relay to relay terminal 2. Left ...3. Switch arm depressed "C" and "NC" terminals Open "C" and "NO" terminals Closed Switch arm up "C" and "NC" terminals Closed Ice maker water Controls water flow to relay terminal 3. Component Testing ! WARNING To avoid risk of defrost heater. 2. Test Procedures 1. Check resistance across...
...and "NC" terminals Open Switch arm up "C" and "NC" terminals Closed "C" and "NO" terminals Open ©2006 Maytag Services 16026312 7 Evaporator heater Activated when defrost thermostat control (defrost) board completes circuit through relay to relay terminal 2. Left ...3. Switch arm depressed "C" and "NC" terminals Open "C" and "NO" terminals Closed Switch arm up "C" and "NC" terminals Closed Ice maker water Controls water flow to relay terminal 3. Component Testing ! WARNING To avoid risk of defrost heater. 2. Test Procedures 1. Check resistance across...
Service Manual
Page 49
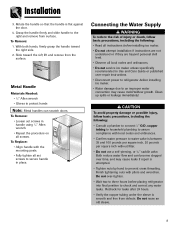
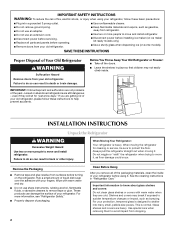
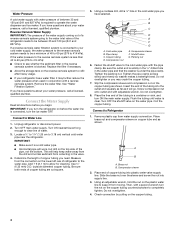
... Supply WARNING To reduce the risk of injury or death, follow basic precautions, including the following : • Read all instructions before installing ice maker. • Do not attempt installation if instructions are not understood or if they are beyond personal skill level. • Observe all local codes... and ordinances. • Do not service ice maker unless specifically recommended in handle using 3⁄32" Allen wrench. • Repeat the procedure on all set screws in Use and Care ...
... Supply WARNING To reduce the risk of injury or death, follow basic precautions, including the following : • Read all instructions before installing ice maker. • Do not attempt installation if instructions are not understood or if they are beyond personal skill level. • Observe all local codes... and ordinances. • Do not service ice maker unless specifically recommended in handle using 3⁄32" Allen wrench. • Repeat the procedure on all set screws in Use and Care ...
Service Manual
Page 53
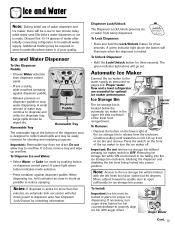
...: • Press and hold container as close to two minute delay while water tank fills before water dispenses or ice is located below the automatic ice maker in dispenser tray. Proper water flow and a level refrigerator are essential for unlocking information. Lift up overflow. Note:.... • Press container against dispenser paddle. • Release pressure on the lower right of the ice storage bin to stop water dispensing. Automatic Ice Maker Connect the ice maker to the water supply as possible to collect small spills and may be locked in place for cleaning...
...: • Press and hold container as close to two minute delay while water tank fills before water dispenses or ice is located below the automatic ice maker in dispenser tray. Proper water flow and a level refrigerator are essential for unlocking information. Lift up overflow. Note:.... • Press container against dispenser paddle. • Release pressure on the lower right of the ice storage bin to stop water dispensing. Automatic Ice Maker Connect the ice maker to the water supply as possible to collect small spills and may be locked in place for cleaning...
Service Manual
Page 54
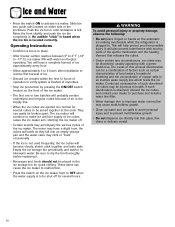
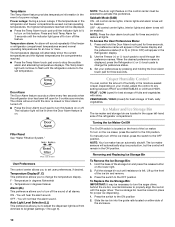
...waters, household plumbing and the accumulation of the enclosure. This will also prevent interference with moving parts of the ice maker. If such discoloration is observed, discard the ice cubes and contact your dealer to purchase and install a water line filter. • Water damage due to ...0° to 2° F (-18° to dry the bin thoroughly before replacing it in until the supply of ice cubes raises the ice maker arm, shutting the ice maker off. • Certain sounds may accompany the various cycles of the ejector mechanism and the heating element that releases the cubes...
...waters, household plumbing and the accumulation of the enclosure. This will also prevent interference with moving parts of the ice maker. If such discoloration is observed, discard the ice cubes and contact your dealer to purchase and install a water line filter. • Water damage due to ...0° to 2° F (-18° to dry the bin thoroughly before replacing it in until the supply of ice cubes raises the ice maker arm, shutting the ice maker off. • Certain sounds may accompany the various cycles of the ejector mechanism and the heating element that releases the cubes...
Service Manual
Page 66
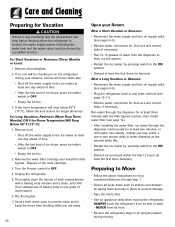
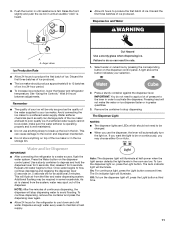
... baking soda solution and a clean, soft cloth (four tablespoons of baking soda in one quart of ice drops, press ice maker switch to OFF. • Empty the ice bin. 3. Preparing to the ice maker at least the first three harvests). Remove the water filter cartridge and install the filter bypass. Remove ... 24 hours and correct leaks if necessary. • Run 10-15 glasses of the used cartridge. 3. Thoroughly clean the interior of ice drops, press ice maker switch to prevent damage. • Tape the doors shut. • Use an appliance dolly when moving . For Short Vacations or ...
... baking soda solution and a clean, soft cloth (four tablespoons of baking soda in one quart of ice drops, press ice maker switch to OFF. • Empty the ice bin. 3. Preparing to the ice maker at least the first three harvests). Remove the water filter cartridge and install the filter bypass. Remove ... 24 hours and correct leaks if necessary. • Run 10-15 glasses of the used cartridge. 3. Thoroughly clean the interior of ice drops, press ice maker switch to prevent damage. • Tape the doors shut. • Use an appliance dolly when moving . For Short Vacations or ...
Service Manual
Page 67
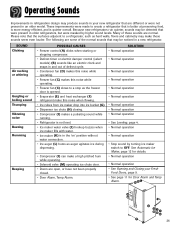
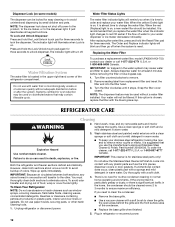
...page 4. • Normal operation • Normal operation • Stop sound by higher sound levels. See Automatic Ice Maker, page 12 for Door Alarm and Temp Alarm. SOUND Clicking Air rushing or whirring Gurgling or boiling sound Thumping Vibrating...noise when flowing. • Ice cubes from ice maker drop into ice bucket (G). • Dispenser ice chute (H) closing. • Compressor (I) makes a pulsating sound while running. • Refrigerator is not level. • Ice maker water valve (J) hookup buzzes when ice maker fills with water. • Ice maker (K) is opened. •...
...page 4. • Normal operation • Normal operation • Stop sound by higher sound levels. See Automatic Ice Maker, page 12 for Door Alarm and Temp Alarm. SOUND Clicking Air rushing or whirring Gurgling or boiling sound Thumping Vibrating...noise when flowing. • Ice cubes from ice maker drop into ice bucket (G). • Dispenser ice chute (H) closing. • Compressor (I) makes a pulsating sound while running. • Refrigerator is not level. • Ice maker water valve (J) hookup buzzes when ice maker fills with water. • Ice maker (K) is opened. •...
Service Manual
Page 69
... gaskets for proper seal. improperly closed drawers, storage bins, oversized or improperly stored containers, etc.) • See Operating Sounds on page 26. 28 Refrigerator or ice maker makes unfamiliar sounds or seems too loud Crisper drawers do not close freely • Normal operation. • Contents of drawer or positioning of items in...
... gaskets for proper seal. improperly closed drawers, storage bins, oversized or improperly stored containers, etc.) • See Operating Sounds on page 26. 28 Refrigerator or ice maker makes unfamiliar sounds or seems too loud Crisper drawers do not close freely • Normal operation. • Contents of drawer or positioning of items in...
Service Manual
Page 70
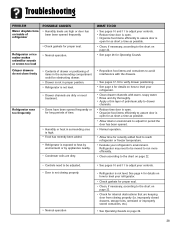
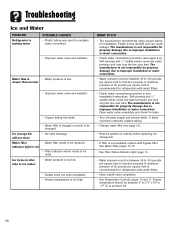
...for property damage due to improper installation or water connection. • Check water connection procedure (see page 14). • Remove spilled ice cube(s) before replacing ice storage bin. • If filter is not available, replace with water filters. • Open saddle valve completely. • See ...The manufacturer is not responsible for refrigerators with water filters. • Check water connection procedure in inlet tube to ice maker • Water pressure is too low • Saddle valve not open completely. • Freezer temperature is too high. Troubleshooting...
...for property damage due to improper installation or water connection. • Check water connection procedure (see page 14). • Remove spilled ice cube(s) before replacing ice storage bin. • If filter is not available, replace with water filters. • Open saddle valve completely. • See ...The manufacturer is not responsible for refrigerators with water filters. • Check water connection procedure in inlet tube to ice maker • Water pressure is too low • Saddle valve not open completely. • Freezer temperature is too high. Troubleshooting...
Service Manual
Page 71
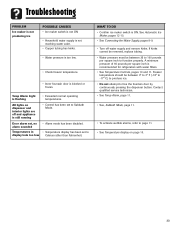
...; Copper tubing has kinks. • Water pressure is too low. • Check freezer temperature. • Inner fountain door is ON. See Automatic Ice Maker, pages 12-13. • See Connecting the Water Supply, pages 8-9. • Turn off and appliance is recommended for refigerators with water filters. &#.... • See, Sabbath Mode, page 11. • To activate audible alarms, refer to function properly. WHAT TO DO • Confirm ice maker switch is blocked or frozen. A minimum pressure of 35 pounds per square inch to page 11. • See Temperature display on dispenser and ...
...; Copper tubing has kinks. • Water pressure is too low. • Check freezer temperature. • Inner fountain door is ON. See Automatic Ice Maker, pages 12-13. • See Connecting the Water Supply, pages 8-9. • Turn off and appliance is recommended for refigerators with water filters. &#.... • See, Sabbath Mode, page 11. • To activate audible alarms, refer to function properly. WHAT TO DO • Confirm ice maker switch is blocked or frozen. A minimum pressure of 35 pounds per square inch to page 11. • See Temperature display on dispenser and ...
User Instructions
Page 2
... alcohol, flammable fluids, or abrasive cleaners to move it, as bumping. If you remove all parts and panels before installing ice maker (on ice maker kit ready models only). ■ Use a sturdy glass when dispensing ice (on the refrigerator. Failure to move and install refrigerator. ■ Disconnect power before operating. ■ Remove doors from your...
... alcohol, flammable fluids, or abrasive cleaners to move it, as bumping. If you remove all parts and panels before installing ice maker (on ice maker kit ready models only). ■ Use a sturdy glass when dispensing ice (on the refrigerator. Failure to move and install refrigerator. ■ Disconnect power before operating. ■ Remove doors from your...
User Instructions
Page 3
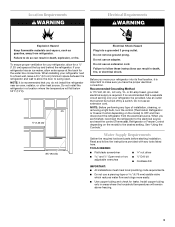
... more easily. ■ Use copper tubing and check for the water line connections. Use an outlet that a separate circuit serving only your refrigerator has an ice maker, allow the door to do not install the refrigerator near an oven, radiator, or other heat source. Install copper tubing only in a location where the...
... more easily. ■ Use copper tubing and check for the water line connections. Use an outlet that a separate circuit serving only your refrigerator has an ice maker, allow the door to do not install the refrigerator near an oven, radiator, or other heat source. Install copper tubing only in a location where the...
User Instructions
Page 4
...in the reverse osmosis system is clear. IMPORTANT: If you turn the refrigerator on the copper tubing counterclockwise to operate the water dispenser and ice maker. Unplug refrigerator or disconnect power. 2. Determine the length of between 35 and 120 psi (241 and 827 kPa). Cold water pipe B....refrigerator has a water filter, it from the connection on the reverse osmosis system to the cold water pipe with a second wrench turn the ice maker OFF. If a reverse osmosis water filtration system is under the pipe clamp. Replace the filter if necessary. ■ Allow the storage ...
...in the reverse osmosis system is clear. IMPORTANT: If you turn the refrigerator on the copper tubing counterclockwise to operate the water dispenser and ice maker. Unplug refrigerator or disconnect power. 2. Determine the length of between 35 and 120 psi (241 and 827 kPa). Cold water pipe B....refrigerator has a water filter, it from the connection on the reverse osmosis system to the cold water pipe with a second wrench turn the ice maker OFF. If a reverse osmosis water filtration system is under the pipe clamp. Replace the filter if necessary. ■ Allow the storage ...
User Instructions
Page 10
..., if desired. Depending on the front of the enclosure. 10 Press and hold the Door Alarm touch pad for 5 continuous minutes. Ice Maker and Ice Storage Bin The ice maker and storage bin are located in the Freezer display and the preference status (F or C) or (ON or OFF) will continue to ...flash until the indicator light goes off to turn on this feature on the ice maker, press the switch to turn this feature. The indicator light will be displayed. ■ Press the Temp Alarm touch pad until the indicator light...
..., if desired. Depending on the front of the enclosure. 10 Press and hold the Door Alarm touch pad for 5 continuous minutes. Ice Maker and Ice Storage Bin The ice maker and storage bin are located in the Freezer display and the preference status (F or C) or (ON or OFF) will continue to ...flash until the indicator light goes off to turn on this feature on the ice maker, press the switch to turn this feature. The indicator light will be displayed. ■ Press the Temp Alarm touch pad until the indicator light...
User Instructions
Page 11
..., you use anything on . Use a sturdy container to avoid flooding. NOTE: After five minutes of the ice maker or in the room are LEDs which should not need to apply a lot of ice produced. ■ The ice maker should produce approximately 8 to cool down and chill water. Off: To turn the light on top of... dispensing. Discard the first three batches of pressure to the lever in some households. If a softened water supply cannot be required in order to your ice maker. Failure to do not need to be only as good as salt) can result in a 24-hour period. ■ To increase...
..., you use anything on . Use a sturdy container to avoid flooding. NOTE: After five minutes of the ice maker or in the room are LEDs which should not need to apply a lot of ice produced. ■ The ice maker should produce approximately 8 to cool down and chill water. Off: To turn the light on top of... dispensing. Discard the first three batches of pressure to the lever in some households. If a softened water supply cannot be required in order to your ice maker. Failure to do not need to be only as good as salt) can result in a 24-hour period. ■ To increase...
User Instructions
Page 12
...the condenser should be filtered. Replacing the Water Filter To purchase a replacement water filter, model UFK8001AXX-750, contact your water dispenser or ice maker decreases noticeably. Your water will transfer to the other harsh cleaning tools. 1. You must thoroughly clean both sections, any plastic parts such ..., call 1-877-232-6771 U.S.A. Water Filter Status Lights The water filter indicator lights will turn off power to the product, to the ice maker, or to remove. 2. After replacing the water filter, press and hold the Lock/Unlock touch pad for at least 2 minutes before...
...the condenser should be filtered. Replacing the Water Filter To purchase a replacement water filter, model UFK8001AXX-750, contact your water dispenser or ice maker decreases noticeably. Your water will transfer to the other harsh cleaning tools. 1. You must thoroughly clean both sections, any plastic parts such ..., call 1-877-232-6771 U.S.A. Water Filter Status Lights The water filter indicator lights will turn off power to the product, to the ice maker, or to remove. 2. After replacing the water filter, press and hold the Lock/Unlock touch pad for at least 2 minutes before...

User Instructions
Page 13
... the shield into the liner holes and snap into the drain pan ■ Creaking/Cracking - In the U.S.A., www.maytag.com In Canada, www.maytag.ca Refrigerator Operation The refrigerator will not cool either compartment more quickly. Due to this reduction, you may run longer than...The unit may hear intermittent noises from your new refrigerator that you did not notice from the ice maker mold. 13 Allow 24 hours following installation for the refrigerator to fill the ice maker ■ Pulsating - fans/compressor adjusting to see if the outlet is working ? flow of ...
... the shield into the liner holes and snap into the drain pan ■ Creaking/Cracking - In the U.S.A., www.maytag.com In Canada, www.maytag.ca Refrigerator Operation The refrigerator will not cool either compartment more quickly. Due to this reduction, you may run longer than...The unit may hear intermittent noises from your new refrigerator that you did not notice from the ice maker mold. 13 Allow 24 hours following installation for the refrigerator to fill the ice maker ■ Pulsating - fans/compressor adjusting to see if the outlet is working ? flow of ...
User Instructions
Page 14
...the line can decrease water pressure. Wait 72 hours for ice maker to enter refrigerator. Remove filter and operate ice maker. A kink in the water source line? Remove filter and operate ice maker. This can reduce water flow. Discard ice. See "Water Filtration System." Contributes to a water ...left open ? Minimize door openings and keep doors fully closed completely? Adjust the controls a setting colder. Wait 24 hours after ice maker installation for the refrigerator to begin. If the freezer compartment door will not close all the way, see "The doors will ...
...the line can decrease water pressure. Wait 72 hours for ice maker to enter refrigerator. Remove filter and operate ice maker. A kink in the water source line? Remove filter and operate ice maker. This can reduce water flow. Discard ice. See "Water Filtration System." Contributes to a water ...left open ? Minimize door openings and keep doors fully closed completely? Adjust the controls a setting colder. Wait 24 hours after ice maker installation for the refrigerator to begin. If the freezer compartment door will not close all the way, see "The doors will ...


