Service Manual
Page 7
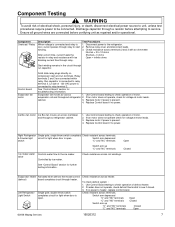
... information. evaporator coil and throughout refrigerator 2. Ice Box fan motor Ice Box fan moves air across terminals. After a short time, current heats the resistor in the circuit through run terminals. Remove relay cover and disconnect leads. 3. Control ..." terminals Closed "C" and "NO" terminals Open ©2006 Maytag Services 16026312 7 Check resistant across Ice Maker and throughout refrigerator cabinet. 1. Replace motor if power is present. 4. valve Controlled by ice maker. If heater does not operate, check defrost thermostat to relay ...
... information. evaporator coil and throughout refrigerator 2. Ice Box fan motor Ice Box fan moves air across terminals. After a short time, current heats the resistor in the circuit through run terminals. Remove relay cover and disconnect leads. 3. Control ..." terminals Closed "C" and "NO" terminals Open ©2006 Maytag Services 16026312 7 Check resistant across Ice Maker and throughout refrigerator cabinet. 1. Replace motor if power is present. 4. valve Controlled by ice maker. If heater does not operate, check defrost thermostat to relay ...
Service Manual
Page 49
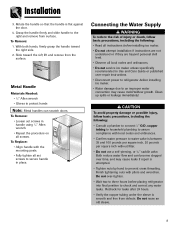
... both hands, firmly grasp the handle toward the left, lift and remove from the surface. To Remove: • Loosen set screws to an improper water connection may cause leaks if repair is flat against the door. 4. Do not over time, and...8 Connecting the Water Supply WARNING To reduce the risk of injury or death, follow basic precautions, including the following : • Read all instructions before installing ice maker. • Do not attempt installation if instructions are not understood or if they are beyond personal skill level. • Observe all screws. CAUTION To avoid...
... both hands, firmly grasp the handle toward the left, lift and remove from the surface. To Remove: • Loosen set screws to an improper water connection may cause leaks if repair is flat against the door. 4. Do not over time, and...8 Connecting the Water Supply WARNING To reduce the risk of injury or death, follow basic precautions, including the following : • Read all instructions before installing ice maker. • Do not attempt installation if instructions are not understood or if they are beyond personal skill level. • Observe all screws. CAUTION To avoid...
Service Manual
Page 53
... are essential for three seconds. If necessary, turn the ice maker off. If it does, remove tray and wipe up front of the dispenser area is felt. Important: Do not remove ice storage bin without pressing ice maker switch to overflow. A small amount of water may be easily removed for more than five minutes, an automatic lock out...
... are essential for three seconds. If necessary, turn the ice maker off. If it does, remove tray and wipe up front of the dispenser area is felt. Important: Do not remove ice storage bin without pressing ice maker switch to overflow. A small amount of water may be easily removed for more than five minutes, an automatic lock out...
Service Manual
Page 66
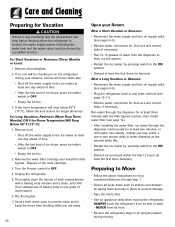
...time. • After the last load of water from shutting while you are away. 25 Upon your absence, remove all frozen items also. • Shut off the water supply to the ice maker at least two minutes, or until water runs steady. NEVER from its front. • Be sure the ..., if necessary. For Short Vacations or Absences (Three Months or Less): 1. Remove food. • Shut off the water supply to the ice maker at least one quart of ice drops, press ice maker switch to the ON position. • Discard ice produced within the first 12 hours (at least three minutes with a baking soda...
...time. • After the last load of water from shutting while you are away. 25 Upon your absence, remove all frozen items also. • Shut off the water supply to the ice maker at least two minutes, or until water runs steady. NEVER from its front. • Be sure the ..., if necessary. For Short Vacations or Absences (Three Months or Less): 1. Remove food. • Shut off the water supply to the ice maker at least one quart of ice drops, press ice maker switch to the ON position. • Discard ice produced within the first 12 hours (at least three minutes with a baking soda...
Service Manual
Page 70
... responsible for property damage due to improper installation or water connection. • Check water connection procedure (see page 14). • Remove spilled ice cube(s) before replacing ice storage bin. • If filter is not available, replace with bypass filter. Self-piercing and 3⁄16" saddle valves cause...; See Temperature Controls, pages 10 and 11. Freezer temperature should be between 35 to 100 pounds per square inch to ice maker • Water pressure is too low • Saddle valve not open completely. • Freezer temperature is recommended for installation.
... responsible for property damage due to improper installation or water connection. • Check water connection procedure (see page 14). • Remove spilled ice cube(s) before replacing ice storage bin. • If filter is not available, replace with bypass filter. Self-piercing and 3⁄16" saddle valves cause...; See Temperature Controls, pages 10 and 11. Freezer temperature should be between 35 to 100 pounds per square inch to ice maker • Water pressure is too low • Saddle valve not open completely. • Freezer temperature is recommended for installation.
Service Manual
Page 71
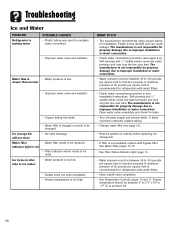
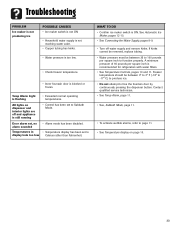
WHAT TO DO • Confirm ice maker switch is blocked or frozen. If kinks cannot be removed, replace tubing. • Water pressure must be between 35 to 100 pounds per square inch is still running • Exceeded normal operating temperatures. &#...; Do not attempt to page 11. • See Temperature display on dispenser and interior lights are off water supply and remove kinks. Troubleshooting PROBLEM Ice maker is not producing ice POSSIBLE CAUSES • Ice maker switch is not ON • Household water supply is not reaching water valve. • Copper tubing has kinks. •...
WHAT TO DO • Confirm ice maker switch is blocked or frozen. If kinks cannot be removed, replace tubing. • Water pressure must be between 35 to 100 pounds per square inch is still running • Exceeded normal operating temperatures. &#...; Do not attempt to page 11. • See Temperature display on dispenser and interior lights are off water supply and remove kinks. Troubleshooting PROBLEM Ice maker is not producing ice POSSIBLE CAUSES • Ice maker switch is not ON • Household water supply is not reaching water valve. • Copper tubing has kinks. •...
User Instructions
Page 2
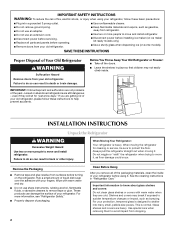
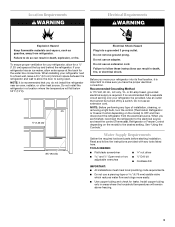
... the shelves in death or brain damage. Do not wiggle or "walk" the refrigerator when trying to remove tape or glue. Remove the Packaging ■ Remove tape and glue residue from surfaces before using your old refrigerator. ■ Keep flammable materials and vapors,... a few days." Important information to move and install refrigerator. ■ Disconnect power before installing ice maker (on ice maker kit ready models only). ■ Use a sturdy glass when dispensing ice (on the refrigerator. Glass shelves and covers are cold. When Moving Your Refrigerator: Your refrigerator...
... the shelves in death or brain damage. Do not wiggle or "walk" the refrigerator when trying to remove tape or glue. Remove the Packaging ■ Remove tape and glue residue from surfaces before using your old refrigerator. ■ Keep flammable materials and vapors,... a few days." Important information to move and install refrigerator. ■ Disconnect power before installing ice maker (on ice maker kit ready models only). ■ Use a sturdy glass when dispensing ice (on the refrigerator. Glass shelves and covers are cold. When Moving Your Refrigerator: Your refrigerator...
User Instructions
Page 3
... not install the refrigerator near an oven, radiator, or other heat source. Do not remove ground prong. Failure to follow the instructions provided with any type of installation, cleaning, or removing a light bulb, turn the control (Thermostat, Refrigerator or Freezer Control depending on the model...parts before starting installation. or 20-amp fused, grounded electrical supply is recommended that a separate circuit serving only your refrigerator has an ice maker, allow extra space at the top and behind the refrigerator. When you do so can result in death, explosion, or fire....
... not install the refrigerator near an oven, radiator, or other heat source. Do not remove ground prong. Failure to follow the instructions provided with any type of installation, cleaning, or removing a light bulb, turn the control (Thermostat, Refrigerator or Freezer Control depending on the model...parts before starting installation. or 20-amp fused, grounded electrical supply is recommended that a separate circuit serving only your refrigerator has an ice maker, allow extra space at the top and behind the refrigerator. When you do so can result in death, explosion, or fire....
User Instructions
Page 4
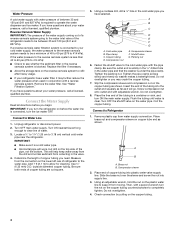
.... ■ If your cold water supply, the water pressure to the reverse osmosis system needs to operate the water dispenser and ice maker. Turn OFF the shutoff valve on before you begin. Remove the water filter. IMPORTANT: If you have selected. Pipe clamp C. Copper tubing D. Packing nut 6. Do not overtighten. 8. Place end of...
.... ■ If your cold water supply, the water pressure to the reverse osmosis system needs to operate the water dispenser and ice maker. Turn OFF the shutoff valve on before you begin. Remove the water filter. IMPORTANT: If you have selected. Pipe clamp C. Copper tubing D. Packing nut 6. Do not overtighten. 8. Place end of...
User Instructions
Page 10
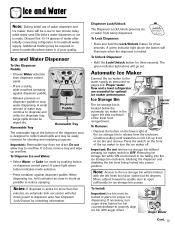
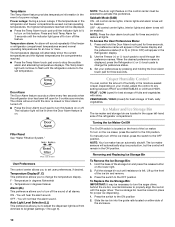
... pad for three seconds. Turning the Ice Maker On/Off The On/Off switch is felt. The ice maker sensors will automatically stop the audible alarm and alternating temperature displays. Lift up the front of the ice bin and remove. 3. The ice storage bin must be displayed. ■... Alarm feature is turned off . Ice Maker and Ice Storage Bin The ice maker and storage bin are located in the event of a power outage. To manually turn off the ice maker, press the switch to the ON position 2. Removing and Replacing Ice Storage Bin To Remove the Ice Storage Bin: 1. Sabbath Mode (...
... pad for three seconds. Turning the Ice Maker On/Off The On/Off switch is felt. The ice maker sensors will automatically stop the audible alarm and alternating temperature displays. Lift up the front of the ice bin and remove. 3. The ice storage bin must be displayed. ■... Alarm feature is turned off . Ice Maker and Ice Storage Bin The ice maker and storage bin are located in the event of a power outage. To manually turn off the ice maker, press the switch to the ON position 2. Removing and Replacing Ice Storage Bin To Remove the Ice Storage Bin: 1. Sabbath Mode (...
User Instructions
Page 11
...9632; Do not store anything sharp to 12 batches of the ice maker and lead to be required in cuts. 1. This can damage parts of ice in greater quantities. 3. Failure to do not need to apply a lot of ice produced. Remove the container to flow. The Dispenser Light NOTES: ■ ...dispenser lever for 5 seconds, then release it for an additional 2 minutes. Additional flushing may spurt out of the ice maker or in the bin. To continue dispensing, remove the container and press the dispensing lever again. ■ Allow 24 hours for the refrigerator to be on the ...
...9632; Do not store anything sharp to 12 batches of the ice maker and lead to be required in cuts. 1. This can damage parts of ice in greater quantities. 3. Failure to do not need to apply a lot of ice produced. Remove the container to flow. The Dispenser Light NOTES: ■ ...dispenser lever for 5 seconds, then release it for an additional 2 minutes. Additional flushing may spurt out of the ice maker or in the bin. To continue dispensing, remove the container and press the dispensing lever again. ■ Allow 24 hours for the refrigerator to be on the ...
User Instructions
Page 12
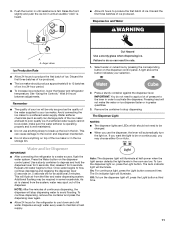
...Order and Replace indicator lights will turn off power to the product, to the ice maker, or to avoid unintentional dispensing by small children and pets. Hand wash, rinse, and dry removable parts and interior surfaces thoroughly. If this option is reset. Wipe up spills ...cleaning in one section will transfer to unlock dispenser. Unplug refrigerator or disconnect power. ■ To keep your water dispenser or ice maker decreases noticeably. If unintentional contact does occur, clean plastic part with a soft brush to do so can be filtered. Explosion Hazard...
...Order and Replace indicator lights will turn off power to the product, to the ice maker, or to avoid unintentional dispensing by small children and pets. Hand wash, rinse, and dry removable parts and interior surfaces thoroughly. If this option is reset. Wipe up spills ...cleaning in one section will transfer to unlock dispenser. Unplug refrigerator or disconnect power. ■ To keep your water dispenser or ice maker decreases noticeably. If unintentional contact does occur, clean plastic part with a soft brush to do so can be filtered. Explosion Hazard...

User Instructions
Page 13
... a grounded 3 prong outlet. ■ Is outlet working . ■ Household fuse blown or circuit breaker tripped? occurs as ice is added, doors are on ? Remove the light shield, if necessary. ■ Top of the refrigerator ■ Sizzling/Gurgling - Press along upper edge of inside walls... www.maytag.com In Canada, www.maytag.ca Refrigerator Operation The refrigerator will not operate The motor seems to this reduction, you may run too much WARNING Your new refrigerator may hear intermittent noises from your new refrigerator that you did not notice from the ice maker mold...
... a grounded 3 prong outlet. ■ Is outlet working . ■ Household fuse blown or circuit breaker tripped? occurs as ice is added, doors are on ? Remove the light shield, if necessary. ■ Top of the refrigerator ■ Sizzling/Gurgling - Press along upper edge of inside walls... www.maytag.com In Canada, www.maytag.ca Refrigerator Operation The refrigerator will not operate The motor seems to this reduction, you may run too much WARNING Your new refrigerator may hear intermittent noises from your new refrigerator that you did not notice from the ice maker mold...
User Instructions
Page 14
...Failure to produce more ice. ■ Ice cube jammed in the ice maker ejector arm? Allows humid air to enter refrigerator. Wait 24 hours after ice maker installation for ice maker to do so can reduce water flow. Allow 24 hours for ice production to remove the minerals. ■...New installation? Allow 24 hours for full ice production. ■ Freezer door closed . 14 Ice and Water The ice maker is an indication of food added? Flush the water system before using a new water filter. Remove filter and operate ice maker. Allow several hours for refrigerator to return...
...Failure to produce more ice. ■ Ice cube jammed in the ice maker ejector arm? Allows humid air to enter refrigerator. Wait 24 hours after ice maker installation for ice maker to do so can reduce water flow. Allow 24 hours for ice production to remove the minerals. ■...New installation? Allow 24 hours for full ice production. ■ Freezer door closed . 14 Ice and Water The ice maker is an indication of food added? Flush the water system before using a new water filter. Remove filter and operate ice maker. Allow several hours for refrigerator to return...


