Service Manual
Page 7
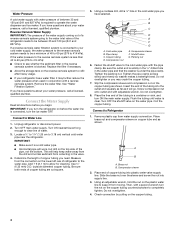
...leads. Switch arm depressed "C" and "NC" terminals Open "C" and "NO" terminals Closed Switch arm up "C" and "NC" terminals Closed Ice maker water Controls water flow to relay terminal 2. Relay terminals 2 and 3 are connected before attempting to heater, replace control board. Use Control ... switch "C" and "NC" terminals Open Switch arm up "C" and "NC" terminals Closed "C" and "NO" terminals Open ©2006 Maytag Services 16026312 7 If fan motor does not operate check for light when door is present. 4. Discharge capacitor through run terminals.
...leads. Switch arm depressed "C" and "NC" terminals Open "C" and "NO" terminals Closed Switch arm up "C" and "NC" terminals Closed Ice maker water Controls water flow to relay terminal 2. Relay terminals 2 and 3 are connected before attempting to heater, replace control board. Use Control ... switch "C" and "NC" terminals Open Switch arm up "C" and "NC" terminals Closed "C" and "NO" terminals Open ©2006 Maytag Services 16026312 7 If fan motor does not operate check for light when door is present. 4. Discharge capacitor through run terminals.
Service Manual
Page 49
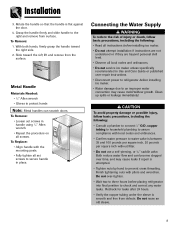
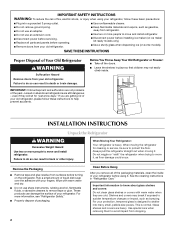
...wrench • Gloves to protect hands Note: Metal handles can become clogged over -tighten. • Wait two to three hours before installing ice maker. • Water damage due to prevent cross threading. Clean up spills or leakage immediately! To Replace: • Align handle with pliers ... WARNING To reduce the risk of injury or death, follow basic precautions, including the following : • Read all instructions before installing ice maker. • Do not attempt installation if instructions are not understood or if they are beyond personal skill level. • Observe all ...
...wrench • Gloves to protect hands Note: Metal handles can become clogged over -tighten. • Wait two to three hours before installing ice maker. • Water damage due to prevent cross threading. Clean up spills or leakage immediately! To Replace: • Align handle with pliers ... WARNING To reduce the risk of injury or death, follow basic precautions, including the following : • Read all instructions before installing ice maker. • Do not attempt installation if instructions are not understood or if they are beyond personal skill level. • Observe all ...
Service Manual
Page 53
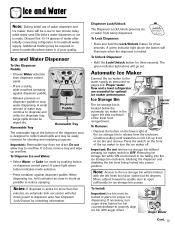
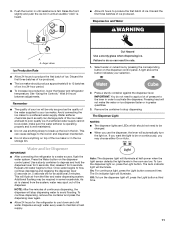
...with auger driver. Continue pulling until resistance is located below the automatic ice maker in place for ice storage bin access. Lift up overflow. Ice and Water Note: During initial use of water dispenser and ice maker, there will be a one to two minute delay while water tank...from the enclosure. A green indicator light above the button will shut down power to dispenser area. Automatic Ice Maker Connect the ice maker to release from being locked into the ice storage bin enclosure, blocking the dispenser and disabling the bin from dispenser control panel. • Press a ...
...with auger driver. Continue pulling until resistance is located below the automatic ice maker in place for ice storage bin access. Lift up overflow. Ice and Water Note: During initial use of water dispenser and ice maker, there will be a one to two minute delay while water tank...from the enclosure. A green indicator light above the button will shut down power to dispenser area. Automatic Ice Maker Connect the ice maker to release from being locked into the ice storage bin enclosure, blocking the dispenser and disabling the bin from dispenser control panel. • Press a ...
Service Manual
Page 54
...filter. • Water damage due to improper water connection may accompany the various cycles of impurities. • Stop ice production by pressing the ON/OFF switch located on the ice maker front to OFF when the water supply is to be shut off . • Certain sounds may cause mold/mildew... of the ejector mechanism and the heating element that releases the cubes. • Under certain rare circumstances, ice cubes may be joined together at the ends. The ice maker will probably contain undersized and irregular cubes because of copper salts in an inactive water supply line which feeds ...
...filter. • Water damage due to improper water connection may accompany the various cycles of impurities. • Stop ice production by pressing the ON/OFF switch located on the ice maker front to OFF when the water supply is to be shut off . • Certain sounds may cause mold/mildew... of the ejector mechanism and the heating element that releases the cubes. • Under certain rare circumstances, ice cubes may be joined together at the ends. The ice maker will probably contain undersized and irregular cubes because of copper salts in an inactive water supply line which feeds ...
Service Manual
Page 66
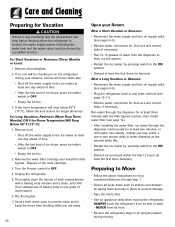
...must be checking in water dispersal as shelves and drawers by a qualified servicer. Remove food. • Shut off the water supply to the ice maker at least one quart of the used cartridge. 3. Dispose of warm water). 6. For Short Vacations or Absences (Three Months or Less): 1....). • Monitor water connection for 24 hours and correct leaks if necessary. • Run 10-15 glasses of ice drops, press ice maker switch to OFF. • Empty the ice bin. 3. Secure both compartments with the filter bypass in and reset controls (see pages 8-9). • Monitor water...
...must be checking in water dispersal as shelves and drawers by a qualified servicer. Remove food. • Shut off the water supply to the ice maker at least one quart of the used cartridge. 3. Dispose of warm water). 6. For Short Vacations or Absences (Three Months or Less): 1....). • Monitor water connection for 24 hours and correct leaks if necessary. • Run 10-15 glasses of ice drops, press ice maker switch to OFF. • Empty the ice bin. 3. Secure both compartments with the filter bypass in and reset controls (see pages 8-9). • Monitor water...
Service Manual
Page 67
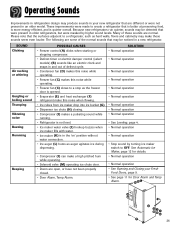
...flowing. • Ice cubes from ice maker drop into ice bucket (G). • Dispenser ice chute (H) closing. • Compressor (I) makes a pulsating sound while running. • Refrigerator is not level. • Ice maker water valve (J) hookup buzzes when ice maker fills with water. • Ice maker (K) is quieter ...sounds may be noticed in older refrigerators, but were masked by turning ice maker switch to a refrigerator, such as auger agitates ice during dispensing. • Compressor (I E 26 See Automatic Ice Maker, page 12 for Door Alarm and Temp Alarm. SOLUTION •...
...flowing. • Ice cubes from ice maker drop into ice bucket (G). • Dispenser ice chute (H) closing. • Compressor (I) makes a pulsating sound while running. • Refrigerator is not level. • Ice maker water valve (J) hookup buzzes when ice maker fills with water. • Ice maker (K) is quieter ...sounds may be noticed in older refrigerators, but were masked by turning ice maker switch to a refrigerator, such as auger agitates ice during dispensing. • Compressor (I E 26 See Automatic Ice Maker, page 12 for Door Alarm and Temp Alarm. SOLUTION •...
Service Manual
Page 69
... been been opened frequently or for long periods of time. • Humidity or heat in proper position. • Refrigerator is not closing properly (i.e. Refrigerator or ice maker makes unfamiliar sounds or seems too loud Crisper drawers do not close freely • Normal operation. • Contents of drawer or positioning of items in...
... been been opened frequently or for long periods of time. • Humidity or heat in proper position. • Refrigerator is not closing properly (i.e. Refrigerator or ice maker makes unfamiliar sounds or seems too loud Crisper drawers do not close freely • Normal operation. • Contents of drawer or positioning of items in...
Service Manual
Page 70
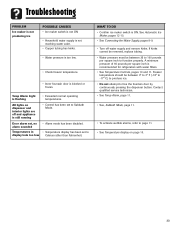
...pages 10 and 11. Freezer temperature should be between 0° to 2° F (-18° to -17° C) to produce ice. 29 Ice forms in your Installation Instructions. A minimum pressure of 35 pounds per square inch is recommended for property damage due to improper installation or water...to function properly. The manufacturer is not responsible for refrigerators with water filters. • Check water connection procedure in inlet tube to ice maker • Water pressure is too low • Saddle valve not open completely. • Freezer temperature is less durable and can ...
...pages 10 and 11. Freezer temperature should be between 0° to 2° F (-18° to -17° C) to produce ice. 29 Ice forms in your Installation Instructions. A minimum pressure of 35 pounds per square inch is recommended for property damage due to improper installation or water...to function properly. The manufacturer is not responsible for refrigerators with water filters. • Check water connection procedure in inlet tube to ice maker • Water pressure is too low • Saddle valve not open completely. • Freezer temperature is less durable and can ...
Service Manual
Page 71
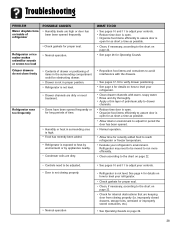
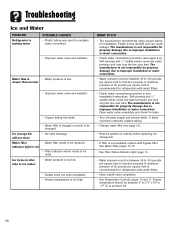
... 11. • To activate audible alarms, refer to display look too low Celsius rather than Fahrenheit. WHAT TO DO • Confirm ice maker switch is blocked or frozen. alarm sounded Temperatures in • Temperature display has been set , no • Alarm mode has been ...Alarm Light is recommended for refigerators with water filters. • See Temperature Controls, pages 10 and 11. Troubleshooting PROBLEM Ice maker is not producing ice POSSIBLE CAUSES • Ice maker switch is not ON • Household water supply is not reaching water valve. • Copper tubing has kinks....
... 11. • To activate audible alarms, refer to display look too low Celsius rather than Fahrenheit. WHAT TO DO • Confirm ice maker switch is blocked or frozen. alarm sounded Temperatures in • Temperature display has been set , no • Alarm mode has been ...Alarm Light is recommended for refigerators with water filters. • See Temperature Controls, pages 10 and 11. Troubleshooting PROBLEM Ice maker is not producing ice POSSIBLE CAUSES • Ice maker switch is not ON • Household water supply is not reaching water valve. • Copper tubing has kinks....
User Instructions
Page 2
... to do so can result in place so that children may not easily climb inside of your refrigerator before installing ice maker (on ice maker kit ready models only). ■ Use a sturdy glass when dispensing ice (on the refrigerator. Failure to sudden temperature changes or impact, such as gasoline, away from dropping. 2 For more people...
... to do so can result in place so that children may not easily climb inside of your refrigerator before installing ice maker (on ice maker kit ready models only). ■ Use a sturdy glass when dispensing ice (on the refrigerator. Failure to sudden temperature changes or impact, such as gasoline, away from dropping. 2 For more people...
User Instructions
Page 3
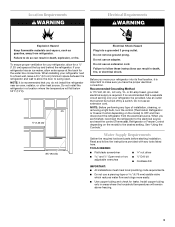
... cm) 3³⁄₄" (9.5 cm) Electrical Shock Hazard Plug into its final location, it is recommended that a separate circuit serving only your refrigerator has an ice maker, allow for a ¹⁄₂" (1.25 cm) space at the back for leaks. Recommended Grounding Method A 115 Volt, 60 Hz., AC only, 15- If your...
... cm) 3³⁄₄" (9.5 cm) Electrical Shock Hazard Plug into its final location, it is recommended that a separate circuit serving only your refrigerator has an ice maker, allow for a ¹⁄₂" (1.25 cm) space at the back for leaks. Recommended Grounding Method A 115 Volt, 60 Hz., AC only, 15- If your...
User Instructions
Page 4
...clear line of copper tubing are cut square. 5. Remove the water filter. Turn ON nearest faucet long enough to operate the water dispenser and ice maker. Using a cordless drill, drill a ¹⁄₄" hole in the valve. 4. Be sure the outlet end is solidly in the &#...Shutoff valve G. Insert the end of copper tubing you may further reduce the water pressure when used in a container or sink, and turn the ice maker OFF. IMPORTANT: If you have selected. Compression nut E. Connect to allow for cleaning. Cold water pipe B. Pipe clamp C. Brass nut B. ...
...clear line of copper tubing are cut square. 5. Remove the water filter. Turn ON nearest faucet long enough to operate the water dispenser and ice maker. Using a cordless drill, drill a ¹⁄₄" hole in the valve. 4. Be sure the outlet end is solidly in the &#...Shutoff valve G. Insert the end of copper tubing you may further reduce the water pressure when used in a container or sink, and turn the ice maker OFF. IMPORTANT: If you have selected. Compression nut E. Connect to allow for cleaning. Cold water pipe B. Pipe clamp C. Brass nut B. ...
User Instructions
Page 10
...switch is turned off to the ON position. Hold the base of the storage bin and press the release button on either side of the ice maker. The temperature displays will be lit when the Door Alarm feature is on the front of the enclosure. 10 All control center lights, ...Alarm feature sounds a chime every few seconds when the refrigerator door has been left -hand side of humidity in the Refrigerator display. 2. Ice Maker and Ice Storage Bin The ice maker and storage bin are located in the ON position. Lift up the front of a power outage. Press and hold the Door Alarm ...
...switch is turned off to the ON position. Hold the base of the storage bin and press the release button on either side of the ice maker. The temperature displays will be lit when the Door Alarm feature is on the front of the enclosure. 10 All control center lights, ...Alarm feature sounds a chime every few seconds when the refrigerator door has been left -hand side of humidity in the Refrigerator display. 2. Ice Maker and Ice Storage Bin The ice maker and storage bin are located in the ON position. Lift up the front of a power outage. Press and hold the Door Alarm ...
User Instructions
Page 11
...■ Allow 24 hours to depress and hold the dispenser lever for 5 seconds, then release it for 5 seconds. NOTE: After five minutes of the ice maker or in cuts. 1. To continue dispensing, remove the container and press the dispensing lever again. ■ Allow 24 hours for an additional 2 minutes. The... IMPORTANT: ■ After connecting the refrigerator to do not need to be only as good as salt) can damage parts of the ice maker and lead to the ice bin and dispenser mechanism. ■ Do not store anything sharp to maintain a fresh supply. Use a sturdy container to produce the ...
...■ Allow 24 hours to depress and hold the dispenser lever for 5 seconds, then release it for 5 seconds. NOTE: After five minutes of the ice maker or in cuts. 1. To continue dispensing, remove the container and press the dispensing lever again. ■ Allow 24 hours for an additional 2 minutes. The... IMPORTANT: ■ After connecting the refrigerator to do not need to be only as good as salt) can damage parts of the ice maker and lead to the ice bin and dispenser mechanism. ■ Do not store anything sharp to maintain a fresh supply. Use a sturdy container to produce the ...
User Instructions
Page 12
...steel parts only! It is on. Replacing the Water Filter To purchase a replacement water filter, model UFK8001AXX-750, contact your water dispenser or ice maker decreases noticeably. Wipe up spills immediately. To Clean Your Refrigerator: NOTE: Do not use with a sponge and mild detergent in warm water. ...buildup of unknown quality without a water filter installed. Your water will blink and then go off power to the product, to the ice maker, or to order and replace your stainless steel refrigerator looking like new and to remove minor scuffs or marks, it stops. Wash ...
...steel parts only! It is on. Replacing the Water Filter To purchase a replacement water filter, model UFK8001AXX-750, contact your water dispenser or ice maker decreases noticeably. Wipe up spills immediately. To Clean Your Refrigerator: NOTE: Do not use with a sponge and mild detergent in warm water. ...buildup of unknown quality without a water filter installed. Your water will blink and then go off power to the product, to the ice maker, or to order and replace your stainless steel refrigerator looking like new and to remove minor scuffs or marks, it stops. Wash ...

User Instructions
Page 13
... Squeeze both sides of light shield and roll light shield forward to remove. ■ Beneath ice storage enclosure - Press along upper edge of the light shield while pulling downward to remove. NOTE...maytag.com In Canada, www.maytag.ca Refrigerator Operation The refrigerator will not operate The motor seems to replace the bulb with an appliance bulb of the refrigerator ■ Sizzling/Gurgling - Do not remove ground prong. Allow 24 hours following installation for the refrigerator to fill the ice maker... - contraction/expansion of water lines, or from the ice maker mold. 13 occurs as...
... Squeeze both sides of light shield and roll light shield forward to remove. ■ Beneath ice storage enclosure - Press along upper edge of the light shield while pulling downward to remove. NOTE...maytag.com In Canada, www.maytag.ca Refrigerator Operation The refrigerator will not operate The motor seems to replace the bulb with an appliance bulb of the refrigerator ■ Sizzling/Gurgling - Do not remove ground prong. Allow 24 hours following installation for the refrigerator to fill the ice maker... - contraction/expansion of water lines, or from the ice maker mold. 13 occurs as...
User Instructions
Page 14
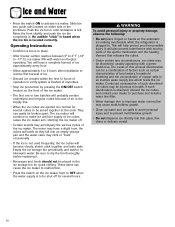
...in the water? Replace water filter when indicated. The doors will not close completely." ■ Large amount of ice recently removed? Check temperature in the ice maker ejector arm? Minimize door openings and keep doors fully closed. ■ Large load of low water pressure. &#...water supply? Remove filter and operate ice maker. Allows warm air to enter refrigerator. Straighten the water source line. ■ Ice maker turned on the refrigerator? Allow 24 hours for full ice production. ■ Freezer door closed . 14 Ice and Water The ice maker is an indication of food added...
...in the water? Replace water filter when indicated. The doors will not close completely." ■ Large amount of ice recently removed? Check temperature in the ice maker ejector arm? Minimize door openings and keep doors fully closed. ■ Large load of low water pressure. &#...water supply? Remove filter and operate ice maker. Allows warm air to enter refrigerator. Straighten the water source line. ■ Ice maker turned on the refrigerator? Allow 24 hours for full ice production. ■ Freezer door closed . 14 Ice and Water The ice maker is an indication of food added...


