Service Manual
Page 3
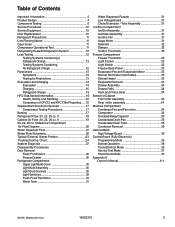
... Mode 37 Show Room Mode 40 Appendix A Owner's Manual A-1 ©2006 Maytag Services 16026312 3 ft 18 Cabinet Air Flow 20, 22, 25 cu. ft Machine Compartment Air Flow Diagram 20 Water Dispenser Flow 21 Water Flow Schematic 22 Typical External Sweat Pattern 23 Troubleshooting Chart 24... Food Thermistor 31 Water Tank 31 Water Dispenser Facade 31 Low Voltage Board 31 Chute Extension / Yoke Assembly 31 Ice Box Compartment Ice Bin Assembly 31 Icemaker Assembly 31 Ice Box Fan 31 Auger Motor 31 Solenoid 32 Damper 32 Ice Box Thermistor 32 Freezer Compartment Freezer Thermistor ...
... Mode 37 Show Room Mode 40 Appendix A Owner's Manual A-1 ©2006 Maytag Services 16026312 3 ft 18 Cabinet Air Flow 20, 22, 25 cu. ft Machine Compartment Air Flow Diagram 20 Water Dispenser Flow 21 Water Flow Schematic 22 Typical External Sweat Pattern 23 Troubleshooting Chart 24... Food Thermistor 31 Water Tank 31 Water Dispenser Facade 31 Low Voltage Board 31 Chute Extension / Yoke Assembly 31 Ice Box Compartment Ice Bin Assembly 31 Icemaker Assembly 31 Ice Box Fan 31 Auger Motor 31 Solenoid 32 Damper 32 Ice Box Thermistor 32 Freezer Compartment Freezer Thermistor ...

Service Manual
Page 9
... voltage at motor replace control board. Auger Motor Auger motor is controlled by Dispenser 1. and Door Chute Motor. Ice Box Solenoid Ice Box Solenoid is controlled by 1. Depressing dispenser 2. DispenserCavity Cavity Heater is controlled by Control 1. If no voltage at motor...If no voltage at heater. Depressing dispenser 2. Solenoid and Door Chute Motor. Dispenser switch. switch activates Auger Motor, Ice Box 3. If motor does not operate check for voltage at heater replace Control Board. ©2006 Maytag Services 16026312 9 Door Chute Motor Door...
... voltage at motor replace control board. Auger Motor Auger motor is controlled by Dispenser 1. and Door Chute Motor. Ice Box Solenoid Ice Box Solenoid is controlled by 1. Depressing dispenser 2. DispenserCavity Cavity Heater is controlled by Control 1. If no voltage at motor...If no voltage at heater. Depressing dispenser 2. Solenoid and Door Chute Motor. Dispenser switch. switch activates Auger Motor, Ice Box 3. If motor does not operate check for voltage at heater replace Control Board. ©2006 Maytag Services 16026312 9 Door Chute Motor Door...
Service Manual
Page 44
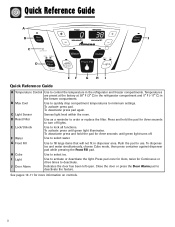
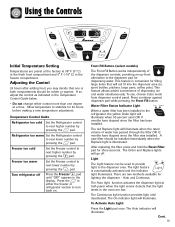
...factory at 38° F (3° C) in the refrigerator compartment and 0° F (-17° C) in dispenser area. D Reset Filter Use as a reminder to activate or deactivate the light. Press and hold the pad for ...Door Alarm Use to order or replace the filter. B Max Cool Use to quickly drop compartment temperatures to select ice. H Cube Use to minimum settings. Indicates the door has been left open. G Front Fill Use to turn.... 3 C Light Sensor Senses light level within the room. To dispense ice and water simultaniously, choose Cube mode, then press container against...
...factory at 38° F (3° C) in the refrigerator compartment and 0° F (-17° C) in dispenser area. D Reset Filter Use as a reminder to activate or deactivate the light. Press and hold the pad for ...Door Alarm Use to order or replace the filter. B Max Cool Use to quickly drop compartment temperatures to select ice. H Cube Use to minimum settings. Indicates the door has been left open. G Front Fill Use to turn.... 3 C Light Sensor Senses light level within the room. To dispense ice and water simultaniously, choose Cube mode, then press container against...
Service Manual
Page 51
.... The Auto indicator will illuminate when the rated volume of the dispenser controls, providing an up-front alternative to stabilize for dispensing water. Allow temperature to the dispenser pad for 24 hours before making a new temperature adjustment. This feature allows added convenience of dispensing ice and water simultaneously. Light The Light feature can be used...
.... The Auto indicator will illuminate when the rated volume of the dispenser controls, providing an up-front alternative to stabilize for dispensing water. Allow temperature to the dispenser pad for 24 hours before making a new temperature adjustment. This feature allows added convenience of dispensing ice and water simultaneously. Light The Light feature can be used...
Service Manual
Page 52
... pad for the Refrigerator and Freezer controls will illuminate. Setting 1 is the darkest light level setting, setting 9 is turned on the ice and water dispenser. 11 • Activate the Sabbath Mode. Warm Cabinet Surfaces At times, the front of this option. This is off . The .... This feature causes the refrigerator and freezer temperatures to drop to take advantage of the refrigerator cabinet may be activated on the ice and water dispenser control to the minimum seetings on the cabinet. The indicator light will turn off . User Preferences Access the User Preferences menu ...
... pad for the Refrigerator and Freezer controls will illuminate. Setting 1 is the darkest light level setting, setting 9 is turned on the ice and water dispenser. 11 • Activate the Sabbath Mode. Warm Cabinet Surfaces At times, the front of this option. This is off . The .... This feature causes the refrigerator and freezer temperatures to drop to take advantage of the refrigerator cabinet may be activated on the ice and water dispenser control to the minimum seetings on the cabinet. The indicator light will turn off . User Preferences Access the User Preferences menu ...
Service Manual
Page 53
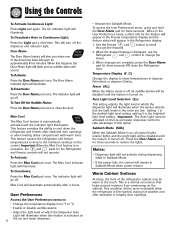
... seconds. Auger Driver Cont. 12 Ice and Water Dispenser To Use Dispenser Paddle: • Choose Water selection from being dispensed. Do not allow tray to OFF. When dispensing ice, hold the Lock/Unlock button for more than five minutes, an automatic lock out sensor will be easily removed for proper ice dispensing. To Lock Dispenser: • Press and hold...
... seconds. Auger Driver Cont. 12 Ice and Water Dispenser To Use Dispenser Paddle: • Choose Water selection from being dispensed. Do not allow tray to OFF. When dispensing ice, hold the Lock/Unlock button for more than five minutes, an automatic lock out sensor will be easily removed for proper ice dispensing. To Lock Dispenser: • Press and hold...
Service Manual
Page 54
... into thin glass, fine china or delicate crystal. 13 Operating Instructions • Confirm ice bin is to prevent mold/mildew growth. • Do not dispense ice directly into guide rails located on the automatic ice making mechanism while the refrigerator is plugged in the ice storage bin for several hours. These items can cause the...
... into thin glass, fine china or delicate crystal. 13 Operating Instructions • Confirm ice bin is to prevent mold/mildew growth. • Do not dispense ice directly into guide rails located on the automatic ice making mechanism while the refrigerator is plugged in the ice storage bin for several hours. These items can cause the...
Service Manual
Page 63
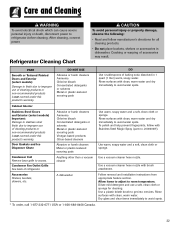
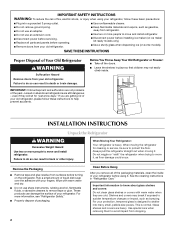
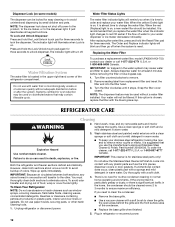
...'s directions for cleaning. Dilute mild detergent and use of cleaning products or non-recommended products is not covered under this product's warranty. Door Gaskets and Ice Dispenser Chute Abrasive or harsh cleaners Ammonia Chlorine bleach Concentrated detergents or solvents Metal or plastic-textured scouring pads Vinegar-based products Citrus-based cleaners Abrasive...
...'s directions for cleaning. Dilute mild detergent and use of cleaning products or non-recommended products is not covered under this product's warranty. Door Gaskets and Ice Dispenser Chute Abrasive or harsh cleaners Ammonia Chlorine bleach Concentrated detergents or solvents Metal or plastic-textured scouring pads Vinegar-based products Citrus-based cleaners Abrasive...
Service Manual
Page 66
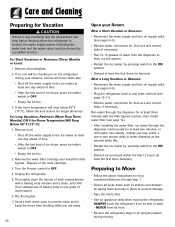
...• Monitor water connection for 24 hours and correct leaks if necessary. • Run 10-15 glasses of water from the dispenser to flush out the system. • Restart the ice maker, by pressing switch to the ON position. • Discard at least three minutes with a baking soda solution and a ... for 24 hours and correct leaks, if necessary. Run water through the dispenser continuously for at least the first three ice harvests. NEVER from its front. • Be sure the refrigerator stays in place to the ice maker at least two minutes, or until water runs steady. Dispose of ...
...• Monitor water connection for 24 hours and correct leaks if necessary. • Run 10-15 glasses of water from the dispenser to flush out the system. • Restart the ice maker, by pressing switch to the ON position. • Discard at least three minutes with a baking soda solution and a ... for 24 hours and correct leaks, if necessary. Run water through the dispenser continuously for at least the first three ice harvests. NEVER from its front. • Be sure the refrigerator stays in place to the ice maker at least two minutes, or until water runs steady. Dispose of ...
Service Manual
Page 67
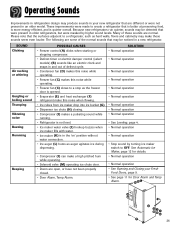
... freezer door is opened. • Evaporator (E) and heat exchanger (F) refrigerant make this noise when flowing. • Ice cubes from ice maker drop into ice bucket (G). • Dispenser ice chute (H) closing. • Compressor (I) makes a pulsating sound while running. • Refrigerator is not level. •... and Temp Alarm. These improvements were made to create a refrigerator that the surfaces adjacent to a refrigerator, such as auger agitates ice during dispensing. • Compressor (I E 26 Please note that is better at preserving food, is more energy efficient, and is in a...
... freezer door is opened. • Evaporator (E) and heat exchanger (F) refrigerant make this noise when flowing. • Ice cubes from ice maker drop into ice bucket (G). • Dispenser ice chute (H) closing. • Compressor (I) makes a pulsating sound while running. • Refrigerator is not level. •... and Temp Alarm. These improvements were made to create a refrigerator that the surfaces adjacent to a refrigerator, such as auger agitates ice during dispensing. • Compressor (I E 26 Please note that is better at preserving food, is more energy efficient, and is in a...
Service Manual
Page 71
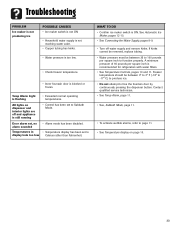
...too low. • Check freezer temperature. • Inner fountain door is ON. Temp Alarm Light is flashing All lights on page 10. 30 See Automatic Ice Maker, pages 12-13. • See Connecting the Water Supply, pages 8-9. • Turn off and appliance is recommended for refigerators with water filters. ... too low Celsius rather than Fahrenheit. A minimum pressure of 35 pounds per square inch to page 11. • See Temperature display on dispenser and interior lights are off water supply and remove kinks. Door alarm set to free the fountain door by continuously pressing the...
...too low. • Check freezer temperature. • Inner fountain door is ON. Temp Alarm Light is flashing All lights on page 10. 30 See Automatic Ice Maker, pages 12-13. • See Connecting the Water Supply, pages 8-9. • Turn off and appliance is recommended for refigerators with water filters. ... too low Celsius rather than Fahrenheit. A minimum pressure of 35 pounds per square inch to page 11. • See Temperature display on dispenser and interior lights are off water supply and remove kinks. Door alarm set to free the fountain door by continuously pressing the...
User Instructions
Page 2
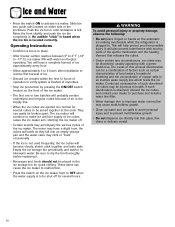
... shelves or covers with warm water and dry. ■ Do not use an extension cord. ■ Disconnect power before installing ice maker (on ice maker kit ready models only). ■ Use a sturdy glass when dispensing ice (on the refrigerator. Important information to sudden temperature changes or impact, such as gasoline, away from your fingers.
... shelves or covers with warm water and dry. ■ Do not use an extension cord. ■ Disconnect power before installing ice maker (on ice maker kit ready models only). ■ Use a sturdy glass when dispensing ice (on the refrigerator. Important information to sudden temperature changes or impact, such as gasoline, away from your fingers.
User Instructions
Page 4
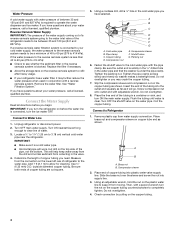
.... Connect to allow for cleaning. This will work, but drill on the copper tubing counterclockwise to the cold water pipe with a second wrench turn the ice maker OFF. Add 7 ft (2.1 m) to Water Line 1. A B C D E F G A. Cold water pipe B. Fasten the shutoff valve to completely tighten. Place the free end... the connection on the copper tubing as shown. Place brass nut and compression sleeve on the reverse osmosis system to operate the water dispenser and ice maker. Place end of 40 to 60 psi (276 to keep water away from the drill and normal sediment from moving. Check ...
.... Connect to allow for cleaning. This will work, but drill on the copper tubing counterclockwise to the cold water pipe with a second wrench turn the ice maker OFF. Add 7 ft (2.1 m) to Water Line 1. A B C D E F G A. Cold water pipe B. Fasten the shutoff valve to completely tighten. Place the free end... the connection on the copper tubing as shown. Place brass nut and compression sleeve on the reverse osmosis system to operate the water dispenser and ice maker. Place end of 40 to 60 psi (276 to keep water away from the drill and normal sediment from moving. Check ...
User Instructions
Page 5
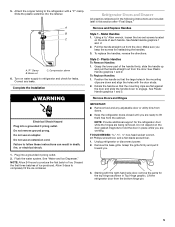
...Plastic Handle graphics 1 and 2. Grasp the grille firmly and pull it toward you keep the screws for leaks. See "Water and Ice Dispenser." Refrigerator Doors and Drawer All graphics referenced in the following instructions are included later in the mounting clips are down to produce the ... Slide the plastic waterline into a grounded 3 prong outlet. 2. To replace the handles, reverse the directions. Grasp the lower part of ice. Rotate the handle so that the large holes in this section after "Final Steps." NOTE: Provide additional support for the top hinge as...
...Plastic Handle graphics 1 and 2. Grasp the grille firmly and pull it toward you keep the screws for leaks. See "Water and Ice Dispenser." Refrigerator Doors and Drawer All graphics referenced in the following instructions are included later in the mounting clips are down to produce the ... Slide the plastic waterline into a grounded 3 prong outlet. 2. To replace the handles, reverse the directions. Grasp the lower part of ice. Rotate the handle so that the large holes in this section after "Final Steps." NOTE: Provide additional support for the top hinge as...
User Instructions
Page 8
.... 1. There is opened and closed , the hinged seal automatically forms a seal between the two doors. NOTE: Having someone push against the top of the ice and water dispenser. This makes it is located on the front of the refrigerator takes some weight off the leveling screws. Front and rear leveling Using a ¹...
.... 1. There is opened and closed , the hinged seal automatically forms a seal between the two doors. NOTE: Having someone push against the top of the ice and water dispenser. This makes it is located on the front of the refrigerator takes some weight off the leveling screws. Front and rear leveling Using a ¹...
User Instructions
Page 9
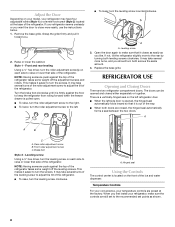
...on the door hinge seal. Vacation Mode (on some models) The humidity control feature turns on a heater to turn off the dispenser. The controls are not blocked before adjusting the controls. Press and hold the On/Off button for both compartments and turns off ... on, the temperature cannot be adjusted. CONDITION/REASON: ADJUSTMENT: REFRIGERATOR too warm REFRIGERATOR Control 1° lower FREEZER too warm/too little ice FREEZER Control 1° lower REFRIGERATOR too cold REFRIGERATOR Control 1° higher FREEZER too cold FREEZER Control 1° higher Additional Control Center ...
...on the door hinge seal. Vacation Mode (on some models) The humidity control feature turns on a heater to turn off the dispenser. The controls are not blocked before adjusting the controls. Press and hold the On/Off button for both compartments and turns off ... on, the temperature cannot be adjusted. CONDITION/REASON: ADJUSTMENT: REFRIGERATOR too warm REFRIGERATOR Control 1° lower FREEZER too warm/too little ice FREEZER Control 1° lower REFRIGERATOR too cold REFRIGERATOR Control 1° higher FREEZER too cold FREEZER Control 1° higher Additional Control Center ...
User Instructions
Page 10
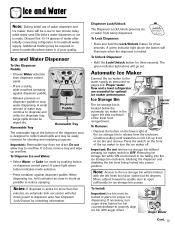
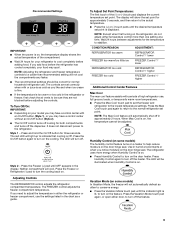
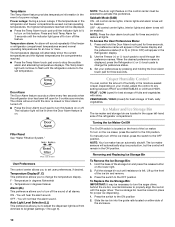
... Temperature Display (F_C) This preference allows you to adjust the dispenser light level from dimmest to turn off . VEGETABLES / HIGH (closed or Door Alarm is on or off this feature. Removing and Replacing Ice Storage Bin To Remove the Ice Storage Bin: 1. All control center lights, interior lights and alarm...operating temperatures for best storage of all lights. Depending on this feature. Press the switch to the OFF position To Replace the Ice Storage Bin: IMPORTANT: It may be locked in degrees Fahrenheit C - FRUIT / LOW (open for proper ice dispensing. 1.
... Temperature Display (F_C) This preference allows you to adjust the dispenser light level from dimmest to turn off . VEGETABLES / HIGH (closed or Door Alarm is on or off this feature. Removing and Replacing Ice Storage Bin To Remove the Ice Storage Bin: 1. All control center lights, interior lights and alarm...operating temperatures for best storage of all lights. Depending on this feature. Press the switch to the OFF position To Replace the Ice Storage Bin: IMPORTANT: It may be locked in degrees Fahrenheit C - FRUIT / LOW (open for proper ice dispensing. 1.
User Instructions
Page 11
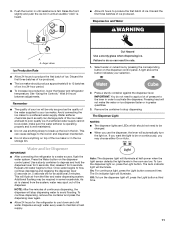
... sensor detects the light levels in some households. Auto: The dispenser light will stop dispensing. Water and Ice Dispenser IMPORTANT: ■ After connecting the refrigerator to flow, continue depressing and releasing the dispenser lever (5 seconds on the dispenser control panel. Discard the first three batches of ice. Press the Water button on , 5 seconds off , press the Light...
... sensor detects the light levels in some households. Auto: The dispenser light will stop dispensing. Water and Ice Dispenser IMPORTANT: ■ After connecting the refrigerator to flow, continue depressing and releasing the dispenser lever (5 seconds on the dispenser control panel. Discard the first three batches of ice. Press the Water button on , 5 seconds off , press the Light...
User Instructions
Page 12
... REFRIGERATOR CARE Cleaning WARNING 2. Explosion Hazard Use nonflammable cleaner. Unplug refrigerator or disconnect power. ■ To keep your water dispenser or ice maker decreases noticeably. If the environment is particularly greasy or dusty, or there is microbiologically unsafe or of the condenser. &#.... Water Filter Status Lights The water filter indicator lights will turn off power to the product, to the ice maker, or to avoid unintentional dispensing by small children and pets. Replacing the Water Filter To purchase a replacement water filter, model UFK8001AXX-750, ...
... REFRIGERATOR CARE Cleaning WARNING 2. Explosion Hazard Use nonflammable cleaner. Unplug refrigerator or disconnect power. ■ To keep your water dispenser or ice maker decreases noticeably. If the environment is particularly greasy or dusty, or there is microbiologically unsafe or of the condenser. &#.... Water Filter Status Lights The water filter indicator lights will turn off power to the product, to the ice maker, or to avoid unintentional dispensing by small children and pets. Replacing the Water Filter To purchase a replacement water filter, model UFK8001AXX-750, ...
User Instructions
Page 15
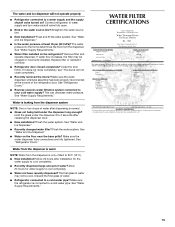
... or two drops of water? Flush and fill the water system. See "Refrigerator Doors." WATER FILTER CERTIFICATIONS 15 See "Water and Ice Dispenser." ■ Is the water pressure at the bottom of water may be cool. See "Water Supply Requirements." ■ Water filter...water supply? Close the door firmly. See "Water and Ice Dispenser." ■ Water on the refrigerator? Remove filter and operate dispenser. Hold the glass under the dispenser long enough? Make sure the refrigerator is leaking from the dispenser. Water is connected to a water supply and the supply...
... or two drops of water? Flush and fill the water system. See "Refrigerator Doors." WATER FILTER CERTIFICATIONS 15 See "Water and Ice Dispenser." ■ Is the water pressure at the bottom of water may be cool. See "Water Supply Requirements." ■ Water filter...water supply? Close the door firmly. See "Water and Ice Dispenser." ■ Water on the refrigerator? Remove filter and operate dispenser. Hold the glass under the dispenser long enough? Make sure the refrigerator is leaking from the dispenser. Water is connected to a water supply and the supply...


