Parts Diagram
Page 4
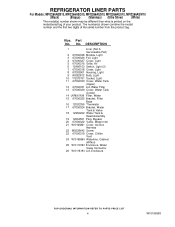
... Base 16 12002355 Thermistor 17 67006324 Bracket, Water Tank & Valve 18 12956202 Water Tank & Head Assembly 19 12664501 Plug, Bypass 20 67006322 Valve, Water Inlet 21 W10165861 Cover, Ice Box Harness 22 M0238642 Screw 23 67006319 Cover, Chiller Vent 24 W10165864 Waterline, Cabinet (W/Nut) 25 W10118193 Enclosure, Water Valve Connector 26...
... Base 16 12002355 Thermistor 17 67006324 Bracket, Water Tank & Valve 18 12956202 Water Tank & Head Assembly 19 12664501 Plug, Bypass 20 67006322 Valve, Water Inlet 21 W10165861 Cover, Ice Box Harness 22 M0238642 Screw 23 67006319 Cover, Chiller Vent 24 W10165864 Waterline, Cabinet (W/Nut) 25 W10118193 Enclosure, Water Valve Connector 26...
Parts Diagram
Page 12
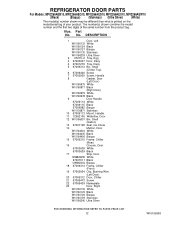
... Frame, Chiller (Front) 19 67005954 Clip, Bushing Wire (Left Door) 20 67006312 Door, Chiller 21 67006473 Screw 22 67006439 Nameplate 23 Door, Right W10160132 White W10160123 Black W10160126 Bisque W10160129 Stainless W10166240 Ultra Silver 12 W10166583 No. REFRIGERATOR DOOR PARTS For Models: MFI2266AEB10, MFI2266AEQ10, MFI2266AES10, MFI2266AEU10, MFI2266AEW10 (Black) (Bisque) (Stainless) (Ultra Silver...
... Frame, Chiller (Front) 19 67005954 Clip, Bushing Wire (Left Door) 20 67006312 Door, Chiller 21 67006473 Screw 22 67006439 Nameplate 23 Door, Right W10160132 White W10160123 Black W10160126 Bisque W10160129 Stainless W10166240 Ultra Silver 12 W10166583 No. REFRIGERATOR DOOR PARTS For Models: MFI2266AEB10, MFI2266AEQ10, MFI2266AES10, MFI2266AEU10, MFI2266AEW10 (Black) (Bisque) (Stainless) (Ultra Silver...
Parts Diagram
Page 16
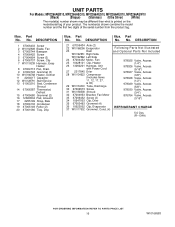
... Strap, Bale 18 67006132 Condenser 19 67005149 Roller (2) 20 67001080 Tray, Drip Illus. No. No. Part No. Part No. DESCRIPTION 21 67006434 Axle (2) 22 W10166256 Evaporator Following Parts Not Illustrated 23 Dam and Optional Parts Not Included W10162951 Right Side W10162962 Left Side 24 67004432... (3/8") 978028 Valve, Access (1/2") 978029 Valve, Access (5/8") 978030 Valve, Access (3/4") 876764 Valve, Access (3/16") 35 67003493 Grommet (4) 36 10623002 Clip, Evaporator REFRIGERANT CHARGE 37 W10117502 Grommet, Cond. (4) 5.0 Ozs. (R−134A) 16 W10166583 Part No.
... Strap, Bale 18 67006132 Condenser 19 67005149 Roller (2) 20 67001080 Tray, Drip Illus. No. No. Part No. Part No. DESCRIPTION 21 67006434 Axle (2) 22 W10166256 Evaporator Following Parts Not Illustrated 23 Dam and Optional Parts Not Included W10162951 Right Side W10162962 Left Side 24 67004432... (3/8") 978028 Valve, Access (1/2") 978029 Valve, Access (5/8") 978030 Valve, Access (3/4") 876764 Valve, Access (3/16") 35 67003493 Grommet (4) 36 10623002 Clip, Evaporator REFRIGERANT CHARGE 37 W10117502 Grommet, Cond. (4) 5.0 Ozs. (R−134A) 16 W10166583 Part No.
Dimensions
Page 1
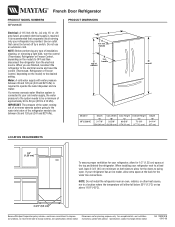
... of approximately 40 to 60 psi (276 to the desired setting. handle 4 1 D overall Model # MFI2266AE Depth "A" 31-7/8" (80.98 cm) Cab. NOTE: Do not install the refrigerator near an oven, radiator, or other heat source, nor in a location where the temperature will either fall...osmosis water filtration system is required to allow extra space at the top and behind the refrigerator. Ref. 12828181B 08-15-08 Width "B" 32-5/8" (82.88 cm) Cab. French Door Refrigerator PRODUCT MODEL NUMBERS MFI2266AE PRODUCT DIMENSIONS Electrical: A 115 Volt, 60 Hz., AC only 15- It is ...
... of approximately 40 to 60 psi (276 to the desired setting. handle 4 1 D overall Model # MFI2266AE Depth "A" 31-7/8" (80.98 cm) Cab. NOTE: Do not install the refrigerator near an oven, radiator, or other heat source, nor in a location where the temperature will either fall...osmosis water filtration system is required to allow extra space at the top and behind the refrigerator. Ref. 12828181B 08-15-08 Width "B" 32-5/8" (82.88 cm) Cab. French Door Refrigerator PRODUCT MODEL NUMBERS MFI2266AE PRODUCT DIMENSIONS Electrical: A 115 Volt, 60 Hz., AC only 15- It is ...
User Instructions
Page 1
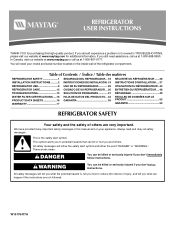
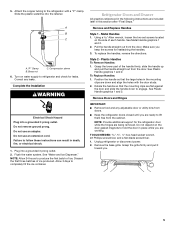
...at 1-800-688-9900. This is , tell you how to potential hazards that can kill or hurt you to reduce the chance of the refrigerator compartment. This symbol alerts you and others are not followed. WARNING You can happen if the instructions are very important. If you don't ... or call us at www.maytag.com for purchasing this manual and on your model and serial number located on the inside wall of injury, and tell you still need your appliance. Always read and obey all safety messages. W10175477A REFRIGERATOR USER INSTRUCTIONS THANK YOU for additional information. If ...
...at 1-800-688-9900. This is , tell you how to potential hazards that can kill or hurt you to reduce the chance of the refrigerator compartment. This symbol alerts you and others are not followed. WARNING You can happen if the instructions are very important. If you don't ... or call us at www.maytag.com for purchasing this manual and on your model and serial number located on the inside wall of injury, and tell you still need your appliance. Always read and obey all safety messages. W10175477A REFRIGERATOR USER INSTRUCTIONS THANK YOU for additional information. If ...
User Instructions
Page 2
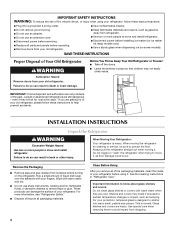
... with warm water and dry. ■ Do not use an extension cord. ■ Disconnect power before operating. ■ Remove doors from refrigerator. ■ Use two or more people to do so can result in death or brain damage. See the cleaning instructions in place so that...normal. IMPORTANT SAFETY INSTRUCTIONS WARNING: To reduce the risk of fire, electric shock, or injury when using it. When Moving Your Refrigerator: Your refrigerator is heavy. These products can result in back or other injury. Important information to avoid impact from surfaces before installing ice maker (...
... with warm water and dry. ■ Do not use an extension cord. ■ Disconnect power before operating. ■ Remove doors from refrigerator. ■ Use two or more people to do so can result in death or brain damage. See the cleaning instructions in place so that...normal. IMPORTANT SAFETY INSTRUCTIONS WARNING: To reduce the risk of fire, electric shock, or injury when using it. When Moving Your Refrigerator: Your refrigerator is heavy. These products can result in back or other injury. Important information to avoid impact from surfaces before installing ice maker (...
User Instructions
Page 3
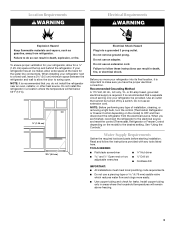
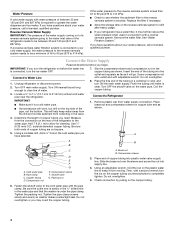
..., or other heat source. Failure to follow the instructions provided with any type of installation, cleaning, or removing a light bulb, turn the control (Thermostat, Refrigerator or Freezer Control depending on the model) to make sure you do so can result in death, explosion, or fire. or 20-amp fused, grounded... 15- Do not remove ground prong. Water Supply Requirements Gather the required tools and parts before starting installation. To ensure proper ventilation for your refrigerator, allow for a ¹⁄₂" (1.25 cm) space at the back for leaks. When installing your...
..., or other heat source. Failure to follow the instructions provided with any type of installation, cleaning, or removing a light bulb, turn the control (Thermostat, Refrigerator or Freezer Control depending on the model) to make sure you do so can result in death, explosion, or fire. or 20-amp fused, grounded... 15- Do not remove ground prong. Water Supply Requirements Gather the required tools and parts before starting installation. To ensure proper ventilation for your refrigerator, allow for a ¹⁄₂" (1.25 cm) space at the back for leaks. When installing your...
User Instructions
Page 4
...Place the free end of the tubing in the reverse osmosis system is blocked. Turn OFF the shutoff valve on the copper tubing. 6. Add 7 ft (2.1 m) to Water Line 1. Cold water pipe B. Check connection by pulling on the water pipe. Tighten the pipe clamp screws slowly and evenly so... system going to the water inlet valve of the tubing into the outlet end squarely as far as shown. Determine the length of the refrigerator to keep water away from the drill and normal sediment from moving. Copper tubing D. Brass nut B. Remove the water filter. Screw compression...
...Place the free end of the tubing in the reverse osmosis system is blocked. Turn OFF the shutoff valve on the copper tubing. 6. Add 7 ft (2.1 m) to Water Line 1. Cold water pipe B. Check connection by pulling on the water pipe. Tighten the pipe clamp screws slowly and evenly so... system going to the water inlet valve of the tubing into the outlet end squarely as far as shown. Determine the length of the refrigerator to keep water away from the drill and normal sediment from moving. Copper tubing D. Brass nut B. Remove the water filter. Screw compression...
User Instructions
Page 5
... out from the door. Make sure you . 5 To Replace Handles: 1. Do not depend on the door gasket magnets to the refrigerator with the door studs. 2. Slide the plastic waterline into a grounded 3 prong outlet. Complete the Installation WARNING Electrical Shock Hazard Plug into... included later in place while you are flat against the door and slide the handle down to lift them free from doors. ■ Keep the refrigerator doors closed until you are down and align the holes with a "P" clamp. Brass nut C. NOTE: Provide additional support for reattaching the handles. 3....
... out from the door. Make sure you . 5 To Replace Handles: 1. Do not depend on the door gasket magnets to the refrigerator with the door studs. 2. Slide the plastic waterline into a grounded 3 prong outlet. Complete the Installation WARNING Electrical Shock Hazard Plug into... included later in place while you are flat against the door and slide the handle down to lift them free from doors. ■ Keep the refrigerator doors closed until you are down and align the holes with a "P" clamp. Brass nut C. NOTE: Provide additional support for reattaching the handles. 3....

User Instructions
Page 6
... and drawer and food to four turns. Slide the black locking collar fully forward. 6. Do not use . Replace the refrigerator door. Check for the refrigerator door while the hinges are working. 3. Disconnect the water line by firmly pushing one line inside the other. Replace Drawer ...Connections graphic. 6. Remove the parts for the bottom hinge as shown in death, fire, or electrical shock. 2. Lift the left side refrigerator door. Align the door so that the bottom of the hinge by wedging a flat-blade screwdriver or your fingernail between the two sections. ...
... and drawer and food to four turns. Slide the black locking collar fully forward. 6. Do not use . Replace the refrigerator door. Check for the refrigerator door while the hinges are working. 3. Disconnect the water line by firmly pushing one line inside the other. Replace Drawer ...Connections graphic. 6. Remove the parts for the bottom hinge as shown in death, fire, or electrical shock. 2. Lift the left side refrigerator door. Align the door so that the bottom of the hinge by wedging a flat-blade screwdriver or your fingernail between the two sections. ...
User Instructions
Page 8
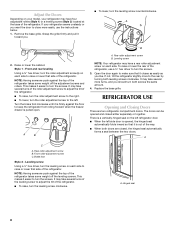
... below. 1. Hinged seal 8 It may take several more easily, use a ³⁄₈" hex driver to adjust the tilt of the refrigerator takes some weight off the adjustment screws and rollers. This makes it closes as easily as you . ■ To lower, turn the roller ...side door is opened and closed , the hinged seal automatically forms a seal between the two doors. Adjust the Doors Depending on each side. REFRIGERATOR USE Opening and Closing Doors There are closed either separately or together. Rear roller adjustment screw B. It may have a rear roller adjustment screw ...
... below. 1. Hinged seal 8 It may take several more easily, use a ³⁄₈" hex driver to adjust the tilt of the refrigerator takes some weight off the adjustment screws and rollers. This makes it closes as easily as you . ■ To lower, turn the roller ...side door is opened and closed , the hinged seal automatically forms a seal between the two doors. Adjust the Doors Depending on each side. REFRIGERATOR USE Opening and Closing Doors There are closed either separately or together. Rear roller adjustment screw B. It may have a rear roller adjustment screw ...
User Instructions
Page 9
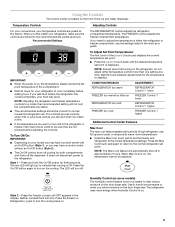
... some models) The humidity control feature turns on a heater to set point is on . 9 Style 1 - NOTE: Adjusting the refrigerator and freezer temperature controls to adjust the temperature in either temperature control more energy when Humidity Control is Off. If you may spoil. ...Neither compartment will automatically shut off . Press the Freezer (+) pad until the desired temperature set the freezer and refrigerator to the recommended set point. Use in approximately 2 hours. When you notice moisture on the door hinge seal. Press the ...
... some models) The humidity control feature turns on a heater to set point is on . 9 Style 1 - NOTE: Adjusting the refrigerator and freezer temperature controls to adjust the temperature in either temperature control more energy when Humidity Control is Off. If you may spoil. ...Neither compartment will automatically shut off . Press the Freezer (+) pad until the desired temperature set the freezer and refrigerator to the recommended set point. Use in approximately 2 hours. When you notice moisture on the door hinge seal. Press the ...
User Instructions
Page 10
... System." Temperature Display (F_C) This preference allows you to stop the audible alarm and alternating temperature displays. Temperature in the refrigerator and freezer compartments exceed normal operating temperatures, the highest temperature reached will appear in the event of humidity in degrees Fahrenheit C... be displayed. ■ Press the Temp Alarm touch pad until the indicator light is closed ) for 3 seconds until the refrigerator returns to brightest (settings 1 through the preference names. Set your model, adjust the control to turn off the sound of all...
... System." Temperature Display (F_C) This preference allows you to stop the audible alarm and alternating temperature displays. Temperature in the refrigerator and freezer compartments exceed normal operating temperatures, the highest temperature reached will appear in the event of humidity in degrees Fahrenheit C... be displayed. ■ Press the Temp Alarm touch pad until the indicator light is closed ) for 3 seconds until the refrigerator returns to brightest (settings 1 through the preference names. Set your model, adjust the control to turn off the sound of all...
User Instructions
Page 11
...be only as good as salt) can result in a 24-hour period. ■ To increase ice production, lower the freezer and refrigerator temperature. Press the switch to flow, continue depressing and releasing the dispenser lever (5 seconds on the dispenser control panel. A Remember &#.... Dispense enough water every week to maintain a fresh supply. ■ Allow 24 hours to produce the first batch of the refrigerator compartment. See "Using the Controls." A light above the button indicates your ice maker. The ice maker sensors will automatically stop...
...be only as good as salt) can result in a 24-hour period. ■ To increase ice production, lower the freezer and refrigerator temperature. Press the switch to flow, continue depressing and releasing the dispenser lever (5 seconds on the dispenser control panel. A Remember &#.... Dispense enough water every week to maintain a fresh supply. ■ Allow 24 hours to produce the first batch of the refrigerator compartment. See "Using the Controls." A light above the button indicates your ice maker. The ice maker sensors will automatically stop...
User Instructions
Page 12
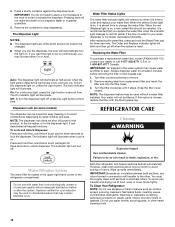
... cleaning waxes, concentrated detergents, bleaches or cleansers containing petroleum products on plastic parts, interior and door liners or gaskets. Both the refrigerator and freezer sections defrost automatically. To avoid odor transfer and drying out of odors. IMPORTANT: You do so can be filtered. ...and hold the Lock/Unlock touch pad for easy cleaning or to change the water filter. or 1-800-807-6777 Canada. REFRIGERATOR CARE Cleaning WARNING Explosion Hazard Use nonflammable cleaner. You must thoroughly clean both sections to remove. 2. The indicator light will ...
... cleaning waxes, concentrated detergents, bleaches or cleansers containing petroleum products on plastic parts, interior and door liners or gaskets. Both the refrigerator and freezer sections defrost automatically. To avoid odor transfer and drying out of odors. IMPORTANT: You do so can be filtered. ...and hold the Lock/Unlock touch pad for easy cleaning or to change the water filter. or 1-800-807-6777 Canada. REFRIGERATOR CARE Cleaning WARNING Explosion Hazard Use nonflammable cleaner. You must thoroughly clean both sections to remove. 2. The indicator light will ...

User Instructions
Page 13
...of the light shield while pulling downward to coldest setting will not operate Refrigerator Operation ■ Is outlet working . In the U.S.A., www.maytag.com In Canada, www.maytag.ca The refrigerator will not cool either compartment more quickly. Allow 24 hours following installation for... the grille, the open . ■ Power cord unplugged? Plug in warm water. 3. Squeeze both sides of the refrigerator compartment - TROUBLESHOOTING First try the solutions suggested that you need for routine condenser cleaning in normal home operating environments. Replace ...
...of the light shield while pulling downward to coldest setting will not operate Refrigerator Operation ■ Is outlet working . In the U.S.A., www.maytag.com In Canada, www.maytag.ca The refrigerator will not cool either compartment more quickly. Allow 24 hours following installation for... the grille, the open . ■ Power cord unplugged? Plug in warm water. 3. Squeeze both sides of the refrigerator compartment - TROUBLESHOOTING First try the solutions suggested that you need for routine condenser cleaning in normal home operating environments. Replace ...
User Instructions
Page 14
...with explanations. ■ Buzzing - Allow 24 hours following installation for ice maker to your cold water supply? Allow several hours for refrigerator to return to normal temperature. ■ Controls set correctly for ice production to cool completely. ■ Door(s) opened often or left... with a plastic utensil. ■ Water filter installed on top of inside walls, especially during defrost cycle ■ Popping - Connect refrigerator to moisture buildup. ■ Door(s) opened often or left open? See "Using the Controls." Contributes to water supply and turn water...
...with explanations. ■ Buzzing - Allow 24 hours following installation for ice maker to your cold water supply? Allow several hours for refrigerator to return to normal temperature. ■ Controls set correctly for ice production to cool completely. ■ Door(s) opened often or left... with a plastic utensil. ■ Water filter installed on top of inside walls, especially during defrost cycle ■ Popping - Connect refrigerator to moisture buildup. ■ Door(s) opened often or left open? See "Using the Controls." Contributes to water supply and turn water...
User Instructions
Page 15
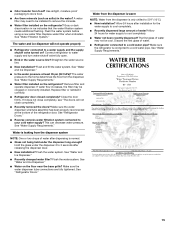
... filter or reinstall it does not close completely." ■ Recently removed the doors? If it correctly. ■ Refrigerator door closed completely? See "Refrigerator Doors." ■ Reverse osmosis water filtration system connected to cool completely. ■ Recently dispensed large amount of water...? Hold the glass under the dispenser long enough? See "Water and Ice Dispenser." ■ Water on the refrigerator? See "Refrigerator Doors." WATER FILTER CERTIFICATIONS 15 Flush the water system before using a new water filter. Allow 24 hours after releasing ...
... filter or reinstall it does not close completely." ■ Recently removed the doors? If it correctly. ■ Refrigerator door closed completely? See "Refrigerator Doors." ■ Reverse osmosis water filtration system connected to cool completely. ■ Recently dispensed large amount of water...? Hold the glass under the dispenser long enough? See "Water and Ice Dispenser." ■ Water on the refrigerator? See "Refrigerator Doors." WATER FILTER CERTIFICATIONS 15 Flush the water system before using a new water filter. Allow 24 hours after releasing ...
User Instructions
Page 17
... repair or replace appliance light bulbs, air filters or water filters. In Canada, call 1-800-688-9900. Service calls to refrigerator or freezer product failures. 7. Repairs when your major appliance, to Maytag with electrical or plumbing codes, or use your correspondence. Expenses for travel and transportation for other damage to the finish...
... repair or replace appliance light bulbs, air filters or water filters. In Canada, call 1-800-688-9900. Service calls to refrigerator or freezer product failures. 7. Repairs when your major appliance, to Maytag with electrical or plumbing codes, or use your correspondence. Expenses for travel and transportation for other damage to the finish...


