Parts Diagram
Page 4
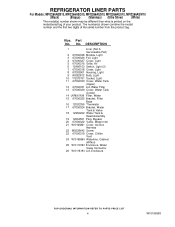
... A Serviceable Part) 2 67006328 Module, Light 3 67006326 Foil, Light 4 67006327 Cover, Light 5 67006316 Grille, Air 6 12466103 Switch, Light (2) 7 67006318 Cover, Light 8 67003901 Housing, Light 9 A0282812 Bulb, Light 10 Y12570701 Socket, Light 11 67006330 Cover, Water Tank (Upper) 12 67006331 Lid, Water Filter 13 67006329 Cover, Water Tank (Lower) 14 UKF8001AXX Filter, Water 15 67006325 Bracket, Filter Base 16 12002355 Thermistor 17 67006324 Bracket, Water Tank & Valve 18 12956202 Water Tank & Head Assembly 19 12664501 Plug, Bypass 20 67006322 Valve, Water Inlet 21...
... A Serviceable Part) 2 67006328 Module, Light 3 67006326 Foil, Light 4 67006327 Cover, Light 5 67006316 Grille, Air 6 12466103 Switch, Light (2) 7 67006318 Cover, Light 8 67003901 Housing, Light 9 A0282812 Bulb, Light 10 Y12570701 Socket, Light 11 67006330 Cover, Water Tank (Upper) 12 67006331 Lid, Water Filter 13 67006329 Cover, Water Tank (Lower) 14 UKF8001AXX Filter, Water 15 67006325 Bracket, Filter Base 16 12002355 Thermistor 17 67006324 Bracket, Water Tank & Valve 18 12956202 Water Tank & Head Assembly 19 12664501 Plug, Bypass 20 67006322 Valve, Water Inlet 21...

Parts Diagram
Page 10
..., Freezer Light 15 67006338 Clip, Fan Motor 16 67006422 Switch, Rocker 17 67006287 Screw, Fan Shroud 18 67006769 Screw, Slide To Basket 19 W10120018 Slide, Drawer (2) 20 67003731 Gasket, Foam 21 Adapter W10120017 Left W10120083 Right 22 67006382 Grille, Air 23 67006424 Shroud, Evap Fan 24 67006337 Blade, Fan (Evaporator) 25 67006339 Grommet, Fan Motor (2) 26 W10162809 Motor, Evaporator Fan 27 D7753903 Funnel, Drain 28 M0500703 Seal, O Ring 29 B8381501 Gasket, Drain Tube...
..., Freezer Light 15 67006338 Clip, Fan Motor 16 67006422 Switch, Rocker 17 67006287 Screw, Fan Shroud 18 67006769 Screw, Slide To Basket 19 W10120018 Slide, Drawer (2) 20 67003731 Gasket, Foam 21 Adapter W10120017 Left W10120083 Right 22 67006382 Grille, Air 23 67006424 Shroud, Evap Fan 24 67006337 Blade, Fan (Evaporator) 25 67006339 Grommet, Fan Motor (2) 26 W10162809 Motor, Evaporator Fan 27 D7753903 Funnel, Drain 28 M0500703 Seal, O Ring 29 B8381501 Gasket, Drain Tube...
Parts Diagram
Page 12
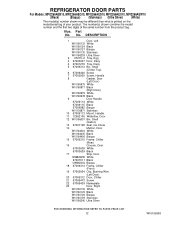
... (Rear) 16 Closure, Door 67003638 White 67003639 Black 17 Stop, Door 12968202W White 67007011 Black 12968202Q Bisque 18 67006314 Frame, Chiller (Front) 19 67005954 Clip, Bushing Wire (Left Door) 20 67006312 Door, Chiller 21 67006473 Screw 22 67006439 Nameplate 23 Door, Right W10160132 White W10160123 Black W10160126 Bisque W10160129 Stainless W10166240 Ultra Silver 12 W10166583 No. Part No. REFRIGERATOR DOOR PARTS For Models: MFI2266AEB10, MFI2266AEQ10...
... (Rear) 16 Closure, Door 67003638 White 67003639 Black 17 Stop, Door 12968202W White 67007011 Black 12968202Q Bisque 18 67006314 Frame, Chiller (Front) 19 67005954 Clip, Bushing Wire (Left Door) 20 67006312 Door, Chiller 21 67006473 Screw 22 67006439 Nameplate 23 Door, Right W10160132 White W10160123 Black W10160126 Bisque W10160129 Stainless W10166240 Ultra Silver 12 W10166583 No. Part No. REFRIGERATOR DOOR PARTS For Models: MFI2266AEB10, MFI2266AEQ10...
Dimensions
Page 1
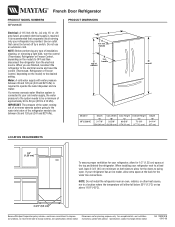
... provided. Do not use an extension cord. If a reverse osmosis water filtration system is connected to your cold water supply, the water pressure to the system needs to be between 35 and 120 psi (241 and 827 kPa) is required to operate the water dispenser and ice maker. handle C top of installation, cleaning, or removing a light bulb, turn the control (Thermostat, Refrigerator or Freezer Control, depending on the model) to 414 kPa). When installing your refrigerator, allow for 1⁄...
... provided. Do not use an extension cord. If a reverse osmosis water filtration system is connected to your cold water supply, the water pressure to the system needs to be between 35 and 120 psi (241 and 827 kPa) is required to operate the water dispenser and ice maker. handle C top of installation, cleaning, or removing a light bulb, turn the control (Thermostat, Refrigerator or Freezer Control, depending on the model) to 414 kPa). When installing your refrigerator, allow for 1⁄...
User Instructions
Page 1
... ...... 36 INSTALLATION INSTRUCTIONS...........2 INSTRUCCIONES DE INSTALACIÓN. 19 INSTRUCTIONS D'INSTALLATION .... 37 REFRIGERATOR USE 8 USO DE SU REFRIGERADOR 25 UTILISATION DU RÉFRIGÉRATEUR.. 43 REFRIGERATOR CARE 12 CUIDADO DE SU REFRIGERADOR ... 30 ENTRETIEN DU RÉFRIGÉRATEUR .... 48 TROUBLESHOOTING 13 SOLUCIÓN DE PROBLEMAS 31 DÉPANNAGE 49 WATER FILTER CERTIFICATIONS .....15 PRODUCT DATA SHEETS 16 WARRANTY 17 HOJA DE DATOS DEL PRODUCTO... 34...
... ...... 36 INSTALLATION INSTRUCTIONS...........2 INSTRUCCIONES DE INSTALACIÓN. 19 INSTRUCTIONS D'INSTALLATION .... 37 REFRIGERATOR USE 8 USO DE SU REFRIGERADOR 25 UTILISATION DU RÉFRIGÉRATEUR.. 43 REFRIGERATOR CARE 12 CUIDADO DE SU REFRIGERADOR ... 30 ENTRETIEN DU RÉFRIGÉRATEUR .... 48 TROUBLESHOOTING 13 SOLUCIÓN DE PROBLEMAS 31 DÉPANNAGE 49 WATER FILTER CERTIFICATIONS .....15 PRODUCT DATA SHEETS 16 WARRANTY 17 HOJA DE DATOS DEL PRODUCTO... 34...
User Instructions
Page 2
... Remove doors from your fingers. Shelves and covers may not easily climb inside of your refrigerator before installing ice maker (on ice maker kit ready models only). ■ Use a sturdy glass when dispensing ice (on the refrigerator. Glass shelves and covers are still dangerous - IMPORTANT SAFETY INSTRUCTIONS WARNING: To reduce the risk of fire, electric shock, or injury when using it . Failure to do so can result in "Refrigerator Care." IMPORTANT: Child entrapment and suffocation are getting...
... Remove doors from your fingers. Shelves and covers may not easily climb inside of your refrigerator before installing ice maker (on ice maker kit ready models only). ■ Use a sturdy glass when dispensing ice (on the refrigerator. Glass shelves and covers are still dangerous - IMPORTANT SAFETY INSTRUCTIONS WARNING: To reduce the risk of fire, electric shock, or injury when using it . Failure to do so can result in "Refrigerator Care." IMPORTANT: Child entrapment and suffocation are getting...
User Instructions
Page 3
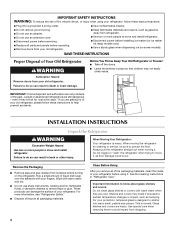
.... To ensure proper ventilation for your refrigerator has an ice maker, allow for a ¹⁄₂" (1.25 cm) space at the back for leaks. Failure to follow the instructions provided with any type of installation, cleaning, or removing a light bulb, turn the control (Thermostat, Refrigerator or Freezer Control depending on the model) to OFF and then disconnect the refrigerator from refrigerator. Location Requirements WARNING Electrical Requirements WARNING Explosion Hazard Keep flammable materials...
.... To ensure proper ventilation for your refrigerator has an ice maker, allow for a ¹⁄₂" (1.25 cm) space at the back for leaks. Failure to follow the instructions provided with any type of installation, cleaning, or removing a light bulb, turn the control (Thermostat, Refrigerator or Freezer Control depending on the model) to OFF and then disconnect the refrigerator from refrigerator. Location Requirements WARNING Electrical Requirements WARNING Explosion Hazard Keep flammable materials...
User Instructions
Page 4
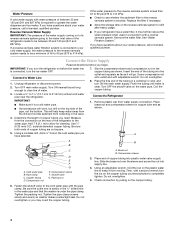
... you turn the refrigerator on copper tube end as shown. Turn OFF main water supply. Flush the tubing until water is under the pipe clamp. This will help keep it will work, but drill on the plastic water line to completely tighten. Measure from water supply connection. Using a cordless drill, drill a ¹⁄₄" hole in the valve. 1. Copper tubing D. Shutoff valve G. Fasten the shutoff valve to operate the water dispenser and ice maker...
... you turn the refrigerator on copper tube end as shown. Turn OFF main water supply. Flush the tubing until water is under the pipe clamp. This will help keep it will work, but drill on the plastic water line to completely tighten. Measure from water supply connection. Using a cordless drill, drill a ¹⁄₄" hole in the valve. 1. Copper tubing D. Shutoff valve G. Fasten the shutoff valve to operate the water dispenser and ice maker...
User Instructions
Page 5
... "Water and Ice Dispenser." Using a Allen wrench, loosen the two set screws located on the door gasket magnets to engage. Make sure you are down to hold the door in the following instructions are ready to refrigerator and check for the refrigerator door while the hinges are flat against the door and slide the handle down and align the holes with a "P" clamp. Plastic Handles To Remove Handles: 1. Remove Doors and Hinges IMPORTANT: ■ Remove...
... "Water and Ice Dispenser." Using a Allen wrench, loosen the two set screws located on the door gasket magnets to engage. Make sure you are down to hold the door in the following instructions are ready to refrigerator and check for the refrigerator door while the hinges are flat against the door and slide the handle down and align the holes with a "P" clamp. Plastic Handles To Remove Handles: 1. Remove Doors and Hinges IMPORTANT: ■ Remove...

User Instructions
Page 6
... use . Replace the top hinge covers. See Bottom Hinge graphic. 8. Replace Doors and Hinges 1. See Drawer Front Removal graphic. Reconnect the wiring plug on the locking collar. 7. Replace Drawer Front 1. Lift drawer front upward and off the screws. Reconnect the water lines by holding the tabbed section of the left-hand side refrigerator door. 5. Pull the drawer brackets toward you hear a "click." NOTE: Provide additional support for leaks. Lift the refrigerator door from the bottom hinge...
... use . Replace the top hinge covers. See Bottom Hinge graphic. 8. Replace Doors and Hinges 1. See Drawer Front Removal graphic. Reconnect the wiring plug on the locking collar. 7. Replace Drawer Front 1. Lift drawer front upward and off the screws. Reconnect the water lines by holding the tabbed section of the left-hand side refrigerator door. 5. Pull the drawer brackets toward you hear a "click." NOTE: Provide additional support for leaks. Lift the refrigerator door from the bottom hinge...

User Instructions
Page 7
Hinge Cover Screw B. Top Hinge Cover C. 5/16" Hex-Head Hinge Screws D. Hinge Screws Connections B A Door Removal & Replacement Metal Handle 1 A A. 3/32" Set Screw Metal Handle 2 Plastic Handle 1 Plastic Handle 2 A. Tabs B. Loosen 4 Door Bracket Screws 7 Bottom Hinge C. Shim (on some models) B. Top Hinges A B C D A. Wiring Plug A A. 3/32" Set Screw Drawer Front Removal Drawer Front Replacement A A. Top Hinge Bottom Hinges A B C A.
Hinge Cover Screw B. Top Hinge Cover C. 5/16" Hex-Head Hinge Screws D. Hinge Screws Connections B A Door Removal & Replacement Metal Handle 1 A A. 3/32" Set Screw Metal Handle 2 Plastic Handle 1 Plastic Handle 2 A. Tabs B. Loosen 4 Door Bracket Screws 7 Bottom Hinge C. Shim (on some models) B. Top Hinges A B C D A. Wiring Plug A A. 3/32" Set Screw Drawer Front Removal Drawer Front Replacement A A. Top Hinge Bottom Hinges A B C A.
User Instructions
Page 9
... the display. Recommended Settings IMPORTANT: ■ When the power is on. 9 NOTE: Adjusting the refrigerator and freezer temperature controls to set point. Style 1 - CONDITION/REASON: ADJUSTMENT: REFRIGERATOR too warm REFRIGERATOR Control 1° lower FREEZER too warm/too little ice FREEZER Control 1° lower REFRIGERATOR too cold REFRIGERATOR Control 1° higher FREEZER too cold FREEZER Control 1° higher Additional Control Center Features Max Cool The max cool feature assists with an On/Off button (Style 1), or you notice moisture on the door hinge seal...
... the display. Recommended Settings IMPORTANT: ■ When the power is on. 9 NOTE: Adjusting the refrigerator and freezer temperature controls to set point. Style 1 - CONDITION/REASON: ADJUSTMENT: REFRIGERATOR too warm REFRIGERATOR Control 1° lower FREEZER too warm/too little ice FREEZER Control 1° lower REFRIGERATOR too cold REFRIGERATOR Control 1° higher FREEZER too cold FREEZER Control 1° higher Additional Control Center Features Max Cool The max cool feature assists with an On/Off button (Style 1), or you notice moisture on the door hinge seal...
User Instructions
Page 10
... Vacation Mode, the freezer will be displayed. ■ Press the Temp Alarm touch pad until the indicator light is lit, to turn on this feature on the feature. Filter Reset See "Water Filtration System." Press and hold the Door Alarm touch pad for best storage of humidity in the event of fruits and vegetables with skins. User Preferences The control center allows you to adjust the dispenser light level...
... Vacation Mode, the freezer will be displayed. ■ Press the Temp Alarm touch pad until the indicator light is lit, to turn on this feature on the feature. Filter Reset See "Water Filtration System." Press and hold the Door Alarm touch pad for best storage of humidity in the event of fruits and vegetables with skins. User Preferences The control center allows you to adjust the dispenser light level...
User Instructions
Page 11
... proper ice dispensing. 1. Press the switch to the OFF position To Replace the Ice Storage Bin: IMPORTANT: It may be necessary to flow. Slide the ice bin into the guide rails located on the ice maker. Turning the Ice Maker On/Off The On/Off switch is felt. Water softener chemicals (such as the quality of the enclosure. 3. Cut Hazard Use a sturdy glass when dispensing ice. To manually turn the auger driver, behind the ice bin...
... proper ice dispensing. 1. Press the switch to the OFF position To Replace the Ice Storage Bin: IMPORTANT: It may be necessary to flow. Slide the ice bin into the guide rails located on the ice maker. Turning the Ice Maker On/Off The On/Off switch is felt. Water softener chemicals (such as the quality of the enclosure. 3. Cut Hazard Use a sturdy glass when dispensing ice. To manually turn the auger driver, behind the ice bin...
User Instructions
Page 12
... To Clean Your Refrigerator: NOTE: Do not use with the blue bypass cap. Auto: The dispenser light will illuminate when Lock is on , a new water filter should not need to apply a lot of the refrigerator compartment. The indicator light will illuminate at least 2 minutes before or after the system. When the yellow (Order) light is on plastic parts, interior and door liners or gaskets. Replacing the Water Filter To purchase a replacement water filter, model UFK8001AXX...
... To Clean Your Refrigerator: NOTE: Do not use with the blue bypass cap. Auto: The dispenser light will illuminate when Lock is on , a new water filter should not need to apply a lot of the refrigerator compartment. The indicator light will illuminate at least 2 minutes before or after the system. When the yellow (Order) light is on plastic parts, interior and door liners or gaskets. Replacing the Water Filter To purchase a replacement water filter, model UFK8001AXX...

User Instructions
Page 13
... ? The motor seems to run too much Your new refrigerator may run longer than your refrigerator. Unplug refrigerator or disconnect power. 2. If you use the manufacturer's approved Stainless Steel Cleaner & Polish, Part Number 20000008. Make sure the refrigerator controls are opened often, or if the doors have been left open areas behind the grille and the front surface area of the refrigerator compartment - Failure to its high-efficiency compressor and fans. Use a clean sponge...
... ? The motor seems to run too much Your new refrigerator may run longer than your refrigerator. Unplug refrigerator or disconnect power. 2. If you use the manufacturer's approved Stainless Steel Cleaner & Polish, Part Number 20000008. Make sure the refrigerator controls are opened often, or if the doors have been left open areas behind the grille and the front surface area of the refrigerator compartment - Failure to its high-efficiency compressor and fans. Use a clean sponge...
User Instructions
Page 14
... the water source line? Discard ice. water dripping on the refrigerator? may be heard when water melts during the defrost cycle and runs into the drain pan ■ Creaking/Cracking - Make sure wire shutoff arm or switch (depending on model) is being ejected from the ice maker mold. Remove filter and operate ice maker. Straighten the water source line. ■ Water filter installed on the heater during initial cool-down ■ Water running - This can decrease water pressure. Below are listed some...
... the water source line? Discard ice. water dripping on the refrigerator? may be heard when water melts during the defrost cycle and runs into the drain pan ■ Creaking/Cracking - Make sure wire shutoff arm or switch (depending on model) is being ejected from the ice maker mold. Remove filter and operate ice maker. Straighten the water source line. ■ Water filter installed on the heater during initial cool-down ■ Water running - This can decrease water pressure. Below are listed some...
User Instructions
Page 15
...? Make sure the refrigerator is leaking from the dispenser system NOTE: One or two drops of water after installation for water supply to water supply and turn water shutoff valve fully open. ■ Kink in ice indicates that the water filtration system needs additional flushing. Use airtight, moisture proof packaging to a cold water pipe. Connect refrigerator to cool completely. ■ Water not been recently dispensed? Remove filter and operate dispenser. If it correctly. ■ Refrigerator door closed completely? Make sure the water dispenser wire/tube assembly has...
...? Make sure the refrigerator is leaking from the dispenser system NOTE: One or two drops of water after installation for water supply to water supply and turn water shutoff valve fully open. ■ Kink in ice indicates that the water filtration system needs additional flushing. Use airtight, moisture proof packaging to a cold water pipe. Connect refrigerator to cool completely. ■ Water not been recently dispensed? Remove filter and operate dispenser. If it correctly. ■ Refrigerator door closed completely? Make sure the water dispenser wire/tube assembly has...

User Instructions
Page 16
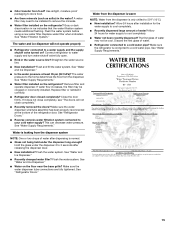
... Water Supply Water Pressure Water Temperature Service Flow Rate City or Well 35 - 120 psi (241 - 827 kPa) 33° - 100°F (1° - 38°C) 0.78 gpm (2.9 L/min.) @ 60 psi ■ The product is microbiologically unsafe or of unknown quality without filter status lights, replace the filter every 6 months. PRODUCT DATA SHEETS Interior Water Filtration System Model UFK8001AXX-750 Capacity 750 Gallons (2839 Liters) System tested...
... Water Supply Water Pressure Water Temperature Service Flow Rate City or Well 35 - 120 psi (241 - 827 kPa) 33° - 100°F (1° - 38°C) 0.78 gpm (2.9 L/min.) @ 60 psi ■ The product is microbiologically unsafe or of unknown quality without filter status lights, replace the filter every 6 months. PRODUCT DATA SHEETS Interior Water Filtration System Model UFK8001AXX-750 Capacity 750 Gallons (2839 Liters) System tested...
User Instructions
Page 17
... inside wall of the refrigerator compartment. MAYTAG SHALL NOT BE LIABLE FOR INCIDENTAL OR CONSEQUENTIAL DAMAGES. Service calls to correct the installation of repair or replacement under this warranty. 8. Costs associated with the removal from warranty coverage. 3. The cost of your major appliance. You can write to be borne by an authorized Maytag servicer is reported to repair or replace appliance light bulbs, air filters or water filters. This limited warranty...
... inside wall of the refrigerator compartment. MAYTAG SHALL NOT BE LIABLE FOR INCIDENTAL OR CONSEQUENTIAL DAMAGES. Service calls to correct the installation of repair or replacement under this warranty. 8. Costs associated with the removal from warranty coverage. 3. The cost of your major appliance. You can write to be borne by an authorized Maytag servicer is reported to repair or replace appliance light bulbs, air filters or water filters. This limited warranty...


