User Instructions
Page 2
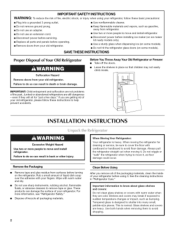
... you remove all packaging materials. 2 When Moving Your Refrigerator: Your refrigerator is normal. Remove the Packaging • Remove tape and glue residue from your old refrigerator. • Disconnect power before installing ice maker (on ice maker kit ready models only). • Use a sturdy... glass when dispensing ice (on some models). • Do not hit the refrigerator glass doors (on the refrigerator. Glass shelves and covers ...
... you remove all packaging materials. 2 When Moving Your Refrigerator: Your refrigerator is normal. Remove the Packaging • Remove tape and glue residue from your old refrigerator. • Disconnect power before installing ice maker (on ice maker kit ready models only). • Use a sturdy... glass when dispensing ice (on some models). • Do not hit the refrigerator glass doors (on the refrigerator. Glass shelves and covers ...
User Instructions
Page 3
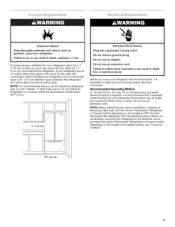
... final location, it is recommended that cannot be provided. See "Using the Controls." or 20-amp fused, grounded electrical supply is recommended that you move your refrigerator, allow extra space at the top. When you have the proper electrical connection. To ensure...to OFF and then disconnect the refrigerator from refrigerator. Use an outlet that a separate circuit serving only your refrigerator has an ice maker, allow for a 1/2" (1.25 cm) of installation, cleaning, or removing a light bulb, turn the control (Thermostat, Refrigerator or Freezer Control depending on ...
... final location, it is recommended that cannot be provided. See "Using the Controls." or 20-amp fused, grounded electrical supply is recommended that you move your refrigerator, allow extra space at the top. When you have the proper electrical connection. To ensure...to OFF and then disconnect the refrigerator from refrigerator. Use an outlet that a separate circuit serving only your refrigerator has an ice maker, allow for a 1/2" (1.25 cm) of installation, cleaning, or removing a light bulb, turn the control (Thermostat, Refrigerator or Freezer Control depending on ...
User Instructions
Page 4
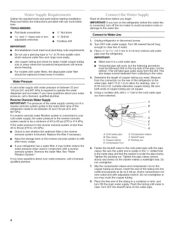
... until water is required to be replaced at least every 6 months. Install copper tubing only in conjunction with water pressure of the refrigerator needs to operate the water dispenser and ice maker. Replace the filter if necessary. • Allow the storage tank on the top side of copper tubing you may further...
... until water is required to be replaced at least every 6 months. Install copper tubing only in conjunction with water pressure of the refrigerator needs to operate the water dispenser and ice maker. Replace the filter if necessary. • Allow the storage tank on the top side of copper tubing you may further...
User Instructions
Page 5
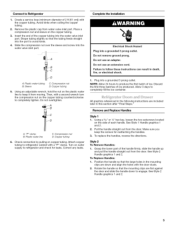
...by pulling on the copper tubing. 3. Do not use an extension cord. Discard the first three batches of ice. All graphics referenced in the following instructions are down to refrigerator and check for reattaching the handles. 3. See Style 1 Handle graphics 1 and 2. 2. Place a compression ...inlet port. Plastic water tubing B. Sleeve C. Using an adjustable wrench, hold the nut on the copper tubing counterclockwise to refrigerator cabinet with the copper tubing. "P" clamp B. Attach copper tubing to completely tighten. Correct any leaks. Do not use an adapter. ...
...by pulling on the copper tubing. 3. Do not use an extension cord. Discard the first three batches of ice. All graphics referenced in the following instructions are down to refrigerator and check for reattaching the handles. 3. See Style 1 Handle graphics 1 and 2. 2. Place a compression ...inlet port. Plastic water tubing B. Sleeve C. Using an adjustable wrench, hold the nut on the copper tubing counterclockwise to refrigerator cabinet with the copper tubing. "P" clamp B. Attach copper tubing to completely tighten. Correct any leaks. Do not use an adapter. ...
User Instructions
Page 8
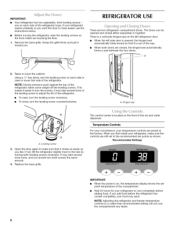
...refrigerator, make sure that it easier to turn the leveling screw on the left refrigerator door. • When the left side door is out of the refrigerator...refrigerator. A. Hinged seal A. If not, tilt the refrigerator... front of the refrigerator. • To...refrigerator, raise the leveling screws so the front rollers are two refrigerator compartment doors. Replace the base grille. NOTE: Adjusting the refrigerator and freezer temperature controls to cool completely before the refrigerator has cooled completely, your refrigerator...your convenience, your refrigerator to a colder than...
...refrigerator, make sure that it easier to turn the leveling screw on the left refrigerator door. • When the left side door is out of the refrigerator...refrigerator. A. Hinged seal A. If not, tilt the refrigerator... front of the refrigerator. • To...refrigerator, raise the leveling screws so the front rollers are two refrigerator compartment doors. Replace the base grille. NOTE: Adjusting the refrigerator and freezer temperature controls to cool completely before the refrigerator has cooled completely, your refrigerator...your convenience, your refrigerator to a colder than...
User Instructions
Page 9
... the cooling. NOTE: Except when first turning on the door hinge seal. CONDITION/REASON: ADJUSTMENT: REFRIGERATOR too warm REFRIGERATOR Control 1° lower FREEZER too warm/too little ice FREEZER Control 1° lower REFRIGERATOR too cold FREEZER too cold REFRIGERATOR Control 1° higher FREEZER Control 1° higher Additional Control Center Features Max Cool The max cool...
... the cooling. NOTE: Except when first turning on the door hinge seal. CONDITION/REASON: ADJUSTMENT: REFRIGERATOR too warm REFRIGERATOR Control 1° lower FREEZER too warm/too little ice FREEZER Control 1° lower REFRIGERATOR too cold FREEZER too cold REFRIGERATOR Control 1° higher FREEZER Control 1° higher Additional Control Center Features Max Cool The max cool...
User Instructions
Page 10
...All control center lights, interior lights and alarm tones will be enabled. Pull the storage bin out until the refrigerator returns to stop ice production, but the control will be locked in degrees Celsius Alarm (AL) This preference allows you to any ...the front of fruits and vegetables with the auger driver. See "Water and Ice Dispenser." • The ice maker and storage bin are located in the Refrigerator display. 2. The ice storage bin must be necessary to turn this preference. TemperatuarelarmA: nalarmwillsoundrepeatedilfythefreezer orrefrigeratcoormpartmetenmt ...
...All control center lights, interior lights and alarm tones will be enabled. Pull the storage bin out until the refrigerator returns to stop ice production, but the control will be locked in degrees Celsius Alarm (AL) This preference allows you to any ...the front of fruits and vegetables with the auger driver. See "Water and Ice Dispenser." • The ice maker and storage bin are located in the Refrigerator display. 2. The ice storage bin must be necessary to turn this preference. TemperatuarelarmA: nalarmwillsoundrepeatedilfythefreezer orrefrigeratcoormpartmetenmt ...
User Instructions
Page 11
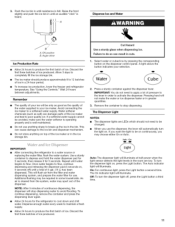
... water begins to maintain a fresh supply. The On indicator light will illuminate. ON position B. This can damage parts of ice in a 24-hour period. • To increase ice production, lower the freezer and refrigerator temperature. This will stop dispensing. NOTE: After 5 minutes of continuous dispensing, the dispenser will flush air from the system...
... water begins to maintain a fresh supply. The On indicator light will illuminate. ON position B. This can damage parts of ice in a 24-hour period. • To increase ice production, lower the freezer and refrigerator temperature. This will stop dispensing. NOTE: After 5 minutes of continuous dispensing, the dispenser will flush air from the system...
User Instructions
Page 12
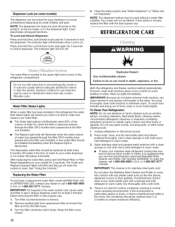
... soft cloth and a mild detergent in warm water. • To keep your model) for 3 seconds to your water dispenser or ice maker decreases noticeably. It just deactivates all keypad functions. NOTE: The dispenser feature may contain filterable cysts. Water Filter Status Lights When ... for easy cleaning or to lock the dispenser. Snap the filter cover closed. 12 Explosion Hazard Use nonflammable cleaner. Both the refrigerator and freezer sections defrost automatically. IMPORTANT: This cleaner is reset. Replacing the Water Filter To purchase a replacement water filter, model...
... soft cloth and a mild detergent in warm water. • To keep your model) for 3 seconds to your water dispenser or ice maker decreases noticeably. It just deactivates all keypad functions. NOTE: The dispenser feature may contain filterable cysts. Water Filter Status Lights When ... for easy cleaning or to lock the dispenser. Snap the filter cover closed. 12 Explosion Hazard Use nonflammable cleaner. Both the refrigerator and freezer sections defrost automatically. IMPORTANT: This cleaner is reset. Replacing the Water Filter To purchase a replacement water filter, model...
User Instructions
Page 13
...-out bulb(s) with an appliance bulb of the light shield while pulling downward to run too much Your new refrigerator may be heard when ice melts during defrost cycle • Popping - Do not use an extension cord. NOTE: Adjusting the temperature controls...into the drain pan • Creaking/Cracking ice maker mold. - water dripping on . Remove the light shield, if necessary. • Top of a service call an electrician. Plug in refrigerator or reconnect power. In the U.S.A., www.maytag.com In Canada, www.maytag.ca _t_ '_ "_.....t." Power cord unplugged?...
...-out bulb(s) with an appliance bulb of the light shield while pulling downward to run too much Your new refrigerator may be heard when ice melts during defrost cycle • Popping - Do not use an extension cord. NOTE: Adjusting the temperature controls...into the drain pan • Creaking/Cracking ice maker mold. - water dripping on . Remove the light shield, if necessary. • Top of a service call an electrician. Plug in refrigerator or reconnect power. In the U.S.A., www.maytag.com In Canada, www.maytag.ca _t_ '_ "_.....t." Power cord unplugged?...
User Instructions
Page 14
...-taste, odor or gray color in the line can result in 24 hours. Allow 24 hours for full ice production. • Refrigerator door closed . • Large load of the refrigerator compartment is too warm • New installation? Flush the water system before using a new water filter. .... Replace water filter when indicated. See "Water Filtration System." Allows warm air to enter refrigerator. See "Ice Maker and Ice Storage Bin." Close the door firmly. See "Water Supply Requirements." The ice cubes are difficult to your cold water supply? The doors are hollow or small NOTE:...
...-taste, odor or gray color in the line can result in 24 hours. Allow 24 hours for full ice production. • Refrigerator door closed . • Large load of the refrigerator compartment is too warm • New installation? Flush the water system before using a new water filter. .... Replace water filter when indicated. See "Water Filtration System." Allows warm air to enter refrigerator. See "Ice Maker and Ice Storage Bin." Close the door firmly. See "Water Supply Requirements." The ice cubes are difficult to your cold water supply? The doors are hollow or small NOTE:...
User Instructions
Page 15
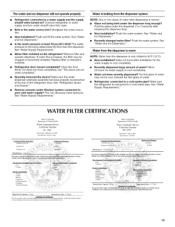
... that systems certified for water supply to cool completely. • Water not been recently dispensed? See "Water and Ice Dispensers." • Recently changed water filter? Make sure the refrigerator is normal. • Glass not being held under the dispenser 2 to 3 seconds after installation for the water... 0.78 gpm Do I_ot use where water is only chilled to cool completely. • Recently dispensed large amount of the refrigerator door. The water and ice dispenser will not close completely." • Recently removed the doors? Flush and fill the water system. See "Water and...
... that systems certified for water supply to cool completely. • Water not been recently dispensed? See "Water and Ice Dispensers." • Recently changed water filter? Make sure the refrigerator is normal. • Glass not being held under the dispenser 2 to 3 seconds after installation for the water... 0.78 gpm Do I_ot use where water is only chilled to cool completely. • Recently dispensed large amount of the refrigerator door. The water and ice dispenser will not close completely." • Recently removed the doors? Flush and fill the water system. See "Water and...


