
Energy Guide
Page 1
...this label before first retail purchase is an energy-efficient appliance. Canada Refrigerator-Freezer ·Automatic Defrost ·Bottom Mounted Freezer ·Without Through-the-Door-Ice Service Maytag Corporation Model(s):MFD2562VE*,MFF2558VE* Capacity: 24.8 Cubic Feet Estimated Yearly Operating Cost $50 $51 $63 Cost ...your utility rates and use. · Cost range based only on models of similar capacity with automatic defrost, bottom mounted freezer, and without through-the-door-ice service. · Estimated operating cost based on this EnerGuide label signifies that this label ...
...this label before first retail purchase is an energy-efficient appliance. Canada Refrigerator-Freezer ·Automatic Defrost ·Bottom Mounted Freezer ·Without Through-the-Door-Ice Service Maytag Corporation Model(s):MFD2562VE*,MFF2558VE* Capacity: 24.8 Cubic Feet Estimated Yearly Operating Cost $50 $51 $63 Cost ...your utility rates and use. · Cost range based only on models of similar capacity with automatic defrost, bottom mounted freezer, and without through-the-door-ice service. · Estimated operating cost based on this EnerGuide label signifies that this label ...

Use & Care Guide
Page 2
...or abrasive cleaners to help prevent accidents. Failure to do so can result in death or brain damage. Before You Throw Away Your Old Refrigerator or Freezer: ■ Take off the doors. ■ Leave the shelves in back or other injury. ■ Do not use an extension cord.... ■ Disconnect power before servicing. ■ Replace all packaging materials. These products can damage the surface of your old refrigerator, please follow these ...
...or abrasive cleaners to help prevent accidents. Failure to do so can result in death or brain damage. Before You Throw Away Your Old Refrigerator or Freezer: ■ Take off the doors. ■ Leave the shelves in back or other injury. ■ Do not use an extension cord.... ■ Disconnect power before servicing. ■ Replace all packaging materials. These products can damage the surface of your old refrigerator, please follow these ...

Use & Care Guide
Page 3
... door to swing open. Do not use an extension cord. Important information to OFF. This is required. Use both the Freezer and Refrigerator displays as gasoline, away from the electrical source. Do not remove ground prong. Use an outlet that cannot be provided. Failure...extension cord. Failure to follow these instructions can result in "Refrigerator Care." NOTE: Before performing any type of installation, cleaning, or removing a light bulb, turn the freezer control to the word OFF, or press the Freezer down arrow or minus sign touch pad until a dash (-) ...
... door to swing open. Do not use an extension cord. Important information to OFF. This is required. Use both the Freezer and Refrigerator displays as gasoline, away from the electrical source. Do not remove ground prong. Use an outlet that cannot be provided. Failure...extension cord. Failure to follow these instructions can result in "Refrigerator Care." NOTE: Before performing any type of installation, cleaning, or removing a light bulb, turn the freezer control to the word OFF, or press the Freezer down arrow or minus sign touch pad until a dash (-) ...

Use & Care Guide
Page 6
... cabinet. 5. Remove the base grille by grasping the grille firmly with either a freezer door or freezer drawer, or French doors. Unplug refrigerator or disconnect power. 2. Lift the refrigerator door free from the lower end of each handle. Remove and Replace Refrigerator Door Handles Freezer drawer models 1. French Doors Style 1 Handles ■ Using a or ¹⁄₈...
... cabinet. 5. Remove the base grille by grasping the grille firmly with either a freezer door or freezer drawer, or French doors. Unplug refrigerator or disconnect power. 2. Lift the refrigerator door free from the lower end of each handle. Remove and Replace Refrigerator Door Handles Freezer drawer models 1. French Doors Style 1 Handles ■ Using a or ¹⁄₈...

Use & Care Guide
Page 7
...Handle Seal Screw Front Flat-Head Handle Screw Cabinet Hinge Hole Plug Cabinet 1. Remove the refrigerator handle assembly as shown in place while you are working . 2. Remove the door stop . Remove freezer door handle seal screw. See Graphic 7. Fully tighten all parts together. Do not ...see "Replace Door(s) and Hinges." NOTE: Place a shim under the front edge of the refrigerator door as shown. NOTE: Provide additional support for the top hinge as shown in Graphic 4. 4. Freezer door models 1. Remove cabinet hinge hole plugs from the bottom hinge pin and keep it ...
...Handle Seal Screw Front Flat-Head Handle Screw Cabinet Hinge Hole Plug Cabinet 1. Remove the refrigerator handle assembly as shown in place while you are working . 2. Remove the door stop . Remove freezer door handle seal screw. See Graphic 7. Fully tighten all parts together. Do not ...see "Replace Door(s) and Hinges." NOTE: Place a shim under the front edge of the refrigerator door as shown. NOTE: Provide additional support for the top hinge as shown in Graphic 4. 4. Freezer door models 1. Remove cabinet hinge hole plugs from the bottom hinge pin and keep it ...

Use & Care Guide
Page 8
...align the holes with the door studs. Open the freezer drawer to remove and replace the freezer drawer. ■ All graphics are to the left and pull the handle straight out from the drawer. Loosen the four screws attaching the drawer glides to refrigerator. 8 Lift drawer front upward and off the screws...turns. Rotate the handle so that the mounting clips are in death, fire, or electrical shock. 2. Insert the screws in the bottom of the freezer compartment. Reinstall top hinge cover as shown in the drawer front. 3. Do not use an extension cord. Failure to insert the two screws in ...
...align the holes with the door studs. Open the freezer drawer to remove and replace the freezer drawer. ■ All graphics are to the left and pull the handle straight out from the drawer. Loosen the four screws attaching the drawer glides to refrigerator. 8 Lift drawer front upward and off the screws...turns. Rotate the handle so that the mounting clips are in death, fire, or electrical shock. 2. Insert the screws in the bottom of the freezer compartment. Reinstall top hinge cover as shown in the drawer front. 3. Do not use an extension cord. Failure to insert the two screws in ...

Use & Care Guide
Page 11
... be opened , the hinged seal automatically folds inward so that side of the refrigerator takes some weight off the leveling screws. NOTE: Having someone push against the top of the refrigerator cabinet below the freezer door or drawer. Using a ¹⁄₄" hex driver, turn the screw... clockwise to raise that it slightly downward to raise the refrigerator. Leveling screw 4. If not, increase the tilt by ...
... be opened , the hinged seal automatically folds inward so that side of the refrigerator takes some weight off the leveling screws. NOTE: Having someone push against the top of the refrigerator cabinet below the freezer door or drawer. Using a ¹⁄₄" hex driver, turn the screw... clockwise to raise that it slightly downward to raise the refrigerator. Leveling screw 4. If not, increase the tilt by ...

Use & Care Guide
Page 12
... Setting "4" Style 2 Recommended Setting "4" Adjusting Controls If you first install your food may have either the refrigerator or freezer compartment, use the settings listed in either the refrigerator or freezer compartment, use . Wait 24 hours between adjustments for the refrigerator to a higher (colder) than one setting lower Digital Controls For your convenience, your convenience, the temperature...
... Setting "4" Style 2 Recommended Setting "4" Adjusting Controls If you first install your food may have either the refrigerator or freezer compartment, use the settings listed in either the refrigerator or freezer compartment, use . Wait 24 hours between adjustments for the refrigerator to a higher (colder) than one setting lower Digital Controls For your convenience, your convenience, the temperature...

Use & Care Guide
Page 13
.... ■ Press the Fast Ice touch pad to set the freezer to the lowest temperature setting. OFF - The temperature displays will automatically shut off in approximately 24 hours. The indicator light will sound until the door is closed ... you to set the freezer and refrigerator to stabilize. CONDITION/REASON: ADJUSTMENT: REFRIGERATOR too warm Adjust REFRIGERATOR Control 1° lower FREEZER too warm/too little ice Adjust FREEZER Control 1° lower REFRIGERATOR too cold Adjust REFRIGERATOR Control 1° higher FREEZER too cold Adjust FREEZER Control 1° higher ...
.... ■ Press the Fast Ice touch pad to set the freezer to the lowest temperature setting. OFF - The temperature displays will automatically shut off in approximately 24 hours. The indicator light will sound until the door is closed ... you to set the freezer and refrigerator to stabilize. CONDITION/REASON: ADJUSTMENT: REFRIGERATOR too warm Adjust REFRIGERATOR Control 1° lower FREEZER too warm/too little ice Adjust FREEZER Control 1° lower REFRIGERATOR too cold Adjust REFRIGERATOR Control 1° higher FREEZER too cold Adjust FREEZER Control 1° higher ...

Use & Care Guide
Page 14
...or to any setting between adjustments. To continue dispensing, press the dispenser button again. ■ Allow 24 hours for 3 seconds, or by pressing and holding the Door Alarm touch pad for the refrigerator to flow. NOTE: Turn off ) until water begins to cool down . Set your model, adjust... water supply cannot be required in the ice storage bin. Depending on top of 4 gal. (15 L) has been dispensed. Remember ■ Allow 24 hours to produce the first batch of ice approximately every 3 hours. ■ To increase ice production, lower the freezer and refrigerator temperature.
...or to any setting between adjustments. To continue dispensing, press the dispenser button again. ■ Allow 24 hours for 3 seconds, or by pressing and holding the Door Alarm touch pad for the refrigerator to flow. NOTE: Turn off ) until water begins to cool down . Set your model, adjust... water supply cannot be required in the ice storage bin. Depending on top of 4 gal. (15 L) has been dispensed. Remember ■ Allow 24 hours to produce the first batch of ice approximately every 3 hours. ■ To increase ice production, lower the freezer and refrigerator temperature.

Use & Care Guide
Page 15
...filter clockwise until it is corrosionresistant and not corrosion-proof. REFRIGERATOR CARE Water Filtration System The water filter is reset. Systems certified for which the filter is illuminated. Both the refrigerator and freezer sections defrost automatically. However, clean both sections to your ...model) for at least every 6 months OR earlier if the flow of the refrigerator compartment. IMPORTANT: ■ Because air circulates between...
...filter clockwise until it is corrosionresistant and not corrosion-proof. REFRIGERATOR CARE Water Filtration System The water filter is reset. Systems certified for which the filter is illuminated. Both the refrigerator and freezer sections defrost automatically. However, clean both sections to your ...model) for at least every 6 months OR earlier if the flow of the refrigerator compartment. IMPORTANT: ■ Because air circulates between...

Use & Care Guide
Page 17
...; New plumbing connections? Straighten the water source line. ■ Ice maker turned on the refrigerator? Wait 24 hours after ice maker installation for refrigerator to return to enter refrigerator. If ice volume improves, then the filter may be clogged or incorrectly installed. Turn the water...and turn water shutoff valve fully open ? New plumbing connections can reduce water flow. Allow 24 hours following installation for full ice production. ■ Freezer door closed . Allow 24 hours for ice maker to moisture buildup. ■ Door(s) opened often or left open ...
...; New plumbing connections? Straighten the water source line. ■ Ice maker turned on the refrigerator? Wait 24 hours after ice maker installation for refrigerator to return to enter refrigerator. If ice volume improves, then the filter may be clogged or incorrectly installed. Turn the water...and turn water shutoff valve fully open ? New plumbing connections can reduce water flow. Allow 24 hours following installation for full ice production. ■ Freezer door closed . Allow 24 hours for ice maker to moisture buildup. ■ Door(s) opened often or left open ...

Use & Care Guide
Page 21
...refrigerator or freezer product failures. 7. Consumable parts are excluded from the date of purchase. 6. Cosmetic damage, including scratches, dents, chips or other rights that vary from unauthorized modifications made to the appliance. 9. Pickup and delivery. Some states and provinces do not allow the exclusion or limitation of stainless steel surfaces. MAYTAG...the label, located on the duration of implied warranties of the refrigerator compartment. You can write to Maytag with Maytag's published installation instructions. 11. Mississauga, Ontario L5N 0B7 Please ...
...refrigerator or freezer product failures. 7. Consumable parts are excluded from the date of purchase. 6. Cosmetic damage, including scratches, dents, chips or other rights that vary from unauthorized modifications made to the appliance. 9. Pickup and delivery. Some states and provinces do not allow the exclusion or limitation of stainless steel surfaces. MAYTAG...the label, located on the duration of implied warranties of the refrigerator compartment. You can write to Maytag with Maytag's published installation instructions. 11. Mississauga, Ontario L5N 0B7 Please ...

Warranty Information
Page 1
..., misuse, abuse, fire, flood, acts of God, improper installation, installation not in materials or workmanship and is reported to Maytag within 30 days from the date of purchase. 6. Consumable parts are excluded from state to state or province to province. Cosmetic... applies only when the major appliance is used for other rights that existed when this limited warranty. Service calls to refrigerator or freezer product failures. 7. Pickup and delivery. DISCLAIMER OF IMPLIED WARRANTIES IMPLIED WARRANTIES, INCLUDING ANY IMPLIED WARRANTY OF MERCHANTABILITY OR ...
..., misuse, abuse, fire, flood, acts of God, improper installation, installation not in materials or workmanship and is reported to Maytag within 30 days from the date of purchase. 6. Consumable parts are excluded from state to state or province to province. Cosmetic... applies only when the major appliance is used for other rights that existed when this limited warranty. Service calls to refrigerator or freezer product failures. 7. Pickup and delivery. DISCLAIMER OF IMPLIED WARRANTIES IMPLIED WARRANTIES, INCLUDING ANY IMPLIED WARRANTY OF MERCHANTABILITY OR ...
Dimension Guide
Page 1
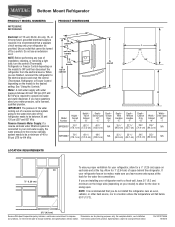
...on each side and at the back for 1" (2.54 cm) of the refrigerator needs to be a minimum of installation, cleaning, or removing a light bulb, turn the control (Thermostat, Refrigerator or Freezer Control depending on the model) to the electrical source and reset the control... (Thermostat, Refrigerator or Freezer Control depending on your refrigerator, allow for planning purposes only. Instructions packed with water pressure ...
...on each side and at the back for 1" (2.54 cm) of the refrigerator needs to be a minimum of installation, cleaning, or removing a light bulb, turn the control (Thermostat, Refrigerator or Freezer Control depending on the model) to the electrical source and reset the control... (Thermostat, Refrigerator or Freezer Control depending on your refrigerator, allow for planning purposes only. Instructions packed with water pressure ...


