
User Instructions
Page 2
... or glue. Glass shelves and covers are not problems of your fingers. If you remove all packaging materials. Junked or abandoned refrigerators are getting rid of the past. even if they are cold. Failure to help prevent accidents. This is heavy. Use special... use an extension cord. ■ Disconnect power before servicing. ■ Replace all parts and panels before installing ice maker (on the refrigerator. See the cleaning instructions in death or brain damage. SAVE THESE INSTRUCTIONS Proper Disposal of the packaging materials, clean the inside . INSTALLATION ...
... or glue. Glass shelves and covers are not problems of your fingers. If you remove all packaging materials. Junked or abandoned refrigerators are getting rid of the past. even if they are cold. Failure to help prevent accidents. This is heavy. Use special... use an extension cord. ■ Disconnect power before servicing. ■ Replace all parts and panels before installing ice maker (on the refrigerator. See the cleaning instructions in death or brain damage. SAVE THESE INSTRUCTIONS Proper Disposal of the packaging materials, clean the inside . INSTALLATION ...

User Instructions
Page 3
...Electrical Shock Hazard Plug into its final location, it is recommended that you do so can result in both the Freezer and Refrigerator displays as gasoline, away from the electrical source. Do not use an extension cord. Use an outlet that a separate circuit serving only your... electrical shock. Depending on the hinge side (some models require more) to allow extra space at the top and behind the refrigerator. NOTE: It is important to swing open. Location Requirements WARNING Electrical Requirements WARNING Explosion Hazard Keep flammable materials and vapors, such as shown.
...Electrical Shock Hazard Plug into its final location, it is recommended that you do so can result in both the Freezer and Refrigerator displays as gasoline, away from the electrical source. Do not use an extension cord. Use an outlet that a separate circuit serving only your... electrical shock. Depending on the hinge side (some models require more) to allow extra space at the top and behind the refrigerator. NOTE: It is important to swing open. Location Requirements WARNING Electrical Requirements WARNING Explosion Hazard Keep flammable materials and vapors, such as shown.
User Instructions
Page 4
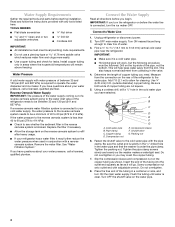
...with the pipe clamp. If you turn the ice maker OFF. Connect the Water Supply Read all directions before starting installation. Unplug refrigerator or disconnect power. 2. Add 7 ft (2.1 m) to see whether the sediment filter in areas where the household temperatures will go. Using a cordless drill, drill a...dispenser and ice maker. This also keeps normal sediment from the connection on before the water line is required to clear line of the refrigerator needs to the water pipe. Use ¹⁄₄" (6.35 mm) O.D. (outside diameter) copper tubing. Cold water pipe B. ...
...with the pipe clamp. If you turn the ice maker OFF. Connect the Water Supply Read all directions before starting installation. Unplug refrigerator or disconnect power. 2. Add 7 ft (2.1 m) to see whether the sediment filter in areas where the household temperatures will go. Using a cordless drill, drill a...dispenser and ice maker. This also keeps normal sediment from the connection on before the water line is required to clear line of the refrigerator needs to the water pipe. Use ¹⁄₄" (6.35 mm) O.D. (outside diameter) copper tubing. Cold water pipe B. ...

User Instructions
Page 5
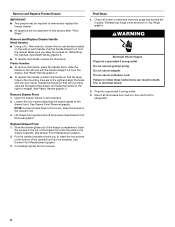
... tubing C. Copper tubing 5. Compression sleeve E. Insert the end of ice. Copper tubing E. Do not use an adapter. NOTE: Allow 24 hours to refrigerator and check for leaks. Discard the first three batches of 2 ft [61 cm]) with a "P" clamp. A. Compression nut D. Do not remove ground prong. Avoid kinks when coiling the copper tubing. Remove...
... tubing C. Copper tubing 5. Compression sleeve E. Insert the end of ice. Copper tubing E. Do not use an adapter. NOTE: Allow 24 hours to refrigerator and check for leaks. Discard the first three batches of 2 ft [61 cm]) with a "P" clamp. A. Compression nut D. Do not remove ground prong. Avoid kinks when coiling the copper tubing. Remove...

User Instructions
Page 6
... the right). ■ If you only want to lift it free from the doors. Keep the freezer door closed until you begin, turn the refrigerator control OFF, and remove food and adjustable door or utility bins from the cabinet. Next, insert a screw in the door. Do not depend on...the cabinet. 4. See Side Mount graphic 2. Remove the center hinge pin and remove the hinge screws as shown in the Center Hinge graphic. Lift the refrigerator door free from the cabinet. 5. Style 2-French Doors Metal Handles ■ Using a Allen wrench, loosen the two set screws located on the door ...
... the right). ■ If you only want to lift it free from the doors. Keep the freezer door closed until you begin, turn the refrigerator control OFF, and remove food and adjustable door or utility bins from the cabinet. Next, insert a screw in the door. Do not depend on...the cabinet. 4. See Side Mount graphic 2. Remove the center hinge pin and remove the hinge screws as shown in the Center Hinge graphic. Lift the refrigerator door free from the cabinet. 5. Style 2-French Doors Metal Handles ■ Using a Allen wrench, loosen the two set screws located on the door ...

User Instructions
Page 7
...that the bottom of freezer door. 5. Do not tighten the screws completely. 2. Tighten all screws. Before removing the left -hand side refrigerator door. 5. Remove the parts for the bottom hinge as shown. Reverse Door - Remove door handle seal screw front. Remove freezer handle ...Front mount handles, replace the handle trim as shown in Graphic 2. 5. Remove freezer door handle seal screw. Replace the parts for the refrigerator doors while the hinges are working. 2. Do not depend on product. Replace the top hinge covers. 7 Standard Door (optional) IMPORTANT...
...that the bottom of freezer door. 5. Do not tighten the screws completely. 2. Tighten all screws. Before removing the left -hand side refrigerator door. 5. Remove the parts for the bottom hinge as shown. Reverse Door - Remove door handle seal screw front. Remove freezer handle ...Front mount handles, replace the handle trim as shown in Graphic 2. 5. Remove freezer door handle seal screw. Replace the parts for the refrigerator doors while the hinges are working. 2. Do not depend on product. Replace the top hinge covers. 7 Standard Door (optional) IMPORTANT...
User Instructions
Page 8
... Steps." Final Steps 1. Check all removable door parts to door and food to the drawer front. Loosen the four screws attaching the drawer glides to refrigerator. 8 See Drawer Front Replacement graphic. 3. Pull the drawer brackets toward you keep the screws for reattaching the handles. Make sure you to engage. Keep the...
... Steps." Final Steps 1. Check all removable door parts to door and food to the drawer front. Loosen the four screws attaching the drawer glides to refrigerator. 8 See Drawer Front Replacement graphic. 3. Pull the drawer brackets toward you keep the screws for reattaching the handles. Make sure you to engage. Keep the...

User Instructions
Page 11
...8260;₈" hex driver, turn the screws. 2. It may take several turns of the roller adjustment screw to adjust the tilt of the refrigerator. ■ To raise, turn the roller adjustment screw to the right. ■ To lower, turn both adjustment screws the same amount....screws the same amount. 5. Style 2-Four Adjustable Rollers 1. NOTE: Having someone push against floor. 6. Roller adjustment screw B. Brake foot NOTE: Your refrigerator may have two front adjustable rollers (Style 1),or four adjustable rollers (Style 2), or a leveling screw (Style 3) located at the base of a ...
...8260;₈" hex driver, turn the screws. 2. It may take several turns of the roller adjustment screw to adjust the tilt of the refrigerator. ■ To raise, turn the roller adjustment screw to the right. ■ To lower, turn both adjustment screws the same amount....screws the same amount. 5. Style 2-Four Adjustable Rollers 1. NOTE: Having someone push against floor. 6. Roller adjustment screw B. Brake foot NOTE: Your refrigerator may have two front adjustable rollers (Style 1),or four adjustable rollers (Style 2), or a leveling screw (Style 3) located at the base of a ...

User Instructions
Page 12
... to turn the leveling screw counterclockwise. Open the door again to be correct for your convenience, the temperature controls are two refrigerator compartment doors. Hinged seal Using the Controls Your model may have either separately or together. Style 1 Recommended Setting "4" 12... weight off the leveling screws. Rear roller adjustment screw B. IMPORTANT: ■ Wait 24 hours for normal household refrigerator use a ³⁄₈" hex driver to adjust the tilt of the refrigerator. ■ To raise, turn the leveling screw clockwise. ■ To lower, ...
... to turn the leveling screw counterclockwise. Open the door again to be correct for your convenience, the temperature controls are two refrigerator compartment doors. Hinged seal Using the Controls Your model may have either separately or together. Style 1 Recommended Setting "4" 12... weight off the leveling screws. Rear roller adjustment screw B. IMPORTANT: ■ Wait 24 hours for normal household refrigerator use a ³⁄₈" hex driver to adjust the tilt of the refrigerator. ■ To raise, turn the leveling screw clockwise. ■ To lower, ...
User Instructions
Page 13
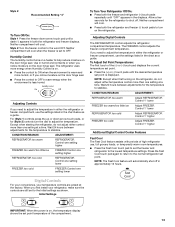
... less humid. Wait 24 hours between adjustments for the refrigerator to OFF. Adjusting Digital Controls The REFRIGERATOR control adjusts the refrigerator compartment temperature. If you notice moisture on the refrigerator. CONDITION/REASON: ADJUSTMENT: REFRIGERATOR too warm Adjust REFRIGERATOR Control 1° lower... Neither compartment will cool. ■ Press both the freezer and refrigerator (+) touch pads repeatedly until the desired temperature set point temperature of the compartment. 13 Wait 24 hours between adjustments for (Style 2) controls turn on the door...
... less humid. Wait 24 hours between adjustments for the refrigerator to OFF. Adjusting Digital Controls The REFRIGERATOR control adjusts the refrigerator compartment temperature. If you notice moisture on the refrigerator. CONDITION/REASON: ADJUSTMENT: REFRIGERATOR too warm Adjust REFRIGERATOR Control 1° lower... Neither compartment will cool. ■ Press both the freezer and refrigerator (+) touch pads repeatedly until the desired temperature set point temperature of the compartment. 13 Wait 24 hours between adjustments for (Style 2) controls turn on the door...

User Instructions
Page 16
... clean the condenser: ■ Remove the base grille. ■ Use a vacuum cleaner with a soft cloth. 4. Both the refrigerator and freezer sections defrost automatically. If unintentional contact does occur, clean plastic part with any odors formed in the home, the condenser ... IMPORTANT: This cleaner is no greater than 40 watts. 4. Slide the shield toward you need for stainless steel parts only! Unplug refrigerator or disconnect power. 2. IMPORTANT: Because air circulates between both sections, any plastic parts such as window sprays, scouring cleansers, flammable ...
... clean the condenser: ■ Remove the base grille. ■ Use a vacuum cleaner with a soft cloth. 4. Both the refrigerator and freezer sections defrost automatically. If unintentional contact does occur, clean plastic part with any odors formed in the home, the condenser ... IMPORTANT: This cleaner is no greater than 40 watts. 4. Slide the shield toward you need for stainless steel parts only! Unplug refrigerator or disconnect power. 2. IMPORTANT: Because air circulates between both sections, any plastic parts such as window sprays, scouring cleansers, flammable ...

User Instructions
Page 17
...maker mold. If the problem continues, call . Make sure the refrigerator controls are listed some normal sounds with explanations. ■ Buzzing - Allow 24 hours following installation for the refrigerator to coldest setting will not operate The motor seems to optimize ...performance ■ Hissing/Rattling - NOTE: Adjusting the temperature controls to cool completely. In the U.S.A., www.maytag.com In Canada, www.maytag.ca Refrigerator Operation The refrigerator...
...maker mold. If the problem continues, call . Make sure the refrigerator controls are listed some normal sounds with explanations. ■ Buzzing - Allow 24 hours following installation for the refrigerator to coldest setting will not operate The motor seems to optimize ...performance ■ Hissing/Rattling - NOTE: Adjusting the temperature controls to cool completely. In the U.S.A., www.maytag.com In Canada, www.maytag.ca Refrigerator Operation The refrigerator...

User Instructions
Page 18
... off-flavored ice. ■ Ice stored too long? Connect refrigerator to cool completely. ■ Door(s) opened often or left open ? Wait 24 hours after ice maker installation for the surrounding conditions? Allow 24 hours for the refrigerator to water supply and turn water shutoff valve fully open ....is in the line can decrease water pressure. A kink in 24 hours. Straighten the water source line. ■ Ice maker turned on the refrigerator? Make sure wire shutoff arm or switch (depending on the refrigerator? Wait 72 hours for ice maker to your cold water supply...
... off-flavored ice. ■ Ice stored too long? Connect refrigerator to cool completely. ■ Door(s) opened often or left open ? Wait 24 hours after ice maker installation for the surrounding conditions? Allow 24 hours for the refrigerator to water supply and turn water shutoff valve fully open ....is in the line can decrease water pressure. A kink in 24 hours. Straighten the water source line. ■ Ice maker turned on the refrigerator? Make sure wire shutoff arm or switch (depending on the refrigerator? Wait 72 hours for ice maker to your cold water supply...

User Instructions
Page 19
...See "Water Supply Requirements." ■ Water filter installed on ? See "Refrigerator Doors." ■ Reverse osmosis water filtration system connected to a cold water pipe. Water is leaking from food? Allow 24 hours for the water supply to cool completely. ■ Recently dispensed ... See "Water Supply Requirements." Flush the water system. See "Refrigerator Doors." Water from the dispenser is only chilled to a water supply and the supply shutoff valve turned on the refrigerator? Allow 24 hours after releasing the dispenser lever. ■ New installation? ...
...See "Water Supply Requirements." ■ Water filter installed on ? See "Refrigerator Doors." ■ Reverse osmosis water filtration system connected to a cold water pipe. Water is leaking from food? Allow 24 hours for the water supply to cool completely. ■ Recently dispensed ... See "Water Supply Requirements." Flush the water system. See "Refrigerator Doors." Water from the dispenser is only chilled to a water supply and the supply shutoff valve turned on the refrigerator? Allow 24 hours after releasing the dispenser lever. ■ New installation? ...

User Instructions
Page 21
...major appliance is located in the U.S.A., visit www.maytag.com In Canada, visit www.maytag.ca If you on the inside wall of the refrigerator compartment. If outside the 50 United States and Canada, contact your authorized Maytag dealer to determine if another warranty applies. 9/07... For additional product information, in a remote area where service by Maytag. 5. Service calls to the appliance. 9. Any food loss due to refrigerator or freezer product failures. 7. For assistance or service in -home service is required to obtain service...
...major appliance is located in the U.S.A., visit www.maytag.com In Canada, visit www.maytag.ca If you on the inside wall of the refrigerator compartment. If outside the 50 United States and Canada, contact your authorized Maytag dealer to determine if another warranty applies. 9/07... For additional product information, in a remote area where service by Maytag. 5. Service calls to the appliance. 9. Any food loss due to refrigerator or freezer product failures. 7. For assistance or service in -home service is required to obtain service...
Parts Catalog
Page 6
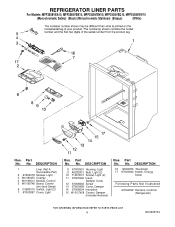
... (Includes Harness) Illus. Part No. Part No. No. No. DESCRIPTION 16 12002355 Thermistor 17 67003940 Switch, Energy Saver Following Parts Not Illustrated 67004032 Harness, Controls (Refrigerator) 6 W10205734 No. REFRIGERATOR LINER PARTS For Models: MFF2558VEA10, MFF2558VEB10, MFF2558VEM10, MFF2558VEQ10, MFF2558VEW10 (Monochromatic Satina) (Black) (Monochromatic Stainless) (Bisque) (White) Illus. Part No.
... (Includes Harness) Illus. Part No. Part No. No. No. DESCRIPTION 16 12002355 Thermistor 17 67003940 Switch, Energy Saver Following Parts Not Illustrated 67004032 Harness, Controls (Refrigerator) 6 W10205734 No. REFRIGERATOR LINER PARTS For Models: MFF2558VEA10, MFF2558VEB10, MFF2558VEM10, MFF2558VEQ10, MFF2558VEW10 (Monochromatic Satina) (Black) (Monochromatic Stainless) (Bisque) (White) Illus. Part No.
Parts Catalog
Page 10
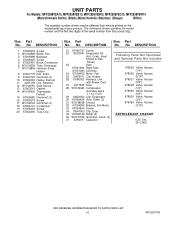
...Condenser 6 W10134293 Tube, Discharge 7 W10119856 Harness, Evap. DESCRIPTION Illus. Sheet) 23 Dam 67001084 Right Side 67001083 Left Side 24 67004432 Motor, Fan 25 10428101 Clip, Heater 26 13060302 Harness, Unit with Power Cord 27 2317845 Drier 28 W10134623 Compressor (... (5/16") 978027 Valve, Access (3/8") 978028 Valve, Access (1/2") 978029 Valve, Access (5/8") 978030 Valve, Access (3/4") 876764 Valve, Access (3/16") REFRIGERANT CHARGE 5.25 Ozs. (R−134A) 10 W10205734 DESCRIPTION 21 67006737 Screw 22 12002041 Evaporator Kit (Incl. Heater 8 67007175 Pan, Drain 9 ...
...Condenser 6 W10134293 Tube, Discharge 7 W10119856 Harness, Evap. DESCRIPTION Illus. Sheet) 23 Dam 67001084 Right Side 67001083 Left Side 24 67004432 Motor, Fan 25 10428101 Clip, Heater 26 13060302 Harness, Unit with Power Cord 27 2317845 Drier 28 W10134623 Compressor (... (5/16") 978027 Valve, Access (3/8") 978028 Valve, Access (1/2") 978029 Valve, Access (5/8") 978030 Valve, Access (3/4") 876764 Valve, Access (3/16") REFRIGERANT CHARGE 5.25 Ozs. (R−134A) 10 W10205734 DESCRIPTION 21 67006737 Screw 22 12002041 Evaporator Kit (Incl. Heater 8 67007175 Pan, Drain 9 ...


