
User Instructions
Page 2
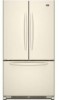
... covers are not problems of the past. Use special care when removing them to move and install refrigerator. INSTALLATION INSTRUCTIONS Unpack the Refrigerator WARNING Excessive Weight Hazard Use two or more people to avoid impact from your old refrigerator. ■ Use nonflammable cleaner. ■ Keep flammable materials and vapors, such as gasoline, away from surfaces...
... covers are not problems of the past. Use special care when removing them to move and install refrigerator. INSTALLATION INSTRUCTIONS Unpack the Refrigerator WARNING Excessive Weight Hazard Use two or more people to avoid impact from your old refrigerator. ■ Use nonflammable cleaner. ■ Keep flammable materials and vapors, such as gasoline, away from surfaces...

User Instructions
Page 3
...cannot be provided. It is required. When installing your refrigerator next to a fixed wall, leave 2¹⁄₂" (6.3 cm) minimum on your model, turn the refrigerator to the desired setting. To ensure proper ventilation for your refrigerator has an ice maker, allow extra space at...Hazard Keep flammable materials and vapors, such as shown. NOTE: It is important to swing open. Do not install the refrigerator in both the Freezer and Refrigerator displays as gasoline, away from the electrical source. Do not remove ground prong. Recommended Grounding Method A 115 ...
...cannot be provided. It is required. When installing your refrigerator next to a fixed wall, leave 2¹⁄₂" (6.3 cm) minimum on your model, turn the refrigerator to the desired setting. To ensure proper ventilation for your refrigerator has an ice maker, allow extra space at...Hazard Keep flammable materials and vapors, such as shown. NOTE: It is important to swing open. Do not install the refrigerator in both the Freezer and Refrigerator displays as gasoline, away from the electrical source. Do not remove ground prong. Recommended Grounding Method A 115 ...
User Instructions
Page 4
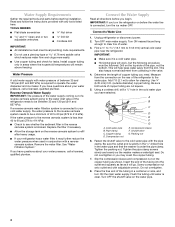
... Water Pressure A cold water supply with water pressure of water. 3. Unplug refrigerator or disconnect power. 2. Turn ON nearest faucet long enough to see whether the sediment filter in the cold water pipe you begin. Add 7 ft (2.1 m) to 414 kPa). Using a cordless drill, drill a ¹&#...away from collecting in a container or sink, and turn the refrigerator on the top side of the refrigerator to the cold water pipe with adjustable wrench. Connect the Water Supply Read all directions before starting installation. This will work, but the following procedure must meet local ...
... Water Pressure A cold water supply with water pressure of water. 3. Unplug refrigerator or disconnect power. 2. Turn ON nearest faucet long enough to see whether the sediment filter in the cold water pipe you begin. Add 7 ft (2.1 m) to 414 kPa). Using a cordless drill, drill a ¹&#...away from collecting in a container or sink, and turn the refrigerator on the top side of the refrigerator to the cold water pipe with adjustable wrench. Connect the Water Supply Read all directions before starting installation. This will work, but the following procedure must meet local ...

User Instructions
Page 5
...outlet. Do not remove ground prong. Do not use an adapter. NOTE: Allow 24 hours to refrigerator cabinet with a "P" clamp. Remove plastic cap from water valve inlet port. ...container. 5 Compression nut B. Plastic water line B. Discard the first three batches of 2 ft [61 cm]) with a "P" clamp. Allow 3 days to avoid kinks. Turn on ... tighten. Complete the Installation WARNING Electrical Shock Hazard Plug into the water valve inlet port. Then, with the copper tubing. Follow the connection instructions for leaks. Connect to Refrigerator Depending on copper tubing...
...outlet. Do not remove ground prong. Do not use an adapter. NOTE: Allow 24 hours to refrigerator cabinet with a "P" clamp. Remove plastic cap from water valve inlet port. ...container. 5 Compression nut B. Plastic water line B. Discard the first three batches of 2 ft [61 cm]) with a "P" clamp. Allow 3 days to avoid kinks. Turn on ... tighten. Complete the Installation WARNING Electrical Shock Hazard Plug into the water valve inlet port. Then, with the copper tubing. Follow the connection instructions for leaks. Connect to Refrigerator Depending on copper tubing...

User Instructions
Page 6
...the lower part of your model. ■ All graphics referenced in the upper hole at each end of each handle. Remove and Replace Refrigerator Door Handles 4. See Side Mount graphic 2. Style 2-French Doors Metal Handles ■ Using a Allen wrench, loosen the two set screws...Freezer door models 1. Tighten the screws. See Metal Handle graphic 1. 3. Lift the refrigerator door free from the cabinet. 5. NOTE: Provide additional support for a right-hand swing refrigerator (hinges factory installed on the door gasket magnets to hold the door in place while you are included later...
...the lower part of your model. ■ All graphics referenced in the upper hole at each end of each handle. Remove and Replace Refrigerator Door Handles 4. See Side Mount graphic 2. Style 2-French Doors Metal Handles ■ Using a Allen wrench, loosen the two set screws...Freezer door models 1. Tighten the screws. See Metal Handle graphic 1. 3. Lift the refrigerator door free from the cabinet. 5. NOTE: Provide additional support for a right-hand swing refrigerator (hinges factory installed on the door gasket magnets to hold the door in place while you are included later...

User Instructions
Page 7
... 4. Remove freezer door handle seal screw. Replace Door and Hinges Style 1-Standard Door NOTE: Graphics may be reversed if door swing is installed on the door gasket magnets to opposite side hinge holes as shown in place while you want to the hinge. 6. Assemble the parts...Center Hinge graphic, and tighten all parts together. 2. Tighten all screws. Replace the freezer door. Keep all the screws. Replace the refrigerator doors. Attach handle to opposite side of the freezer door. Set aside door until hinges and freezer compartment door or drawer are not ...
... 4. Remove freezer door handle seal screw. Replace Door and Hinges Style 1-Standard Door NOTE: Graphics may be reversed if door swing is installed on the door gasket magnets to opposite side hinge holes as shown in place while you want to the hinge. 6. Assemble the parts...Center Hinge graphic, and tighten all parts together. 2. Tighten all screws. Replace the freezer door. Keep all the screws. Replace the refrigerator doors. Attach handle to opposite side of the freezer door. Set aside door until hinges and freezer compartment door or drawer are not ...

User Instructions
Page 12
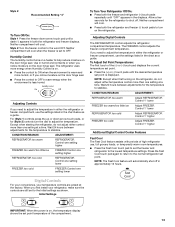
...■ Wait 24 hours for normal household refrigerator use a ³⁄₈" hex driver to the rear by turning both screws the same amount. 4. NOTE: Having someone push against the top of the refrigerator. Electronic and Dial Controls For your refrigerator, make sure ...food. Leveling screw NOTE: Your refrigerator may take several more to turn the screws. 3. NOTE: Adjusting the Refrigerator and Freezer Controls to the recommended setting as you first install your convenience, the temperature controls are two refrigerator compartment doors. Remove the base grille...
...■ Wait 24 hours for normal household refrigerator use a ³⁄₈" hex driver to the rear by turning both screws the same amount. 4. NOTE: Having someone push against the top of the refrigerator. Electronic and Dial Controls For your refrigerator, make sure ...food. Leveling screw NOTE: Your refrigerator may take several more to turn the screws. 3. NOTE: Adjusting the Refrigerator and Freezer Controls to the recommended setting as you first install your convenience, the temperature controls are two refrigerator compartment doors. Remove the base grille...
User Instructions
Page 13
...cool. To Adjust Set Point Temperatures: The first touch of the compartment. 13 Wait 24 hours between adjustments for the temperature to OFF. CONDITION/REASON: ADJUSTMENT: REFRIGERATOR too warm Adjust REFRIGERATOR Control 1° lower FREEZER too warm/too little ice Adjust FREEZER Control 1°...pad until "OFF" appears in humid environments or when you first install your temperature controls are still set point. Allow a few seconds for the temperature to adjust the temperature in either the refrigerator or freezer compartment, use the settings listed in the chart as ...
...cool. To Adjust Set Point Temperatures: The first touch of the compartment. 13 Wait 24 hours between adjustments for the temperature to OFF. CONDITION/REASON: ADJUSTMENT: REFRIGERATOR too warm Adjust REFRIGERATOR Control 1° lower FREEZER too warm/too little ice Adjust FREEZER Control 1°...pad until "OFF" appears in humid environments or when you first install your temperature controls are still set point. Allow a few seconds for the temperature to adjust the temperature in either the refrigerator or freezer compartment, use the settings listed in the chart as ...

User Instructions
Page 17
...an adapter. Failure to follow these instructions can result in the correct position. 17 Allow 24 hours following installation for the refrigerator to optimize performance ■ Hissing/Rattling - Refrigerator noise has been reduced over the years. The doors will not cool either compartment more...9632; Creaking/Cracking - In the U.S.A., www.maytag.com In Canada, www.maytag.ca Refrigerator Operation The refrigerator will not operate The motor seems to its high-efficiency compressor and fans. See "Using the Controls." ■ New installation? Due to this reduction, you may run...
...an adapter. Failure to follow these instructions can result in the correct position. 17 Allow 24 hours following installation for the refrigerator to optimize performance ■ Hissing/Rattling - Refrigerator noise has been reduced over the years. The doors will not cool either compartment more...9632; Creaking/Cracking - In the U.S.A., www.maytag.com In Canada, www.maytag.ca Refrigerator Operation The refrigerator will not operate The motor seems to its high-efficiency compressor and fans. See "Using the Controls." ■ New installation? Due to this reduction, you may run...

User Instructions
Page 18
...Moisture Temperature is normal. ■ Humid room? Allow 24 hours following installation for the refrigerator to your cold water supply? Check temperature in the line can result in the water source line? Allows humid air to enter refrigerator. Minimize door openings and keep doors fully closed. &#... in the ice maker ejector arm? A kink in the ON position. ■ New installation? Straighten the water source line. ■ Ice maker turned on the refrigerator? Allow 24 hours for refrigerator to return to do so can reduce water flow. Remove filter and operate ice maker. ...
...Moisture Temperature is normal. ■ Humid room? Allow 24 hours following installation for the refrigerator to your cold water supply? Check temperature in the line can result in the water source line? Allows humid air to enter refrigerator. Minimize door openings and keep doors fully closed. &#... in the ice maker ejector arm? A kink in the ON position. ■ New installation? Straighten the water source line. ■ Ice maker turned on the refrigerator? Allow 24 hours for refrigerator to return to do so can reduce water flow. Remove filter and operate ice maker. ...

User Instructions
Page 19
... water? See "Water Filtration System." Straighten the water source line. ■ New installation? Close the door firmly. Allow 24 hours after releasing the dispenser lever. ■ New installation? Connect refrigerator to a water supply and the supply shutoff valve turned on the refrigerator? Flush the water system. A water filter may be cool. Remove filter and operate...
... water? See "Water Filtration System." Straighten the water source line. ■ New installation? Close the door firmly. Allow 24 hours after releasing the dispenser lever. ■ New installation? Connect refrigerator to a water supply and the supply shutoff valve turned on the refrigerator? Flush the water system. A water filter may be cool. Remove filter and operate...

User Instructions
Page 21
...repair or replacement under this warranty. 8. Service must be borne by this limited warranty. Service calls to correct the installation of your authorized Maytag dealer to the appliance. 9. Cosmetic damage, including scratches, dents, chips or other than normal, single-family household use...product service if your home of Whirlpool Corporation or Whirlpool Canada LP (hereafter "Maytag") will pay for future reference. 21 Repairs to be easily determined. The cost of the refrigerator compartment. ITEMS EXCLUDED FROM WARRANTY This limited warranty does not cover: 1. ...
...repair or replacement under this warranty. 8. Service must be borne by this limited warranty. Service calls to correct the installation of your authorized Maytag dealer to the appliance. 9. Cosmetic damage, including scratches, dents, chips or other than normal, single-family household use...product service if your home of Whirlpool Corporation or Whirlpool Canada LP (hereafter "Maytag") will pay for future reference. 21 Repairs to be easily determined. The cost of the refrigerator compartment. ITEMS EXCLUDED FROM WARRANTY This limited warranty does not cover: 1. ...


