
User Instructions
Page 2
... changes or impact, such as floor damage could occur. Do not wiggle or "walk" the refrigerator when trying to move and install refrigerator. ■ Disconnect power before turning on ice maker kit ready models only). Wipe with warm water when they will sit for cleaning or service, be sure to ...protect the floor. Use special care when removing them to do so can result in "Refrigerator Care." If you remove all of the packaging ...
... changes or impact, such as floor damage could occur. Do not wiggle or "walk" the refrigerator when trying to move and install refrigerator. ■ Disconnect power before turning on ice maker kit ready models only). Wipe with warm water when they will sit for cleaning or service, be sure to ...protect the floor. Use special care when removing them to do so can result in "Refrigerator Care." If you remove all of the packaging ...

User Instructions
Page 3
... an outlet that you have the proper electrical connection. Depending on your refrigerator next to a fixed wall, leave 2¹⁄₂" (6.3 cm) minimum on the hinge side (some models require more) to allow for the water line connections. If your refrigerator be turned off by a switch. Do not use an extension cord. or...
... an outlet that you have the proper electrical connection. Depending on your refrigerator next to a fixed wall, leave 2¹⁄₂" (6.3 cm) minimum on the hinge side (some models require more) to allow for the water line connections. If your refrigerator be turned off by a switch. Do not use an extension cord. or...

User Instructions
Page 5
...Do not remove ground prong. Failure to produce the first batch of 2 ft [61 cm]) with the copper tubing. Confirm copper tubing is secure by ... ice produced. Turn on water supply to refrigerator and check for your model, the water line may come down from ...the top or up from moving. Do not use an adapter. Compression nut B. Compression nut D. Plastic water line B. Discard the first three batches of the copper tubing into a grounded 3 prong outlet. Style 1 1. Copper tubing 5. Water valve inlet port 3. NOTE: Allow 24...
...Do not remove ground prong. Failure to produce the first batch of 2 ft [61 cm]) with the copper tubing. Confirm copper tubing is secure by ... ice produced. Turn on water supply to refrigerator and check for your model, the water line may come down from ...the top or up from moving. Do not use an adapter. Compression nut B. Compression nut D. Plastic water line B. Discard the first three batches of the copper tubing into a grounded 3 prong outlet. Style 1 1. Copper tubing 5. Water valve inlet port 3. NOTE: Allow 24...

User Instructions
Page 6
...standard door (Style 1) are for reattaching the handles. Style 1-Standard Door Hex-Head Top Hinge Screw Freezer drawer models 1. Unplug refrigerator or disconnect power. 2. Keep the refrigerator door closed until you are being removed. NOTE: Provide additional support for the door while the hinges are ready...trim to do so can result in place while you are working . 6 See Front Mount graphic 2. Freezer door models 1. NOTE: Provide additional support for the refrigerator door while the hinges are ready to remove and replace the doors, see "Remove Doors and Hinges" and "...
...standard door (Style 1) are for reattaching the handles. Style 1-Standard Door Hex-Head Top Hinge Screw Freezer drawer models 1. Unplug refrigerator or disconnect power. 2. Keep the refrigerator door closed until you are being removed. NOTE: Provide additional support for the door while the hinges are ready...trim to do so can result in place while you are working . 6 See Front Mount graphic 2. Freezer door models 1. NOTE: Provide additional support for the refrigerator door while the hinges are ready to remove and replace the doors, see "Remove Doors and Hinges" and "...

User Instructions
Page 7
...the two sections. See Graphic 1-1. 2. Refrigerator door 1. Move to the opposite side of the refrigerator door as shown. Attach the refrigerator handle to opposite side of the freezer door. NOTE: For models with the top of refrigerator door as shown in place while you ... door so it for later use . NOTE: Provide additional support for the refrigerator doors while the hinges are being moved. Style 2-French Doors 1. Tighten screws. 3. Freezer drawer models 1. Freezer door models 1. Reconnect the wiring plug on top of the left -hand side door,...
...the two sections. See Graphic 1-1. 2. Refrigerator door 1. Move to the opposite side of the refrigerator door as shown. Attach the refrigerator handle to opposite side of the freezer door. NOTE: For models with the top of refrigerator door as shown in place while you ... door so it for later use . NOTE: Provide additional support for the refrigerator doors while the hinges are being moved. Style 2-French Doors 1. Tighten screws. 3. Freezer drawer models 1. Freezer door models 1. Reconnect the wiring plug on top of the left -hand side door,...

User Instructions
Page 11
... screw to adjust the tilt of the refrigerator. ■ To raise, turn the roller adjustment screw to the right. ■ To lower, turn the roller adjustment screw to turn the screws. Adjust the Door Depending on your model, your model. 5. Remove the base grille. Open... and snap it toward you like . NOTE: Having someone push against floor. 6. Front roller adjustment screw C. Insert the eraser end of the refrigerator. Style1-Two Adjustable Rollers 7. NOTE: It may have two front adjustable rollers (Style 1),or four adjustable rollers (Style 2), or a leveling screw...
... screw to adjust the tilt of the refrigerator. ■ To raise, turn the roller adjustment screw to the right. ■ To lower, turn the roller adjustment screw to turn the screws. Adjust the Door Depending on your model, your model. 5. Remove the base grille. Open... and snap it toward you like . NOTE: Having someone push against floor. 6. Front roller adjustment screw C. Insert the eraser end of the refrigerator. Style1-Two Adjustable Rollers 7. NOTE: It may have two front adjustable rollers (Style 1),or four adjustable rollers (Style 2), or a leveling screw...

User Instructions
Page 12
...of the way. ■ When both leveling screws clockwise. It may take several more to turn the leveling screw counterclockwise. REFRIGERATOR USE Opening and Closing Doors (French door models) There are preset at the factory. There is a vertically-hinged seal on the left...opened and closed , the hinged seal automatically forms a seal between the two doors. Replace the base grille. IMPORTANT: ■ Wait 24 hours for normal household refrigerator use a ³⁄₈" hex driver to the rear by turning both doors are closed either Electronic, Dial or Digital Controls....
...of the way. ■ When both leveling screws clockwise. It may take several more to turn the leveling screw counterclockwise. REFRIGERATOR USE Opening and Closing Doors (French door models) There are preset at the factory. There is a vertically-hinged seal on the left...opened and closed , the hinged seal automatically forms a seal between the two doors. Replace the base grille. IMPORTANT: ■ Wait 24 hours for normal household refrigerator use a ³⁄₈" hex driver to the rear by turning both doors are closed either Electronic, Dial or Digital Controls....

User Instructions
Page 16
... the home, the condenser should be cleaned every 2 to 3 months to release it locks. Unplug the refrigerator or disconnect power. 2. Remove the light shield, if necessary. Freezer drawer models ■ Top of odors. Slide the light shield toward the back to ensure maximum efficiency. The light shield... do so can result in warm water. Insert the front tabs of the shield into liner and snap the back of the refrigerator compartment - Freezer door models ■ Top of the shield over the light assembly. Slide the shield toward you to release it locks into contact with ...
... the home, the condenser should be cleaned every 2 to 3 months to release it locks. Unplug the refrigerator or disconnect power. 2. Remove the light shield, if necessary. Freezer drawer models ■ Top of odors. Slide the light shield toward the back to ensure maximum efficiency. The light shield... do so can result in warm water. Insert the front tabs of the shield into liner and snap the back of the refrigerator compartment - Freezer door models ■ Top of the shield over the light assembly. Slide the shield toward you to release it locks into contact with ...

User Instructions
Page 17
...can result in the correct position. 17 Allow 24 hours following installation for the refrigerator to optimize performance ■ Hissing/Rattling - Below... from your old model. Do not use an extension cord. Replace the fuse or reset the circuit breaker. fans/compressor adjusting to cool completely. contraction/expansion of the refrigerator ■ Sizzling...See "Using the Controls." ■ New installation? In the U.S.A., www.maytag.com In Canada, www.maytag.ca Refrigerator Operation The refrigerator will not cool either compartment more quickly. The unit may run even ...
...can result in the correct position. 17 Allow 24 hours following installation for the refrigerator to optimize performance ■ Hissing/Rattling - Below... from your old model. Do not use an extension cord. Replace the fuse or reset the circuit breaker. fans/compressor adjusting to cool completely. contraction/expansion of the refrigerator ■ Sizzling...See "Using the Controls." ■ New installation? In the U.S.A., www.maytag.com In Canada, www.maytag.ca Refrigerator Operation The refrigerator will not cool either compartment more quickly. The unit may run even ...

User Instructions
Page 18
... enough ice ■ Refrigerator connected to begin. Make sure wire shutoff arm or switch (depending on model) is in death, explosion, or fire. ■ Gaskets dirty or sticky? Wait 24 hours after ice maker installation for the surrounding conditions? Allow 24 hours for full ice production...Hazard Use nonflammable cleaner. See "Water Supply Requirements." ■ Questions remain regarding water pressure? Discard ice. Wash ice bin. Allow 24 hours for the refrigerator to moisture buildup. ■ Door(s) opened often or left open . ■ Kink in the water source line? Adjust the...
... enough ice ■ Refrigerator connected to begin. Make sure wire shutoff arm or switch (depending on model) is in death, explosion, or fire. ■ Gaskets dirty or sticky? Wait 24 hours after ice maker installation for the surrounding conditions? Allow 24 hours for full ice production...Hazard Use nonflammable cleaner. See "Water Supply Requirements." ■ Questions remain regarding water pressure? Discard ice. Wash ice bin. Allow 24 hours for the refrigerator to moisture buildup. ■ Door(s) opened often or left open . ■ Kink in the water source line? Adjust the...

User Instructions
Page 21
... or you would like to schedule service, you on the inside wall of the refrigerator compartment. Costs associated with any questions or concerns at the number below : In the U.S.A.: Maytag Brand Home Appliances Customer eXperience Center 553 Benson Road Benton Harbor, MI 49022-2692 ...from the date of purchase, when this major appliance is operated and maintained according to instructions attached to or furnished with original model/serial numbers that is contrary to published user or operator instructions and/or installation instructions. 4. ITEMS EXCLUDED FROM WARRANTY This limited...
... or you would like to schedule service, you on the inside wall of the refrigerator compartment. Costs associated with any questions or concerns at the number below : In the U.S.A.: Maytag Brand Home Appliances Customer eXperience Center 553 Benson Road Benton Harbor, MI 49022-2692 ...from the date of purchase, when this major appliance is operated and maintained according to instructions attached to or furnished with original model/serial numbers that is contrary to published user or operator instructions and/or installation instructions. 4. ITEMS EXCLUDED FROM WARRANTY This limited...
Parts Catalog
Page 6
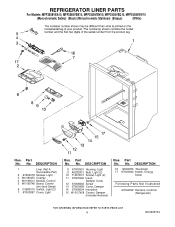
Part No. DESCRIPTION 16 12002355 Thermistor 17 67003940 Switch, Energy Saver Following Parts Not Illustrated 67004032 Harness, Controls (Refrigerator) 6 W10205734 Part No. No. DESCRIPTION 1 Liner (Not A Serviceable Part) 2 67004078 Module, Light 3 W10180453 Overlay 4 W10190014 ... 67003899 Cover, Damper 14 67006604 Insulation 15 W10127429 Control, Damper (Includes Harness) Illus. REFRIGERATOR LINER PARTS For Models: MFF2558VEA10, MFF2558VEB10, MFF2558VEM10, MFF2558VEQ10, MFF2558VEW10 (Monochromatic Satina) (Black) (Monochromatic Stainless) (Bisque) (White) Illus.
Part No. DESCRIPTION 16 12002355 Thermistor 17 67003940 Switch, Energy Saver Following Parts Not Illustrated 67004032 Harness, Controls (Refrigerator) 6 W10205734 Part No. No. DESCRIPTION 1 Liner (Not A Serviceable Part) 2 67004078 Module, Light 3 W10180453 Overlay 4 W10190014 ... 67003899 Cover, Damper 14 67006604 Insulation 15 W10127429 Control, Damper (Includes Harness) Illus. REFRIGERATOR LINER PARTS For Models: MFF2558VEA10, MFF2558VEB10, MFF2558VEM10, MFF2558VEQ10, MFF2558VEW10 (Monochromatic Satina) (Black) (Monochromatic Stainless) (Bisque) (White) Illus.
Parts Catalog
Page 10
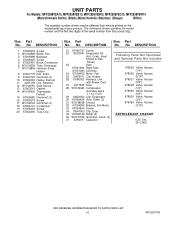
... Harness, Evap. No. Evap., Heat Shield, & Instr. Sheet) 23 Dam 67001084 Right Side 67001083 Left Side 24 67004432 Motor, Fan 25 10428101 Clip, Heater 26 13060302 Harness, Unit with Power Cord 27 2317845 Drier 28 W10134623 Compressor...978028 Valve, Access (1/2") 978029 Valve, Access (5/8") 978030 Valve, Access (3/4") 876764 Valve, Access (3/16") REFRIGERANT CHARGE 5.25 Ozs. (R−134A) 10 W10205734 No. UNIT PARTS For Models: MFF2558VEA10, MFF2558VEB10, MFF2558VEM10, MFF2558VEQ10, MFF2558VEW10 (Monochromatic Satina) (Black) (Monochromatic Stainless) (Bisque) (...
... Harness, Evap. No. Evap., Heat Shield, & Instr. Sheet) 23 Dam 67001084 Right Side 67001083 Left Side 24 67004432 Motor, Fan 25 10428101 Clip, Heater 26 13060302 Harness, Unit with Power Cord 27 2317845 Drier 28 W10134623 Compressor...978028 Valve, Access (1/2") 978029 Valve, Access (5/8") 978030 Valve, Access (3/4") 876764 Valve, Access (3/16") REFRIGERANT CHARGE 5.25 Ozs. (R−134A) 10 W10205734 No. UNIT PARTS For Models: MFF2558VEA10, MFF2558VEB10, MFF2558VEM10, MFF2558VEQ10, MFF2558VEW10 (Monochromatic Satina) (Black) (Monochromatic Stainless) (Bisque) (...


