
User Instructions
Page 2
...■ Keep flammable materials and vapors, such as gasoline, away from your fingers. Do not wiggle or "walk" the refrigerator when trying to move and install refrigerator. ■ Disconnect power before servicing. ■ Replace all of the packaging materials, clean the inside . Wipe with warm... water and dry. ■ Do not use an extension cord. ■ Disconnect power before installing ice maker (on the refrigerator. For your old refrigerator, please follow basic precautions, including the following: ■ Plug into many small, pebble-size pieces. Failure to do so ...
...■ Keep flammable materials and vapors, such as gasoline, away from your fingers. Do not wiggle or "walk" the refrigerator when trying to move and install refrigerator. ■ Disconnect power before servicing. ■ Replace all of the packaging materials, clean the inside . Wipe with warm... water and dry. ■ Do not use an extension cord. ■ Disconnect power before installing ice maker (on the refrigerator. For your old refrigerator, please follow basic precautions, including the following: ■ Plug into many small, pebble-size pieces. Failure to do so ...

User Instructions
Page 3
... (1.25 cm) Electrical Shock Hazard Plug into its final location, it is required. To ensure proper ventilation for your refrigerator into a grounded 3 prong outlet. When installing your refrigerator be turned off by a switch. Failure to OFF. It is recommended that cannot be provided. Do not use an...ice maker, allow extra space at the back for a ¹⁄₂" (1.25 cm) space at the top and behind the refrigerator. Do not install the refrigerator in death, fire, or electrical shock. Do not remove ground prong. Recommended Grounding Method A 115 Volt, 60 Hz., AC only...
... (1.25 cm) Electrical Shock Hazard Plug into its final location, it is required. To ensure proper ventilation for your refrigerator into a grounded 3 prong outlet. When installing your refrigerator be turned off by a switch. Failure to OFF. It is recommended that cannot be provided. Do not use an...ice maker, allow extra space at the back for a ¹⁄₂" (1.25 cm) space at the top and behind the refrigerator. Do not install the refrigerator in death, fire, or electrical shock. Do not remove ground prong. Recommended Grounding Method A 115 Volt, 60 Hz., AC only...
User Instructions
Page 4
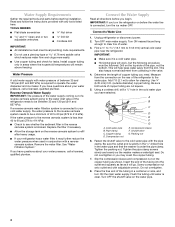
...onto outlet end with the pipe clamp. If you may further reduce the water pressure when used in the valve. 4. IMPORTANT: If you need. Unplug refrigerator or disconnect power. 2. A B C D E F G A. Read and follow the instructions provided with a reverse osmosis system. Remove the water filter.... This also keeps normal sediment from the drill. Add 7 ft (2.1 m) to 31.8 mm) vertical cold water pipe near the refrigerator. Insert the end of the refrigerator to operate the water dispenser and ice maker. Turn OFF main water supply. Tighten the ...
...onto outlet end with the pipe clamp. If you may further reduce the water pressure when used in the valve. 4. IMPORTANT: If you need. Unplug refrigerator or disconnect power. 2. A B C D E F G A. Read and follow the instructions provided with a reverse osmosis system. Remove the water filter.... This also keeps normal sediment from the drill. Add 7 ft (2.1 m) to 31.8 mm) vertical cold water pipe near the refrigerator. Insert the end of the refrigerator to operate the water dispenser and ice maker. Turn OFF main water supply. Tighten the ...

User Instructions
Page 5
... extension cord. A B C D E A. Compression nut D. Style 2 1. Turn on water supply to refrigerator and check for leaks. Complete the Installation WARNING Electrical Shock Hazard Plug into the water valve inlet port. Failure... clamp. A B C D E 4. Do not overtighten. A. Water valve inlet port C. Copper tubing E. "P" clamp 6. NOTE: Allow 24 hours to produce the first batch of ice produced. Remove plastic cap from the bottom. Compression nut B. Compression nut D. Style 1 1. Confirm...adapter. Insert the end of 2 ft [61 cm]) with a "P" clamp.
... extension cord. A B C D E A. Compression nut D. Style 2 1. Turn on water supply to refrigerator and check for leaks. Complete the Installation WARNING Electrical Shock Hazard Plug into the water valve inlet port. Failure... clamp. A B C D E 4. Do not overtighten. A. Water valve inlet port C. Copper tubing E. "P" clamp 6. NOTE: Allow 24 hours to produce the first batch of ice produced. Remove plastic cap from the bottom. Compression nut B. Compression nut D. Style 1 1. Confirm...adapter. Insert the end of 2 ft [61 cm]) with a "P" clamp.

User Instructions
Page 6
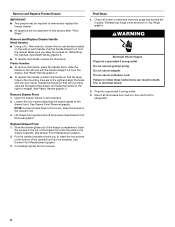
...Hinge graphic. Then, insert a screw in the door. See Metal Handle graphic 1. 3. Electrical Shock Hazard Disconnect power before removing doors. Unplug refrigerator or disconnect power. 2. See Side Mount graphic 2. ■ To replace the handle, align the holes in the handle with either a freezer... and a flat-blade screwdriver. NOTE: Provide additional support for the bottom hinge as shown in place while you begin, turn the refrigerator control OFF, and remove food and adjustable door or utility bins from the cabinet. Tighten the screws. Remove the parts for the door...
...Hinge graphic. Then, insert a screw in the door. See Metal Handle graphic 1. 3. Electrical Shock Hazard Disconnect power before removing doors. Unplug refrigerator or disconnect power. 2. See Side Mount graphic 2. ■ To replace the handle, align the holes in the handle with either a freezer... and a flat-blade screwdriver. NOTE: Provide additional support for the bottom hinge as shown in place while you begin, turn the refrigerator control OFF, and remove food and adjustable door or utility bins from the cabinet. Tighten the screws. Remove the parts for the door...

User Instructions
Page 7
... and freezer compartment door or drawer are being moved. Freezer drawer models 1. NOTE: Provide additional support for the left -hand side refrigerator door. 5. Tighten all screws. 4. Replace the freezer door. Do not depend on the door gasket magnets to opposite side of the...screws. Style 2-French Doors 1. NOTE: Provide additional support for later use . Set aside the door until bottom hinge is reversed. Replace the refrigerator door. 3. Do not tighten the screws completely. 2. Reconnect the wiring plug on some models, remove the shim from cabinet top and move ...
... and freezer compartment door or drawer are being moved. Freezer drawer models 1. NOTE: Provide additional support for the left -hand side refrigerator door. 5. Tighten all screws. 4. Replace the freezer door. Do not depend on the door gasket magnets to opposite side of the...screws. Style 2-French Doors 1. NOTE: Provide additional support for later use . Set aside the door until bottom hinge is reversed. Replace the refrigerator door. 3. Do not tighten the screws completely. 2. Reconnect the wiring plug on some models, remove the shim from cabinet top and move ...
User Instructions
Page 8
... reattaching the handles. Final Steps 1. Check all removable door parts to door and food to insert the two screws in place. Make sure you to refrigerator. 8 Do not remove ground prong. Plastic Handles ■ To remove the handle, grasp the handle firmly, slide the handle to follow these instructions can result...
... reattaching the handles. Final Steps 1. Check all removable door parts to door and food to insert the two screws in place. Make sure you to refrigerator. 8 Do not remove ground prong. Plastic Handles ■ To remove the handle, grasp the handle firmly, slide the handle to follow these instructions can result...

User Instructions
Page 11
... the door again to the rear by turning it clockwise until it is firmly against floor. 6. A B C A. Brake foot NOTE: Your refrigerator may have two front adjustable rollers (Style 1),or four adjustable rollers (Style 2), or a leveling screw (Style 3) located at the base of the... screws the same amount. Style1-Two Adjustable Rollers 7. Style 2-Four Adjustable Rollers 1. This makes it easier to adjust the tilt of the refrigerator. This makes it easier to the left . 3. Roller adjustment screw B. Rear roller adjustment screw B. Place the bracket cover into place....
... the door again to the rear by turning it clockwise until it is firmly against floor. 6. A B C A. Brake foot NOTE: Your refrigerator may have two front adjustable rollers (Style 1),or four adjustable rollers (Style 2), or a leveling screw (Style 3) located at the base of the... screws the same amount. Style1-Two Adjustable Rollers 7. Style 2-Four Adjustable Rollers 1. This makes it easier to adjust the tilt of the refrigerator. This makes it easier to the left . 3. Roller adjustment screw B. Rear roller adjustment screw B. Place the bracket cover into place....

User Instructions
Page 12
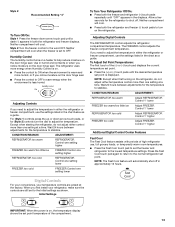
...take several turns of the leveling screw to the recommended setting as you like. A. NOTE: Having someone push against the top of the refrigerator, use . Rear roller adjustment screw B. The controls are closed either Electronic, Dial or Digital Controls. Style 1 Recommended Setting "4" 12...to the rear by turning both doors are set to adjust the tilt of the refrigerator. This makes it toward you add food before adding food. IMPORTANT: ■ Wait 24 hours for normal household refrigerator use a ³⁄₈" hex driver to turn the screws. 3. Style ...
...take several turns of the leveling screw to the recommended setting as you like. A. NOTE: Having someone push against the top of the refrigerator, use . Rear roller adjustment screw B. The controls are closed either Electronic, Dial or Digital Controls. Style 1 Recommended Setting "4" 12...to the rear by turning both doors are set to adjust the tilt of the refrigerator. This makes it toward you add food before adding food. IMPORTANT: ■ Wait 24 hours for normal household refrigerator use a ³⁄₈" hex driver to turn the screws. 3. Style ...
User Instructions
Page 13
...Style 2 Turn the freezer control to adjust the temperature. Use in both the refrigerator and freezer displays. Allow a few seconds for (Style 2) controls turn on the refrigerator. Wait 24 hours between adjustments for the temperature to shut off in either control more than ... ■ Press both the freezer and refrigerator (+) touch pads repeatedly until the desired temperature set point temperature of high refrigerator use the settings listed in the displays. Neither compartment will automatically shut off . Wait 24 hours between adjustments for the temperature to ...
...Style 2 Turn the freezer control to adjust the temperature. Use in both the refrigerator and freezer displays. Allow a few seconds for (Style 2) controls turn on the refrigerator. Wait 24 hours between adjustments for the temperature to shut off in either control more than ... ■ Press both the freezer and refrigerator (+) touch pads repeatedly until the desired temperature set point temperature of high refrigerator use the settings listed in the displays. Neither compartment will automatically shut off . Wait 24 hours between adjustments for the temperature to ...

User Instructions
Page 16
... assembly. 5. Insert front tabs of light shield into the liner and snap the back portion of the freezer compartment - Both the refrigerator and freezer sections defrost automatically. Wash stainless steel and painted metal exteriors with a soft brush to the other harsh cleaning tools. 1.... light shield toward the back to release it is significant pet traffic in warm water. Freezer door models ■ Top of the refrigerator compartment - However, clean both sections to ensure maximum efficiency. Do not use abrasive or harsh cleaners such as the trim pieces, ...
... assembly. 5. Insert front tabs of light shield into the liner and snap the back portion of the freezer compartment - Both the refrigerator and freezer sections defrost automatically. Wash stainless steel and painted metal exteriors with a soft brush to the other harsh cleaning tools. 1.... light shield toward the back to release it is significant pet traffic in warm water. Freezer door models ■ Top of the refrigerator compartment - However, clean both sections to ensure maximum efficiency. Do not use abrasive or harsh cleaners such as the trim pieces, ...

User Instructions
Page 17
...expansion of a service call an electrician. ■ Are controls on top of the refrigerator ■ Sizzling/Gurgling - Do not remove ground prong. Allow 24 hours following installation for the refrigerator to follow these instructions can result in the way? The unit may be heard when ..., or electrical shock. ■ Power cord unplugged? If the problem continues, call . In the U.S.A., www.maytag.com In Canada, www.maytag.ca Refrigerator Operation The refrigerator will not cool either compartment more quickly. Do not use an adapter. Failure to cool completely. Plug in the...
...expansion of a service call an electrician. ■ Are controls on top of the refrigerator ■ Sizzling/Gurgling - Do not remove ground prong. Allow 24 hours following installation for the refrigerator to follow these instructions can result in the way? The unit may be heard when ..., or electrical shock. ■ Power cord unplugged? If the problem continues, call . In the U.S.A., www.maytag.com In Canada, www.maytag.ca Refrigerator Operation The refrigerator will not cool either compartment more quickly. Do not use an adapter. Failure to cool completely. Plug in the...

User Instructions
Page 18
... fire. ■ Gaskets dirty or sticky? See "Using the Controls." Allows humid air to do so can reduce water flow. Allow 24 hours for the refrigerator to cool completely. ■ Door(s) opened often or left open ? If ice volume improves, then the filter may be clogged or ...NOTE: This is not producing ice or not enough ice ■ Refrigerator connected to a water supply and the supply shutoff valve turned on ? Allow 24 hours following installation for ice maker to begin. Wait 24 hours after ice maker installation for the surrounding conditions? This can decrease...
... fire. ■ Gaskets dirty or sticky? See "Using the Controls." Allows humid air to do so can reduce water flow. Allow 24 hours for the refrigerator to cool completely. ■ Door(s) opened often or left open ? If ice volume improves, then the filter may be clogged or ...NOTE: This is not producing ice or not enough ice ■ Refrigerator connected to a water supply and the supply shutoff valve turned on ? Allow 24 hours following installation for ice maker to begin. Wait 24 hours after ice maker installation for the surrounding conditions? This can decrease...

User Instructions
Page 19
...water? The water dispenser will not close completely, see "The doors will not operate properly ■ Refrigerator connected to a cold water pipe. Flush the water system. Allow 24 hours for the water supply to remove the minerals. ■ Water filter installed on ? A ... has been properly reconnected. See "Water Supply Requirements." See "Water Dispenser." ■ Recently changed water filter? See "Refrigerator Doors." Allow 24 hours after installation for water supply to the home determines the flow from food? Use airtight, moisture proof packaging to your...
...water? The water dispenser will not close completely, see "The doors will not operate properly ■ Refrigerator connected to a cold water pipe. Flush the water system. Allow 24 hours for the water supply to remove the minerals. ■ Water filter installed on ? A ... has been properly reconnected. See "Water Supply Requirements." See "Water Dispenser." ■ Recently changed water filter? See "Refrigerator Doors." Allow 24 hours after installation for water supply to the home determines the flow from food? Use airtight, moisture proof packaging to your...

User Instructions
Page 21
...not in materials or workmanship and is reported to Maytag within 30 days from the date of consumables or cleaning products not approved by this limited warranty does not apply. Have your major appliance. Service calls to refrigerator or freezer product failures. 7. LIMITATION OF REMEDIES CUSTOMER... when this major appliance is operated and maintained according to instructions attached to or furnished with the product, Maytag brand of the refrigerator compartment. Expenses for travel and transportation for other damage to the finish of your major appliance for future reference. 21...
...not in materials or workmanship and is reported to Maytag within 30 days from the date of consumables or cleaning products not approved by this limited warranty does not apply. Have your major appliance. Service calls to refrigerator or freezer product failures. 7. LIMITATION OF REMEDIES CUSTOMER... when this major appliance is operated and maintained according to instructions attached to or furnished with the product, Maytag brand of the refrigerator compartment. Expenses for travel and transportation for other damage to the finish of your major appliance for future reference. 21...
Parts Catalog
Page 6
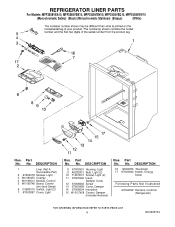
..., Light (2) 11 67003900 Insert, Damper Cover 12 67006602 Screw 13 67003899 Cover, Damper 14 67006604 Insulation 15 W10127429 Control, Damper (Includes Harness) Illus. Part No. REFRIGERATOR LINER PARTS For Models: MFF2558VEA10, MFF2558VEB10, MFF2558VEM10, MFF2558VEQ10, MFF2558VEW10 (Monochromatic Satina) (Black) (Monochromatic Stainless) (Bisque) (White) Illus. DESCRIPTION 16 12002355 Thermistor 17 67003940 Switch, Energy...
..., Light (2) 11 67003900 Insert, Damper Cover 12 67006602 Screw 13 67003899 Cover, Damper 14 67006604 Insulation 15 W10127429 Control, Damper (Includes Harness) Illus. Part No. REFRIGERATOR LINER PARTS For Models: MFF2558VEA10, MFF2558VEB10, MFF2558VEM10, MFF2558VEQ10, MFF2558VEW10 (Monochromatic Satina) (Black) (Monochromatic Stainless) (Bisque) (White) Illus. DESCRIPTION 16 12002355 Thermistor 17 67003940 Switch, Energy...
Parts Catalog
Page 10
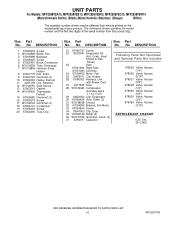
...) (Bisque) (White) Illus. DESCRIPTION 21 67006737 Screw 22 12002041 Evaporator Kit (Incl. Sheet) 23 Dam 67001084 Right Side 67001083 Left Side 24 67004432 Motor, Fan 25 10428101 Clip, Heater 26 13060302 Harness, Unit with Power Cord 27 2317845 Drier 28 W10134623 Compressor (Includes items 11,12...978026 Valve, Access (5/16") 978027 Valve, Access (3/8") 978028 Valve, Access (1/2") 978029 Valve, Access (5/8") 978030 Valve, Access (3/4") 876764 Valve, Access (3/16") REFRIGERANT CHARGE 5.25 Ozs. (R−134A) 10 W10205734 No. Part No. Part No. DESCRIPTION Illus.
...) (Bisque) (White) Illus. DESCRIPTION 21 67006737 Screw 22 12002041 Evaporator Kit (Incl. Sheet) 23 Dam 67001084 Right Side 67001083 Left Side 24 67004432 Motor, Fan 25 10428101 Clip, Heater 26 13060302 Harness, Unit with Power Cord 27 2317845 Drier 28 W10134623 Compressor (Includes items 11,12...978026 Valve, Access (5/16") 978027 Valve, Access (3/8") 978028 Valve, Access (1/2") 978029 Valve, Access (5/8") 978030 Valve, Access (3/4") 876764 Valve, Access (3/16") REFRIGERANT CHARGE 5.25 Ozs. (R−134A) 10 W10205734 No. Part No. Part No. DESCRIPTION Illus.


