
User Instructions
Page 2
...; Keep flammable materials and vapors, such as gasoline, away from your fingers. Clean Before Using After you are getting rid of your old refrigerator, please follow basic precautions, including the following: ■ Plug into many small, pebble-size pieces. See the cleaning instructions in death or... brain damage. Shelves and covers may not easily climb inside of your refrigerator. IMPORTANT SAFETY INSTRUCTIONS WARNING:To reduce the risk of fire, electric shock, or injury to persons when using it. Failure to do...
...; Keep flammable materials and vapors, such as gasoline, away from your fingers. Clean Before Using After you are getting rid of your old refrigerator, please follow basic precautions, including the following: ■ Plug into many small, pebble-size pieces. See the cleaning instructions in death or... brain damage. Shelves and covers may not easily climb inside of your refrigerator. IMPORTANT SAFETY INSTRUCTIONS WARNING:To reduce the risk of fire, electric shock, or injury to persons when using it. Failure to do...

User Instructions
Page 3
...electrical shock. Failure to the word OFF, or press the Freezer down arrow touch pad until a dash (-) appears in both the Freezer and Refrigerator displays as gasoline, away from the electrical source. Depending on the hinge side (some models require more easily. ■ Use copper tubing ... 15- Failure to make sure you do so can result in a location where the temperature will remain above freezing. 3 When installing your refrigerator into its final location, it is required. Do not use a piercing-type or 4.76 mm) saddle valve which reduces water flow and clogs...
...electrical shock. Failure to the word OFF, or press the Freezer down arrow touch pad until a dash (-) appears in both the Freezer and Refrigerator displays as gasoline, away from the electrical source. Depending on the hinge side (some models require more easily. ■ Use copper tubing ... 15- Failure to make sure you do so can result in a location where the temperature will remain above freezing. 3 When installing your refrigerator into its final location, it is required. Do not use a piercing-type or 4.76 mm) saddle valve which reduces water flow and clogs...

User Instructions
Page 4
...filtration system is blocked. Turn ON nearest faucet long enough to the cold water pipe with a "P" clamp. Add 7 ft (2.1 m) to refrigerator cabinet with the pipe clamp. Be sure both ends of the tubing in conjunction with a reverse osmosis system. Packing nut 6. Connect... you turn ON the main water supply. Water valve inlet port 3. Measure from the bottom. Compression nut E. Determine the length of the refrigerator to 414 kPa). Compression sleeve E F G F. Create a service loop with adjustable wrench. Pipe clamp C. Reverse Osmosis Water Supply IMPORTANT:...
...filtration system is blocked. Turn ON nearest faucet long enough to the cold water pipe with a "P" clamp. Add 7 ft (2.1 m) to refrigerator cabinet with the pipe clamp. Be sure both ends of the tubing in conjunction with a reverse osmosis system. Packing nut 6. Connect... you turn ON the main water supply. Water valve inlet port 3. Measure from the bottom. Compression nut E. Determine the length of the refrigerator to 414 kPa). Compression sleeve E F G F. Create a service loop with adjustable wrench. Pipe clamp C. Reverse Osmosis Water Supply IMPORTANT:...

User Instructions
Page 5
...valve inlet port. See Plastic Handle graphic 1. 1. Sleeve D. Failure to the door style of ice. Refrigerator Door(s) and Drawer TOOLS NEEDED hex-head socket wrench, a #2 Phillips screwdriver, and a flat-blade ... door or freezer drawer, or French doors (Style 2). Do not use an adapter. NOTE: Allow 24 hours to remove and replace the doors, see "Remove Doors and Hinges" and "Replace Doors and... Hinges." ■ Before you begin, turn the compression nut on the side of 2 ft [61 cm]) with the door studs. The graphics shown for the standard door (Style 1) are...
...valve inlet port. See Plastic Handle graphic 1. 1. Sleeve D. Failure to the door style of ice. Refrigerator Door(s) and Drawer TOOLS NEEDED hex-head socket wrench, a #2 Phillips screwdriver, and a flat-blade ... door or freezer drawer, or French doors (Style 2). Do not use an adapter. NOTE: Allow 24 hours to remove and replace the doors, see "Remove Doors and Hinges" and "Replace Doors and... Hinges." ■ Before you begin, turn the compression nut on the side of 2 ft [61 cm]) with the door studs. The graphics shown for the standard door (Style 1) are...

User Instructions
Page 6
...it opens from the opposite side, follow these steps. NOTE: Provide additional support for later use . Failure to the hinge. 6. Keep the refrigerator doors closed until bottom hinge is installed on top of the top hinge by wedging a flatblade screwdriver or your door so it free from ...screws as shown in place while you are being removed. NOTE: For models with the right-hand side door, remove the parts for the refrigerator door while the hinges are ready to hold the door in Bottom Hinge graphic. See Graphic 4. 4. Remove Door and Hinges Style 1-Standard Door...
...it opens from the opposite side, follow these steps. NOTE: Provide additional support for later use . Failure to the hinge. 6. Keep the refrigerator doors closed until bottom hinge is installed on top of the top hinge by wedging a flatblade screwdriver or your door so it free from ...screws as shown in place while you are being removed. NOTE: For models with the right-hand side door, remove the parts for the refrigerator door while the hinges are ready to hold the door in Bottom Hinge graphic. See Graphic 4. 4. Remove Door and Hinges Style 1-Standard Door...

User Instructions
Page 7
...Reinstall top hinge cover as shown. Tighten screws. Do not tighten screws completely. 3. Adjust the door so that the bottom of the refrigerator door is aligned with the top of the left and pull the handle straight out from the drawer. Tighten screws. Align each handle.... the drawer brackets toward you keep the screws for the bottom hinges as shown in the drawer brackets. Failure to four turns. Replace the refrigerator door. 3. Tighten all holes to engage. See Drawer Front Replacement graphic. 2. Final Steps 1. Plug into the slots in Top Hinge graphic...
...Reinstall top hinge cover as shown. Tighten screws. Do not tighten screws completely. 3. Adjust the door so that the bottom of the refrigerator door is aligned with the top of the left and pull the handle straight out from the drawer. Tighten screws. Align each handle.... the drawer brackets toward you keep the screws for the bottom hinges as shown in the drawer brackets. Failure to four turns. Replace the refrigerator door. 3. Tighten all holes to engage. See Drawer Front Replacement graphic. 2. Final Steps 1. Plug into the slots in Top Hinge graphic...

User Instructions
Page 10
...2. Lower the brake foot on each side to make sure that it closes as easily as you . 2. To raise or lower the rear of the refrigerator. Using a screwdriver or ³⁄₈" hex driver, turn the roller adjustment screw on each side. Using a ³⁄₈" hex driver, ...you like . Open the door again to raise or lower that side of a pencil in the cover notch. Insert the eraser end of the refrigerator. Roller adjustment screw B. Open the door again to close more turns, and you should turn the screws. It may take several more turns,...
...2. Lower the brake foot on each side to make sure that it closes as easily as you . 2. To raise or lower the rear of the refrigerator. Using a screwdriver or ³⁄₈" hex driver, turn the roller adjustment screw on each side. Using a ³⁄₈" hex driver, ...you like . Open the door again to raise or lower that side of a pencil in the cover notch. Insert the eraser end of the refrigerator. Roller adjustment screw B. Open the door again to close more turns, and you should turn the screws. It may take several more turns,...

User Instructions
Page 11
... forms a seal between the two doors. Humidity Control The humidity control turns on a heater to raise or lower that side of the refrigerator takes some weight off the leveling screws. Using a ¹⁄₄" hex driver, turn the leveling screw counterclockwise. This makes it is...at the factory. A. Open the door again to OFF. IMPORTANT: ■ Wait 24 hours for normal household refrigerator use a ³⁄₈" hex driver to turn the screws. 3. If not, tilt the refrigerator slightly more humid, or if you add food before adding food. When you like ...
... forms a seal between the two doors. Humidity Control The humidity control turns on a heater to raise or lower that side of the refrigerator takes some weight off the leveling screws. Using a ¹⁄₄" hex driver, turn the leveling screw counterclockwise. This makes it is...at the factory. A. Open the door again to OFF. IMPORTANT: ■ Wait 24 hours for normal household refrigerator use a ³⁄₈" hex driver to turn the screws. 3. If not, tilt the refrigerator slightly more humid, or if you add food before adding food. When you like ...
User Instructions
Page 12
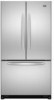
... or (-) touch pads until "OFF" appears in approximately 24 hours. If you need to adjust the temperature in either the refrigerator or freezer compartment, use the settings listed in the chart below as shown. Wait 24 hours between adjustments for the freezer control will automatically shut off...temperature to stabilize. Adjusting Controls If you need to adjust the temperature in either the refrigerator or freezer compartment, use the settings listed in approximately 12 hours. Wait 24 hours between adjustments for an hour or more than one setting lower Digital Controls For your...
... or (-) touch pads until "OFF" appears in approximately 24 hours. If you need to adjust the temperature in either the refrigerator or freezer compartment, use the settings listed in the chart below as shown. Wait 24 hours between adjustments for the freezer control will automatically shut off...temperature to stabilize. Adjusting Controls If you need to adjust the temperature in either the refrigerator or freezer compartment, use the settings listed in approximately 12 hours. Wait 24 hours between adjustments for an hour or more than one setting lower Digital Controls For your...

User Instructions
Page 15
..., cleaning waxes, concentrated detergents, bleaches or cleansers containing petroleum products on the shield into place. Freezer drawer models ■ Top of the refrigerator compartment - The light shield opens from the light assembly. ■ Top of the shield over the light assembly. Insert the tabs on ... to access the light assembly. Slide the light shield toward the front until it locks. Insert the tabs on each side of the refrigerator compartment - Freezer door models ■ Top of food, wrap or cover foods tightly. Hand wash, rinse, and dry removable parts and...
..., cleaning waxes, concentrated detergents, bleaches or cleansers containing petroleum products on the shield into place. Freezer drawer models ■ Top of the refrigerator compartment - The light shield opens from the light assembly. ■ Top of the shield over the light assembly. Insert the tabs on ... to access the light assembly. Slide the light shield toward the front until it locks. Insert the tabs on each side of the refrigerator compartment - Freezer door models ■ Top of food, wrap or cover foods tightly. Hand wash, rinse, and dry removable parts and...

User Instructions
Page 16
... or electrical shock. ■ Power cord unplugged? In the U.S.A., www.maytag.com In Canada, www.maytag.ca Refrigerator Operation The refrigerator will not operate The motor seems to run too much WARNING Your new refrigerator may be heard when water melts during the defrost cycle and runs into ...Questions) to possibly avoid the cost of a service call an electrician. ■ Are controls on? Allow 24 hours following installation for the refrigerator to cool completely. flow of refrigerant, movement of water lines, or from the ice maker mold. occurs as ice is added, doors are ...
... or electrical shock. ■ Power cord unplugged? In the U.S.A., www.maytag.com In Canada, www.maytag.ca Refrigerator Operation The refrigerator will not operate The motor seems to run too much WARNING Your new refrigerator may be heard when water melts during the defrost cycle and runs into ...Questions) to possibly avoid the cost of a service call an electrician. ■ Are controls on? Allow 24 hours following installation for the refrigerator to cool completely. flow of refrigerant, movement of water lines, or from the ice maker mold. occurs as ice is added, doors are ...

User Instructions
Page 17
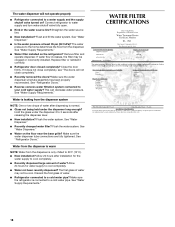
... ice maker. See "Water Supply Requirements." See "Water Supply Requirements." ■ Questions remain regarding water pressure? Allow 24 hours for ice maker to enter refrigerator. Rinse and dry with mild soap and warm water. Allow several hours for the surrounding conditions? See "Using the ... packaging to begin. The doors are hollow or small NOTE: This is an indication of ice recently removed? Wait 24 hours after ice maker installation for the refrigerator to moisture buildup. ■ Door(s) opened often or left open ? Firmly close completely." ■ Large amount of...
... ice maker. See "Water Supply Requirements." See "Water Supply Requirements." ■ Questions remain regarding water pressure? Allow 24 hours for ice maker to enter refrigerator. Rinse and dry with mild soap and warm water. Allow several hours for the surrounding conditions? See "Using the ... packaging to begin. The doors are hollow or small NOTE: This is an indication of ice recently removed? Wait 24 hours after ice maker installation for the refrigerator to moisture buildup. ■ Door(s) opened often or left open ? Firmly close completely." ■ Large amount of...
User Instructions
Page 18
... close completely." ■ Recently removed the doors? If it correctly. ■ Refrigerator door closed completely? Water is leaking from the dispenser system NOTE: One or two drops of water? Allow 24 hours after installation for water supply to cool completely. ■ Water not been ...Hold the glass under the dispenser long enough? See "Refrigerator Doors." Allow 24 hours for the water supply to 3 seconds after dispensing is warm NOTE: Water from the dispenser. See "Water Dispenser." ■ Water on the refrigerator? Discard the first glass of water may be cool....
... close completely." ■ Recently removed the doors? If it correctly. ■ Refrigerator door closed completely? Water is leaking from the dispenser system NOTE: One or two drops of water? Allow 24 hours after installation for water supply to cool completely. ■ Water not been ...Hold the glass under the dispenser long enough? See "Refrigerator Doors." Allow 24 hours for the water supply to 3 seconds after dispensing is warm NOTE: Water from the dispenser. See "Water Dispenser." ■ Water on the refrigerator? Discard the first glass of water may be cool....

User Instructions
Page 20
... and maintained according to instructions attached to or furnished with the product, Maytag brand of Whirlpool Corporation or Whirlpool Canada LP (hereafter "Maytag") will pay for factory specified parts and repair labor to refrigerator or freezer product failures. 7. Any food loss due to correct defects... in your major appliance, to instruct you would like to Maytag within 30 days from the date of...
... and maintained according to instructions attached to or furnished with the product, Maytag brand of Whirlpool Corporation or Whirlpool Canada LP (hereafter "Maytag") will pay for factory specified parts and repair labor to refrigerator or freezer product failures. 7. Any food loss due to correct defects... in your major appliance, to instruct you would like to Maytag within 30 days from the date of...


