
Warranty Information
Page 1
... States and Canada, contact your major appliance, unless such damage results from defects in materials or workmanship and is reported to Maytag within 30 days from the date of purchase. 6. MAYTAG® REFRIGERATION LIMITED WARRANTY FIRST YEAR LIMITED WARRANTY (PARTS AND LABOR) For one year from the date of purchase, when this major...
... States and Canada, contact your major appliance, unless such damage results from defects in materials or workmanship and is reported to Maytag within 30 days from the date of purchase. 6. MAYTAG® REFRIGERATION LIMITED WARRANTY FIRST YEAR LIMITED WARRANTY (PARTS AND LABOR) For one year from the date of purchase, when this major...
Warranty Information
Page 2
Have your model number and serial number on the label, located on the inside wall of the refrigerator compartment. In Canada, call 1-800-688-9900. Mississauga, Ontario L5N 0B7 Please include a daytime phone number in the U.S.A., call 1-800-807-6777. Please keep these... and the model number information for future reference. 28 For assistance or service in your correspondence. For additional product information, in the U.S.A., visit www.maytag.com In Canada, visit www.maytag.ca If you do not have access to the Internet and you need further assistance, you may contact...
Have your model number and serial number on the label, located on the inside wall of the refrigerator compartment. In Canada, call 1-800-688-9900. Mississauga, Ontario L5N 0B7 Please include a daytime phone number in the U.S.A., call 1-800-807-6777. Please keep these... and the model number information for future reference. 28 For assistance or service in your correspondence. For additional product information, in the U.S.A., visit www.maytag.com In Canada, visit www.maytag.ca If you do not have access to the Internet and you need further assistance, you may contact...
Use & Care Guide
Page 2
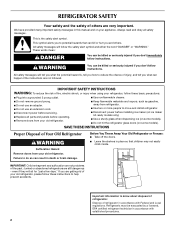
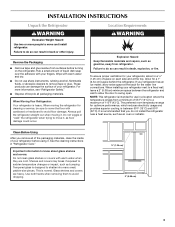
...maker kit ready models only). ■ Use a sturdy glass when dispensing ice (on some models). ■ Do not hit the refrigerator glass doors (on your old refrigerator. If you and others are not followed. IMPORTANT SAFETY INSTRUCTIONS WARNING: To reduce the risk of fire, electric shock, or injury when ... messages will tell you what the potential hazard is the safety alert symbol. Failure to help prevent accidents. Before You Throw Away Your Old Refrigerator or Freezer: ■ Take off the doors. ■ Leave the shelves in place so that can be killed or seriously injured if ...
...maker kit ready models only). ■ Use a sturdy glass when dispensing ice (on some models). ■ Do not hit the refrigerator glass doors (on your old refrigerator. If you and others are not followed. IMPORTANT SAFETY INSTRUCTIONS WARNING: To reduce the risk of fire, electric shock, or injury when ... messages will tell you what the potential hazard is the safety alert symbol. Failure to help prevent accidents. Before You Throw Away Your Old Refrigerator or Freezer: ■ Take off the doors. ■ Leave the shelves in place so that can be killed or seriously injured if ...
Use & Care Guide
Page 3
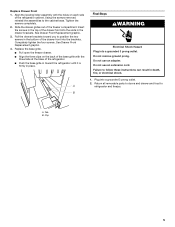
... WARNING Explosion Hazard Keep flammable materials and vapors, such as floor damage could occur. If your refrigerator. It is between the refrigerator and wall to allow the door to move and install refrigerator. Shelves and covers may break if exposed to shatter into many small, pebble-size pieces. This...and dry. ■ Do not use in death, explosion, or fire. These products can damage the surface of your refrigerator has an ice maker, allow for your refrigerator before turning on each side and at the back for the water line connections. When moving it . Allow for use ...
... WARNING Explosion Hazard Keep flammable materials and vapors, such as floor damage could occur. If your refrigerator. It is between the refrigerator and wall to allow the door to move and install refrigerator. Shelves and covers may break if exposed to shatter into many small, pebble-size pieces. This...and dry. ■ Do not use in death, explosion, or fire. These products can damage the surface of your refrigerator has an ice maker, allow for your refrigerator before turning on each side and at the back for the water line connections. When moving it . Allow for use ...
Use & Care Guide
Page 4
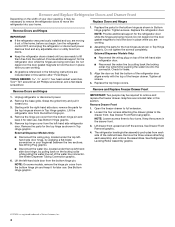
... graphic. See Water Dispenser Tubing Connection graphic. 6. Check for the top hinge as shown in the drawer front. 3. Lift the refrigerator door from the bottom hinge pin. Graphics are being removed. See Drawer Front Removal graphic. 4. Tighten screws. Assemble the parts for...-blade screwdriver or your fingernail between the two sections. See Wiring Plug graphic. Keep the screws in Top Hinge graphic. See Refrigerator Leveling/Roller Assembly graphic. ■ Disconnect the water line, located under the top lefthand side door hinge, by pulling back...
... graphic. See Water Dispenser Tubing Connection graphic. 6. Check for the top hinge as shown in the drawer front. 3. Lift the refrigerator door from the bottom hinge pin. Graphics are being removed. See Drawer Front Removal graphic. 4. Tighten screws. Assemble the parts for...-blade screwdriver or your fingernail between the two sections. See Wiring Plug graphic. Keep the screws in Top Hinge graphic. See Refrigerator Leveling/Roller Assembly graphic. ■ Disconnect the water line, located under the top lefthand side door hinge, by pulling back...
Use & Care Guide
Page 5
... the screws in place. See Drawer Front Replacement graphic. 4. Do not use an extension cord. Failure to refrigerator and freezer. Clip 5 Slide the drawer glides out of the refrigerator cabinet. Pull the drawer brackets toward the refrigerator until it is firmly in the top of the drawer front into a grounded 3 prong outlet. A B Final... shock. 1. Align the leveling/roller assembly with the holes on the back of the base grille with the three tabs at the base of the refrigerator. ■ Push the base grille in the drawer brackets.
... the screws in place. See Drawer Front Replacement graphic. 4. Do not use an extension cord. Failure to refrigerator and freezer. Clip 5 Slide the drawer glides out of the refrigerator cabinet. Pull the drawer brackets toward the refrigerator until it is firmly in the top of the drawer front into a grounded 3 prong outlet. A B Final... shock. 1. Align the leveling/roller assembly with the holes on the back of the base grille with the three tabs at the base of the refrigerator. ■ Push the base grille in the drawer brackets.
Use & Care Guide
Page 8
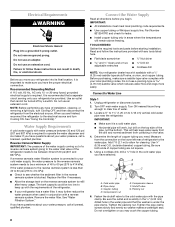
...qualified plumber. If you have selected. Do not use an adapter. Compression nut E. Do not overtighten or you have questions about your refrigerator into a grounded 3 prong outlet. Do not use an extension cord. This will work, but drill on the lower left rear ...reverse osmosis system. Be sure the outlet end is solidly in the ¹⁄₄" (6.35 mm) drilled hole in the valve. 4. Unplug refrigerator or disconnect power. 2. A G B C FE D A. Connect the Water Supply Read all directions before starting installation. See "Using the Control(s)."...
...qualified plumber. If you have selected. Do not use an adapter. Compression nut E. Do not overtighten or you have questions about your refrigerator into a grounded 3 prong outlet. Do not use an extension cord. This will work, but drill on the lower left rear ...reverse osmosis system. Be sure the outlet end is solidly in the ¹⁄₄" (6.35 mm) drilled hole in the valve. 4. Unplug refrigerator or disconnect power. 2. A G B C FE D A. Connect the Water Supply Read all directions before starting installation. See "Using the Control(s)."...
Use & Care Guide
Page 9
... from your water conditions require a second water strainer, install it with adjustable wrench. Turn shutoff valve ON. 5. Unplug refrigerator or disconnect power. 2. Tighten the compression nut. Do not overtighten. 3. Tighten any connections (including connections at the valve... Compression nut E. Discard the first three batches of the tubing into the outlet end squarely as far as shown. Coil the copper tubing. Unplug refrigerator or disconnect power. 2. Style 2 1. Check for leaks. Household water line 4. Tube clamp B. Nut (provided) 4. Nut (provided) C. Insert...
... from your water conditions require a second water strainer, install it with adjustable wrench. Turn shutoff valve ON. 5. Unplug refrigerator or disconnect power. 2. Tighten the compression nut. Do not overtighten. 3. Tighten any connections (including connections at the valve... Compression nut E. Discard the first three batches of the tubing into the outlet end squarely as far as shown. Coil the copper tubing. Unplug refrigerator or disconnect power. 2. Style 2 1. Check for leaks. Household water line 4. Tube clamp B. Nut (provided) 4. Nut (provided) C. Insert...
Use & Care Guide
Page 10
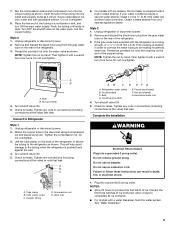
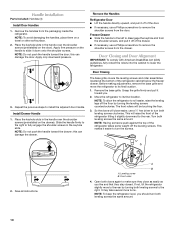
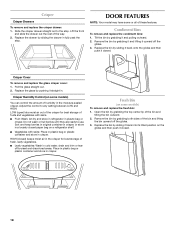
...turn the screws. ¹⁄₄" 2. Remove the handles from the door. Slide the handle firmly to the right to lower the refrigerator. Door Closing and Door Alignment IMPORTANT: To comply with American Disabilities Act (ADA) guidelines, fully retract the rollers into the cabinet to ...fully engage the shoulder screws in the keyhole slots. Move the refrigerator to turn both leveling screws clockwise. This will raise the front of the door. ■ If necessary, use a ¹⁄₄"...
...turn the screws. ¹⁄₄" 2. Remove the handles from the door. Slide the handle firmly to the right to lower the refrigerator. Door Closing and Door Alignment IMPORTANT: To comply with American Disabilities Act (ADA) guidelines, fully retract the rollers into the cabinet to ...fully engage the shoulder screws in the keyhole slots. Move the refrigerator to turn both leveling screws clockwise. This will raise the front of the door. ■ If necessary, use a ¹⁄₄"...
Use & Care Guide
Page 11
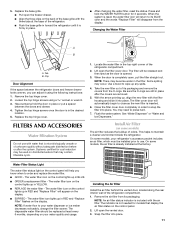
... RED and "Replace Filter" will appear on the display. ■ EXPIRED - Close the filter cover door completely in the top-right corner of the refrigerator compartment. 2. This helps to order and replace the water filter. ■ GOOD - The water filter icon on the display. The water filter icon... (on the control lights up , align the new filter with the three tabs at the base of its packaging. On some models, your refrigerator's accessory packet includes an air filter, which must be released and then eject as the new filter is completely open the freezer drawer. ■...
... RED and "Replace Filter" will appear on the display. ■ EXPIRED - Close the filter cover door completely in the top-right corner of the refrigerator compartment. 2. This helps to order and replace the water filter. ■ GOOD - The water filter icon on the display. The water filter icon... (on the control lights up , align the new filter with the three tabs at the base of its packaging. On some models, your refrigerator's accessory packet includes an air filter, which must be released and then eject as the new filter is completely open the freezer drawer. ■...
Use & Care Guide
Page 12
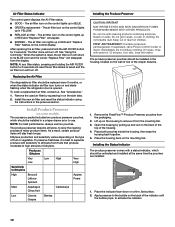
... displays the Air Filter status. ■ GOOD - The air filter icon on the mounting tab. The air filter icon on and starts flashing when the refrigerator door is best to slow the ripening process of children. After replacing the air filter, press and hold the AIR FILTER button for 15 minutes...
... displays the Air Filter status. ■ GOOD - The air filter icon on the mounting tab. The air filter icon on and starts flashing when the refrigerator door is best to slow the ripening process of children. After replacing the air filter, press and hold the AIR FILTER button for 15 minutes...
Use & Care Guide
Page 13
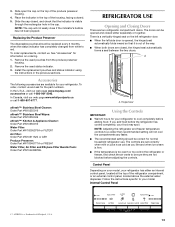
... the housing, facing outward. 5. In the U.S.A., visit our web page www.maytag.com/ accessories or call 1-800-807-6777. See "Accessories" for the part numbers. The doors can be correct for your refrigerator has either separately or together. Control Panel Depending on ordering. 1. If you... cold in the cap. To order, contact us . Hinged seal Using the Controls IMPORTANT: ■ Wait 24 hours for normal household refrigerator use. Follow the instructions specific to a colder than recommended setting will not easily close if the indicator's bubble has not been popped....
... the housing, facing outward. 5. In the U.S.A., visit our web page www.maytag.com/ accessories or call 1-800-807-6777. See "Accessories" for the part numbers. The doors can be correct for your refrigerator has either separately or together. Control Panel Depending on ordering. 1. If you... cold in the cap. To order, contact us . Hinged seal Using the Controls IMPORTANT: ■ Wait 24 hours for normal household refrigerator use. Follow the instructions specific to a colder than recommended setting will not easily close if the indicator's bubble has not been popped....
Use & Care Guide
Page 14
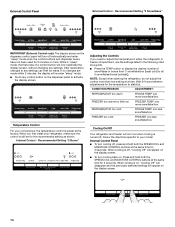
...guide. ■ Press the TEMP button to stabilize. External Control Panel External Control - When you need to adjust the temperature in either the refrigerator or freezer compartment, use the settings listed in "sleep" mode, the first press of snowflakes or boxes from (1 snowflake/box [least cold...the control buttons and dispenser levers have not been used for 2 minutes or more than one less snowflake/box Cooling On/Off Your refrigerator and freezer will turn cooling back on the dispenser panel to all 5 snowflakes/boxes [coldest]). Recommended Setting "3 Boxes" Adjusting the ...
...guide. ■ Press the TEMP button to stabilize. External Control Panel External Control - When you need to adjust the temperature in either the refrigerator or freezer compartment, use the settings listed in "sleep" mode, the first press of snowflakes or boxes from (1 snowflake/box [least cold...the control buttons and dispenser levers have not been used for 2 minutes or more than one less snowflake/box Cooling On/Off Your refrigerator and freezer will turn cooling back on the dispenser panel to all 5 snowflakes/boxes [coldest]). Recommended Setting "3 Boxes" Adjusting the ...
Use & Care Guide
Page 15
...as while cleaning the inside of ice. Flush the Water System Air in SpeedCool mode. ■ The SpeedCool feature will be illuminated while the refrigerator is on . NOTE: The moisture control icon will light up whenever either door is open again for 5 minutes. To turn on . ...Off" will disappear and the previously selected settings will appear on the display screen. ■ To turn cooling back on . After connecting the refrigerator to drip. Additional flushing may be fully closed properly. When cooling is left open for 5 minutes and cooling is off, "Cooling Off" will...
...as while cleaning the inside of ice. Flush the Water System Air in SpeedCool mode. ■ The SpeedCool feature will be illuminated while the refrigerator is on . NOTE: The moisture control icon will light up whenever either door is open again for 5 minutes. To turn on . ...Off" will disappear and the previously selected settings will appear on the display screen. ■ To turn cooling back on . After connecting the refrigerator to drip. Additional flushing may be fully closed properly. When cooling is left open for 5 minutes and cooling is off, "Cooling Off" will...
Use & Care Guide
Page 16
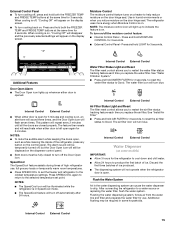
... for easy cleaning or to avoid unintentional dispensing by small children and pets. Dispense Water IMPORTANT: ■ The dispensing system will not operate when the refrigerator door is open. ■ The display screen on the dispenser control panel will turn off the ice maker, see "Troubleshooting" for 5 seconds. Press a sturdy ... ice maker, and push it toward the back as far as it appears that your dispenser lights are LEDs that the "off power to the refrigerator, to the ice maker, or to begin producing ice. NOTE: As air is made, the ice cubes will fill the ice storage bin and...
... for easy cleaning or to avoid unintentional dispensing by small children and pets. Dispense Water IMPORTANT: ■ The dispensing system will not operate when the refrigerator door is open. ■ The display screen on the dispenser control panel will turn off the ice maker, see "Troubleshooting" for 5 seconds. Press a sturdy ... ice maker, and push it toward the back as far as it appears that your dispenser lights are LEDs that the "off power to the refrigerator, to the ice maker, or to begin producing ice. NOTE: As air is made, the ice cubes will fill the ice storage bin and...
Use & Care Guide
Page 17
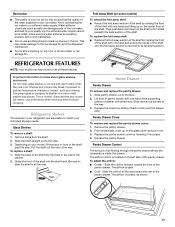
... may have some models) To retract the fold away shelf: ■ Retract the fold away section of the shelf by sliding it back in your refrigerator are heavy. The airflow control is located on some or all the way. Then push back and down on the center front of the shelf... one hand while supporting bottom of drawer with warm water when they are cold. Fold Away Shelf (on the left side of the pantry drawer. REFRIGERATOR FEATURES NOTE: Your model may break if exposed to sudden temperature changes or impact, such as the quality of the water supplied to the stop...
... may have some models) To retract the fold away shelf: ■ Retract the fold away section of the shelf by sliding it back in your refrigerator are heavy. The airflow control is located on some or all the way. Then push back and down on the center front of the shelf... one hand while supporting bottom of drawer with warm water when they are cold. Fold Away Shelf (on the left side of the pantry drawer. REFRIGERATOR FEATURES NOTE: Your model may break if exposed to sudden temperature changes or impact, such as the quality of the water supplied to the stop...
Use & Care Guide
Page 18
... plastic container and store in crisper. Replace the drawer by grabbing it back into its tilted position on a refrigerator shelf. ■ Vegetables with skins. ■ Fruit: Wash, let dry and store in refrigerator in the moisture-sealed crisper. Crisper Humidity Control (on some or all of fruits and vegetables with skins: Place...
... plastic container and store in crisper. Replace the drawer by grabbing it back into its tilted position on a refrigerator shelf. ■ Vegetables with skins. ■ Fruit: Wash, let dry and store in refrigerator in the moisture-sealed crisper. Crisper Humidity Control (on some or all of fruits and vegetables with skins: Place...
Use & Care Guide
Page 19
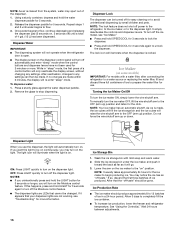
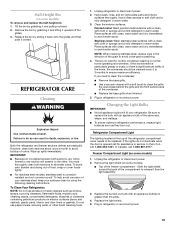
...If the lights do so can result in the direction of the same size, shape, and wattage. ■ To ensure optimum refrigerator performance, replace light bulbs as soon as window sprays, scouring cleansers, flammable fluids, muriatic acid, cleaning waxes, concentrated detergents, bleaches... or cleansers containing petroleum products on some models). ■ Top of the refrigerator compartment never needs to be cleaned every 2 to 3 months to avoid cross-grain scratching. 4. In the U.S.A., call 1-800-807-6777....
...If the lights do so can result in the direction of the same size, shape, and wattage. ■ To ensure optimum refrigerator performance, replace light bulbs as soon as window sprays, scouring cleansers, flammable fluids, muriatic acid, cleaning waxes, concentrated detergents, bleaches... or cleansers containing petroleum products on some models). ■ Top of the refrigerator compartment never needs to be cleaned every 2 to 3 months to avoid cross-grain scratching. 4. In the U.S.A., call 1-800-807-6777....
Use & Care Guide
Page 20
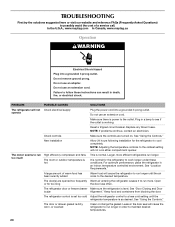
... Asked Questions) to possibly avoid the cost of warm food has been recently added Warm food will cause the refrigerator to run longer until the refrigerator temperature is as desired. Do not use an adapter. Failure to the outlet. Make sure there is power to...refrigerator to run too much High efficiency compressor and fans The room or outdoor temperature is hot This is ajar Alignment." Keep food and containers from blocking the door. Leaks in the door seal will not Check electrical supply operate Plug the power cord into a grounded 3 prong outlet. In the U.S.A., www.maytag...
... Asked Questions) to possibly avoid the cost of warm food has been recently added Warm food will cause the refrigerator to run longer until the refrigerator temperature is as desired. Do not use an adapter. Failure to the outlet. Make sure there is power to...refrigerator to run too much High efficiency compressor and fans The room or outdoor temperature is hot This is ajar Alignment." Keep food and containers from blocking the door. Leaks in the door seal will not Check electrical supply operate Plug the power cord into a grounded 3 prong outlet. In the U.S.A., www.maytag...
Use & Care Guide
Page 21
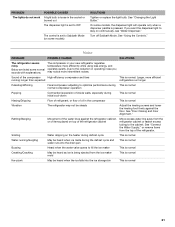
... some models, the dispenser light will operate only when a dispenser paddle is normal. Noise PROBLEM POSSIBLE CAUSES SOLUTIONS The refrigerator seems noisy Below are listed some models) SOLUTIONS Tighten or replace the light bulb. Sound of the compressor High efficiency compressor... light to stay on the heater during initial cool-down This is normal Hissing/Dripping Flow of refrigerant, or flow of oil in the compressor This is normal Vibration The refrigerator may notice more intermittent noises. See "Door Closing and Door Alignment." Larger, more efficiently while using...
... some models, the dispenser light will operate only when a dispenser paddle is normal. Noise PROBLEM POSSIBLE CAUSES SOLUTIONS The refrigerator seems noisy Below are listed some models) SOLUTIONS Tighten or replace the light bulb. Sound of the compressor High efficiency compressor... light to stay on the heater during initial cool-down This is normal Hissing/Dripping Flow of refrigerant, or flow of oil in the compressor This is normal Vibration The refrigerator may notice more intermittent noises. See "Door Closing and Door Alignment." Larger, more efficiently while using...


