
Warranty Information
Page 1
.... 9. If outside the 50 United States and Canada, contact your major appliance, to instruct you on major appliances with original model/serial numbers that is inconsistent to published user or operator instructions and/or installation instructions. 2. This warranty gives you specific legal rights...applies. 5/10 27 Any food or medicine loss due to repair or replace appliance light bulbs, air filters or water filters. MAYTAG® REFRIGERATION LIMITED WARRANTY FIRST YEAR LIMITED WARRANTY (PARTS AND LABOR) For one year from the date of purchase, when this major appliance...
.... 9. If outside the 50 United States and Canada, contact your major appliance, to instruct you on major appliances with original model/serial numbers that is inconsistent to published user or operator instructions and/or installation instructions. 2. This warranty gives you specific legal rights...applies. 5/10 27 Any food or medicine loss due to repair or replace appliance light bulbs, air filters or water filters. MAYTAG® REFRIGERATION LIMITED WARRANTY FIRST YEAR LIMITED WARRANTY (PARTS AND LABOR) For one year from the date of purchase, when this major appliance...

Warranty Information
Page 2
...: Maytag Brand Home Appliances Customer eXperience Centre 200 - 6750 Century Ave. If you need assistance using your product or you would like to schedule service, you can find your model number and serial number on the label, located on the inside wall of the refrigerator compartment.... Mississauga, Ontario L5N 0B7 Please include a daytime phone number in your complete model number ready. Please keep these User Instructions and the model number information for future reference. 28 In Canada, call 1-800...
...: Maytag Brand Home Appliances Customer eXperience Centre 200 - 6750 Century Ave. If you need assistance using your product or you would like to schedule service, you can find your model number and serial number on the label, located on the inside wall of the refrigerator compartment.... Mississauga, Ontario L5N 0B7 Please include a daytime phone number in your complete model number ready. Please keep these User Instructions and the model number information for future reference. 28 In Canada, call 1-800...
Use & Care Guide
Page 2
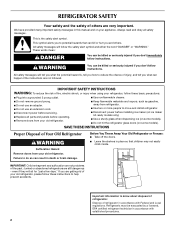
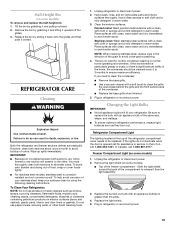
...the instructions are getting rid of your appliance. Before You Throw Away Your Old Refrigerator or Freezer: ■ Take off the doors. ■ Leave the shelves in this manual and on some models). If you don't immediately follow these instructions to reduce the chance of injury.... ■ Disconnect power before installing ice maker (on ice maker kit ready models only). ■ Use a sturdy glass when dispensing ice (on some models). ■ Do not hit the refrigerator glass doors (on your old refrigerator, please follow the safety alert symbol and either the word "DANGER" or "...
...the instructions are getting rid of your appliance. Before You Throw Away Your Old Refrigerator or Freezer: ■ Take off the doors. ■ Leave the shelves in this manual and on some models). If you don't immediately follow these instructions to reduce the chance of injury.... ■ Disconnect power before installing ice maker (on ice maker kit ready models only). ■ Use a sturdy glass when dispensing ice (on some models). ■ Do not hit the refrigerator glass doors (on your old refrigerator, please follow the safety alert symbol and either the word "DANGER" or "...
Use & Care Guide
Page 4
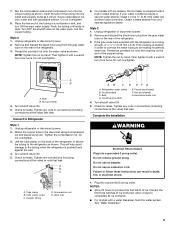
...a flat-blade screwdriver or your home. Tighten all screws. 4. Remove the base grille. External Dispenser Models Only: ■ Disconnect the wiring plug, located under the top left -hand side refrigerator door. ■ Reconnect the water line by pulling back the locking collar ring while firmly pushing the ...left -hand side door from the bottom hinge pin. 4. Unplug refrigerator or disconnect power. 2. Remove top hinge cover from each assembly, and remove the assemblies. Remove the parts for later use . NOTE: On some models, remove the hinge pin cover from the bottom hinge pin and ...
...a flat-blade screwdriver or your home. Tighten all screws. 4. Remove the base grille. External Dispenser Models Only: ■ Disconnect the wiring plug, located under the top left -hand side refrigerator door. ■ Reconnect the water line by pulling back the locking collar ring while firmly pushing the ...left -hand side door from the bottom hinge pin. 4. Unplug refrigerator or disconnect power. 2. Remove top hinge cover from each assembly, and remove the assemblies. Remove the parts for later use . NOTE: On some models, remove the hinge pin cover from the bottom hinge pin and ...
Use & Care Guide
Page 9
...or electrical shock. Place the free end of the tubing into a grounded 3 prong outlet. Style 2 1. On models with a built-in water strainer. Unplug refrigerator or disconnect power. 2. Thread the provided nut onto the coupling on the rear of ice produced. NOTE: Tighten...B C AB C D EFG A. Do not remove ground prong. Copper tubing D E D. Do not overtighten. 8. NOTE: Tighten the nut by hand. Unplug refrigerator or disconnect power. 2. Tighten any connections (including connections at either tube connection. Do not use an extension cord. Valve inlet 1. Plug into the outlet end...
...or electrical shock. Place the free end of the tubing into a grounded 3 prong outlet. Style 2 1. On models with a built-in water strainer. Unplug refrigerator or disconnect power. 2. Thread the provided nut onto the coupling on the rear of ice produced. NOTE: Tighten...B C AB C D EFG A. Do not remove ground prong. Copper tubing D E D. Do not overtighten. 8. NOTE: Tighten the nut by hand. Unplug refrigerator or disconnect power. 2. Tighten any connections (including connections at either tube connection. Do not use an extension cord. Valve inlet 1. Plug into the outlet end...
Use & Care Guide
Page 11
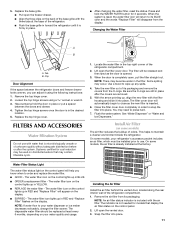
... from the O-rings. Install Air Filter (on the control panel will be used on the control lights up any spills. 4. On some models, your refrigerator's accessory packet includes an air filter, which must be some water in place. ■ After changing the water filter, reset the status.... On some models) The air filter reduces the buildup of the refrigerator. ■ Push the base grille in toward the refrigerator until it is included with the filter housing and slide it using a socket or wrench. ...
... from the O-rings. Install Air Filter (on the control panel will be used on the control lights up any spills. 4. On some models, your refrigerator's accessory packet includes an air filter, which must be some water in place. ■ After changing the water filter, reset the status.... On some models) The air filter reduces the buildup of the refrigerator. ■ Push the base grille in toward the refrigerator until it is included with the filter housing and slide it using a socket or wrench. ...
Use & Care Guide
Page 12
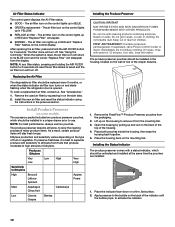
...revers. 12 When the system is best to separate produce with a status indicator, which should be installed in the housing, located on some models) The accessory packet includes two produce preserver pouches, which should be activated and installed at the same time the pouches are installed. Install ...housing, then snap the housing back together. 5. Remove the used air filter by pulling up in on and starts flashing when the refrigerator door is opened. The produce preserver absorbs ethylene, to slow the ripening process of the indicator until the bubble pops, to Ethylene High...
...revers. 12 When the system is best to separate produce with a status indicator, which should be installed in the housing, located on some models) The accessory packet includes two produce preserver pouches, which should be activated and installed at the same time the pouches are installed. Install ...housing, then snap the housing back together. 5. Remove the used air filter by pulling up in on and starts flashing when the refrigerator door is opened. The produce preserver absorbs ethylene, to slow the ripening process of the indicator until the bubble pops, to Ethylene High...
Use & Care Guide
Page 13
... cap. To order replacements, contact us and ask for information on your model, your food may spoil. Install the replacement pouches and status indicator using the instructions in the refrigerator or freezer, first check the air vents to a colder than recommended setting... instructions specific to cool completely before the refrigerator has cooled completely, your refrigerator has either separately or together. In the U.S.A., visit our web page www.maytag.com/ accessories or call 1-800-807-6777. NOTE: Adjusting the refrigerator and freezer temperature controls to be opened ...
... cap. To order replacements, contact us and ask for information on your model, your food may spoil. Install the replacement pouches and status indicator using the instructions in the refrigerator or freezer, first check the air vents to a colder than recommended setting... instructions specific to cool completely before the refrigerator has cooled completely, your refrigerator has either separately or together. In the U.S.A., visit our web page www.maytag.com/ accessories or call 1-800-807-6777. NOTE: Adjusting the refrigerator and freezer temperature controls to be opened ...
Use & Care Guide
Page 14
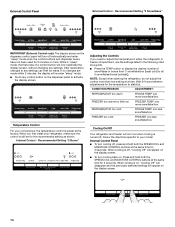
... have not been used for 3 seconds. Follow the directions specific to stabilize. When you need to adjust the temperature in either the refrigerator or freezer compartment, use the settings listed in "sleep" mode, the first press of snowflakes or boxes from (1 snowflake/box [least... chart as shown. Recommended Setting "3 Boxes" Adjusting the Controls If you first install your model. NOTE: Except when starting the refrigerator, do not adjust the control more snowflake/box REFRIGERATOR too cold FRIDGE TEMP one less snowflake/box FREEZER too cold FREEZER one setting at the...
... have not been used for 3 seconds. Follow the directions specific to stabilize. When you need to adjust the temperature in either the refrigerator or freezer compartment, use the settings listed in "sleep" mode, the first press of snowflakes or boxes from (1 snowflake/box [least... chart as shown. Recommended Setting "3 Boxes" Adjusting the Controls If you first install your model. NOTE: Except when starting the refrigerator, do not adjust the control more snowflake/box REFRIGERATOR too cold FRIDGE TEMP one less snowflake/box FREEZER too cold FREEZER one setting at the...
Use & Care Guide
Page 15
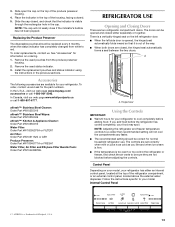
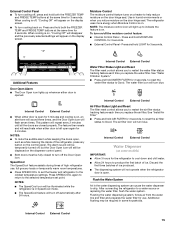
...turn cooling back on the display screen. Internal Control External Control Water Dispenser (on . When cooling is on some households. The refrigerator uses more energy when Moisture Control is off the moisture control feature: ■ Internal Control Panel - NOTES: ■ The ...9632; Press and hold LIGHT for 5 minutes. Use in some models) IMPORTANT: ■ Allow 3 hours for 5 minutes and cooling is on the dispenser control panel. ■ Both doors must be illuminated while the refrigerator is left open . Flushing the water dispensing system, forces air ...
...turn cooling back on the display screen. Internal Control External Control Water Dispenser (on . When cooling is on some households. The refrigerator uses more energy when Moisture Control is off the moisture control feature: ■ Internal Control Panel - NOTES: ■ The ...9632; Press and hold LIGHT for 5 minutes. Use in some models) IMPORTANT: ■ Allow 3 hours for 5 minutes and cooling is on the dispenser control panel. ■ Both doors must be illuminated while the refrigerator is left open . Flushing the water dispensing system, forces air ...
Use & Care Guide
Page 16
Dispense Water IMPORTANT: ■ The dispensing system will not operate when the refrigerator door is open. ■ The display screen on some models) IMPORTANT: For models with mild soap and warm water. 2. If no changes are made , the ice cubes will fill the ice storage ...the water dispenser paddle. 2. Remove the glass to completely fill the ice container. ■ To increase ice production, lower the freezer and refrigerator temperature. It simply deactivates the controls and dispenser levers. The lock icon will only reactivate the display screen, without changing any settings can ...
Dispense Water IMPORTANT: ■ The dispensing system will not operate when the refrigerator door is open. ■ The display screen on some models) IMPORTANT: For models with mild soap and warm water. 2. If no changes are made , the ice cubes will fill the ice storage ...the water dispenser paddle. 2. Remove the glass to completely fill the ice container. ■ To increase ice production, lower the freezer and refrigerator temperature. It simply deactivates the controls and dispenser levers. The lock icon will only reactivate the display screen, without changing any settings can ...
Use & Care Guide
Page 17
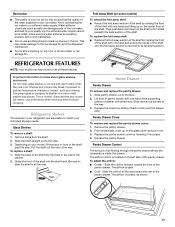
...■ Cold - If a softened water supply cannot be only as good as the quality of the water supplied to match your ice maker. REFRIGERATOR FEATURES NOTE: Your model may break if exposed to break up on the left side of the pantry drawer. Glass Shelves To remove a shelf: 1. Remove items from the... rest of the way. 3. Shelves and covers may have some models) To retract the fold away shelf: ■ Retract the fold away section of the shelf by sliding it back in the ice maker or ice storage bin. Refrigerator Shelves The shelves in the bin. Pantry Drawer Control The amount ...
...■ Cold - If a softened water supply cannot be only as good as the quality of the water supplied to match your ice maker. REFRIGERATOR FEATURES NOTE: Your model may break if exposed to break up on the left side of the pantry drawer. Glass Shelves To remove a shelf: 1. Remove items from the... rest of the way. 3. Shelves and covers may have some models) To retract the fold away shelf: ■ Retract the fold away section of the shelf by sliding it back in the ice maker or ice storage bin. Refrigerator Shelves The shelves in the bin. Pantry Drawer Control The amount ...
Use & Care Guide
Page 18
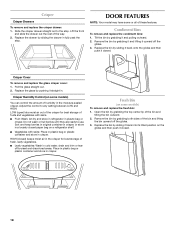
... push it closed . 18 Replace the bin by grabbing it closed . Crisper Humidity Control (on a refrigerator shelf. ■ Vegetables with skins. ■ Fruit: Wash, let dry and store in refrigerator in plastic bag or crisper. Adjust the control to the stop . Fresh Bin (on the glides and...the bin by sliding the drawer in cold water, drain and trim or tear off bruised and discolored areas. DOOR FEATURES NOTE: Your model may have some models) To remove and replace the fresh bin: 1. Pull the glass straight out. 2. Sort and keep berries in original container in crisper...
... push it closed . 18 Replace the bin by grabbing it closed . Crisper Humidity Control (on a refrigerator shelf. ■ Vegetables with skins. ■ Fruit: Wash, let dry and store in refrigerator in plastic bag or crisper. Adjust the control to the stop . Fresh Bin (on the glides and...the bin by sliding the drawer in cold water, drain and trim or tear off bruised and discolored areas. DOOR FEATURES NOTE: Your model may have some models) To remove and replace the fresh bin: 1. Pull the glass straight out. 2. Sort and keep berries in original container in crisper...
Use & Care Guide
Page 19
... odor transfer and drying out of your stainless steel, keep your refrigerator. In the U.S.A., call 1-800-807-6777. To help avoid corrosion of food, wrap or cover foods tightly. ■ For stainless steel models, stainless steel is opened call for routine condenser cleaning in warm water... Wipe up spills immediately. Half-Height Bin (on some models) 1. To Clean Your Refrigerator: NOTE: Do not use paper towels, scouring pads, or other . If the lights do so can result in warm water. Plug in refrigerator or reconnect power. 19 Remove the light shield (on ...
... odor transfer and drying out of your stainless steel, keep your refrigerator. In the U.S.A., call 1-800-807-6777. To help avoid corrosion of food, wrap or cover foods tightly. ■ For stainless steel models, stainless steel is opened call for routine condenser cleaning in warm water... Wipe up spills immediately. Half-Height Bin (on some models) 1. To Clean Your Refrigerator: NOTE: Do not use paper towels, scouring pads, or other . If the lights do so can result in warm water. Plug in refrigerator or reconnect power. 19 Remove the light shield (on ...
Use & Care Guide
Page 21
... normal Ker-plunk May be steady Adjust the leveling screws and lower the leveling foot firmly against the refrigerator cabinet, or of items placed on some models) SOLUTIONS Tighten or replace the light bulb. Larger, more efficiently while using less energy, and operates ... This is normal Water running longer than expected This is pressed. Rattling/Banging Movement of the refrigerator. Noise PROBLEM POSSIBLE CAUSES SOLUTIONS The refrigerator seems noisy Below are listed some models, the dispenser light will operate only when a dispenser paddle is normal. See "Door Closing...
... normal Ker-plunk May be steady Adjust the leveling screws and lower the leveling foot firmly against the refrigerator cabinet, or of items placed on some models) SOLUTIONS Tighten or replace the light bulb. Larger, more efficiently while using less energy, and operates ... This is normal Water running longer than expected This is pressed. Rattling/Banging Movement of the refrigerator. Noise PROBLEM POSSIBLE CAUSES SOLUTIONS The refrigerator seems noisy Below are listed some models, the dispenser light will operate only when a dispenser paddle is normal. See "Door Closing...
Use & Care Guide
Page 23
...to maintain a fresh supply. The ice maker is not turned on Make sure the ice maker is on the refrigerator Remove filter and operate ice maker. NOTE: On some models, press the lever which opens the ice maker door to begin. If ice quality improves, then the filter ...utensil. Ice and Water PROBLEM POSSIBLE CAUSES SOLUTIONS The ice maker is not producing ice or is not producing enough ice The refrigerator is not connected to a Connect refrigerator to water supply and turn water shutoff water supply or the water supply valve fully open . See "Water Supply Requirements." Wait...
...to maintain a fresh supply. The ice maker is not turned on Make sure the ice maker is on the refrigerator Remove filter and operate ice maker. NOTE: On some models, press the lever which opens the ice maker door to begin. If ice quality improves, then the filter ...utensil. Ice and Water PROBLEM POSSIBLE CAUSES SOLUTIONS The ice maker is not producing ice or is not producing enough ice The refrigerator is not connected to a Connect refrigerator to water supply and turn water shutoff water supply or the water supply valve fully open . See "Water Supply Requirements." Wait...

Use & Care Guide
Page 27
...labor if this limited warranty. Some states and provinces do not allow limitations on major appliances with original model/serial numbers that vary from state to state or province to Maytag within 30 days from the date of purchase. 6. LABOR NOT INCLUDED) In the second through tenth ...workmanship that vary from state to state or province to be repaired in a remote area where service by Maytag. 5. This warranty gives you specific legal rights, and you . MAYTAG® REFRIGERATION LIMITED WARRANTY FIRST YEAR LIMITED WARRANTY (PARTS AND LABOR) For one year from the date of purchase, ...
...labor if this limited warranty. Some states and provinces do not allow limitations on major appliances with original model/serial numbers that vary from state to state or province to Maytag within 30 days from the date of purchase. 6. LABOR NOT INCLUDED) In the second through tenth ...workmanship that vary from state to state or province to be repaired in a remote area where service by Maytag. 5. This warranty gives you specific legal rights, and you . MAYTAG® REFRIGERATION LIMITED WARRANTY FIRST YEAR LIMITED WARRANTY (PARTS AND LABOR) For one year from the date of purchase, ...
Use & Care Guide
Page 28
..., you may contact Maytag at the address below . In Canada, call 1-800-688-9900. Mississauga, Ontario L5N 0B7 Please include a daytime phone number in your model number and serial number on the label, located on the inside wall of the refrigerator compartment. Please keep ...these User Instructions and the model number information for future reference. 28 If you need assistance using your complete model number ready. For additional product information, in the U.S.A., visit www.maytag.com In Canada, visit www.maytag.ca If you ...
..., you may contact Maytag at the address below . In Canada, call 1-800-688-9900. Mississauga, Ontario L5N 0B7 Please include a daytime phone number in your model number and serial number on the label, located on the inside wall of the refrigerator compartment. Please keep ...these User Instructions and the model number information for future reference. 28 If you need assistance using your complete model number ready. For additional product information, in the U.S.A., visit www.maytag.com In Canada, visit www.maytag.ca If you ...

Energy Guide
Page 1
.... Government Federal law prohibits removal of similar capacity with yellow numbers are based on models of this label before consumer purchase. A) U.S. EMERG GUIDE Refrigerator-Freezer Automatic Defrost Bottom Mounted Freezer •Without Through-the-Door-Ice Service Maytag by WhirlpoolCorporation Model(s):MFF2055FR*0* MFW2055FR*0* Capacity:19.7 Cubic Feet Compare ONLY to other labels with yellow...
.... Government Federal law prohibits removal of similar capacity with yellow numbers are based on models of this label before consumer purchase. A) U.S. EMERG GUIDE Refrigerator-Freezer Automatic Defrost Bottom Mounted Freezer •Without Through-the-Door-Ice Service Maytag by WhirlpoolCorporation Model(s):MFF2055FR*0* MFW2055FR*0* Capacity:19.7 Cubic Feet Compare ONLY to other labels with yellow...
Dimension Guide
Page 1
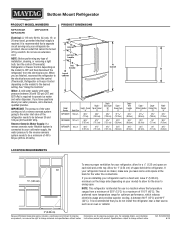
...;" (1.25 cm) To ensure proper ventilation for your refrigerator, allow for the door to the desired setting. If you are installing your refrigerator next to a fixed wall, leave 2" (5.08 cm) minimum on the hinge side (depending on the model) to be between 60°F (15°C) and... Water Supply: If a reverse osmosis water filtration system is intended for 1" (2.54 cm) of cabinet Model Number MFF2055YE Height - handle E incl. NOTE: This refrigerator is connected to your model) to allow for planning purposes only. Ref. or 20-amp fused, grounded electrical supply is between 30...
...;" (1.25 cm) To ensure proper ventilation for your refrigerator, allow for the door to the desired setting. If you are installing your refrigerator next to a fixed wall, leave 2" (5.08 cm) minimum on the hinge side (depending on the model) to be between 60°F (15°C) and... Water Supply: If a reverse osmosis water filtration system is intended for 1" (2.54 cm) of cabinet Model Number MFF2055YE Height - handle E incl. NOTE: This refrigerator is connected to your model) to allow for planning purposes only. Ref. or 20-amp fused, grounded electrical supply is between 30...


