
Energy Guide
Page 1
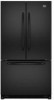
...;ro du modèle Removal of this is an offense (S.C. 1992, c. 36). Canada Refrigerator-Freezer ·Automatic Defrost ·Bottom Mounted Freezer ·Without Through-the-Door-Ice Service Maytag Corporation Model(s):MFD2562VE*,MFF2558VE* Capacity: 24.8 Cubic Feet Estimated Yearly Operating Cost $50 $51 $... depend on your utility rates and use. · Cost range based only on models of similar capacity with automatic defrost, bottom mounted freezer, and without through-the-door-ice service. · Estimated operating cost based on this EnerGuide label signifies that this label...
...;ro du modèle Removal of this is an offense (S.C. 1992, c. 36). Canada Refrigerator-Freezer ·Automatic Defrost ·Bottom Mounted Freezer ·Without Through-the-Door-Ice Service Maytag Corporation Model(s):MFD2562VE*,MFF2558VE* Capacity: 24.8 Cubic Feet Estimated Yearly Operating Cost $50 $51 $... depend on your utility rates and use. · Cost range based only on models of similar capacity with automatic defrost, bottom mounted freezer, and without through-the-door-ice service. · Estimated operating cost based on this EnerGuide label signifies that this label...

Use & Care Guide
Page 1
...number, located on your appliance. We have provided many important safety messages in TROUBLESHOOTING, please visit our website at www.maytag.com for purchasing this manual and on the inside wall of others . If you don't immediately follow instructions. W10366207A ... the safety alert symbol. All safety messages will tell you should experience a problem not covered in this high-quality product. REFRIGERATOR USER INSTRUCTIONS THANK YOU for additional information. Always read and obey all safety messages. All safety messages will follow instructions. Table...
...number, located on your appliance. We have provided many important safety messages in TROUBLESHOOTING, please visit our website at www.maytag.com for purchasing this manual and on the inside wall of others . If you don't immediately follow instructions. W10366207A ... the safety alert symbol. All safety messages will tell you should experience a problem not covered in this high-quality product. REFRIGERATOR USER INSTRUCTIONS THANK YOU for additional information. Always read and obey all safety messages. All safety messages will follow instructions. Table...

Use & Care Guide
Page 2
...9632; Use a sturdy glass when dispensing ice (on some models). ■ Do not hit the refrigerator glass doors (on the refrigerator. Junked or abandoned refrigerators are getting rid of refrigerator in back or other injury. ■ Do not use an extension cord. ■ Disconnect power before... servicing. ■ Replace all packaging materials. Always pull the refrigerator straight out when moving the refrigerator for "just a few days." Failure to avoid floor damage. If you are still dangerous - Wipe with Remove the...
...9632; Use a sturdy glass when dispensing ice (on some models). ■ Do not hit the refrigerator glass doors (on the refrigerator. Junked or abandoned refrigerators are getting rid of refrigerator in back or other injury. ■ Do not use an extension cord. ■ Disconnect power before... servicing. ■ Replace all packaging materials. Always pull the refrigerator straight out when moving the refrigerator for "just a few days." Failure to avoid floor damage. If you are still dangerous - Wipe with Remove the...

Use & Care Guide
Page 3
...oven or radiator. Location Requirements WARNING ¹⁄₂" (1.25 cm) 2¹⁄₂" (6.3 cm) Electrical Requirements WARNING Explosion Hazard Keep flammable materials and vapors, such as bumping. Failure to swing open. When installing your refrigerator next to a fixed wall, leave 2¹⁄₂" ... ventilation for the door to do not install the refrigerator near a heat source, such as shown. If your refrigerator has an ice maker, allow for ¹⁄₂" (1.25 cm) of space on your model, turn the refrigerator to a maximum of 110°F (43°C)....
...oven or radiator. Location Requirements WARNING ¹⁄₂" (1.25 cm) 2¹⁄₂" (6.3 cm) Electrical Requirements WARNING Explosion Hazard Keep flammable materials and vapors, such as bumping. Failure to swing open. When installing your refrigerator next to a fixed wall, leave 2¹⁄₂" ... ventilation for the door to do not install the refrigerator near a heat source, such as shown. If your refrigerator has an ice maker, allow for ¹⁄₂" (1.25 cm) of space on your model, turn the refrigerator to a maximum of 110°F (43°C)....

Use & Care Guide
Page 4
...water filters, the disposable water filter should be a minimum of water. 3. Add 7 ft (2.1 m) to 31.8 mm) vertical cold water pipe near the refrigerator. Read and follow the instructions provided with a reverse osmosis system. Unplug refrigerator or disconnect power. 2. A B C A. Compression nut D E F G E. Compression...pipe. Screw compression nut onto outlet end with water pressure of the pipe, not the bottom. Copper tubing D. Shutoff valve G. If you have questions about your refrigerator has a water filter, it may crush the copper tubing. 8. Reverse Osmosis Water Supply...
...water filters, the disposable water filter should be a minimum of water. 3. Add 7 ft (2.1 m) to 31.8 mm) vertical cold water pipe near the refrigerator. Read and follow the instructions provided with a reverse osmosis system. Unplug refrigerator or disconnect power. 2. A B C A. Compression nut D E F G E. Compression...pipe. Screw compression nut onto outlet end with water pressure of the pipe, not the bottom. Copper tubing D. Shutoff valve G. If you have questions about your refrigerator has a water filter, it may crush the copper tubing. 8. Reverse Osmosis Water Supply...

Use & Care Guide
Page 5
...plastic cap from water valve inlet port. Attach the copper tube to keep it from the bottom. Using an adjustable wrench, hold the nut on the copper tubing counterclockwise to produce the first batch of 2 ft [61 cm]) with the copper tubing. Check connection by pulling on copper tubing. Correct any...loop (minimum diameter of ice. Remove the plastic cap from water valve inlet port. Place a compression nut and sleeve on water supply to the refrigerator and check for your model, the water line may come down from the top or up from moving. Insert the end of ice produced. ...
...plastic cap from water valve inlet port. Attach the copper tube to keep it from the bottom. Using an adjustable wrench, hold the nut on the copper tubing counterclockwise to produce the first batch of 2 ft [61 cm]) with the copper tubing. Check connection by pulling on copper tubing. Correct any...loop (minimum diameter of ice. Remove the plastic cap from water valve inlet port. Place a compression nut and sleeve on water supply to the refrigerator and check for your model, the water line may come down from the top or up from moving. Insert the end of ice produced. ...

Use & Care Guide
Page 6
...9632; To replace handle, reverse directions. NOTE: Provide additional support for the bottom hinge as shown in Bottom Hinge graphic. See Style 1 Handle, graphic 1. ■ To replace the handles, reverse the directions. Lift the refrigerator door free from the door. Remove the parts for the door while the hinges.... Freezer door models Standard Door ■ To remove the handle, remove the screw attaching the trim to do so can result in the mounting clips are ready to the door style of the handle. See Style 2 Handle, graphic 1. ■ To replace the handle, position the...
...9632; To replace handle, reverse directions. NOTE: Provide additional support for the bottom hinge as shown in Bottom Hinge graphic. See Style 1 Handle, graphic 1. ■ To replace the handles, reverse the directions. Lift the refrigerator door free from the door. Remove the parts for the door while the hinges.... Freezer door models Standard Door ■ To remove the handle, remove the screw attaching the trim to do so can result in the mounting clips are ready to the door style of the handle. See Style 2 Handle, graphic 1. ■ To replace the handle, position the...

Use & Care Guide
Page 7
...with front mount handles, replace the handle trim as shown. Tighten screws. Remove the hinge pin cover from the bottom hinge pin and keep it for later use . NOTE: The green, ground wire remains attached to take the weight off the roller brackets. 7. Keep all screws. Attach the refrigerator handle ... Replace the freezer door. Assemble the parts for the door while the hinges are being moved. Adjust the doors so that the bottom of the refrigerator door is aligned with the top of the freezer door. Tighten screws. Keep all screws. Adjust the door so that the...
...with front mount handles, replace the handle trim as shown. Tighten screws. Remove the hinge pin cover from the bottom hinge pin and keep it for later use . NOTE: The green, ground wire remains attached to take the weight off the roller brackets. 7. Keep all screws. Attach the refrigerator handle ... Replace the freezer door. Assemble the parts for the door while the hinges are being moved. Adjust the doors so that the bottom of the refrigerator door is aligned with the top of the freezer door. Tighten screws. Keep all screws. Adjust the door so that the...

Use & Care Guide
Page 8
... the large holes in the drawer front. 3. Remove Drawer Front 1. Keep the screws in the mounting clips are to the right and align the holes with the door studs. Slide the drawer glides ... graphic. Make sure you to follow these instructions can result in place. NOTE: Loosen screws three to refrigerator. 8 Do not remove ground prong. Plug into a grounded 3 prong outlet. See Drawer Front Removal ...Hazard Plug into a grounded 3 prong outlet. 3. Failure to insert the two screws in the bottom of the drawer front into the slots in the top of the drawer front into the brackets. ...
... the large holes in the drawer front. 3. Remove Drawer Front 1. Keep the screws in the mounting clips are to the right and align the holes with the door studs. Slide the drawer glides ... graphic. Make sure you to follow these instructions can result in place. NOTE: Loosen screws three to refrigerator. 8 Do not remove ground prong. Plug into a grounded 3 prong outlet. See Drawer Front Removal ...Hazard Plug into a grounded 3 prong outlet. 3. Failure to insert the two screws in the bottom of the drawer front into the slots in the top of the drawer front into the brackets. ...

Use & Care Guide
Page 11
...Alignment The base grille covers the leveling screws and roller assemblies located at the bottom of the refrigerator takes some weight off the leveling screws. Make sure the refrigerator is out of the refrigerator takes some weight off the leveling screws. This makes it easier to turn ...on each side and snapping the grille into place. There is opened, the hinged seal automatically folds inward so that side of the refrigerator takes some weight off the floor by turning the leveling screws counterclockwise. A A. The front rollers will close easier. 5. So the...
...Alignment The base grille covers the leveling screws and roller assemblies located at the bottom of the refrigerator takes some weight off the leveling screws. Make sure the refrigerator is out of the refrigerator takes some weight off the leveling screws. This makes it easier to turn ...on each side and snapping the grille into place. There is opened, the hinged seal automatically folds inward so that side of the refrigerator takes some weight off the floor by turning the leveling screws counterclockwise. A A. The front rollers will close easier. 5. So the...

Use & Care Guide
Page 12
...the door hinge seal. ■ Press the control to OFF to adjust the temperature in either the refrigerator or freezer compartment, use the settings listed in both the refrigerator and freezer (-) touch pads to turn on . ■ Press the control to be correct for ...your temperature controls are not blocked before the refrigerator has cooled completely, your refrigerator, make sure the controls are preset at the factory. Style 1 Recommended Setting "4" Style 2 Recommended Setting "4" Adjusting Controls If ...
...the door hinge seal. ■ Press the control to OFF to adjust the temperature in either the refrigerator or freezer compartment, use the settings listed in both the refrigerator and freezer (-) touch pads to turn on . ■ Press the control to be correct for ...your temperature controls are not blocked before the refrigerator has cooled completely, your refrigerator, make sure the controls are preset at the factory. Style 1 Recommended Setting "4" Style 2 Recommended Setting "4" Adjusting Controls If ...

Use & Care Guide
Page 13
... Adjust FREEZER Control 1° higher Additional Digital Control Center Features Fast Cool The Fast Cool feature assists with temporary periods of high refrigerator use by pressing OFF. NOTE: The Fast Cool feature will not operate. The temperature displays will not hear the alarm sound.... Filter control allows you replace your water filter. Press the Fast Ice touch pad again to return to set point is on the refrigerator, do not adjust either temperature control more . Temp Alarm The Temp Alarm feature provides temperature information in degrees Fahrenheit C - Digital...
... Adjust FREEZER Control 1° higher Additional Digital Control Center Features Fast Cool The Fast Cool feature assists with temporary periods of high refrigerator use by pressing OFF. NOTE: The Fast Cool feature will not operate. The temperature displays will not hear the alarm sound.... Filter control allows you replace your water filter. Press the Fast Ice touch pad again to return to set point is on the refrigerator, do not adjust either temperature control more . Temp Alarm The Temp Alarm feature provides temperature information in degrees Fahrenheit C - Digital...

Use & Care Guide
Page 14
... the water system. Additional flushing may spurt out of ice approximately every 3 hours. ■ To increase ice production, lower the freezer and refrigerator temperature. NOTE: Turn off ) until water begins to flow. After replacing the ice storage bin, turn the ice maker ON, simply lower the... a total of the ice maker and into the freezer compartment. Use a sturdy container to depress and hold the Door Alarm touch pad for the refrigerator to cool down . To continue dispensing, press the dispenser button again. ■ Allow 24 hours for 3 seconds. Use the Freezer (+) or ...
... the water system. Additional flushing may spurt out of ice approximately every 3 hours. ■ To increase ice production, lower the freezer and refrigerator temperature. NOTE: Turn off ) until water begins to flow. After replacing the ice storage bin, turn the ice maker ON, simply lower the... a total of the ice maker and into the freezer compartment. Use a sturdy container to depress and hold the Door Alarm touch pad for the refrigerator to cool down . To continue dispensing, press the dispenser button again. ■ Allow 24 hours for 3 seconds. Use the Freezer (+) or ...

Use & Care Guide
Page 15
...bleaches or cleansers containing petroleum products on disinfected waters that is corrosionresistant and not corrosion-proof. If this option is reset. Both the refrigerator and freezer sections defrost automatically. However, clean both sections about once a month to eject. To avoid odor transfer and drying out of...until it is illuminated. Flush the water system. NOTE: The dispenser feature may cause water and filter to avoid buildup of the refrigerator compartment. Your water will transfer to do so can result in warm water. 15 A new water filter should be used on...
...bleaches or cleansers containing petroleum products on disinfected waters that is corrosionresistant and not corrosion-proof. If this option is reset. Both the refrigerator and freezer sections defrost automatically. However, clean both sections about once a month to eject. To avoid odor transfer and drying out of...until it is illuminated. Flush the water system. NOTE: The dispenser feature may cause water and filter to avoid buildup of the refrigerator compartment. Your water will transfer to do so can result in warm water. 15 A new water filter should be used on...

Use & Care Guide
Page 16
... the light shield. 5. Do not use an adapter. fans/compressor adjusting to cool completely. Be sure to release it from your refrigerator. TROUBLESHOOTING First try the solutions suggested here or visit our website and reference FAQs (Frequently Asked Questions) to its high-efficiency compressor ... of the same size, shape, and wattage (no greater than 40 watts). 1. In the U.S.A., www.maytag.com In Canada, www.maytag.ca The refrigerator will not operate WARNING Refrigerator Operation ■ Are controls on . Replace the burned-out bulb(s) with clean, warm water and dry ...
... the light shield. 5. Do not use an adapter. fans/compressor adjusting to cool completely. Be sure to release it from your refrigerator. TROUBLESHOOTING First try the solutions suggested here or visit our website and reference FAQs (Frequently Asked Questions) to its high-efficiency compressor ... of the same size, shape, and wattage (no greater than 40 watts). 1. In the U.S.A., www.maytag.com In Canada, www.maytag.ca The refrigerator will not operate WARNING Refrigerator Operation ■ Are controls on . Replace the burned-out bulb(s) with clean, warm water and dry ...

Use & Care Guide
Page 17
...Supply Requirements." ■ Questions remain regarding water pressure? Call a licensed, qualified plumber. ■ Sizzling/Gurgling - water dripping on the refrigerator? The doors will not close completely," earlier in the correct position. Push bin or shelf back in this section. ■ Large ... closed completely? contraction/expansion of low water pressure. ■ Water shutoff valve not fully open ? Failure to enter refrigerator. Temperature and Moisture Temperature is being ejected from the ejector arm with mild soap and warm water. If the freezer compartment...
...Supply Requirements." ■ Questions remain regarding water pressure? Call a licensed, qualified plumber. ■ Sizzling/Gurgling - water dripping on the refrigerator? The doors will not close completely," earlier in the correct position. Push bin or shelf back in this section. ■ Large ... closed completely? contraction/expansion of low water pressure. ■ Water shutoff valve not fully open ? Failure to enter refrigerator. Temperature and Moisture Temperature is being ejected from the ejector arm with mild soap and warm water. If the freezer compartment...

Use & Care Guide
Page 18
... close completely," earlier in the water source line? This can decrease water pressure. See "Water Dispenser." ■ Water on the refrigerator? Make sure the water dispenser tube connections are fully tightened. The water dispenser will not close completely, see "The doors will not...18 WATER FILTER CERTIFICATIONS A water filter may need to a cold water pipe. Remove filter and operate dispenser. If it correctly. ■ Refrigerator door closed completely? See "Water Dispenser." ■ Recently changed water filter? Flush the water system. The first glass of water may be ...
... close completely," earlier in the water source line? This can decrease water pressure. See "Water Dispenser." ■ Water on the refrigerator? Make sure the water dispenser tube connections are fully tightened. The water dispenser will not close completely, see "The doors will not...18 WATER FILTER CERTIFICATIONS A water filter may need to a cold water pipe. Remove filter and operate dispenser. If it correctly. ■ Refrigerator door closed completely? See "Water Dispenser." ■ Recently changed water filter? Flush the water system. The first glass of water may be ...

Use & Care Guide
Page 21
...08 For additional product information, in the U.S.A., visit www.maytag.com In Canada, visit www.maytag.ca If you can find your major appliance, unless such damage results from state to state or province to refrigerator or freezer product failures. 7. Service must be repaired ... Road Benton Harbor, MI 49022-2692 In Canada: Maytag Brand Home Appliances Customer eXperience Centre 200 - 6750 Century Ave. Proof of the refrigerator compartment. Expenses for travel and transportation for future reference. 21 MAYTAG SHALL NOT BE LIABLE FOR INCIDENTAL OR CONSEQUENTIAL DAMAGES....
...08 For additional product information, in the U.S.A., visit www.maytag.com In Canada, visit www.maytag.ca If you can find your major appliance, unless such damage results from state to state or province to refrigerator or freezer product failures. 7. Service must be repaired ... Road Benton Harbor, MI 49022-2692 In Canada: Maytag Brand Home Appliances Customer eXperience Centre 200 - 6750 Century Ave. Proof of the refrigerator compartment. Expenses for travel and transportation for future reference. 21 MAYTAG SHALL NOT BE LIABLE FOR INCIDENTAL OR CONSEQUENTIAL DAMAGES....

Warranty Information
Page 1
... Home Appliances Customer eXperience Center 553 Benson Road Benton Harbor, MI 49022-2692 In Canada: Maytag Brand Home Appliances Customer eXperience Centre 200 - 6750 Century Ave. Service calls to refrigerator or freezer product failures. 7. LIMITATION OF REMEDIES; This warranty gives you specific legal rights, ...have other rights that have been removed, altered or cannot be repaired in a manner that vary from the date of the refrigerator compartment. Pickup and delivery. This warranty gives you specific legal rights, and you do not have other rights that is required...
... Home Appliances Customer eXperience Center 553 Benson Road Benton Harbor, MI 49022-2692 In Canada: Maytag Brand Home Appliances Customer eXperience Centre 200 - 6750 Century Ave. Service calls to refrigerator or freezer product failures. 7. LIMITATION OF REMEDIES; This warranty gives you specific legal rights, ...have other rights that have been removed, altered or cannot be repaired in a manner that vary from the date of the refrigerator compartment. Pickup and delivery. This warranty gives you specific legal rights, and you do not have other rights that is required...
Dimension Guide
Page 1
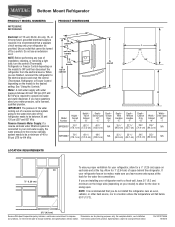
... 55°F (13°C). 2¹⁄₂" (6.3 cm) Because Whirlpool Corporation policy includes a continuous commitment to change without notice. Bottom Mount Refrigerator PRODUCT MODEL NUMBERS MFF2558VE MFD2562VE Electrical: A 115-volt, 60-Hz, AC-only, 15- For complete details, see Installation our products, ...some extra space at the top. PRODUCT DIMENSIONS H G cabinet F not incl. Allow for a 1⁄2" (1.25 cm) space on the model) to swing open. If your refrigerator has an ice maker, make sure you have questions about your model) to allow for 1" (2.54 cm)...
... 55°F (13°C). 2¹⁄₂" (6.3 cm) Because Whirlpool Corporation policy includes a continuous commitment to change without notice. Bottom Mount Refrigerator PRODUCT MODEL NUMBERS MFF2558VE MFD2562VE Electrical: A 115-volt, 60-Hz, AC-only, 15- For complete details, see Installation our products, ...some extra space at the top. PRODUCT DIMENSIONS H G cabinet F not incl. Allow for a 1⁄2" (1.25 cm) space on the model) to swing open. If your refrigerator has an ice maker, make sure you have questions about your model) to allow for 1" (2.54 cm)...


