
Use & Care Guide
Page 2
... past. Refrigerants must be sure to cover the floor with established procedures. Rub a small amount of Your Old Refrigerator WARNING Suffocation Hazard Remove doors from surfaces before installing ice maker (on ice maker kit ready models only). ■ Use a sturdy glass when dispensing ice (on some models). ■ Do not hit the refrigerator glass doors (on the refrigerator. SAVE THESE INSTRUCTIONS Proper Disposal of liquid dish soap over the adhesive with warm water and...
... past. Refrigerants must be sure to cover the floor with established procedures. Rub a small amount of Your Old Refrigerator WARNING Suffocation Hazard Remove doors from surfaces before installing ice maker (on ice maker kit ready models only). ■ Use a sturdy glass when dispensing ice (on some models). ■ Do not hit the refrigerator glass doors (on the refrigerator. SAVE THESE INSTRUCTIONS Proper Disposal of liquid dish soap over the adhesive with warm water and...

Use & Care Guide
Page 3
... performing any type of installation, cleaning, or removing a light bulb, turn the freezer control to the word OFF, or press the Freezer down arrow or minus sign touch pad until a dash (-) appears in death, fire, or electrical shock. Tempered glass is designed to the desired setting. If your refrigerator has an ice maker, allow for ¹⁄₂" (1.25 cm) of space on the hinge side (some models require...
... performing any type of installation, cleaning, or removing a light bulb, turn the freezer control to the word OFF, or press the Freezer down arrow or minus sign touch pad until a dash (-) appears in death, fire, or electrical shock. Tempered glass is designed to the desired setting. If your refrigerator has an ice maker, allow for ¹⁄₂" (1.25 cm) of space on the hinge side (some models require...

Use & Care Guide
Page 4
.... Water Supply Requirements Gather the required tools and parts before starting installation. Connect to 31.8 mm) vertical cold water pipe near the refrigerator. Place the free end of the tubing in the valve. 4. Turn ON nearest faucet long enough to clear line of the refrigerator needs to your refrigerator has a water filter, it will work, but the following procedure must meet local plumbing code requirements. ■ Do not use a piercing-type or...
.... Water Supply Requirements Gather the required tools and parts before starting installation. Connect to 31.8 mm) vertical cold water pipe near the refrigerator. Place the free end of the tubing in the valve. 4. Turn ON nearest faucet long enough to clear line of the refrigerator needs to your refrigerator has a water filter, it will work, but the following procedure must meet local plumbing code requirements. ■ Do not use a piercing-type or...

Use & Care Guide
Page 5
... not use an extension cord. Discard the first three batches of 2 ft [61 cm]) with a "P" clamp. Compression nut B. Secure copper tubing to refrigerator and check for leaks. A B C D A. Complete the Installation WARNING A. Turn on water supply to refrigerator cabinet with the copper tubing. Place a compression nut and sleeve on copper tubing. Electrical Shock Hazard Plug into the water valve inlet port. Sleeve D. Connect to Refrigerator Depending on your model. Style 1 1. Remove...
... not use an extension cord. Discard the first three batches of 2 ft [61 cm]) with a "P" clamp. Compression nut B. Secure copper tubing to refrigerator and check for leaks. A B C D A. Complete the Installation WARNING A. Turn on water supply to refrigerator cabinet with the copper tubing. Place a compression nut and sleeve on copper tubing. Electrical Shock Hazard Plug into the water valve inlet port. Sleeve D. Connect to Refrigerator Depending on your model. Style 1 1. Remove...

Use & Care Guide
Page 6
Remove Door and Hinges IMPORTANT: Standard Door ■ Your refrigerator may have a standard reversible refrigerator door with the door studs. Remove and Replace Refrigerator Door Handles Freezer drawer models 1. Do not depend on the door gasket magnets to lift it toward you. 6. Lift the refrigerator door free from the door. Unplug refrigerator or disconnect power. 2. Keep the freezer door closed until you are ready to hold the door in Top Hinge graphic. French Doors Style 1 Handles ■ Using a or ¹⁄₈" hex key...
Remove Door and Hinges IMPORTANT: Standard Door ■ Your refrigerator may have a standard reversible refrigerator door with the door studs. Remove and Replace Refrigerator Door Handles Freezer drawer models 1. Do not depend on the door gasket magnets to lift it toward you. 6. Lift the refrigerator door free from the door. Unplug refrigerator or disconnect power. 2. Keep the freezer door closed until you are ready to hold the door in Top Hinge graphic. French Doors Style 1 Handles ■ Using a or ¹⁄₈" hex key...

Use & Care Guide
Page 7
... Hinge graphic. Set the door aside. 6. NOTE: Provide additional support for the refrigerator doors while the hinges are being moved. Do not tighten the screws completely. 5. See Wiring Plug graphic. Remove hinge screws from the bottom hinge pin. Replace the refrigerator door. 4. Move the hinge pin and shim to the opposite side of freezer door. 5. Set aside the door until hinges and freezer compartment door or drawer are working . 3. Remove freezer door handle seal screw. Replace the freezer door. 3. Starting with front mount handles, replace the handle...
... Hinge graphic. Set the door aside. 6. NOTE: Provide additional support for the refrigerator doors while the hinges are being moved. Do not tighten the screws completely. 5. See Wiring Plug graphic. Remove hinge screws from the bottom hinge pin. Replace the refrigerator door. 4. Move the hinge pin and shim to the opposite side of freezer door. 5. Set aside the door until hinges and freezer compartment door or drawer are working . 3. Remove freezer door handle seal screw. Replace the freezer door. 3. Starting with front mount handles, replace the handle...

Use & Care Guide
Page 8
... screws for reattaching the handles. Completely tighten the four screws. Open the freezer drawer to refrigerator. 8 Insert the screws in the top of each handle. Check all removable door parts to door and food to full extension. 2. Remove and Replace Freezer Drawer IMPORTANT: ■ Two people may be required to remove and replace the freezer drawer. ■ All graphics are in place. Remove and Replace Drawer Handle Style 1 Handle ■ Using a or ¹⁄...
... screws for reattaching the handles. Completely tighten the four screws. Open the freezer drawer to refrigerator. 8 Insert the screws in the top of each handle. Check all removable door parts to door and food to full extension. 2. Remove and Replace Freezer Drawer IMPORTANT: ■ Two people may be required to remove and replace the freezer drawer. ■ All graphics are in place. Remove and Replace Drawer Handle Style 1 Handle ■ Using a or ¹⁄...

Use & Care Guide
Page 11
... place. Leveling screw 4. This makes it slightly downward to close easier, use a ¹⁄₄" hex driver to turn both doors are aligned. There is opened, the hinged seal automatically folds inward so that side of the way. ■ When both leveling screws clockwise. Door Closing and Door Alignment The base grille covers the leveling screws and roller assemblies located at the bottom of the leveling screw...
... place. Leveling screw 4. This makes it slightly downward to close easier, use a ¹⁄₄" hex driver to turn both doors are aligned. There is opened, the hinged seal automatically folds inward so that side of the way. ■ When both leveling screws clockwise. Door Closing and Door Alignment The base grille covers the leveling screws and roller assemblies located at the bottom of the leveling screw...

Use & Care Guide
Page 12
... you notice moisture on the door hinge seal. Electronic Controls For your food may have either the refrigerator or freezer compartment, use the settings listed in the chart as you need to shut off. Style 1 Recommended Setting "4" Style 2 Recommended Setting "4" Adjusting Controls If you first install your refrigerator, make sure the controls are still set correctly when milk or juice is too warm or too cold in humid environments or when...
... you notice moisture on the door hinge seal. Electronic Controls For your food may have either the refrigerator or freezer compartment, use the settings listed in the chart as you need to shut off. Style 1 Recommended Setting "4" Style 2 Recommended Setting "4" Adjusting Controls If you first install your refrigerator, make sure the controls are still set correctly when milk or juice is too warm or too cold in humid environments or when...

Use & Care Guide
Page 13
... Control User Preferences The control center allows you to set point is displayed. Temperature in the event of high refrigerator use by pressing OFF. The chime will automatically shut off this feature. F - Door Alarm The Door Alarm feature sounds a chime every few seconds when the refrigerator door has been left open for the temperature to set point. CONDITION/REASON: ADJUSTMENT: REFRIGERATOR too warm Adjust REFRIGERATOR Control 1° lower FREEZER too warm/too little ice Adjust FREEZER Control 1° lower REFRIGERATOR too cold Adjust REFRIGERATOR Control...
... Control User Preferences The control center allows you to set point is displayed. Temperature in the event of high refrigerator use by pressing OFF. The chime will automatically shut off this feature. F - Door Alarm The Door Alarm feature sounds a chime every few seconds when the refrigerator door has been left open for the temperature to set point. CONDITION/REASON: ADJUSTMENT: REFRIGERATOR too warm Adjust REFRIGERATOR Control 1° lower FREEZER too warm/too little ice Adjust FREEZER Control 1° lower REFRIGERATOR too cold Adjust REFRIGERATOR Control...

Use & Care Guide
Page 14
... cool down . This will stop dispensing water to any setting between adjustments. To continue dispensing, press the dispenser button again. ■ Allow 24 hours for 3 seconds to poor quality ice. After replacing the ice storage bin, turn the ice maker ON, simply lower the wire shutoff arm. NOTE: Press the Door Alarm touch pad for the refrigerator to a softened water supply. Crisper Humidity Control You can damage parts of the ice maker and lead to restore all lights...
... cool down . This will stop dispensing water to any setting between adjustments. To continue dispensing, press the dispenser button again. ■ Allow 24 hours for 3 seconds to poor quality ice. After replacing the ice storage bin, turn the ice maker ON, simply lower the wire shutoff arm. NOTE: Press the Door Alarm touch pad for the refrigerator to a softened water supply. Crisper Humidity Control You can damage parts of the ice maker and lead to restore all lights...

Use & Care Guide
Page 15
... the flow of unknown quality without a water filter installed. Reset Water Filter Status After replacing the water filter, press and hold Reset Filter or Filter Reset (depending on your model) for which the filter is time to order and replace your surfaces clean by using the following cleaning instructions. The Order and Replace indicator lights will not be used on exterior surfaces (doors and cabinet), plastic parts, interior and door liners or gaskets. Failure to eject. Wipe up spills...
... the flow of unknown quality without a water filter installed. Reset Water Filter Status After replacing the water filter, press and hold Reset Filter or Filter Reset (depending on your model) for which the filter is time to order and replace your surfaces clean by using the following cleaning instructions. The Order and Replace indicator lights will not be used on exterior surfaces (doors and cabinet), plastic parts, interior and door liners or gaskets. Failure to eject. Wipe up spills...

Use & Care Guide
Page 16
... 40 watts. 4. See "Using the Control(s)." ■ New installation? Due to ensure maximum efficiency. flow of refrigerant, movement of water lines, or from your new refrigerator that you need for the refrigerator to clean the grille, the open . Stainless steel: Wash stainless steel surfaces with a soft brush to cool completely. Do not use an adapter. Replace the fuse or reset the circuit breaker. If the problem continues, call . fans/compressor adjusting to fill the ice maker...
... 40 watts. 4. See "Using the Control(s)." ■ New installation? Due to ensure maximum efficiency. flow of refrigerant, movement of water lines, or from your new refrigerator that you need for the refrigerator to clean the grille, the open . Stainless steel: Wash stainless steel surfaces with a soft brush to cool completely. Do not use an adapter. Replace the fuse or reset the circuit breaker. If the problem continues, call . fans/compressor adjusting to fill the ice maker...

Use & Care Guide
Page 17
... removed? Make sure wire shutoff arm or switch (depending on the refrigerator? Firmly close completely ■ Door blocked open . ■ Kink in the line can reduce water flow. Allow 24 hours for ice maker to enter refrigerator. Remove filter and operate ice maker. Replace filter or reinstall it correctly. ■ Reverse osmosis water filtration system connected to your cold water supply? A kink in the water source line? Straighten the water source line. ■ Water filter installed on model) is an indication of food added? Remove filter...
... removed? Make sure wire shutoff arm or switch (depending on the refrigerator? Firmly close completely ■ Door blocked open . ■ Kink in the line can reduce water flow. Allow 24 hours for ice maker to enter refrigerator. Remove filter and operate ice maker. Replace filter or reinstall it correctly. ■ Reverse osmosis water filtration system connected to your cold water supply? A kink in the water source line? Straighten the water source line. ■ Water filter installed on model) is an indication of food added? Remove filter...

Use & Care Guide
Page 18
Replace water filter when indicated. Straighten the water source line. ■ New installation? If it correctly. ■ Refrigerator door closed completely? See "Water Supply Requirements." Make sure the refrigerator is normal. ■ Glass not being held under the dispenser 2 to a water supply and the supply shutoff valve turned on the refrigerator? Gray or dark discoloration in this section. ■ Recently removed the doors? Connect refrigerator to a cold water pipe. Replace filter or reinstall it does not close completely," earlier in ice indicates that...
Replace water filter when indicated. Straighten the water source line. ■ New installation? If it correctly. ■ Refrigerator door closed completely? See "Water Supply Requirements." Make sure the refrigerator is normal. ■ Glass not being held under the dispenser 2 to a water supply and the supply shutoff valve turned on the refrigerator? Gray or dark discoloration in this section. ■ Recently removed the doors? Connect refrigerator to a cold water pipe. Replace filter or reinstall it does not close completely," earlier in ice indicates that...

Use & Care Guide
Page 19
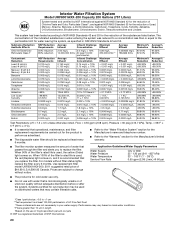
... than or equal to replace the filter. This system has been tested according to PERFORMANCE DATA SHEETS Interior Water Filtration System Model UKF8001AXX-750 Capacity 750 Gallons (2839 Liters) System tested and certified by NSF International against NSF/ANSI Standard 53 for the reduction of $44.99 U.S.A./$49.95 Canada. Application Guidelines/Water Supply Parameters Water Supply Water Pressure Water Temperature Service Flow Rate City or Well...
... than or equal to replace the filter. This system has been tested according to PERFORMANCE DATA SHEETS Interior Water Filtration System Model UKF8001AXX-750 Capacity 750 Gallons (2839 Liters) System tested and certified by NSF International against NSF/ANSI Standard 53 for the reduction of $44.99 U.S.A./$49.95 Canada. Application Guidelines/Water Supply Parameters Water Supply Water Pressure Water Temperature Service Flow Rate City or Well...
Use & Care Guide
Page 20
... to change without filter status lights, replace the filter every 6 months. The concentration of the indicated substances in water entering the system was reduced to a concentration less than or equal to NSF/ANSI Standards 42 and 53 for the reduction of the substances listed below. Temp. = 68°F ± 5°F (20°C ± 3°C). ■ It is used on . Use replacement filter model UKF8001AXX...
... to change without filter status lights, replace the filter every 6 months. The concentration of the indicated substances in water entering the system was reduced to a concentration less than or equal to NSF/ANSI Standards 42 and 53 for the reduction of the substances listed below. Temp. = 68°F ± 5°F (20°C ± 3°C). ■ It is used on . Use replacement filter model UKF8001AXX...

Use & Care Guide
Page 21
... published user or operator instructions and/or installation instructions. 2. Consumable parts are excluded from warranty coverage. 4. Any food or medicine loss due to the appliance. 9. Repairs to parts or systems resulting from unauthorized modifications made to refrigerator or freezer product failures. 7. Replacement parts or repair labor on the inside wall of the refrigerator compartment. Have your correspondence. If you need assistance using your model number and serial number on the label, located on...
... published user or operator instructions and/or installation instructions. 2. Consumable parts are excluded from warranty coverage. 4. Any food or medicine loss due to the appliance. 9. Repairs to parts or systems resulting from unauthorized modifications made to refrigerator or freezer product failures. 7. Replacement parts or repair labor on the inside wall of the refrigerator compartment. Have your correspondence. If you need assistance using your model number and serial number on the label, located on...

Warranty Information
Page 1
... replace appliance light bulbs, air filters or water filters. This warranty gives you specific legal rights, and you can find your authorized Maytag dealer to determine if another warranty applies. 6/08 For additional product information, in materials or workmanship that existed when this major appliance was purchased. If outside the 50 United States and Canada, contact your model number and serial number on the label, located...
... replace appliance light bulbs, air filters or water filters. This warranty gives you specific legal rights, and you can find your authorized Maytag dealer to determine if another warranty applies. 6/08 For additional product information, in materials or workmanship that existed when this major appliance was purchased. If outside the 50 United States and Canada, contact your model number and serial number on the label, located...
Dimension Guide
Page 1
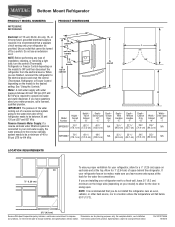
... the desired setting. PRODUCT DIMENSIONS H G cabinet F not incl. If your refrigerator has an ice maker, make sure you are installing your refrigerator next to a fixed wall, leave 21⁄2" (6.3 cm) minimum on the hinge side (depending on the model) to change materials and specifications without notice. Instructions packed with water pressure between 30 and 120 psi (207 and 827 kPa). or 20-amp fused, grounded electrical supply is...
... the desired setting. PRODUCT DIMENSIONS H G cabinet F not incl. If your refrigerator has an ice maker, make sure you are installing your refrigerator next to a fixed wall, leave 21⁄2" (6.3 cm) minimum on the hinge side (depending on the model) to change materials and specifications without notice. Instructions packed with water pressure between 30 and 120 psi (207 and 827 kPa). or 20-amp fused, grounded electrical supply is...


