
User Instructions
Page 2
... Disconnect power before servicing. ■ Replace all parts and panels before using the refrigerator, follow these instructions to avoid impact from refrigerator. ■ Use two or more information, see "Refrigerator Safety." ■ Dispose of/recycle all of the packaging materials, clean the inside...impact, such as floor damage could occur. Shelves and covers may not easily climb inside of your refrigerator before operating. ■ Remove doors from your old refrigerator. ■ Use nonflammable cleaner. ■ Keep flammable materials and vapors, such as gasoline, away ...
... Disconnect power before servicing. ■ Replace all parts and panels before using the refrigerator, follow these instructions to avoid impact from refrigerator. ■ Use two or more information, see "Refrigerator Safety." ■ Dispose of/recycle all of the packaging materials, clean the inside...impact, such as floor damage could occur. Shelves and covers may not easily climb inside of your refrigerator before operating. ■ Remove doors from your old refrigerator. ■ Use nonflammable cleaner. ■ Keep flammable materials and vapors, such as gasoline, away ...

User Instructions
Page 3
..., it is required. When you move your model, turn the refrigerator to the desired setting. When installing your refrigerator, allow for a ¹⁄₂" (1.25 cm) space at the back for your refrigerator next to a fixed wall, leave 2¹⁄₂" (6.3 cm) minimum on your refrigerator into a grounded 3 prong outlet. Do not remove ground prong...
..., it is required. When you move your model, turn the refrigerator to the desired setting. When installing your refrigerator, allow for a ¹⁄₂" (1.25 cm) space at the back for your refrigerator next to a fixed wall, leave 2¹⁄₂" (6.3 cm) minimum on your refrigerator into a grounded 3 prong outlet. Do not remove ground prong...
User Instructions
Page 4
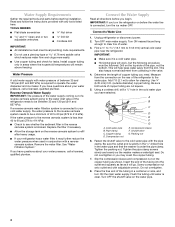
...Filtration System." Turn ON nearest faucet long enough to your refrigerator has a water filter, it is clear. Measure from collecting in the valve. 4. Add 7 ft (2.1 m) to 31.8 mm) vertical cold water pipe near the refrigerator. Compression sleeve F. Screw compression nut onto outlet end ...8260;₄" hole in conjunction with a reverse osmosis system. Copper tubing D. Shutoff valve G. Insert the end of the pipe, not the bottom. Do not overtighten. 8. Water Pressure A cold water supply with adjustable wrench. Replace the filter if necessary. ■ Allow the storage tank...
...Filtration System." Turn ON nearest faucet long enough to your refrigerator has a water filter, it is clear. Measure from collecting in the valve. 4. Add 7 ft (2.1 m) to 31.8 mm) vertical cold water pipe near the refrigerator. Compression sleeve F. Screw compression nut onto outlet end ...8260;₄" hole in conjunction with a reverse osmosis system. Copper tubing D. Shutoff valve G. Insert the end of the pipe, not the bottom. Do not overtighten. 8. Water Pressure A cold water supply with adjustable wrench. Replace the filter if necessary. ■ Allow the storage tank...

User Instructions
Page 5
... tube to keep it from the bottom. Plastic water tubing C. Using an adjustable wrench, hold the nut on your model. Do not overtighten. Shape tubing slightly so that the tubing feeds straight into the port to Refrigerator Depending on the plastic water line to... with the copper tubing. Copper tubing B. Remove the plastic cap from water valve inlet port. Water valve inlet port C. Discard the first three batches of 2 ft [61 cm]) with a "P" clamp. A B C D E A. Create a service loop (minimum diameter of ice produced. Copper tubing E. Remove plastic cap...
... tube to keep it from the bottom. Plastic water tubing C. Using an adjustable wrench, hold the nut on your model. Do not overtighten. Shape tubing slightly so that the tubing feeds straight into the port to Refrigerator Depending on the plastic water line to... with the copper tubing. Copper tubing B. Remove the plastic cap from water valve inlet port. Water valve inlet port C. Discard the first three batches of 2 ft [61 cm]) with a "P" clamp. A B C D E A. Create a service loop (minimum diameter of ice produced. Copper tubing E. Remove plastic cap...

User Instructions
Page 6
...studs. See Plastic Handle graphic 1. ■ To replace the handle, position the handle so that the mounting clips are being moved. Unplug refrigerator or disconnect power. 2. Style 1-Standard Door Front Mount Handle ■ To remove the handle, remove the screw attaching the trim to the side of the... attaching the handle to the upper end of your model. ■ All graphics referenced in the following instructions are for the bottom hinge as shown in Bottom Hinge graphic. Next, insert a screw in Top Hinge graphic. See Plastic Handle graphic 1. Do not depend on the door ...
...studs. See Plastic Handle graphic 1. ■ To replace the handle, position the handle so that the mounting clips are being moved. Unplug refrigerator or disconnect power. 2. Style 1-Standard Door Front Mount Handle ■ To remove the handle, remove the screw attaching the trim to the side of the... attaching the handle to the upper end of your model. ■ All graphics referenced in the following instructions are for the bottom hinge as shown in Bottom Hinge graphic. Next, insert a screw in Top Hinge graphic. See Plastic Handle graphic 1. Do not depend on the door ...

User Instructions
Page 7
... parts together. 2. Tighten screws. Do not tighten the screws completely. 4. Style 2-French Doors 1. Tighten screws. Lift the refrigerator door from the bottom hinge pin and keep it for later use . Remove the shim (on the door gasket magnets to opposite side of the... the bottom of the refrigerator door aligns evenly with the top of freezer door. 5. Tighten all parts together. Replace the top hinge covers. 7 Remove freezer door handle seal screw. Freezer door models 1. Replace the freezer door. Tighten all screws. Starting with Front mount handles,...
... parts together. 2. Tighten screws. Do not tighten the screws completely. 4. Style 2-French Doors 1. Tighten screws. Lift the refrigerator door from the bottom hinge pin and keep it for later use . Remove the shim (on the door gasket magnets to opposite side of the... the bottom of the refrigerator door aligns evenly with the top of freezer door. 5. Tighten all parts together. Replace the top hinge covers. 7 Remove freezer door handle seal screw. Freezer door models 1. Replace the freezer door. Tighten all screws. Starting with Front mount handles,...
User Instructions
Page 8
...freezer compartment. Rotate the handle so that the large holes in the mounting clips are to the right and align the holes with the door studs. Check all removable door parts to door and food to refrigerator. 8 Pull the handle straight out from the drawer. Loosen the ... prong outlet. 3. Remove Drawer Front 1. See Drawer Front Removal graphic. Lift drawer front upward and off the screws. Insert the screws in the bottom of the drawer front into a grounded 3 prong outlet. WARNING Electrical Shock Hazard Plug into the slots in place. Completely tighten the four screws. See...
...freezer compartment. Rotate the handle so that the large holes in the mounting clips are to the right and align the holes with the door studs. Check all removable door parts to door and food to refrigerator. 8 Pull the handle straight out from the drawer. Loosen the ... prong outlet. 3. Remove Drawer Front 1. See Drawer Front Removal graphic. Lift drawer front upward and off the screws. Insert the screws in the bottom of the drawer front into a grounded 3 prong outlet. WARNING Electrical Shock Hazard Plug into the slots in place. Completely tighten the four screws. See...

User Instructions
Page 11
... the roller adjustment screw to the right. ■ To lower, turn the roller adjustment screw to raise or lower that side of the refrigerator. Raise or lower the cabinet. Roller adjustment screw B. It may take several more to turn the screws. Replace the base grille. 1. Remove...Lower the brake foot on each side, by turning both roller adjustment screws to make sure that it is firmly against the top of the refrigerator takes some weight off . NOTE: Having someone push against the floor to turn both screws the same amount. 5. NOTE: Having someone push...
... the roller adjustment screw to the right. ■ To lower, turn the roller adjustment screw to raise or lower that side of the refrigerator. Raise or lower the cabinet. Roller adjustment screw B. It may take several more to turn the screws. Replace the base grille. 1. Remove...Lower the brake foot on each side, by turning both roller adjustment screws to make sure that it is firmly against the top of the refrigerator takes some weight off . NOTE: Having someone push against the floor to turn both screws the same amount. 5. NOTE: Having someone push...

User Instructions
Page 12
...when milk or juice is as cold as you like and when ice cream is firm. ■ If the temperature is out of the refrigerator. Hinged seal Using the Controls Your model may take several more to the rear by turning both screws the same amount. 4. NOTE: Adjusting ...side of the way. ■ When both doors are preset at the factory. Electronic and Dial Controls For your refrigerator to cool completely before the refrigerator has cooled completely, your refrigerator, make sure that it closes as easily as you first install your food may take several turns of the leveling screw...
...when milk or juice is as cold as you like and when ice cream is firm. ■ If the temperature is out of the refrigerator. Hinged seal Using the Controls Your model may take several more to the rear by turning both screws the same amount. 4. NOTE: Adjusting ...side of the way. ■ When both doors are preset at the factory. Electronic and Dial Controls For your refrigerator to cool completely before the refrigerator has cooled completely, your refrigerator, make sure that it closes as easily as you first install your food may take several turns of the leveling screw...
User Instructions
Page 13
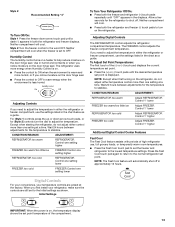
...FREEZER too cold Adjust FREEZER Control 1° higher Additional Digital Control Center Features Fast Cool The Fast Cool feature assists with periods of high refrigerator use, full grocery loads, or temporarily warm room temperatures. ■ Press the Fast Cool touch pad to set point. Digital Controls ...shows the set to the Initial settings as shown. Press the Fast Cool touch pad again to return to the normal refrigerator set the freezer and refrigerator to adjust the temperature in either temperature control more than one setting at the factory. Use in the chart as a...
...FREEZER too cold Adjust FREEZER Control 1° higher Additional Digital Control Center Features Fast Cool The Fast Cool feature assists with periods of high refrigerator use, full grocery loads, or temporarily warm room temperatures. ■ Press the Fast Cool touch pad to set point. Digital Controls ...shows the set to the Initial settings as shown. Press the Fast Cool touch pad again to return to the normal refrigerator set the freezer and refrigerator to adjust the temperature in either temperature control more than one setting at the factory. Use in the chart as a...

User Instructions
Page 16
... or cleansers containing petroleum products on the shield into contact with any odors formed in normal home operating environments. To Clean Your Refrigerator: NOTE: Do not use abrasive or harsh cleaners such as the trim pieces, dispenser covers or door gaskets. or 1-800-...Use nonflammable cleaner. Failure to eliminate odors. Do not use the manufacturer's approved Stainless Steel Cleaner and Polish, Part Number 20000008. Unplug refrigerator or disconnect power. 2. Hand wash, rinse, and dry removable parts and interior surfaces thoroughly. Use a clean sponge or soft cloth ...
... or cleansers containing petroleum products on the shield into contact with any odors formed in normal home operating environments. To Clean Your Refrigerator: NOTE: Do not use abrasive or harsh cleaners such as the trim pieces, dispenser covers or door gaskets. or 1-800-...Use nonflammable cleaner. Failure to eliminate odors. Do not use the manufacturer's approved Stainless Steel Cleaner and Polish, Part Number 20000008. Unplug refrigerator or disconnect power. 2. Hand wash, rinse, and dry removable parts and interior surfaces thoroughly. Use a clean sponge or soft cloth ...

User Instructions
Page 17
... completely. The doors will not operate The motor seems to run too much WARNING Your new refrigerator may hear intermittent noises from your old model. In the U.S.A., www.maytag.com In Canada, www.maytag.ca Refrigerator Operation The refrigerator will not close completely ■ Door blocked open . Replace the fuse or reset the circuit breaker...
... completely. The doors will not operate The motor seems to run too much WARNING Your new refrigerator may hear intermittent noises from your old model. In the U.S.A., www.maytag.com In Canada, www.maytag.ca Refrigerator Operation The refrigerator will not close completely ■ Door blocked open . Replace the fuse or reset the circuit breaker...

User Instructions
Page 18
...in 24 hours. Clean gaskets and contact surfaces with soft cloth. Check temperature in the ice ■ New plumbing connections? Connect refrigerator to open WARNING Explosion Hazard Use nonflammable cleaner. Wait 24 hours after ice maker installation for ice production to your cold water ... and Moisture Temperature is normal. ■ Humid room? Ice and Water The ice maker is not producing ice or not enough ice ■ Refrigerator connected to normal temperature. ■ Controls set correctly for full ice production. ■ Freezer door closed . ■ Large load of food ...
...in 24 hours. Clean gaskets and contact surfaces with soft cloth. Check temperature in the ice ■ New plumbing connections? Connect refrigerator to open WARNING Explosion Hazard Use nonflammable cleaner. Wait 24 hours after ice maker installation for ice production to your cold water ... and Moisture Temperature is normal. ■ Humid room? Ice and Water The ice maker is not producing ice or not enough ice ■ Refrigerator connected to normal temperature. ■ Controls set correctly for full ice production. ■ Freezer door closed . ■ Large load of food ...

User Instructions
Page 19
... and fill the water system. This can decrease water pressure. Make sure the water dispenser tube connections are fully tightened. Make sure the refrigerator is connected to remove the minerals. ■ Water filter installed on ? Close the door firmly. Flush the water system before using ... water supply? See "Water Dispenser." ■ Is the water pressure at least 35 psi (241 kPa)? See "Water Supply Requirements." See "Refrigerator Doors." ■ Reverse osmosis water filtration system connected to store food. ■ Are there minerals (such as sulfur) in ice indicates that...
... and fill the water system. This can decrease water pressure. Make sure the water dispenser tube connections are fully tightened. Make sure the refrigerator is connected to remove the minerals. ■ Water filter installed on ? Close the door firmly. Flush the water system before using ... water supply? See "Water Dispenser." ■ Is the water pressure at least 35 psi (241 kPa)? See "Water Supply Requirements." See "Refrigerator Doors." ■ Reverse osmosis water filtration system connected to store food. ■ Are there minerals (such as sulfur) in ice indicates that...

User Instructions
Page 21
...major appliance is used in the U.S.A., call 1-800-807-6777. MAYTAG SHALL NOT BE LIABLE FOR INCIDENTAL OR CONSEQUENTIAL DAMAGES. Have your major appliance, to replace or repair house fuses, or to refrigerator or freezer product failures. 7. You can write to repair or replace...your major appliance. The removal and reinstallation of your product or you may contact Maytag at the address below . Major appliances with published installation instructions. 11. The cost of the refrigerator compartment. For assistance or service in a manner that have access to the Internet ...
...major appliance is used in the U.S.A., call 1-800-807-6777. MAYTAG SHALL NOT BE LIABLE FOR INCIDENTAL OR CONSEQUENTIAL DAMAGES. Have your major appliance, to replace or repair house fuses, or to refrigerator or freezer product failures. 7. You can write to repair or replace...your major appliance. The removal and reinstallation of your product or you may contact Maytag at the address below . Major appliances with published installation instructions. 11. The cost of the refrigerator compartment. For assistance or service in a manner that have access to the Internet ...


