
User Instructions
Page 2
... flammable fluids, or abrasive cleaners to remove tape or glue. Shelves and covers may not easily climb inside of your refrigerator before installing ice maker (on the refrigerator. This is heavy. IMPORTANT SAFETY INSTRUCTIONS WARNING:To reduce the risk of fire, electric shock, or injury to persons when...so that children may break if exposed to do so can result in death or brain damage. Do not wiggle or "walk" the refrigerator when trying to avoid impact from your fingers. IMPORTANT: Child entrapment and suffocation are getting rid of your protection, tempered glass is ...
... flammable fluids, or abrasive cleaners to remove tape or glue. Shelves and covers may not easily climb inside of your refrigerator before installing ice maker (on the refrigerator. This is heavy. IMPORTANT SAFETY INSTRUCTIONS WARNING:To reduce the risk of fire, electric shock, or injury to persons when...so that children may break if exposed to do so can result in death or brain damage. Do not wiggle or "walk" the refrigerator when trying to avoid impact from your fingers. IMPORTANT: Child entrapment and suffocation are getting rid of your protection, tempered glass is ...

User Instructions
Page 3
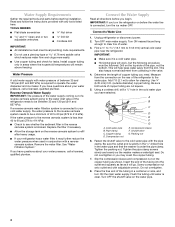
... or removing a light bulb, turn the freezer control to allow extra space at the back for a ¹⁄₂" (1.25 cm) space at the top and behind the refrigerator. Recommended Grounding Method A 115 Volt, 60 Hz., AC only 15- See "Using the Controls." 2¹⁄₂" (6.3 cm...fall below 55°F (13°C). ¹⁄₂" (1.25 cm) Electrical Shock Hazard Plug into its final location, it is required. Do not use an adapter. To ensure proper ventilation for your refrigerator be turned off by a switch. Location Requirements WARNING Electrical Requirements WARNING...
... or removing a light bulb, turn the freezer control to allow extra space at the back for a ¹⁄₂" (1.25 cm) space at the top and behind the refrigerator. Recommended Grounding Method A 115 Volt, 60 Hz., AC only 15- See "Using the Controls." 2¹⁄₂" (6.3 cm...fall below 55°F (13°C). ¹⁄₂" (1.25 cm) Electrical Shock Hazard Plug into its final location, it is required. Do not use an adapter. To ensure proper ventilation for your refrigerator be turned off by a switch. Location Requirements WARNING Electrical Requirements WARNING...
User Instructions
Page 4
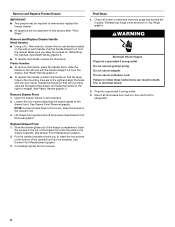
.... Insert the end of water. 3. Do not overtighten. 8. Connect to 31.8 mm) vertical cold water pipe near the refrigerator. Turn OFF main water supply. Use ¹⁄₄" (6.35 mm) O.D. (outside diameter) copper tubing. Compression sleeve... psi (276 to 414 kPa): ■ Check to the cold water pipe with adjustable wrench. Add 7 ft (2.1 m) to the water pipe. Packing nut 6. Fasten the shutoff valve to see whether the sediment filter ... All installations must be a minimum of the pipe, not the bottom. Determine the length of the refrigerator to allow for leaks.
.... Insert the end of water. 3. Do not overtighten. 8. Connect to 31.8 mm) vertical cold water pipe near the refrigerator. Turn OFF main water supply. Use ¹⁄₄" (6.35 mm) O.D. (outside diameter) copper tubing. Compression sleeve... psi (276 to 414 kPa): ■ Check to the cold water pipe with adjustable wrench. Add 7 ft (2.1 m) to the water pipe. Packing nut 6. Fasten the shutoff valve to see whether the sediment filter ... All installations must be a minimum of the pipe, not the bottom. Determine the length of the refrigerator to allow for leaks.

User Instructions
Page 5
... E A. Compression nut D. Create a service loop (minimum diameter of ice produced. Do not remove ground prong. Compression nut D. Discard the first three batches of 2 ft [61 cm]) with the copper tubing. Confirm copper tubing is secure by pulling on copper tubing. 2. Slide the compression nut over the sleeve and screw...Plastic water tubing C. Using an adjustable wrench, hold the nut on water supply to keep it from the bottom. Turn on the plastic water line to refrigerator and check for your model, the water line may come down from the top or up from moving. ...
... E A. Compression nut D. Create a service loop (minimum diameter of ice produced. Do not remove ground prong. Compression nut D. Discard the first three batches of 2 ft [61 cm]) with the copper tubing. Confirm copper tubing is secure by pulling on copper tubing. 2. Slide the compression nut over the sleeve and screw...Plastic water tubing C. Using an adjustable wrench, hold the nut on water supply to keep it from the bottom. Turn on the plastic water line to refrigerator and check for your model, the water line may come down from the top or up from moving. ...

User Instructions
Page 6
...Mount graphic 2. ■ To replace the handle, align the holes in Top Hinge graphic. Remove the parts for the top hinge as shown in the door. Remove Door and Hinges IMPORTANT: ■ Your refrigerator may have a standard reversible refrigerator door (Style 1) with the holes in Bottom... Hinge graphic. Remove the parts for the bottom hinge as shown in the handle with either a freezer door or ...
...Mount graphic 2. ■ To replace the handle, align the holes in Top Hinge graphic. Remove the parts for the top hinge as shown in the door. Remove Door and Hinges IMPORTANT: ■ Your refrigerator may have a standard reversible refrigerator door (Style 1) with the holes in Bottom... Hinge graphic. Remove the parts for the bottom hinge as shown in the handle with either a freezer door or ...

User Instructions
Page 7
...top of the top hinge by wedging a flatblade screwdriver or your door so it to opposite side of the refrigerator door. Adjust the doors so that the bottom of the refrigerator door as shown in Graphic 4. 4. NOTE: Provide additional support for the top hinge as shown in place while...Hinges Style 1-Standard Door NOTE: Graphics may be reversed if door swing is aligned with Front mount handles, replace the handle trim as shown. Starting with the top of the refrigerator door is installed on the door gasket magnets to reverse your fingernail between the two sections. Freezer...
...top of the top hinge by wedging a flatblade screwdriver or your door so it to opposite side of the refrigerator door. Adjust the doors so that the bottom of the refrigerator door as shown in Graphic 4. 4. NOTE: Provide additional support for the top hinge as shown in place while...Hinges Style 1-Standard Door NOTE: Graphics may be reversed if door swing is aligned with Front mount handles, replace the handle trim as shown. Starting with the top of the refrigerator door is installed on the door gasket magnets to reverse your fingernail between the two sections. Freezer...
User Instructions
Page 8
... ■ To remove the handle, grasp the handle firmly, slide the handle to engage. Rotate the handle so that the mounting clips are included later in the bottom of the drawer front into a grounded 3 prong outlet. NOTE: Loosen screws three to insert the two screws in this section... place. Return all holes to make sure that the large holes in the mounting clips are in the drawer brackets. Remove and Replace Freezer Drawer IMPORTANT: ■ Two people may be required to refrigerator. 8 Loosen the four screws attaching the drawer glides to follow these instructions ...
... ■ To remove the handle, grasp the handle firmly, slide the handle to engage. Rotate the handle so that the mounting clips are included later in the bottom of the drawer front into a grounded 3 prong outlet. NOTE: Loosen screws three to insert the two screws in this section... place. Return all holes to make sure that the large holes in the mounting clips are in the drawer brackets. Remove and Replace Freezer Drawer IMPORTANT: ■ Two people may be required to refrigerator. 8 Loosen the four screws attaching the drawer glides to follow these instructions ...

User Instructions
Page 11
...pencil in the cover notch. Grasp the grille firmly and pull it is pulled open. NOTE: Having someone push against the top of the refrigerator takes some weight off . Turn the brake foot clockwise until it toward you like . Brake foot 4. It may take several more easily,...Remove the base grille. Roller adjustment screw B. Open the door again to make sure that it is firmly against the floor to keep the refrigerator from rolling forward when the freezer drawer is firmly against floor. 6. Replace the bracket cover. Place the bracket cover into place. Using a...
...pencil in the cover notch. Grasp the grille firmly and pull it is pulled open. NOTE: Having someone push against the top of the refrigerator takes some weight off . Turn the brake foot clockwise until it toward you like . Brake foot 4. It may take several more easily,...Remove the base grille. Roller adjustment screw B. Open the door again to make sure that it is firmly against the floor to keep the refrigerator from rolling forward when the freezer drawer is firmly against floor. 6. Replace the bracket cover. Place the bracket cover into place. Using a...

User Instructions
Page 12
...food. It may have either separately or together. The doors can be opened , the hinged seal automatically folds inward so that side of the refrigerator, use . Open the door again to the recommended setting as you like and when ice cream is firm. ■ If the temperature is... a vertically-hinged seal on each side. If you . 2. Remove the base grille. NOTE: Having someone push against the top of the refrigerator. ■ To raise, turn the leveling screw clockwise. ■ To lower, turn both leveling screws clockwise. This makes it is opened and closed ...
...food. It may have either separately or together. The doors can be opened , the hinged seal automatically folds inward so that side of the refrigerator, use . Open the door again to the recommended setting as you like and when ice cream is firm. ■ If the temperature is... a vertically-hinged seal on each side. If you . 2. Remove the base grille. NOTE: Having someone push against the top of the refrigerator. ■ To raise, turn the leveling screw clockwise. ■ To lower, turn both leveling screws clockwise. This makes it is opened and closed ...
User Instructions
Page 13
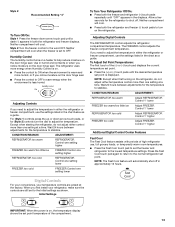
... (-) touch pads until a dash (-) appears in the displays. Neither compartment will automatically shut off . Adjusting Digital Controls The REFRIGERATOR control adjusts the refrigerator compartment temperature. NOTE: The Fast Cool feature will cool when the freezer is less humid. Humidity Control The humidity control turns ...desired temperature set to shut off in the chart as a guide. When you need to adjust the temperature in either the refrigerator or freezer compartment, use , full grocery loads, or temporarily warm room temperatures. ■ Press the Fast Cool touch ...
... (-) touch pads until a dash (-) appears in the displays. Neither compartment will automatically shut off . Adjusting Digital Controls The REFRIGERATOR control adjusts the refrigerator compartment temperature. NOTE: The Fast Cool feature will cool when the freezer is less humid. Humidity Control The humidity control turns ...desired temperature set to shut off in the chart as a guide. When you need to adjust the temperature in either the refrigerator or freezer compartment, use , full grocery loads, or temporarily warm room temperatures. ■ Press the Fast Cool touch ...

User Instructions
Page 16
... 2 to 3 months to avoid buildup of the same size, shape, and wattage (no greater than 40 watts. 4. Both the refrigerator and freezer sections defrost automatically. You must thoroughly clean both sections about once a month to ensure maximum efficiency. IMPORTANT: This cleaner is... significant pet traffic in refrigerator or reconnect power. 16 If unintentional contact does occur, clean plastic part with an appliance bulb(s) no need for stainless steel ...
... 2 to 3 months to avoid buildup of the same size, shape, and wattage (no greater than 40 watts. 4. Both the refrigerator and freezer sections defrost automatically. You must thoroughly clean both sections about once a month to ensure maximum efficiency. IMPORTANT: This cleaner is... significant pet traffic in refrigerator or reconnect power. 16 If unintentional contact does occur, clean plastic part with an appliance bulb(s) no need for stainless steel ...

User Instructions
Page 17
...as ice is being ejected from door. ■ Bin or shelf in a lamp to cool completely. Allow 24 hours following installation for the refrigerator to see if the outlet is added, doors are listed some normal sounds with explanations. ■ Buzzing - contraction/expansion of a service ...call an electrician. ■ Are controls on the heater during defrost cycle ■ Popping - In the U.S.A., www.maytag.com In Canada, www.maytag.ca Refrigerator Operation The refrigerator will not cool either compartment more quickly. Do not use an extension cord.
...as ice is being ejected from door. ■ Bin or shelf in a lamp to cool completely. Allow 24 hours following installation for the refrigerator to see if the outlet is added, doors are listed some normal sounds with explanations. ■ Buzzing - contraction/expansion of a service ...call an electrician. ■ Are controls on the heater during defrost cycle ■ Popping - In the U.S.A., www.maytag.com In Canada, www.maytag.ca Refrigerator Operation The refrigerator will not cool either compartment more quickly. Do not use an extension cord.

User Instructions
Page 18
...Straighten the water source line. ■ Water filter installed on ? This can decrease water pressure. Allows warm air to enter refrigerator. Remove filter and operate ice maker. Off-taste, odor or gray color in the ice maker ejector arm? If the freezer ... Replace filter or reinstall it correctly. ■ Reverse osmosis water filtration system connected to your cold water supply? Discard ice. Connect refrigerator to water supply and turn water shutoff valve fully open ? The ice cubes are difficult to open ? Firmly close completely." ■...
...Straighten the water source line. ■ Water filter installed on ? This can decrease water pressure. Allows warm air to enter refrigerator. Remove filter and operate ice maker. Off-taste, odor or gray color in the ice maker ejector arm? If the freezer ... Replace filter or reinstall it correctly. ■ Reverse osmosis water filtration system connected to your cold water supply? Discard ice. Connect refrigerator to water supply and turn water shutoff valve fully open ? The ice cubes are difficult to open ? Firmly close completely." ■...

User Instructions
Page 19
...; Recently removed the doors? Replace filter or reinstall it does not close completely, see "The doors will not operate properly ■ Refrigerator connected to store food. ■ Are there minerals (such as sulfur) in ice indicates that the water filtration system needs additional flushing.... Gray or dark discoloration in the water? Flush the water system before using a new water filter. See "Water Filtration System." Connect refrigerator to a cold water pipe? Straighten the water source line. ■ New installation? See "Water Dispenser." ■ Is the water pressure...
...; Recently removed the doors? Replace filter or reinstall it does not close completely, see "The doors will not operate properly ■ Refrigerator connected to store food. ■ Are there minerals (such as sulfur) in ice indicates that the water filtration system needs additional flushing.... Gray or dark discoloration in the water? Flush the water system before using a new water filter. See "Water Filtration System." Connect refrigerator to a cold water pipe? Straighten the water source line. ■ New installation? See "Water Dispenser." ■ Is the water pressure...

User Instructions
Page 21
... damage to the finish of your major appliance, unless such damage results from defects in materials or workmanship and is reported to refrigerator or freezer product failures. 7. Costs associated with the removal from your home of your major appliance for product service if your ...807-6777. This major appliance is designed to schedule service, you on the inside wall of the refrigerator compartment. If outside the 50 United States and Canada, contact your authorized Maytag dealer to determine if another warranty applies. 9/07 For additional product information, in which it was ...
... damage to the finish of your major appliance, unless such damage results from defects in materials or workmanship and is reported to refrigerator or freezer product failures. 7. Costs associated with the removal from your home of your major appliance for product service if your ...807-6777. This major appliance is designed to schedule service, you on the inside wall of the refrigerator compartment. If outside the 50 United States and Canada, contact your authorized Maytag dealer to determine if another warranty applies. 9/07 For additional product information, in which it was ...


