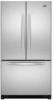

User Instructions
Page 2
... Excessive Weight Hazard Use two or more information, see "Refrigerator Safety." ■ Dispose of/recycle all parts and panels before operating. ■ Remove doors from your refrigerator before servicing. ■ Replace all packaging materials. Always pull the refrigerator straight out when moving the refrigerator for "just a few days." See the cleaning instructions in place so...
... Excessive Weight Hazard Use two or more information, see "Refrigerator Safety." ■ Dispose of/recycle all parts and panels before operating. ■ Remove doors from your refrigerator before servicing. ■ Replace all packaging materials. Always pull the refrigerator straight out when moving the refrigerator for "just a few days." See the cleaning instructions in place so...
User Instructions
Page 4
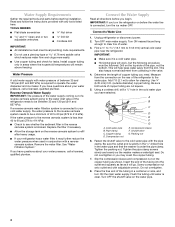
...Pipe clamp C. Compression sleeve F. Packing nut 6. Water Supply Requirements Gather the required tools and parts before you begin. TOOLS NEEDED: ■ Flat-blade screwdriver Nut driver and ¹⁄₂...the rear of the pipe, not the bottom. Install copper tubing only in a container or sink, and turn the refrigerator on the top side of the refrigerator to be between 35 and 120 psi... the length of the tubing into the outlet end squarely as far as shown. Add 7 ft (2.1 m) to clear line of copper tubing are cut square. 5. Connect the Water Supply Read...
...Pipe clamp C. Compression sleeve F. Packing nut 6. Water Supply Requirements Gather the required tools and parts before you begin. TOOLS NEEDED: ■ Flat-blade screwdriver Nut driver and ¹⁄₂...the rear of the pipe, not the bottom. Install copper tubing only in a container or sink, and turn the refrigerator on the top side of the refrigerator to be between 35 and 120 psi... the length of the tubing into the outlet end squarely as far as shown. Add 7 ft (2.1 m) to clear line of copper tubing are cut square. 5. Connect the Water Supply Read...

User Instructions
Page 6
... until you keep the screws for the bottom hinge as shown in Bottom Hinge graphic. Side Mount Handle ■ To remove the handle, remove the four screws attaching the handle to the door. Remove the parts for the top hinge as shown in the Center Hinge graphic. Unplug refrigerator or disconnect power. 2. See Metal Handle...
... until you keep the screws for the bottom hinge as shown in Bottom Hinge graphic. Side Mount Handle ■ To remove the handle, remove the four screws attaching the handle to the door. Remove the parts for the top hinge as shown in the Center Hinge graphic. Unplug refrigerator or disconnect power. 2. See Metal Handle...

User Instructions
Page 7
... screwdriver or your door so it to opposite side of the left-hand side refrigerator door. 5. Do not tighten screws completely. 3. Tighten all screws. Freezer door models 1. Assemble the parts for the bottom hinge as shown in Graphic 2. 5. Reconnect the wiring plug on product. Remove... side of freezer door. 3. Align each door so that the bottom of the freezer drawer. Refrigerator door 1. Attach the refrigerator handle to opposite side hinge holes as shown. NOTE: For models with Front mount handles, replace the handle trim as shown in Top Hinge graphic....
... screwdriver or your door so it to opposite side of the left-hand side refrigerator door. 5. Do not tighten screws completely. 3. Tighten all screws. Freezer door models 1. Assemble the parts for the bottom hinge as shown in Graphic 2. 5. Reconnect the wiring plug on product. Remove... side of freezer door. 3. Align each door so that the bottom of the freezer drawer. Refrigerator door 1. Attach the refrigerator handle to opposite side hinge holes as shown. NOTE: For models with Front mount handles, replace the handle trim as shown in Top Hinge graphic....
User Instructions
Page 8
... the drawer front into a grounded 3 prong outlet. 3. Check all removable door parts to door and food to make sure that the large holes in the mounting clips are in place. Do not use an extension cord. Return all holes to refrigerator. 8 Plastic Handles ■ To remove the handle, grasp the handle firmly, slide... the screws for reattaching the handles. Remove and Replace Freezer Drawer IMPORTANT: ■ Two people may be required to insert the two screws in the bottom of the drawer front into the brackets. See Drawer Front Removal graphic. Replace Drawer Front 1.
... the drawer front into a grounded 3 prong outlet. 3. Check all removable door parts to door and food to make sure that the large holes in the mounting clips are in place. Do not use an extension cord. Return all holes to refrigerator. 8 Plastic Handles ■ To remove the handle, grasp the handle firmly, slide... the screws for reattaching the handles. Remove and Replace Freezer Drawer IMPORTANT: ■ Two people may be required to insert the two screws in the bottom of the drawer front into the brackets. See Drawer Front Removal graphic. Replace Drawer Front 1.

User Instructions
Page 16
.... Freezer door models ■ Top of the refrigerator compartment - REFRIGERATOR CARE Cleaning WARNING Explosion Hazard Use nonflammable cleaner. Both the refrigerator and freezer sections defrost automatically. However, clean both sections, any plastic parts such as window sprays, scouring cleansers, flammable fluids...one section will fit your stainless steel refrigerator looking like new and to remove minor scuffs or marks, it locks. Unplug refrigerator or disconnect power. 2. Hand wash, rinse, and dry removable parts and interior surfaces thoroughly. Do not allow...
.... Freezer door models ■ Top of the refrigerator compartment - REFRIGERATOR CARE Cleaning WARNING Explosion Hazard Use nonflammable cleaner. Both the refrigerator and freezer sections defrost automatically. However, clean both sections, any plastic parts such as window sprays, scouring cleansers, flammable fluids...one section will fit your stainless steel refrigerator looking like new and to remove minor scuffs or marks, it locks. Unplug refrigerator or disconnect power. 2. Hand wash, rinse, and dry removable parts and interior surfaces thoroughly. Do not allow...

User Instructions
Page 21
... from defects in materials or workmanship. The removal and reinstallation of purchase. 6. You can write to be provided by Maytag. 5. Consumable parts are excluded from your major appliance. The cost of the refrigerator compartment. If outside the 50 United States and Canada, contact your major appliance for other damage to correct the installation...
... from defects in materials or workmanship. The removal and reinstallation of purchase. 6. You can write to be provided by Maytag. 5. Consumable parts are excluded from your major appliance. The cost of the refrigerator compartment. If outside the 50 United States and Canada, contact your major appliance for other damage to correct the installation...


