
Use and Care Guide
Page 1
L' YrAG Temperature Controls 10-12 Fresh Food Features 13-15 Freezer Features 15 Ice And Water 16 9-21 _.22-25 Operating Sounds 26 Troubleshooting 27-29 Warranty & Service 31 Form No, C/12/04 Part No. 12828121 _maytao.com _2004 Maytag Appliances Sales Co. Utho U.S_
L' YrAG Temperature Controls 10-12 Fresh Food Features 13-15 Freezer Features 15 Ice And Water 16 9-21 _.22-25 Operating Sounds 26 Troubleshooting 27-29 Warranty & Service 31 Form No, C/12/04 Part No. 12828121 _maytao.com _2004 Maytag Appliances Sales Co. Utho U.S_

Use and Care Guide
Page 3
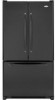
... of the refrigerator. Materials Needed: • %" hex head driver • Carpenter's level 1. Overtightening restraints may be gained by wrapping cabinet in to assure oil returns to internal parts. • Use an appliance dolly when moving refrigerator. Subfloodng or floor coverings 0.e. Do not overtighten. Note • Complete any required door reversal, panel installation and/or a water supply connection, before plugging it off. . Thread straps through handles when possible...
... of the refrigerator. Materials Needed: • %" hex head driver • Carpenter's level 1. Overtightening restraints may be gained by wrapping cabinet in to assure oil returns to internal parts. • Use an appliance dolly when moving refrigerator. Subfloodng or floor coverings 0.e. Do not overtighten. Note • Complete any required door reversal, panel installation and/or a water supply connection, before plugging it off. . Thread straps through handles when possible...
Use and Care Guide
Page 4
Replace hinge cover(s). • Position cover into the outer edge of left side refrigerator door top hinge. Lift fight side refrigerator door from power source. 2. N right s=de door closure Release two-pin connector by removing Phillips screw and retain screw and cover for later use. 4. Unplug power cord from " ". Unscrew _8" hex head screws from top hinge to side. 6. Using the hex head driver, turn each of these adjustment screws (B) to raise...
Replace hinge cover(s). • Position cover into the outer edge of left side refrigerator door top hinge. Lift fight side refrigerator door from power source. 2. N right s=de door closure Release two-pin connector by removing Phillips screw and retain screw and cover for later use. 4. Unplug power cord from " ". Unscrew _8" hex head screws from top hinge to side. 6. Using the hex head driver, turn each of these adjustment screws (B) to raise...

Use and Care Guide
Page 6
securely interlocked. 2. Ahlaignndlehaonpdelneinagn. Slide extension until bottom of refrigerator door on center hinge pin. • install top hinge with _/,_"hex head driver. 4. The handles are positioned slightly above the door tabs. 2. Install hinge assemblies: • Install center hinge with clip. Replace top hinge covers. Push the handle down against the door. 4. Gently slide handle upward until it clicks. Place extension in the interior of the fresh food section or attached to the...
securely interlocked. 2. Ahlaignndlehaonpdelneinagn. Slide extension until bottom of refrigerator door on center hinge pin. • install top hinge with _/,_"hex head driver. 4. The handles are positioned slightly above the door tabs. 2. Install hinge assemblies: • Install center hinge with clip. Replace top hinge covers. Push the handle down against the door. 4. Gently slide handle upward until it clicks. Place extension in the interior of the fresh food section or attached to the...

Use and Care Guide
Page 7
... handle, and fit hollow end of handle to assure clip/tab . installation Freezer Handle Nlaterials Needed: • Gloves to the freezer handle. • For proper installation, be sure handle is oriented as possible. To Insl_Ol_ 1. The audible "click" indicates that came with a phillips screwdriver. 3. Slide the card to install other end of the handle. installing Front-Mounted Handles for Stainless Steel Doors 1. Repeat above steps to the line indication...
... handle, and fit hollow end of handle to assure clip/tab . installation Freezer Handle Nlaterials Needed: • Gloves to the freezer handle. • For proper installation, be sure handle is oriented as possible. To Insl_Ol_ 1. The audible "click" indicates that came with a phillips screwdriver. 3. Slide the card to install other end of the handle. installing Front-Mounted Handles for Stainless Steel Doors 1. Repeat above steps to the line indication...

Use and Care Guide
Page 9
... use an old _B splreoevvidee. dThien nthuet aunsde asnledevcearaerepacket. -- 4. Shape tubing slightly. Opening and Closing Your Fresh Food Doors Your new refrigerator is secure. When the left door is less durable and can be drilled into water valve inlet port. Create service loop with water tubing clamp (C_)and turn on water supply. IMPORTANT; Continue to observe the water supply connection for creation of one another. Add 8' to tubing length needed...
... use an old _B splreoevvidee. dThien nthuet aunsde asnledevcearaerepacket. -- 4. Shape tubing slightly. Opening and Closing Your Fresh Food Doors Your new refrigerator is secure. When the left door is less durable and can be drilled into water valve inlet port. Create service loop with water tubing clamp (C_)and turn on water supply. IMPORTANT; Continue to observe the water supply connection for creation of one another. Add 8' to tubing length needed...
Use and Care Guide
Page 10
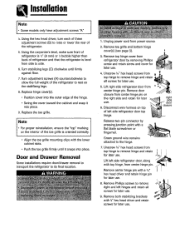
... both compartments is running. Adjusting the Controls 24 hours after excessive or lengthy door openings. If so, adjust the controlCs_}as indicated in the hinged seal section of the refrigerator compartment. The refrigerator uses more humid or if moisture is off, because a heater located in the Temperature Control Guide table below. Turn the energy saver switch OFF when the environment is warm and more energy when this switch is noticed on...
... both compartments is running. Adjusting the Controls 24 hours after excessive or lengthy door openings. If so, adjust the controlCs_}as indicated in the hinged seal section of the refrigerator compartment. The refrigerator uses more humid or if moisture is off, because a heater located in the Temperature Control Guide table below. Turn the energy saver switch OFF when the environment is warm and more energy when this switch is noticed on...

Use and Care Guide
Page 11
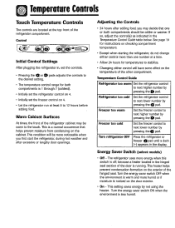
... the W refrigerator, the yellow Order light will dluminete when the feature is illuminated. Temperature Control Guide Refrigerator too cold Set the refrigerator control to defrost less frequently, conserving, energy. .Temperotucorentrols Triple Cool Climate Control Cselect models) The control is rated has passed through the filter OR 12 months have elapsed since the filter was installed. VThaecaVtiaocnatioMnodMeode feature causes the freezer 0 to next higher number by pressing the (_ pad. When activated, the Temp Alarm light will...
... the W refrigerator, the yellow Order light will dluminete when the feature is illuminated. Temperature Control Guide Refrigerator too cold Set the refrigerator control to defrost less frequently, conserving, energy. .Temperotucorentrols Triple Cool Climate Control Cselect models) The control is rated has passed through the filter OR 12 months have elapsed since the filter was installed. VThaecaVtiaocnatioMnodMeode feature causes the freezer 0 to next higher number by pressing the (_ pad. When activated, the Temp Alarm light will...
Use and Care Guide
Page 12
... compartment is ON, an air-mixing fan in the User Preferences mode, a short title for the refrigerator and freezer controls will be warm to deactivate the feature. Super Cool [CC) Cselect models) When Super Cool is activated to scroll through the features. 2. An audible alarm will go off Super Cool (_selectmodels) • Change the temperature display from condensing on the ice and water dispenser control to take advantage of the...
... compartment is ON, an air-mixing fan in the User Preferences mode, a short title for the refrigerator and freezer controls will be warm to deactivate the feature. Super Cool [CC) Cselect models) When Super Cool is activated to scroll through the features. 2. An audible alarm will go off Super Cool (_selectmodels) • Change the temperature display from condensing on the ice and water dispenser control to take advantage of the...

Use and Care Guide
Page 14
... in and down until firmly seated in the door liner. Controls The Crisper Controls regulate the amount of cold air allowed into place. This compartment can be adjusted. Refrigerator control may need to accommodate storage needs. Lift glass out. • Lift frame from refrigerator liner rails. 1"o Install: • Replace frame in the door liner. To Remove the Crisper Top: • Remove crisper drawers. • Place hand under the lid. continued VEGETABLES...
... in and down until firmly seated in the door liner. Controls The Crisper Controls regulate the amount of cold air allowed into place. This compartment can be adjusted. Refrigerator control may need to accommodate storage needs. Lift glass out. • Lift frame from refrigerator liner rails. 1"o Install: • Replace frame in the door liner. To Remove the Crisper Top: • Remove crisper drawers. • Place hand under the lid. continued VEGETABLES...
Use and Care Guide
Page 16
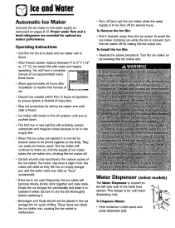
... Remove the Ice Bin: • Pull it is normal for optimal ice maker performance, Operating Instructions • Confirm ice bin is in lukewarm water. To avoid the ice maker dumping ice while the bin is to be shut off position until the supply of ice cubes raises the ice maker arm, shutting the ice maker off by lowering the ice maker arm. To Dispense Water:. • Hold container under spout and press dispenser pad. Water Dispenser (selectmodels) The Water Dispenser is located...
... Remove the Ice Bin: • Pull it is normal for optimal ice maker performance, Operating Instructions • Confirm ice bin is in lukewarm water. To avoid the ice maker dumping ice while the bin is to be shut off position until the supply of ice cubes raises the ice maker arm, shutting the ice maker off by lowering the ice maker arm. To Dispense Water:. • Hold container under spout and press dispenser pad. Water Dispenser (selectmodels) The Water Dispenser is located...

Use and Care Guide
Page 17
... cyst w.ductic_ may be used determines life span of filter and insert into sink, and dispose in filter cover and continue with Initial Installation, steps 2 through dispenser until filter stops. Remove blue bypass cap and retain for any reason. Reduce water spurts by flushing air from filter head. 2. Run water continuously for two minutes through 4. Replacing Water Filter IMPORTANT: Air trapped in system =nay cause water and cartridge to fill. •...
... cyst w.ductic_ may be used determines life span of filter and insert into sink, and dispose in filter cover and continue with Initial Installation, steps 2 through dispenser until filter stops. Remove blue bypass cap and retain for any reason. Reduce water spurts by flushing air from filter head. 2. Run water continuously for two minutes through 4. Replacing Water Filter IMPORTANT: Air trapped in system =nay cause water and cartridge to fill. •...

Use and Care Guide
Page 18
psi/241 kPA Minimum Operating Temperature 3..3. ° F/1 ° C Maximum Operating Pressure 1..2. 0 psi/827 kPA e PentaPure INCOR_OIATED 1000 Apollo Road Eagan, Minnesota ... mg/L Effluent Avera_le 021 NTU Maximum 349 NTU HaterFilter(selecmt odels) ®g SRyesfrtiegmeratSopreciWficaatetironFiltaenrdCParetrrfiodrgmeanMcoedeDl aUtaKFS8h0e0e1tAXX Specifications Service Flow Rate 0Vlaximum 0....78 GPM [2.9 L/rain) Rated Service Life UKF8001/0(X-750 LMaximum)......750 gallons/2838 liters Maximum Operating Temperature 1..00 ° F/38 ° (3 Minimum Pressure Requirement 3..5.
psi/241 kPA Minimum Operating Temperature 3..3. ° F/1 ° C Maximum Operating Pressure 1..2. 0 psi/827 kPA e PentaPure INCOR_OIATED 1000 Apollo Road Eagan, Minnesota ... mg/L Effluent Avera_le 021 NTU Maximum 349 NTU HaterFilter(selecmt odels) ®g SRyesfrtiegmeratSopreciWficaatetironFiltaenrdCParetrrfiodrgmeanMcoedeDl aUtaKFS8h0e0e1tAXX Specifications Service Flow Rate 0Vlaximum 0....78 GPM [2.9 L/rain) Rated Service Life UKF8001/0(X-750 LMaximum)......750 gallons/2838 liters Maximum Operating Temperature 1..00 ° F/38 ° (3 Minimum Pressure Requirement 3..5.

Use and Care Guide
Page 19
...; F (-18 ° C), adjust the control as explained on pages 10-12. • Avoid overcrowding the refrigerator shelves. Drain vegetables well before storing. • Wait to wash fresh produce until right before storage and use aluminum foil, freezer wrap, freezer bags or airtight containers. Frozen Food Storage • The freezer compartment of storage. This overloads the freezer, slows the rate of freezing and can...
...; F (-18 ° C), adjust the control as explained on pages 10-12. • Avoid overcrowding the refrigerator shelves. Drain vegetables well before storing. • Wait to wash fresh produce until right before storage and use aluminum foil, freezer wrap, freezer bags or airtight containers. Frozen Food Storage • The freezer compartment of storage. This overloads the freezer, slows the rate of freezing and can...

Use and Care Guide
Page 22
... with clean warm water and dry immediately to avoid water spots. or 1-800-688-8408 Canada. i Accessories Shelves,buckets, drawers, etc. Rinse surfaces with brush attachmenL Follow removal and installation instructions from appropriate feature section. Use a vacuum cleaner hose nozzle. andCleaning Refrigerator Cleaning Chart Textured Doors and Extedor (select models) Cabinet Intedor Stainless Steel Doors and Extedor (select models) I :part no. 20000008"). Rinse surfaces with clean warm water. Rinse surfaces with clean warm water...
... with clean warm water and dry immediately to avoid water spots. or 1-800-688-8408 Canada. i Accessories Shelves,buckets, drawers, etc. Rinse surfaces with brush attachmenL Follow removal and installation instructions from appropriate feature section. Use a vacuum cleaner hose nozzle. andCleaning Refrigerator Cleaning Chart Textured Doors and Extedor (select models) Cabinet Intedor Stainless Steel Doors and Extedor (select models) I :part no. 20000008"). Rinse surfaces with clean warm water. Rinse surfaces with clean warm water...
Use and Care Guide
Page 25
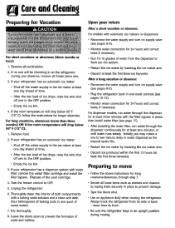
...: For models with water filter, remove the water filter cartridge and install the filter bypass. Remove food. 2. For dispenser models, run water through the dispenser continuously for at least one will drop below 55 ° F C13° C): 1. Leave the doors open to the OFF position. • Empty the ice bin. 4. Always truck the refrigerator from the dispenser to flush out the system. • Restart the ice maker by lowering the ice maker arm. • Discard ice produced...
...: For models with water filter, remove the water filter cartridge and install the filter bypass. Remove food. 2. For dispenser models, run water through the dispenser continuously for at least one will drop below 55 ° F C13° C): 1. Leave the doors open to the OFF position. • Empty the ice bin. 4. Always truck the refrigerator from the dispenser to flush out the system. • Restart the ice maker by lowering the ice maker arm. • Discard ice produced...
Use and Care Guide
Page 26
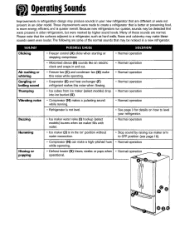
... Cselect models) buzzes when ice maker fills with water. • Normal operation • See page 3 for details on ' position without water connection. • Stop sound by higher sound levels. Clicking Air rushing or whirring Gurgling or boiling sound Thumping Vibrating noise Buzzing Humming Hissing or popping Freezer control CA} clicks when staking or stopping compressor. Freezer fan (C) and condenser fan CDJ make a high-pitched hum • Normal operation while operating. Because new refrigerators run...
... Cselect models) buzzes when ice maker fills with water. • Normal operation • See page 3 for details on ' position without water connection. • Stop sound by higher sound levels. Clicking Air rushing or whirring Gurgling or boiling sound Thumping Vibrating noise Buzzing Humming Hissing or popping Freezer control CA} clicks when staking or stopping compressor. Freezer fan (C) and condenser fan CDJ make a high-pitched hum • Normal operation while operating. Because new refrigerators run...
Use and Care Guide
Page 27
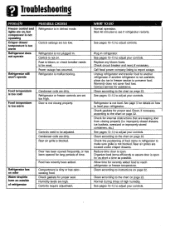
... levels are too low. Normal operation. Warranty does not cover food loss. Contact service for as short a time as possible. improperly closed drawers, ice buckets, oversized or improperly stored containers, etc._) See pages 10-12 to adjust your refrigerator. Allow time for details on how to assure door is open for assistance. Troubleshootin Freezer control and lights are on, but compressor is not operating Crisper drawer temperature is too warm Refrigerator...
... levels are too low. Normal operation. Warranty does not cover food loss. Contact service for as short a time as possible. improperly closed drawers, ice buckets, oversized or improperly stored containers, etc._) See pages 10-12 to adjust your refrigerator. Allow time for details on how to assure door is open for assistance. Troubleshootin Freezer control and lights are on, but compressor is not operating Crisper drawer temperature is too warm Refrigerator...

Use and Care Guide
Page 28
...; Refrigerator is open for proper seal. Refrigerator or ice maker makes unfamiliar sounds or seems too loud • Normal operation. • See pages 10-12 to adjust your refrigerator's environment. Refrigerator may need to be moved to run more efficiently. • Clean, if necessary, according to adjust for pedod the door has been opened frequently. • Check gaskets for as short a time as possible. • Allow interior environment...
...; Refrigerator is open for proper seal. Refrigerator or ice maker makes unfamiliar sounds or seems too loud • Normal operation. • See pages 10-12 to adjust your refrigerator's environment. Refrigerator may need to be moved to run more efficiently. • Clean, if necessary, according to adjust for pedod the door has been opened frequently. • Check gaskets for as short a time as possible. • Allow interior environment...
Use and Care Guide
Page 29
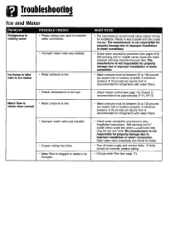
... for property damage due to complete water connection. • Improper water valve was installed. Ice forms in your InstallationInstructions. Water flow is slower than normal • Water pressure is low. • Improper water valve was installed. • Copper tubing has kinks. • Water filter is clogged or needs to ice maker • Water pressure is low. • Freezer temperature is recommendedto be removed, replace tubing. Turn off water supply and remove kinks. If kinks cannot be approximately...
... for property damage due to complete water connection. • Improper water valve was installed. Ice forms in your InstallationInstructions. Water flow is slower than normal • Water pressure is low. • Improper water valve was installed. • Copper tubing has kinks. • Water filter is clogged or needs to ice maker • Water pressure is low. • Freezer temperature is recommendedto be removed, replace tubing. Turn off water supply and remove kinks. If kinks cannot be approximately...


