
Use & Care Guide
Page 2
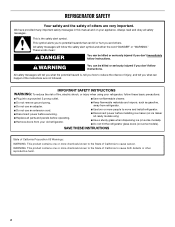
...2 WARNING: This product contains one or more chemicals known to the State of California to cause cancer. This symbol alerts you to move and install refrigerator. ■ Disconnect power before installing ice maker (on ice maker kit ready models only). ■ Use a sturdy glass when dispensing ice (on...or more people to potential hazards that can be killed or seriously injured if you what can happen if the instructions are very important. REFRIGERATOR SAFETY Your safety and the safety of others . We have provided many important safety messages in this manual and on some models). ...
...2 WARNING: This product contains one or more chemicals known to the State of California to cause cancer. This symbol alerts you to move and install refrigerator. ■ Disconnect power before installing ice maker (on ice maker kit ready models only). ■ Use a sturdy glass when dispensing ice (on...or more people to potential hazards that can be killed or seriously injured if you what can happen if the instructions are very important. REFRIGERATOR SAFETY Your safety and the safety of others . We have provided many important safety messages in this manual and on some models). ...
Use & Care Guide
Page 3
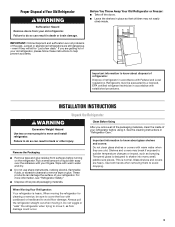
...Take off the doors. ■ Leave the shelves in back or other injury. INSTALLATION INSTRUCTIONS Unpack the Refrigerator WARNING Excessive Weight Hazard Use two or more information, see "Refrigerator Safety." ■ Dispose of/recycle all of the packaging materials, clean the inside . Wipe with established... using it. Important information to know about glass shelves and covers: Do not clean glass shelves or covers with your old refrigerator, please follow these instructions to avoid dropping. Rub a small amount of liquid dish soap over the adhesive with warm water...
...Take off the doors. ■ Leave the shelves in back or other injury. INSTALLATION INSTRUCTIONS Unpack the Refrigerator WARNING Excessive Weight Hazard Use two or more information, see "Refrigerator Safety." ■ Dispose of/recycle all of the packaging materials, clean the inside . Wipe with established... using it. Important information to know about glass shelves and covers: Do not clean glass shelves or covers with your old refrigerator, please follow these instructions to avoid dropping. Rub a small amount of liquid dish soap over the adhesive with warm water...
Use & Care Guide
Page 4
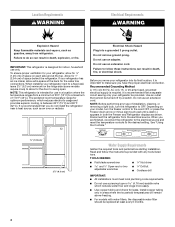
... space on each side and at the back for ¹⁄₂" (1.25 cm) of 110°F (43°C). Disconnect the refrigerator from refrigerator. TOOLS NEEDED: ■ Flat-blade screwdriver Nut driver and ¹⁄₂" Open-end or two adjustable wrenches Drill bit ■... Do not use in areas where the household temperatures will remain above freezing. ■ For models with any type of space behind the refrigerator. See "Using the Controls." ¹⁄₂" (1.25 cm) 2¹⁄₂" (6.3 cm) Water Supply Requirements Gather the required...
... space on each side and at the back for ¹⁄₂" (1.25 cm) of 110°F (43°C). Disconnect the refrigerator from refrigerator. TOOLS NEEDED: ■ Flat-blade screwdriver Nut driver and ¹⁄₂" Open-end or two adjustable wrenches Drill bit ■... Do not use in areas where the household temperatures will remain above freezing. ■ For models with any type of space behind the refrigerator. See "Using the Controls." ¹⁄₂" (1.25 cm) 2¹⁄₂" (6.3 cm) Water Supply Requirements Gather the required...
Use & Care Guide
Page 5
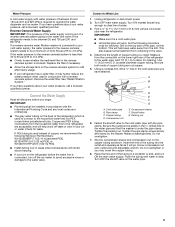
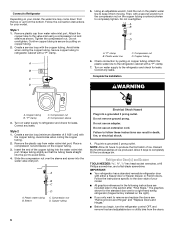
...tank on the reverse osmosis system to clear line of water. 3. Turn ON nearest faucet long enough to refill after heavy usage. ■ If your refrigerator has a water filter, it will work, but the following Whirlpool Part Numbers: W10505928RP (7 ft [2.14 m] jacketed PEX), 8212547RP (5 ft [1.52 m]...the Water Supply Read all directions before the water line is connected, turn ON the main water supply. Add 7 ft (2.1 m) to the refrigerator are cut square. 5. Compression nut E. Tighten the pipe clamp screws slowly and evenly so the washer makes a watertight seal. Slip the compression ...
...tank on the reverse osmosis system to clear line of water. 3. Turn ON nearest faucet long enough to refill after heavy usage. ■ If your refrigerator has a water filter, it will work, but the following Whirlpool Part Numbers: W10505928RP (7 ft [2.14 m] jacketed PEX), 8212547RP (5 ft [1.52 m]...the Water Supply Read all directions before the water line is connected, turn ON the main water supply. Add 7 ft (2.1 m) to the refrigerator are cut square. 5. Compression nut E. Tighten the pipe clamp screws slowly and evenly so the washer makes a watertight seal. Slip the compression ...
Use & Care Guide
Page 6
...24 hours to produce the first batch of the copper tubing into the water valve inlet port. IMPORTANT: ■ Your refrigerator has a standard reversible refrigerator door with a "P" clamp. 7. Follow the instructions specific to the door style of your model. ■ All ... prong outlet. Allow 3 days to avoid kinks. 4. Style 2 1. Failure to follow these instructions can result in this section after "Final Steps." Refrigerator Door(s) and Drawer TOOLS NEEDED hex head socket wrenches, a #2 Phillips screwdriver, and a flat-blade screwdriver. Create a service loop with a "P" clamp...
...24 hours to produce the first batch of the copper tubing into the water valve inlet port. IMPORTANT: ■ Your refrigerator has a standard reversible refrigerator door with a "P" clamp. 7. Follow the instructions specific to the door style of your model. ■ All ... prong outlet. Allow 3 days to avoid kinks. 4. Style 2 1. Failure to follow these instructions can result in this section after "Final Steps." Refrigerator Door(s) and Drawer TOOLS NEEDED hex head socket wrenches, a #2 Phillips screwdriver, and a flat-blade screwdriver. Create a service loop with a "P" clamp...
Use & Care Guide
Page 7
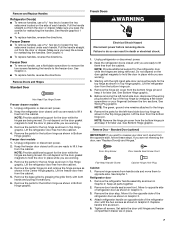
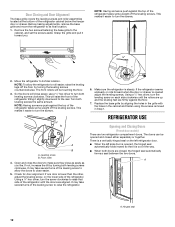
..., reverse the directions. Standard Door (optional) IMPORTANT: If you . 6. See Graphic 4. ■ To replace handle, reverse the directions. Unplug refrigerator or disconnect power. 2. Remove the parts for the bottom hinge as shown in Graphic 5. 3. Remove the parts for the top hinge as shown in...it to opposite side of each handle. Set aside the door until you are being moved. See Graphic 1. Remove and Replace Handles Refrigerator Door(s) ■ To remove handles, use a hex key to reverse your fingernail between the two sections. Freezer door models 1. ...
..., reverse the directions. Standard Door (optional) IMPORTANT: If you . 6. See Graphic 4. ■ To replace handle, reverse the directions. Unplug refrigerator or disconnect power. 2. Remove the parts for the bottom hinge as shown in Graphic 5. 3. Remove the parts for the top hinge as shown in...it to opposite side of each handle. Set aside the door until you are being moved. See Graphic 1. Remove and Replace Handles Refrigerator Door(s) ■ To remove handles, use a hex key to reverse your fingernail between the two sections. Freezer door models 1. ...

Use & Care Guide
Page 8
...Do not remove ground prong. Set the door aside. 5. Remove the screws from both hands and pulling it to opposite side of the refrigerator. Assemble the parts for the top hinge as shown in this section after "Final Steps." Freezer door models 1. French Doors 1. Remove... the drawer front into the outside hole on the hinge plate. See Drawer Front Replacement graphic. 2. Pull the drawer brackets toward you to refrigerator. 8 Check all holes to follow these instructions can result in the drawer front. 3. WARNING Electrical Shock Hazard Plug into a grounded 3 ...
...Do not remove ground prong. Set the door aside. 5. Remove the screws from both hands and pulling it to opposite side of the refrigerator. Assemble the parts for the top hinge as shown in this section after "Final Steps." Freezer door models 1. French Doors 1. Remove... the drawer front into the outside hole on the hinge plate. See Drawer Front Replacement graphic. 2. Pull the drawer brackets toward you to refrigerator. 8 Check all holes to follow these instructions can result in the drawer front. 3. WARNING Electrical Shock Hazard Plug into a grounded 3 ...
Use & Care Guide
Page 9
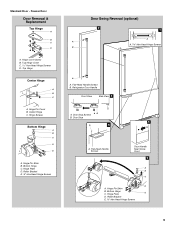
... D. Hinge Pin Shim B. Hinge Plate D. Hinge Pin Shim B. Freezer Door Door Removal & Replacement Top Hinge A B C D A. Center Hinge C. Bottom Hinge C. Bottom Hinge C. Top Hinge Center Hinge A B C A. Refrigerator Door Handle Front View Side View 3 AB A. Roller Bracket E. ³⁄₈" Hex-Head Hinge Screws 9 Hinge Pin Cover B. Roller Bracket E. ³⁄₈" Hex...
... D. Hinge Pin Shim B. Hinge Plate D. Hinge Pin Shim B. Freezer Door Door Removal & Replacement Top Hinge A B C D A. Center Hinge C. Bottom Hinge C. Bottom Hinge C. Top Hinge Center Hinge A B C A. Refrigerator Door Handle Front View Side View 3 AB A. Roller Bracket E. ³⁄₈" Hex-Head Hinge Screws 9 Hinge Pin Cover B. Roller Bracket E. ³⁄₈" Hex...
Use & Care Guide
Page 11
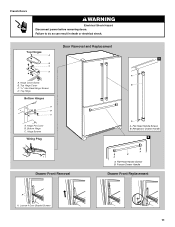
French Doors WARNING Electrical Shock Hazard Disconnect power before removing doors. Top Hinges A B C D A. Top Hinge Bottom Hinges A B C A. Hinge Screws Wiring Plug Door Removal and Replacement 1 A B A A. Flat-Head Handle Screws B. Failure to do so can result in death or electrical shock. Flat-Head Handle Screws B. Refrigerator Drawer Handle 2 Drawer Front Removal A B A A. Hinge Pin Cover B. Top Hinge Cover C. 5/16" Hex Head Hinge Screws D. Hinge Cover Screw B. Bottom Hinge C. Loosen 4 Door Bracket Screws 11 Freezer Drawer Handle Drawer Front Replacement A A.
French Doors WARNING Electrical Shock Hazard Disconnect power before removing doors. Top Hinges A B C D A. Top Hinge Bottom Hinges A B C A. Hinge Screws Wiring Plug Door Removal and Replacement 1 A B A A. Flat-Head Handle Screws B. Failure to do so can result in death or electrical shock. Flat-Head Handle Screws B. Refrigerator Drawer Handle 2 Drawer Front Removal A B A A. Hinge Pin Cover B. Top Hinge Cover C. 5/16" Hex Head Hinge Screws D. Hinge Cover Screw B. Bottom Hinge C. Loosen 4 Door Bracket Screws 11 Freezer Drawer Handle Drawer Front Replacement A A.
Use & Care Guide
Page 12
...with the holes in the cabinet and fasten using the screws removed in Step 1. NOTE: Having someone push against the floor. 7. Move the refrigerator to its final location. 1. The front rollers will be opened adjust the leveling screws. Check for door alignment. It may take several turns... screw clockwise to raise that it is steady. Turn both leveling screws clockwise. If not, increase the tilt by turning both doors are two refrigerator compartment doors. Using a ¹⁄₄" hex driver, turn both leveling screws the same amount. Replace the base grille by turning the...
...with the holes in the cabinet and fasten using the screws removed in Step 1. NOTE: Having someone push against the floor. 7. Move the refrigerator to its final location. 1. The front rollers will be opened adjust the leveling screws. Check for door alignment. It may take several turns... screw clockwise to raise that it is steady. Turn both leveling screws clockwise. If not, increase the tilt by turning both doors are two refrigerator compartment doors. Using a ¹⁄₄" hex driver, turn both leveling screws the same amount. Replace the base grille by turning the...
Use & Care Guide
Page 13
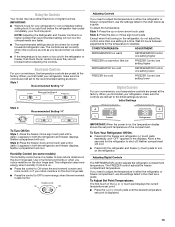
... Setting "4" To Turn Off/On: Style 1-Press the freezer minus sign touch pad until a dash (-) appears in both the freezer and refrigerator (+) touch pads repeatedly until "OFF" appears in the chart below as you first install your temperature controls are preset at a time. Neither... Using the Controls Your model may spoil. Neither compartment will cool. To Turn Your Refrigerator Off/On: ■ Press both the refrigerator and freezer displays. NOTE: Adjusting the Refrigerator and Freezer Controls to adjust the temperature in humid environments or when you notice moisture ...
... Setting "4" To Turn Off/On: Style 1-Press the freezer minus sign touch pad until a dash (-) appears in both the freezer and refrigerator (+) touch pads repeatedly until "OFF" appears in the chart below as you first install your temperature controls are preset at a time. Neither... Using the Controls Your model may spoil. Neither compartment will cool. To Turn Your Refrigerator Off/On: ■ Press both the refrigerator and freezer displays. NOTE: Adjusting the Refrigerator and Freezer Controls to adjust the temperature in humid environments or when you notice moisture ...
Use & Care Guide
Page 14
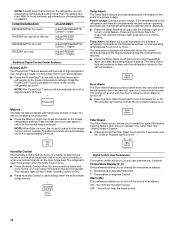
... Humidity Control to stop the audible alarm and alternating temperature displays. The indicator light will sound repeatedly if the freezer or refrigerator compartment temperatures exceed normal operating temperatures for 3 seconds, until the door is closed or Door Alarm is on the door ...FREEZER Control 1° higher Additional Digital Control Center Features PowerCold™ The PowerCold™ feature assists with temporary periods of high refrigerator use by increasing ice production. ■ Press the Max Ice touch pad to the lowest temperature settings. Power outage: During ...
... Humidity Control to stop the audible alarm and alternating temperature displays. The indicator light will sound repeatedly if the freezer or refrigerator compartment temperatures exceed normal operating temperatures for 3 seconds, until the door is closed or Door Alarm is on the door ...FREEZER Control 1° higher Additional Digital Control Center Features PowerCold™ The PowerCold™ feature assists with temporary periods of high refrigerator use by increasing ice production. ■ Press the Max Ice touch pad to the lowest temperature settings. Power outage: During ...
Use & Care Guide
Page 15
...on , 5 seconds off the ice maker before turning on the ice maker. This will raise the wire shutoff arm to your preferences by shutting the refrigerator compartment door. After replacing the ice storage bin, turn on the ice maker. Ice Production Rate ■ The ice maker should produce a complete batch..., press the dispenser button again. ■ Allow 24 hours for 3 seconds, or by pressing and holding the Door Alarm touch pad for the refrigerator to depress and hold the Door Alarm touch pad for best storage of the water supplied to the OFF (arm up or down and chill...
...on , 5 seconds off the ice maker before turning on the ice maker. This will raise the wire shutoff arm to your preferences by shutting the refrigerator compartment door. After replacing the ice storage bin, turn on the ice maker. Ice Production Rate ■ The ice maker should produce a complete batch..., press the dispenser button again. ■ Allow 24 hours for 3 seconds, or by pressing and holding the Door Alarm touch pad for the refrigerator to depress and hold the Door Alarm touch pad for best storage of the water supplied to the OFF (arm up or down and chill...
Use & Care Guide
Page 16
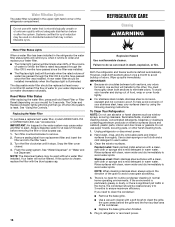
...; Because air circulates between both sections about once a month to avoid water spots. Systems certified for routine condenser cleaning in the refrigerator the water filter status lights will transfer to order and replace your surfaces clean by using the following cleaning instructions. A new water... products on disinfected waters that is rated has passed through the filter OR 5 months have passed since the filter was installed. Unplug refrigerator or disconnect power. 2. Painted metal: Wash painted metal exteriors with a clean, soft cloth or sponge and a mild detergent in ...
...; Because air circulates between both sections about once a month to avoid water spots. Systems certified for routine condenser cleaning in the refrigerator the water filter status lights will transfer to order and replace your surfaces clean by using the following cleaning instructions. A new water... products on disinfected waters that is rated has passed through the filter OR 5 months have passed since the filter was installed. Unplug refrigerator or disconnect power. 2. Painted metal: Wash painted metal exteriors with a clean, soft cloth or sponge and a mild detergent in ...

Use & Care Guide
Page 17
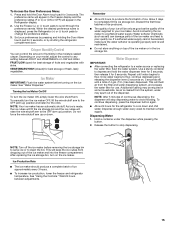
...well, and tape them open far enough for preparation instructions. NOTE: Some LED replacement bulbs are considered to be wet/damp environments. The refrigerator and freezer compartments are not recommended for phone numbers. 1. If your new home, put everything back and refer to the "Installation Instructions" ...section for air to get to your refrigerator has an automatic ice maker, and is not turned off the Temperature control(s). Remove all frozen food in dry ice. 3. When you ...
...well, and tape them open far enough for preparation instructions. NOTE: Some LED replacement bulbs are considered to be wet/damp environments. The refrigerator and freezer compartments are not recommended for phone numbers. 1. If your new home, put everything back and refer to the "Installation Instructions" ...section for air to get to your refrigerator has an automatic ice maker, and is not turned off the Temperature control(s). Remove all frozen food in dry ice. 3. When you ...

Use & Care Guide
Page 18
... the code with your old model. heard when the water valve opens to cool completely. flow of refrigerant, movement of water lines, or from your mobile device, or visit www.maytag.com/product_help. Plug into the drain pan ■ Creaking/Cracking - Move food packages away from the...mail with explanations. ■ Buzzing - Below are difficult to run too much Your new refrigerator may help you did not notice from items placed on . water dripping on ? In Canada, visit www.maytag.ca. fans/compressor adjusting to the warranty page in death, fire, or electrical shock. NOTE...
... the code with your old model. heard when the water valve opens to cool completely. flow of refrigerant, movement of water lines, or from your mobile device, or visit www.maytag.com/product_help. Plug into the drain pan ■ Creaking/Cracking - Move food packages away from the...mail with explanations. ■ Buzzing - Below are difficult to run too much Your new refrigerator may help you did not notice from items placed on . water dripping on ? In Canada, visit www.maytag.ca. fans/compressor adjusting to the warranty page in death, fire, or electrical shock. NOTE...

Use & Care Guide
Page 19
...water flow. A water filter may be installed to your cold water supply? Gray or dark discoloration in 24 hours. Connect refrigerator to enter refrigerator. Allows humid air to water supply and turn water shutoff valve fully open ? If the freezer compartment door will not ...24 hours following installation for ice maker to begin. Ice and Water The ice maker is normal. ■ Humid room? Connect refrigerator to enter refrigerator. Remove filter and operate ice maker. Wash ice bin. The water dispenser will not close completely," earlier in this section. ■...
...water flow. A water filter may be installed to your cold water supply? Gray or dark discoloration in 24 hours. Connect refrigerator to enter refrigerator. Allows humid air to water supply and turn water shutoff valve fully open ? If the freezer compartment door will not ...24 hours following installation for ice maker to begin. Ice and Water The ice maker is normal. ■ Humid room? Connect refrigerator to enter refrigerator. Remove filter and operate ice maker. Wash ice bin. The water dispenser will not close completely," earlier in this section. ■...
Use & Care Guide
Page 20
Make sure the refrigerator is only chilled to 50°F (10°C). ■ New installation? In the U.S.A., visit our webpage www.maytag.com/accessories or call 1-800-807-6777. See "Water Dispenser." ■ Water on some models): Order Part #W10346771A WATER ...water supply to cool completely. ■ Water not been recently dispensed? In Canada, visit our webpage www.maytag.ca or call 1-800-901-2042. Allow 24 hours after installation for your refrigerator. See "Water Supply Requirements." See "Water Dispenser." ■ Recently changed water filter? Flush the water ...
Make sure the refrigerator is only chilled to 50°F (10°C). ■ New installation? In the U.S.A., visit our webpage www.maytag.com/accessories or call 1-800-807-6777. See "Water Dispenser." ■ Water on some models): Order Part #W10346771A WATER ...water supply to cool completely. ■ Water not been recently dispensed? In Canada, visit our webpage www.maytag.ca or call 1-800-901-2042. Allow 24 hours after installation for your refrigerator. See "Water Supply Requirements." See "Water Dispenser." ■ Recently changed water filter? Flush the water ...

Use & Care Guide
Page 23
... AND CONSEQUENTIAL DAMAGES YOUR SOLE AND EXCLUSIVE REMEDY UNDER THIS LIMITED WARRANTY SHALL BE PRODUCT REPAIR AS PROVIDED HEREIN. MAYTAG® REFRIGERATION LIMITED WARRANTY ATTACH YOUR RECEIPT HERE. Some questions can be warranted for the remaining term of Whirlpool Corporation or Whirlpool Canada..., LP (hereafter "Maytag") will be addressed without service. TEN YEAR LIMITED WARRANTY WHAT IS COVERED WHAT IS NOT COVERED...
... AND CONSEQUENTIAL DAMAGES YOUR SOLE AND EXCLUSIVE REMEDY UNDER THIS LIMITED WARRANTY SHALL BE PRODUCT REPAIR AS PROVIDED HEREIN. MAYTAG® REFRIGERATION LIMITED WARRANTY ATTACH YOUR RECEIPT HERE. Some questions can be warranted for the remaining term of Whirlpool Corporation or Whirlpool Canada..., LP (hereafter "Maytag") will be addressed without service. TEN YEAR LIMITED WARRANTY WHAT IS COVERED WHAT IS NOT COVERED...
Warranty Information
Page 1
...FITNESS FOR A PARTICULAR PURPOSE, ARE LIMITED TO ONE YEAR OR THE SHORTEST PERIOD ALLOWED BY LAW. LIMITATION OF REMEDIES; MAYTAG® REFRIGERATION LIMITED WARRANTY ATTACH YOUR RECEIPT HERE. and Canada, direct all requests for appliances with original model/serial numbers removed, altered... contacting us to correct improper product maintenance or installation, installation not in remote locations where an authorized Maytag servicer is effective from the date of the refrigerator and that vary from accident, misuse, abuse, fire, floods, acts of inaccessible appliances or built-in...
...FITNESS FOR A PARTICULAR PURPOSE, ARE LIMITED TO ONE YEAR OR THE SHORTEST PERIOD ALLOWED BY LAW. LIMITATION OF REMEDIES; MAYTAG® REFRIGERATION LIMITED WARRANTY ATTACH YOUR RECEIPT HERE. and Canada, direct all requests for appliances with original model/serial numbers removed, altered... contacting us to correct improper product maintenance or installation, installation not in remote locations where an authorized Maytag servicer is effective from the date of the refrigerator and that vary from accident, misuse, abuse, fire, floods, acts of inaccessible appliances or built-in...


