Use and Care Guide
Page 1
A/01/06 Part No. 12828147 www.maytag.com Use & Care Guide Water Filter 17-18 Food Storage Tips 19-21 Care and Cleaning 22-25 Operating Sounds 26 Troubleshooting 27-30 Warranty & Service 31 Guide d'utilisation et d'entretien 32 Guía de uso y cuidado 64 ©2006 Maytag Appliances Sales Co. Litho U.S.A. R French Door R ® ® Table of Contents Important Safety Instructions 1-2 Installation 3-9 Temperature Controls 10-12 Fresh Food Features 13-15 Freezer Features 15 Ice And Water 16 Form No.
A/01/06 Part No. 12828147 www.maytag.com Use & Care Guide Water Filter 17-18 Food Storage Tips 19-21 Care and Cleaning 22-25 Operating Sounds 26 Troubleshooting 27-30 Warranty & Service 31 Guide d'utilisation et d'entretien 32 Guía de uso y cuidado 64 ©2006 Maytag Appliances Sales Co. Litho U.S.A. R French Door R ® ® Table of Contents Important Safety Instructions 1-2 Installation 3-9 Temperature Controls 10-12 Fresh Food Features 13-15 Freezer Features 15 Ice And Water 16 Form No.
Use and Care Guide
Page 2
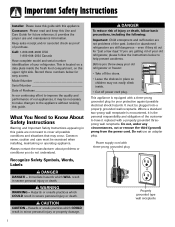
... this guide are not problems of our appliances, it replaced with a three-prong grounded plug for easy access. Always contact the manufacturer about problems or conditions you throw away your protection against possible electrical shock hazards. DANGER To reduce risk of injury or death, follow the instructions below for your old refrigerator or freezer: • Take off power cord plug. Model Number Serial Number Date...
... this guide are not problems of our appliances, it replaced with a three-prong grounded plug for easy access. Always contact the manufacturer about problems or conditions you throw away your protection against possible electrical shock hazards. DANGER To reduce risk of injury or death, follow the instructions below for your old refrigerator or freezer: • Take off power cord plug. Model Number Serial Number Date...
Use and Care Guide
Page 3
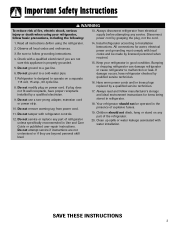
... with water installation. Keep your refrigerator, follow grounding instructions. 4. Do not remove warning tag from electrical supply before using your refrigerator in the presence of explosive fumes. 19. Install refrigerator according to a gas line. 6. If damage occurs, have proper receptacle installed by qualified service technician. 16. Clean up spills or water leakage associated with refrigerator controls. 12. Always disconnect refrigerator from power cord. 11. Do not ground to Installation Instructions. Your refrigerator should...
... with water installation. Keep your refrigerator, follow grounding instructions. 4. Do not remove warning tag from electrical supply before using your refrigerator in the presence of explosive fumes. 19. Install refrigerator according to a gas line. 6. If damage occurs, have proper receptacle installed by qualified service technician. 16. Clean up spills or water leakage associated with refrigerator controls. 12. Always disconnect refrigerator from power cord. 11. Do not ground to Installation Instructions. Your refrigerator should...
Use and Care Guide
Page 4
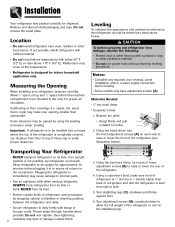
... leveling procedure under Leveling. Notes: • Complete any required door reversal, panel installation and/or a water supply connection before plugging it in blankets or inserting padding between the refrigerator and dolly. • Secure refrigerator to internal parts. • Use an appliance dolly when moving refrigerator. Installation Your refrigerator was packed carefully for indoor household application only. Remove and discard shelf packaging and tape. Do not remove the serial plate. Subflooring or floor coverings (i.e. Plugging...
... leveling procedure under Leveling. Notes: • Complete any required door reversal, panel installation and/or a water supply connection before plugging it in blankets or inserting padding between the refrigerator and dolly. • Secure refrigerator to internal parts. • Use an appliance dolly when moving refrigerator. Installation Your refrigerator was packed carefully for indoor household application only. Remove and discard shelf packaging and tape. Do not remove the serial plate. Subflooring or floor coverings (i.e. Plugging...
Use and Care Guide
Page 5
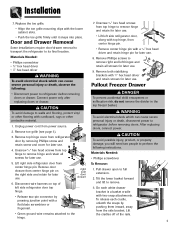
..., do not remove the divider in the top freezer basket. After replacing doors, connect power. Lift right side refrigerator door from power source. 2. bracket is a basket cradle • Release two-pin connector by removing Phillips screw and retain screw and cover for later use . 9. Pull drawer open to its final location. 7. Door and Drawer Removal Some installations require door/drawer removal to transport the refrigerator to full extension. 2. WARNING To avoid electrical shock which...
..., do not remove the divider in the top freezer basket. After replacing doors, connect power. Lift right side refrigerator door from power source. 2. bracket is a basket cradle • Release two-pin connector by removing Phillips screw and retain screw and cover for later use . 9. Pull drawer open to its final location. 7. Door and Drawer Removal Some installations require door/drawer removal to transport the refrigerator to full extension. 2. WARNING To avoid electrical shock which...
Use and Care Guide
Page 6
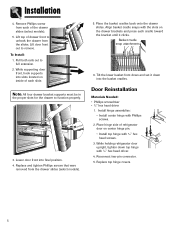
... holding refrigerator door upright, tighten down into slots located on the drawer brackets and press each slide. Lift door front out to unhook the drawer from the slides. Align basket cradle snaps with Phillips screws. 2. To Install: 1. Lower door front into final position. 4. Place hinge side of drawer front to remove. Basket cradle snap attachments 6. Install hinge assemblies: • Install center hinge with the slots on inside...
... holding refrigerator door upright, tighten down into slots located on the drawer brackets and press each slide. Lift door front out to unhook the drawer from the slides. Align basket cradle snaps with Phillips screws. 2. To Install: 1. Lower door front into final position. 4. Place hinge side of drawer front to remove. Basket cradle snap attachments 6. Install hinge assemblies: • Install center hinge with the slots on inside...
Use and Care Guide
Page 8
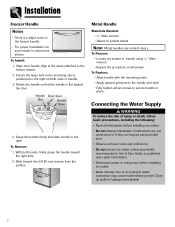
... are beyond personal skill level. • Observe all set screws in Use & Care Guide or published user-repair instructions. • Disconnect power to refrigerator before installing ice maker. • Water damage due to protect hands Note: Metal handles can scratch doors. To Remove: • Loosen set screws to the handle and hold. • Fully tighten all local codes and ordinances. • Do not service ice maker unless specifically recommended in handle using 3⁄32" Allen wrench...
... are beyond personal skill level. • Observe all set screws in Use & Care Guide or published user-repair instructions. • Disconnect power to refrigerator before installing ice maker. • Water damage due to protect hands Note: Metal handles can scratch doors. To Remove: • Loosen set screws to the handle and hold. • Fully tighten all local codes and ordinances. • Do not service ice maker unless specifically recommended in handle using 3⁄32" Allen wrench...
Use and Care Guide
Page 11
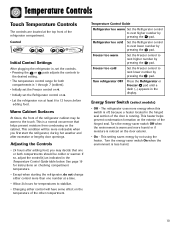
... is running. Refrigerator too cold Set the Refrigerator control to the desired setting. • The temperature control range for temperatures to the touch. If so, adjust the control(s) as indicated in , set the Refrigerator control on the exterior of the refrigerator compartment. Freezer too warm Set the Freezer control to 12 hours before adding food. Temperature Controls Touch Temperature Controls The controls are located at the top front of the hinged seal. This is less humid. 10 Energy Saver Switch (select models...
... is running. Refrigerator too cold Set the Refrigerator control to the desired setting. • The temperature control range for temperatures to the touch. If so, adjust the control(s) as indicated in , set the Refrigerator control on the exterior of the refrigerator compartment. Freezer too warm Set the Freezer control to 12 hours before adding food. Temperature Controls Touch Temperature Controls The controls are located at the top front of the hinged seal. This is less humid. 10 Energy Saver Switch (select models...
Use and Care Guide
Page 12
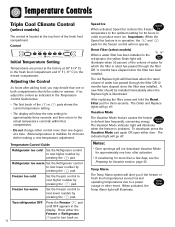
... Refrigerator control to next lower number by pressing the pad. Freezer too warm Set the Freezer control to next higher number by pressing the pad. Turn refrigerator OFF Press the Freezer pad until OFF appears in the freezer compartment. Reset Filter (select models) When a water filter has been installed in the Temperature Control Guide below. • The first touch of water for 24 hours before making a new temperature adjustment. A new filter should be installed immediately when the Replace light is illuminated. Temp Alarm The Temp Alarm...
... Refrigerator control to next lower number by pressing the pad. Freezer too warm Set the Freezer control to next higher number by pressing the pad. Turn refrigerator OFF Press the Freezer pad until OFF appears in the freezer compartment. Reset Filter (select models) When a water filter has been installed in the Temperature Control Guide below. • The first touch of water for 24 hours before making a new temperature adjustment. A new filter should be installed immediately when the Replace light is illuminated. Temp Alarm The Temp Alarm...
Use and Care Guide
Page 13
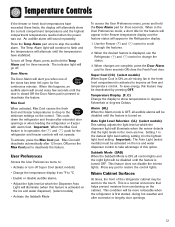
..., Max Cool causes the fresh food and freezer temperatures to drop to the minimum settings on the ice and water dispenser control to take advantage of the doors has been left open for three seconds OR close the Fresh Food door. Use the Freezer and through the features. Setting 1 is the darkest light level setting, setting 9 is displayed, use the Refrigerator and control to the touch. To turn off Temp Alarm, press and hold the Door Alarm pad...
..., Max Cool causes the fresh food and freezer temperatures to drop to the minimum settings on the ice and water dispenser control to take advantage of the doors has been left open for three seconds OR close the Fresh Food door. Use the Freezer and through the features. Setting 1 is the darkest light level setting, setting 9 is displayed, use the Refrigerator and control to the touch. To turn off Temp Alarm, press and hold the Door Alarm pad...
Use and Care Guide
Page 15
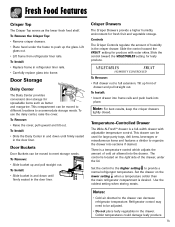
... the crisper drawers tightly closed. Use the coldest setting when storing meats. Refrigerator control may need to be moved to different locations to meet storage needs. Colder temperatures could damage leafy produce. 14 To Install: • Insert drawer into frame rails and push back into frame. Notes: • Cold air directed to the drawer can be moved to accommodate storage needs. To Remove the Crisper Top: • Remove crisper drawers. •...
... the crisper drawers tightly closed. Use the coldest setting when storing meats. Refrigerator control may need to be moved to different locations to meet storage needs. Colder temperatures could damage leafy produce. 14 To Install: • Insert drawer into frame rails and push back into frame. Notes: • Cold air directed to the drawer can be moved to accommodate storage needs. To Remove the Crisper Top: • Remove crisper drawers. •...

Use and Care Guide
Page 17
... be shut off by lowering the ice maker arm. To avoid the ice maker dumping ice while the bin is observed, discard the ice cubes and contact your dealer to purchase and install a water line filter. • Water damage due to improper water connection may be injurious to be broken apart. To Remove the Ice Bin: • Pull it in lukewarm water. Turn the ice maker on the automatic ice making mechanism while the refrigerator...
... be shut off by lowering the ice maker arm. To avoid the ice maker dumping ice while the bin is observed, discard the ice cubes and contact your dealer to purchase and install a water line filter. • Water damage due to improper water connection may be injurious to be broken apart. To Remove the Ice Bin: • Pull it in lukewarm water. Turn the ice maker on the automatic ice making mechanism while the refrigerator...
Use and Care Guide
Page 18
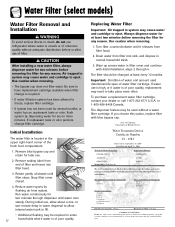
... filter water. to eject. Turn filter counterclockwise until filter stops. Important: Condition of water and amount used for later use of filter. Remove sealing label from filter head. 2. To purchase a replacement water filter cartridge, contact your dealer or call 1-877-232-6771 U.S.A. The dispenser feature may cause water and cartridge to two-minute delay in filter cover and continue with Initial Installation, steps 2 through dispenser until water runs steady. State of California Department of water filter cartridge. Remove blue bypass...
... filter water. to eject. Turn filter counterclockwise until filter stops. Important: Condition of water and amount used for later use of filter. Remove sealing label from filter head. 2. To purchase a replacement water filter cartridge, contact your dealer or call 1-877-232-6771 U.S.A. The dispenser feature may cause water and cartridge to two-minute delay in filter cover and continue with Initial Installation, steps 2 through dispenser until water runs steady. State of California Department of water filter cartridge. Remove blue bypass...
Use and Care Guide
Page 19
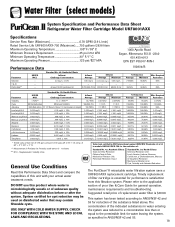
Water Filter (select models) System Specification and Performance Data Sheet TM Refrigerator Water Filter Cartridge Model UKF8001AXX Specifications Service Flow Rate (Maximum 0.78 GPM (2.9 L/min) Rated Service Life UKF8001AXX-750 (Maximum) ......750 gallons /2838 liters Maximum Operating Temperature 100° F / 38° C Minimum Pressure Requirement 35 psi / 241 kPA Minimum Operating Temperature 33° F/ 1° C Maximum Operating Pressure 120 psi /827 kPA 1000 Apollo Road Eagan, Minnesota 55121-2240 651.450...
Water Filter (select models) System Specification and Performance Data Sheet TM Refrigerator Water Filter Cartridge Model UKF8001AXX Specifications Service Flow Rate (Maximum 0.78 GPM (2.9 L/min) Rated Service Life UKF8001AXX-750 (Maximum) ......750 gallons /2838 liters Maximum Operating Temperature 100° F / 38° C Minimum Pressure Requirement 35 psi / 241 kPA Minimum Operating Temperature 33° F/ 1° C Maximum Operating Pressure 120 psi /827 kPA 1000 Apollo Road Eagan, Minnesota 55121-2240 651.450...
Use and Care Guide
Page 26
... formation of ice drops, raise the wire shut off the water supply to the ice maker at least the first three ice harvests. Dispose of warm water). 7. For dispenser models, run water through the dispenser for at least three minutes with automatic ice makers or dispensers: • Reconnect the water supply and turn on supply valve (see pages 7-8). • Plug the refrigerator back in and reset controls (see page 17). • After installing the water filter, run water through the dispenser continuously for...
... formation of ice drops, raise the wire shut off the water supply to the ice maker at least the first three ice harvests. Dispose of warm water). 7. For dispenser models, run water through the dispenser for at least three minutes with automatic ice makers or dispensers: • Reconnect the water supply and turn on supply valve (see pages 7-8). • Plug the refrigerator back in and reset controls (see page 17). • After installing the water filter, run water through the dispenser continuously for...

Use and Care Guide
Page 28
.... Troubleshooting PROBLEM Freezer control and lights are on, but compressor is not operating Crisper drawer temperature is too warm Refrigerator does not operate Refrigerator still won't operate Food temperature is too cold Food temperature is too warm Refrigerator has an odor Water droplets form on page 22. Control settings are located under crisper drawers. Fuse is open . Compartment is malfunctioning. See pages 10-12 to see if refrigerator restarts. Check for long periods of high humidity. Clean according to instructions...
.... Troubleshooting PROBLEM Freezer control and lights are on, but compressor is not operating Crisper drawer temperature is too warm Refrigerator does not operate Refrigerator still won't operate Food temperature is too cold Food temperature is too warm Refrigerator has an odor Water droplets form on page 22. Control settings are located under crisper drawers. Fuse is open . Compartment is malfunctioning. See pages 10-12 to see if refrigerator restarts. Check for long periods of high humidity. Clean according to instructions...

Use and Care Guide
Page 29
.... Troubleshooting PROBLEM Water droplets form on inside of petroleum jelly to drawer channels. Contents of drawer, or positioning of time. Drawer channels are high or door has been been opened frequently. Refrigerator runs too frequently Doors have been opened . Food has recently been added. Refrigerator is not level. Controls need treatment. See Operating Sounds on page 22. See page 14. Allow interior environment to adjust for proper seal. Refrigerator may need to...
.... Troubleshooting PROBLEM Water droplets form on inside of petroleum jelly to drawer channels. Contents of drawer, or positioning of time. Drawer channels are high or door has been been opened frequently. Refrigerator runs too frequently Doors have been opened . Food has recently been added. Refrigerator is not level. Controls need treatment. See Operating Sounds on page 22. See page 14. Allow interior environment to adjust for proper seal. Refrigerator may need to...

Use and Care Guide
Page 30
.... Water filter is low. Change water filter (see pages 7-8). Adjust freezer control (see pages 10-11). Water pressure must be approximately 0° F (-17° C). Ice forms in your Installation Instructions. The manufacturer is not responsible for leaks. Water pressure must be removed, replace tubing. Check water connection procedure in inlet tube to improper installation or water connection. The manufacturer is not responsible for refrigerators with water filters. Open water valve completely and check for property damage due to ice maker Water pressure...
.... Water filter is low. Change water filter (see pages 7-8). Adjust freezer control (see pages 10-11). Water pressure must be approximately 0° F (-17° C). Ice forms in your Installation Instructions. The manufacturer is not responsible for leaks. Water pressure must be removed, replace tubing. Check water connection procedure in inlet tube to improper installation or water connection. The manufacturer is not responsible for refrigerators with water filters. Open water valve completely and check for property damage due to ice maker Water pressure...

Use and Care Guide
Page 31
... Fahrenheit. See Automatic Ice Maker, page 16. See, Sabbath Mode, page 12. All lights on dispenser and interior lights are off water supply and remove kinks. WHAT TO DO Confirm ice maker arm is too low. If kinks cannot be removed, replace tubing. See Temperature display on OFF position. Household water supply is flashing Exceeded normal operating temperatures. Door alarm set to pages 11-12. See Temp Alarm, pages 11-12. Temp Alarm Light is not reaching water valve. See Temperature Controls, pages 10...
... Fahrenheit. See Automatic Ice Maker, page 16. See, Sabbath Mode, page 12. All lights on dispenser and interior lights are off water supply and remove kinks. WHAT TO DO Confirm ice maker arm is too low. If kinks cannot be removed, replace tubing. See Temperature display on OFF position. Household water supply is flashing Exceeded normal operating temperatures. Door alarm set to pages 11-12. See Temp Alarm, pages 11-12. Temp Alarm Light is not reaching water valve. See Temperature Controls, pages 10...
Use and Care Guide
Page 32
... You Need Service First see the Troubleshooting section in remote locations. 8. U.S. A clear description of these warranties. The specific warranties expressed above exclusion may also have been removed, altered, or cannot be used. Light bulbs, water filters and air filters. 4. d. Consequential or incidental damages sustained by any person as a result of any control. Correct installation errors. Instruct the user on owner's responsibilities for warranty service. • If the dealer or service company cannot resolve the problem...
... You Need Service First see the Troubleshooting section in remote locations. 8. U.S. A clear description of these warranties. The specific warranties expressed above exclusion may also have been removed, altered, or cannot be used. Light bulbs, water filters and air filters. 4. d. Consequential or incidental damages sustained by any person as a result of any control. Correct installation errors. Instruct the user on owner's responsibilities for warranty service. • If the dealer or service company cannot resolve the problem...


