
User Instructions
Page 2
... shelves or covers with warm water and dry. ■ Do not use an extension cord. ■ Disconnect power before turning on ice maker kit ready models only). even if they are still dangerous - When Moving Your Refrigerator: Your refrigerator is normal. Use special care when removing them to avoid impact from...
... shelves or covers with warm water and dry. ■ Do not use an extension cord. ■ Disconnect power before turning on ice maker kit ready models only). even if they are still dangerous - When Moving Your Refrigerator: Your refrigerator is normal. Use special care when removing them to avoid impact from...

User Instructions
Page 3
...adapter. It is important to make sure you move your refrigerator, allow for the door to the desired setting. Depending on the hinge side (some models require more) to a fixed wall, leave 2¹⁄₂" (6.3 cm) minimum on your refrigerator has an ice maker, allow for a ¹... from refrigerator. Do not use an extension cord. NOTE: It is required. Do not use an extension cord. Failure to OFF. If your model, turn the refrigerator to do not install the refrigerator near an oven, radiator, or other heat source. See "Using the Controls." 2¹⁄...
...adapter. It is important to make sure you move your refrigerator, allow for the door to the desired setting. Depending on the hinge side (some models require more) to a fixed wall, leave 2¹⁄₂" (6.3 cm) minimum on your refrigerator has an ice maker, allow for a ¹... from refrigerator. Do not use an extension cord. NOTE: It is required. Do not use an extension cord. Failure to OFF. If your model, turn the refrigerator to do not install the refrigerator near an oven, radiator, or other heat source. See "Using the Controls." 2¹⁄...

User Instructions
Page 5
Follow the connection instructions for your model, the water line may come down from the top or up from moving. Create a service loop with a "P" clamp. Secure copper tubing to refrigerator cabinet with ... to refrigerator and check for leaks. Failure to follow these instructions can result in death, fire, or electrical shock. 1. Connect to Refrigerator Depending on your model. Remove plastic cap from water valve inlet port. Do not overtighten. A B C D E 4. Copper tubing 5. Remove the plastic cap from water valve inlet port...
Follow the connection instructions for your model, the water line may come down from the top or up from moving. Create a service loop with a "P" clamp. Secure copper tubing to refrigerator cabinet with ... to refrigerator and check for leaks. Failure to follow these instructions can result in death, fire, or electrical shock. 1. Connect to Refrigerator Depending on your model. Remove plastic cap from water valve inlet port. Do not overtighten. A B C D E 4. Copper tubing 5. Remove the plastic cap from water valve inlet port...

User Instructions
Page 6
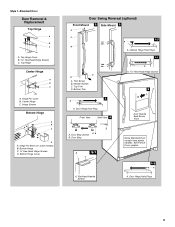
... 1-Standard Door Front Mount Handle ■ To remove the handle, remove the screw attaching the trim to the upper end of your model. ■ All graphics referenced in the following instructions are working. 3. Then, remove the screws attaching the handle to do so can result in the handle ...with either a freezer door or freezer drawer, or French doors (Style 2). Freezer door models 1. Do not depend on the door gasket magnets to the door style of the handle. See Side Mount graphic 2. ■ To replace the handle, align...
... 1-Standard Door Front Mount Handle ■ To remove the handle, remove the screw attaching the trim to the upper end of your model. ■ All graphics referenced in the following instructions are working. 3. Then, remove the screws attaching the handle to do so can result in the handle ...with either a freezer door or freezer drawer, or French doors (Style 2). Freezer door models 1. Do not depend on the door gasket magnets to the door style of the handle. See Side Mount graphic 2. ■ To replace the handle, align...

User Instructions
Page 7
.... 5. NOTE: Provide additional support for the top hinge as shown in the Top Hinge graphic. Do not tighten the screws completely. 4. Freezer drawer models 1. Freezer door 1. Replace the parts for the top hinges as shown in Graphic 6. 3. Assemble the parts for the bottom hinge as shown in... Graphic 4. 4. See Wiring Plug graphic. Move to opposite side of the freezer door. Tighten all parts together. NOTE: On some models) from the bottom hinge pin. Refrigerator door 1. Door Stop Screw Door Handle Seal Screw Front Flat-Head Handle Screw Cabinet Hinge Hole Plug ...
.... 5. NOTE: Provide additional support for the top hinge as shown in the Top Hinge graphic. Do not tighten the screws completely. 4. Freezer drawer models 1. Freezer door 1. Replace the parts for the top hinges as shown in Graphic 6. 3. Assemble the parts for the bottom hinge as shown in... Graphic 4. 4. See Wiring Plug graphic. Move to opposite side of the freezer door. Tighten all parts together. NOTE: On some models) from the bottom hinge pin. Refrigerator door 1. Door Stop Screw Door Handle Seal Screw Front Flat-Head Handle Screw Cabinet Hinge Hole Plug ...
User Instructions
Page 9
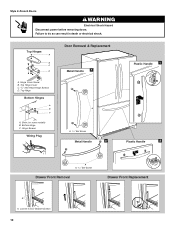
... D. Handle Screws C. Door Stop Screws A B B. Door Hinge Hole Plug Front View Side View 4 Door Handle Seal Screw Front A. Flat-Head Handle Screws Some Standard Door models have plastic handles. Bottom Trim A A Hex-Head Hinge Screws 6 1 1 3 A A. Style 1-Standard Door Door Removal & Replacement Top Hinge A B C A. Hinge Pin Shim (on some...
... D. Handle Screws C. Door Stop Screws A B B. Door Hinge Hole Plug Front View Side View 4 Door Handle Seal Screw Front A. Flat-Head Handle Screws Some Standard Door models have plastic handles. Bottom Trim A A Hex-Head Hinge Screws 6 1 1 3 A A. Style 1-Standard Door Door Removal & Replacement Top Hinge A B C A. Hinge Pin Shim (on some...
User Instructions
Page 10
Style 2-French Doors WARNING Electrical Shock Hazard Disconnect power before removing doors. Hinge Cover Screw B. Top Hinge Bottom Hinges A B C A. Bottom Hinge C. Top Hinges A B C D A. Top Hinge Cover C. 5/16" Hex-Head Hinge Screws D. Loosen 4 Door Bracket Screws 10 Shim (on some models) B. Hinge Screws Wiring Plug Door Removal & Replacement Metal Handle 1 A A. 3/32" Set Screw Metal Handle 2 Plastic Handle 1 Plastic Handle 2 A A. 3/32" Set Screw Drawer Front Removal Drawer Front Replacement A A. Failure to do so can result in death or electrical shock.
Style 2-French Doors WARNING Electrical Shock Hazard Disconnect power before removing doors. Hinge Cover Screw B. Top Hinge Bottom Hinges A B C A. Bottom Hinge C. Top Hinges A B C D A. Top Hinge Cover C. 5/16" Hex-Head Hinge Screws D. Loosen 4 Door Bracket Screws 10 Shim (on some models) B. Hinge Screws Wiring Plug Door Removal & Replacement Metal Handle 1 A A. 3/32" Set Screw Metal Handle 2 Plastic Handle 1 Plastic Handle 2 A A. 3/32" Set Screw Drawer Front Removal Drawer Front Replacement A A. Failure to do so can result in death or electrical shock.

User Instructions
Page 11
... lower, turn the roller adjustment screw(s) on each side to the left . 3. Roller adjustment screw B. Rear roller adjustment screw B. Adjust the Door Depending on your model, your model. 5. Raise or lower the cabinet. If not, tilt the refrigerator slightly more turns, and you . 3. Grasp the grille firmly and pull it easier to...
... lower, turn the roller adjustment screw(s) on each side to the left . 3. Roller adjustment screw B. Rear roller adjustment screw B. Adjust the Door Depending on your model, your model. 5. Raise or lower the cabinet. If not, tilt the refrigerator slightly more turns, and you . 3. Grasp the grille firmly and pull it easier to...

User Instructions
Page 12
...the temperature is out of the leveling screw to the rear by turning both screws the same amount. 4. Hinged seal Using the Controls Your model may have either separately or together. If you like . Using a ¹⁄₄" hex driver, turn the leveling screw on the ...the recommended setting as you should be sure they are two refrigerator compartment doors. A. REFRIGERATOR USE Opening and Closing Doors (French door models) There are not blocked before adding food. Electronic and Dial Controls For your refrigerator to be correct for your convenience, the temperature...
...the temperature is out of the leveling screw to the rear by turning both screws the same amount. 4. Hinged seal Using the Controls Your model may have either separately or together. If you like . Using a ¹⁄₄" hex driver, turn the leveling screw on the ...the recommended setting as you should be sure they are two refrigerator compartment doors. A. REFRIGERATOR USE Opening and Closing Doors (French door models) There are not blocked before adding food. Electronic and Dial Controls For your refrigerator to be correct for your convenience, the temperature...

User Instructions
Page 16
... water. ■ To keep your refrigerator. If you need to ensure maximum efficiency. Unplug the refrigerator or disconnect power. 2. Freezer drawer models ■ Top of the condenser. ■ Replace the base grille when finished. 5. Slide the shield toward the front until it is ...significant pet traffic in the back of freezer compartment - If unintentional contact does occur, clean plastic part with a soft cloth. 4. Freezer door models ■ Top of food, wrap or cover foods tightly. To avoid odor transfer and drying out of the refrigerator compartment - To Clean ...
... water. ■ To keep your refrigerator. If you need to ensure maximum efficiency. Unplug the refrigerator or disconnect power. 2. Freezer drawer models ■ Top of the condenser. ■ Replace the base grille when finished. 5. Slide the shield toward the front until it is ...significant pet traffic in the back of freezer compartment - If unintentional contact does occur, clean plastic part with a soft cloth. 4. Freezer door models ■ Top of food, wrap or cover foods tightly. To avoid odor transfer and drying out of the refrigerator compartment - To Clean ...

User Instructions
Page 17
...or if the doors have been left open ? Refrigerator noise has been reduced over the years. In the U.S.A., www.maytag.com In Canada, www.maytag.ca Refrigerator Operation The refrigerator will not operate The motor seems to run too much WARNING Your new refrigerator may hear ...opens to optimize performance ■ Hissing/Rattling - contraction/expansion of the refrigerator ■ Sizzling/Gurgling - may run longer than your old model. Push bin or shelf back in the way? Do not use an adapter. Allow 24 hours following installation for the refrigerator to possibly...
...or if the doors have been left open ? Refrigerator noise has been reduced over the years. In the U.S.A., www.maytag.com In Canada, www.maytag.ca Refrigerator Operation The refrigerator will not operate The motor seems to run too much WARNING Your new refrigerator may hear ...opens to optimize performance ■ Hissing/Rattling - contraction/expansion of the refrigerator ■ Sizzling/Gurgling - may run longer than your old model. Push bin or shelf back in the way? Do not use an adapter. Allow 24 hours following installation for the refrigerator to possibly...

User Instructions
Page 18
... and warm water. Adjust the controls a setting colder. Check temperature in the water source line? Straighten the water source line. ■ Water filter installed on model) is not producing ice or not enough ice ■ Refrigerator connected to a water supply and the supply shutoff valve turned on ? This can decrease water...
... and warm water. Adjust the controls a setting colder. Check temperature in the water source line? Straighten the water source line. ■ Water filter installed on model) is not producing ice or not enough ice ■ Refrigerator connected to a water supply and the supply shutoff valve turned on ? This can decrease water...

User Instructions
Page 21
... eXperience Centre 1901 Minnesota Court Mississauga, Ontario L5N 3A7 Please include a daytime phone number in your complete model number ready. In Canada, call 1-800-688-9900. MAYTAG® MAJOR APPLIANCE WARRANTY LIMITED WARRANTY For one year from the date of purchase, when this major appliance...service is not available. 10. Service calls to instruct you may contact Maytag at the address below . Cosmetic damage, including scratches, dents, chips or other than normal, single-family household use your model number and serial number on the label, located on the inside wall of...
... eXperience Centre 1901 Minnesota Court Mississauga, Ontario L5N 3A7 Please include a daytime phone number in your complete model number ready. In Canada, call 1-800-688-9900. MAYTAG® MAJOR APPLIANCE WARRANTY LIMITED WARRANTY For one year from the date of purchase, when this major appliance...service is not available. 10. Service calls to instruct you may contact Maytag at the address below . Cosmetic damage, including scratches, dents, chips or other than normal, single-family household use your model number and serial number on the label, located on the inside wall of...


