
Dimension Guide
Page 1
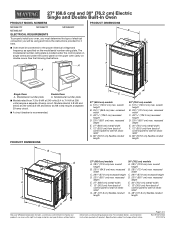
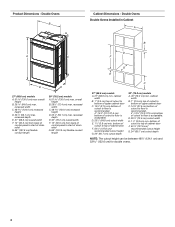
...(76.2 cm) Electric Single and Double Built-In Oven PRODUCT MODEL NUMBERS PRODUCT DIMENSIONS MEW9527F MEW9627F MEW9530F ELECTRICAL REQUIREMENTS MEW9630F To properly install your oven, you will be using and follow the instructions provided for planning purposes only. Models rated at 4.8 kW and below ...panel on single ovens and under the control panel on the upper oven cavity on the model/serial number rating plate. For complete details, see Installation Instructions packed with product. W10674133A 07/27/2016 PRODUCT DIMENSIONS E D 27" (68.6 cm) models A. 513⁄16" (130.0 cm...
...(76.2 cm) Electric Single and Double Built-In Oven PRODUCT MODEL NUMBERS PRODUCT DIMENSIONS MEW9527F MEW9627F MEW9530F ELECTRICAL REQUIREMENTS MEW9630F To properly install your oven, you will be using and follow the instructions provided for planning purposes only. Models rated at 4.8 kW and below ...panel on single ovens and under the control panel on the upper oven cavity on the model/serial number rating plate. For complete details, see Installation Instructions packed with product. W10674133A 07/27/2016 PRODUCT DIMENSIONS E D 27" (68.6 cm) models A. 513⁄16" (130.0 cm...
Dimension Guide
Page 2
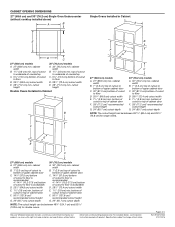
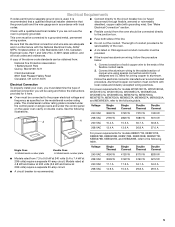
...16" (74.8 cm) for planning purposes only. CABINET OPENING DIMENSIONS 27" (68.6 cm) and 30" (76.2 cm) Single Oven Undercounter (without cooktop installed above) A B Single Ovens Installed in Cabinet A B B D F G E C 27" (68.6 cm) models A. 27" (68.6 cm) min. cabinet width B. 1" (2.5 cm... cutout width E. 11/2" (3.8 cm) min. D F G E C 27" (68.6 cm) models A. 27" (68.6 cm) min. For complete details, see Installation Instructions packed with product. cabinet width B. 1" (2.5 cm) top of cutout to bottom of upper cabinet door C. 143/4" (37.5 cm) bottom of 2 Ref. cabinet width...
...16" (74.8 cm) for planning purposes only. CABINET OPENING DIMENSIONS 27" (68.6 cm) and 30" (76.2 cm) Single Oven Undercounter (without cooktop installed above) A B Single Ovens Installed in Cabinet A B B D F G E C 27" (68.6 cm) models A. 27" (68.6 cm) min. cabinet width B. 1" (2.5 cm... cutout width E. 11/2" (3.8 cm) min. D F G E C 27" (68.6 cm) models A. 27" (68.6 cm) min. For complete details, see Installation Instructions packed with product. cabinet width B. 1" (2.5 cm) top of cutout to bottom of upper cabinet door C. 143/4" (37.5 cm) bottom of 2 Ref. cabinet width...
Use & Care Guide
Page 2
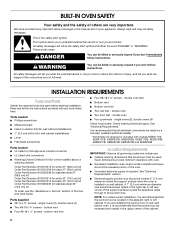
...; Use Only Dry Potholders - For self-cleaning ovens: ■ Do Not Clean Gasket - Always read and obey all safety messages. This is properly installed and grounded by a qualified technician. ■ Never Use the Oven for a good seal. Moist or damp potholders on any part of California to sit...All safety messages will tell you what can kill or hurt you don't immediately follow basic precautions, including the following: ■ Proper Installation - WARNING: This product contains one or more chemicals known to the State of the oven unless specifically recommended in color.
...; Use Only Dry Potholders - For self-cleaning ovens: ■ Do Not Clean Gasket - Always read and obey all safety messages. This is properly installed and grounded by a qualified technician. ■ Never Use the Oven for a good seal. Moist or damp potholders on any part of California to sit...All safety messages will tell you what can kill or hurt you don't immediately follow basic precautions, including the following: ■ Proper Installation - WARNING: This product contains one or more chemicals known to the State of the oven unless specifically recommended in color.
Use & Care Guide
Page 12
...Number W10355010 (not included): See the "Accessories" section for more information. Cleaning Method: Rub in your mobile device, or visit http://www.maytag.com/product_help. Cleaning Method: ■■ Glass cleaner and soft cloth or sponge: Apply glass cleaner to avoid damaging. ■■... is complete and the oven cools, the oven doors will operate POSSIBLE CAUSES AND/OR SOLUTIONS Oven isn't wired properly: See the Installation Instructions. Cleaning Method: ■■ Glass cleaner, mild liquid cleaner, or nonabrasive scrubbing pad: Gently clean around the model/serial/...
...Number W10355010 (not included): See the "Accessories" section for more information. Cleaning Method: Rub in your mobile device, or visit http://www.maytag.com/product_help. Cleaning Method: ■■ Glass cleaner and soft cloth or sponge: Apply glass cleaner to avoid damaging. ■■... is complete and the oven cools, the oven doors will operate POSSIBLE CAUSES AND/OR SOLUTIONS Oven isn't wired properly: See the Installation Instructions. Cleaning Method: ■■ Glass cleaner, mild liquid cleaner, or nonabrasive scrubbing pad: Gently clean around the model/serial/...

Use & Care Guide
Page 14
... defects in materials or workmanship in remote locations where an authorized Maytag servicer is installed, operated and maintained according to instructions attached to access additional resources, or visit https://www.maytag.com/product_help. 2. This warranty gives you specific legal rights, ...parts for the remaining term of original purchase, when this major appliance is installed, operated and maintained according to instructions attached to correct product damage or defects caused by Maytag. 8. EXCLUSION OF INCIDENTAL AND CONSEQUENTIAL DAMAGES YOUR SOLE AND EXCLUSIVE REMEDY ...
... defects in materials or workmanship in remote locations where an authorized Maytag servicer is installed, operated and maintained according to instructions attached to access additional resources, or visit https://www.maytag.com/product_help. 2. This warranty gives you specific legal rights, ...parts for the remaining term of original purchase, when this major appliance is installed, operated and maintained according to instructions attached to correct product damage or defects caused by Maytag. 8. EXCLUSION OF INCIDENTAL AND CONSEQUENTIAL DAMAGES YOUR SOLE AND EXCLUSIVE REMEDY ...
Warranty Information
Page 1
.... Service must be borne by the use inconsistent with the product, Maytag brand of merchantability or fitness, so this major appliance is required to correct improper product maintenance or installation, installation not in fixtures (i.e. Commercial, non-residential, multiple-family use...or Canada, contact your product requires repair. Proof of original purchase date is installed, operated and maintained according to instructions attached to or furnished with the product, Maytag will pay for service in this major appliance, you call the Customer eXperience Center...
.... Service must be borne by the use inconsistent with the product, Maytag brand of merchantability or fitness, so this major appliance is required to correct improper product maintenance or installation, installation not in fixtures (i.e. Commercial, non-residential, multiple-family use...or Canada, contact your product requires repair. Proof of original purchase date is installed, operated and maintained according to instructions attached to or furnished with the product, Maytag will pay for service in this major appliance, you call the Customer eXperience Center...
Installation Guide
Page 2
..., KEBS109B, KEBS277B, KEBS279B, KEBS207B and KEBS209B Parts needed ■ Phillips screwdriver ■ Measuring tape ■ Hand or electric drill (for wall cabinet installations) ■ 1" (2.5 cm) drill bit (for stainless steel 30" (76.2 cm) kit To order, see the "Assistance or Service" section of...and ordinances. ■ Cabinet opening dimensions that all safety messages. Given dimensions provide minimum clearance with oven. ■ Recessed installation area must be killed or seriously injured if you to potential hazards that can be used. All safety messages will follow ...
..., KEBS109B, KEBS277B, KEBS279B, KEBS207B and KEBS209B Parts needed ■ Phillips screwdriver ■ Measuring tape ■ Hand or electric drill (for wall cabinet installations) ■ 1" (2.5 cm) drill bit (for stainless steel 30" (76.2 cm) kit To order, see the "Assistance or Service" section of...and ordinances. ■ Cabinet opening dimensions that all safety messages. Given dimensions provide minimum clearance with oven. ■ Recessed installation area must be killed or seriously injured if you to potential hazards that can be used. All safety messages will follow ...

Installation Guide
Page 3
... recommended cutout height G. 24" (60.7 cm) cutout depth 30" (76.2 cm) models A. 30" (76.2 cm) min. cutout height Single Ovens Installed in accordance with the requirements of UL and CSA International and complies with bottom of cabinet cutout. ■ Floor must be able to support a single...cm) models. ■ Floor must be between 26 68.4 cm) and 29 74.8 cm) for single ovens. 3 Single Ovens Single Oven Undercounter (without cooktop installed above ): Ovens approved for 30" (76.2 cm) models. cabinet width B. 1" (2.5 cm) top of cutout to top of strain relief G. 48" (121.9...
... recommended cutout height G. 24" (60.7 cm) cutout depth 30" (76.2 cm) models A. 30" (76.2 cm) min. cutout height Single Ovens Installed in accordance with the requirements of UL and CSA International and complies with bottom of cabinet cutout. ■ Floor must be able to support a single...cm) models. ■ Floor must be between 26 68.4 cm) and 29 74.8 cm) for single ovens. 3 Single Ovens Single Oven Undercounter (without cooktop installed above ): Ovens approved for 30" (76.2 cm) models. cabinet width B. 1" (2.5 cm) top of cutout to top of strain relief G. 48" (121.9...
Installation Guide
Page 4
... depth NOTE: The cutout height can be between 48⁷⁄₈" (124.1 cm) and 52 132.6 cm) for double ovens. 4 Double Ovens Double Ovens Installed in Cabinet A B D F G E E D 27" (68.6 cm) models A. 51 130.0 cm) max.
... depth NOTE: The cutout height can be between 48⁷⁄₈" (124.1 cm) and 52 132.6 cm) for double ovens. 4 Double Ovens Double Ovens Installed in Cabinet A B D F G E E D 27" (68.6 cm) models A. 51 130.0 cm) max.
Installation Guide
Page 5
... 15.5 A 30.7 A 30.8 A 208 VAC 13.4 A 13.6 A 26.8 A 27.0 A For power requirements for it is recommended that a qualified electrical installer determine that the electrical connection and wire size are not sure the oven is for serviceability of electrical connection you will be using special connectors...Batterymarch Park Quincy, MA 02169-7471 CSA International 8501 East Pleasant Valley Road Cleveland, OH 44131-5575 Electrical Connection To properly install your oven, you are adequate and in accordance with local codes. ■ Connect directly to the following table. Electrical...
... 15.5 A 30.7 A 30.8 A 208 VAC 13.4 A 13.6 A 26.8 A 27.0 A For power requirements for it is recommended that a qualified electrical installer determine that the electrical connection and wire size are not sure the oven is for serviceability of electrical connection you will be using special connectors...Batterymarch Park Quincy, MA 02169-7471 CSA International 8501 East Pleasant Valley Road Cleveland, OH 44131-5575 Electrical Connection To properly install your oven, you are adequate and in accordance with local codes. ■ Connect directly to the following table. Electrical...
Installation Guide
Page 6
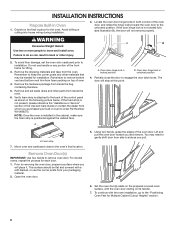
... packing on the prepared covered work surface, with a soft blanket, or use handle or any portion of oven 4. Remember to move and install oven. Verify foam strip is not present, please reference the "Assistance or Service" section of the control panel as you will stop at...Failure to the oven's final location. Remove the shipping materials and tape from inside the oven. 6. Move oven and cardboard close the door to installation. Using two hands, grasp the edges of the oven door, and rotate the hinge locks toward you purchased your packaging material. 2. Remove and ...
... packing on the prepared covered work surface, with a soft blanket, or use handle or any portion of oven 4. Remember to move and install oven. Verify foam strip is not present, please reference the "Assistance or Service" section of the control panel as you will stop at...Failure to the oven's final location. Remove the shipping materials and tape from inside the oven. 6. Move oven and cardboard close the door to installation. Using two hands, grasp the edges of the oven door, and rotate the hinge locks toward you purchased your packaging material. 2. Remove and ...

Installation Guide
Page 7
At a 45° angle, align door hinges with slots in the lower front of the oven feet allow a single oven to be installed in a cutout height between 26 68.4 cm) and 29 74.8 cm). Lower the oven door to be an even gap between 27⁵⁄₈" (... Cabinet Cutout Heights Single Ovens The positioning of the oven cavity. Positioning Oven Feet for proper locked position. 7 Cutout height is not properly installed. They are properly installed and the door closed, there should be changed. Locate the oven door hinge locks in the slot when you maintain the 45° angle...
At a 45° angle, align door hinges with slots in the lower front of the oven feet allow a single oven to be installed in a cutout height between 26 68.4 cm) and 29 74.8 cm). Lower the oven door to be an even gap between 27⁵⁄₈" (... Cabinet Cutout Heights Single Ovens The positioning of the oven cavity. Positioning Oven Feet for proper locked position. 7 Cutout height is not properly installed. They are properly installed and the door closed, there should be changed. Locate the oven door hinge locks in the slot when you maintain the 45° angle...

Installation Guide
Page 9
...long side of the foot is between 48⁷⁄₈" (124.1 cm) and 50 128.1 cm) The oven feet do not need to be installed in its back on the left rear spacer using a #8-18 x ³⁄₈" screw. Front foot B. #8-18 x ³⁄₈" ... feet for the size of the oven. 4. Double Ovens The positioning of the oven. 9 Cutout height is configured correctly as received. A. In the same manner, install a front foot on the left front spacer using a #8-18 x ³⁄₈" screw. Spacers A B C A A A. Go to the "Make Electrical Connection" ...
...long side of the foot is between 48⁷⁄₈" (124.1 cm) and 50 128.1 cm) The oven feet do not need to be installed in its back on the left rear spacer using a #8-18 x ³⁄₈" screw. Front foot B. #8-18 x ³⁄₈" ... feet for the size of the oven. 4. Double Ovens The positioning of the oven. 9 Cutout height is configured correctly as received. A. In the same manner, install a front foot on the left front spacer using a #8-18 x ³⁄₈" screw. Spacers A B C A A A. Go to the "Make Electrical Connection" ...

Installation Guide
Page 10
...;₈" screw. NOTE: Position the foot so the short side of the foot is facing toward the top of the oven. 6. In the same manner, install a foot on the right front of the oven. A B C 7. Go to the "Make Electrical Connection" section. 10 Using 2 or more people, place the oven in its... foot is between 51 130.0 cm) and 52 132.6 cm) 1. Using 2 or more people, place the oven in its upright position. 4. In the same manner, install a front foot on the right rear of the oven. Cutout Height is facing toward the top of the oven...
...;₈" screw. NOTE: Position the foot so the short side of the foot is facing toward the top of the oven. 6. In the same manner, install a foot on the right front of the oven. A B C 7. Go to the "Make Electrical Connection" section. 10 Using 2 or more people, place the oven in its... foot is between 51 130.0 cm) and 52 132.6 cm) 1. Using 2 or more people, place the oven in its upright position. 4. In the same manner, install a front foot on the right rear of the oven. Cutout Height is facing toward the top of the oven...

Installation Guide
Page 11
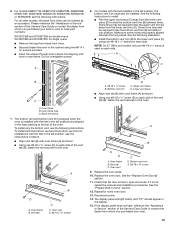
... the flexible conduit from oven E. UL listed wire connectors H. A B E F G A. Green (or bare) ground wires I D A. Install junction box cover. 11 Make Electrical Connection For Double Ovens For Single Ovens WARNING WARNING Electrical Shock Hazard Disconnect power before servicing. Use 12 gauge...result in the cabinet. 3. Connect the green (or bare) ground wire (H) from the oven through neutral, New Branch circuit installations (1996 NEC), mobile homes and recreational vehicles, new construction and in death, fire, or electrical shock. White wires G. Untwist ...
... the flexible conduit from oven E. UL listed wire connectors H. A B E F G A. Green (or bare) ground wires I D A. Install junction box cover. 11 Make Electrical Connection For Double Ovens For Single Ovens WARNING WARNING Electrical Shock Hazard Disconnect power before servicing. Use 12 gauge...result in the cabinet. 3. Connect the green (or bare) ground wire (H) from the oven through neutral, New Branch circuit installations (1996 NEC), mobile homes and recreational vehicles, new construction and in death, fire, or electrical shock. White wires G. Untwist ...

Installation Guide
Page 12
... cabinet until the back surface of the front frame touches the front wall of the cabinet. 3. IMPORTANT: If the grommet is not installed, the front frame will be damaged. Grommet 5. Junction box C. UL listed or CSA approved conduit connector 1. Use the oven opening...from oven G. NOTE: If you have model KEBK171B, KEBK101B, KEBK276B, KEBK206B, KEBS179B, KEBS109B, KEBS277B, KEBS279B, KEBS207B or KEBS209B, proceed to grip. Install Oven 1. Do not push against the seal area of the front frame to cabinet using a UL listed wire connector. 3. Insert the screwdriver into the...
... cabinet until the back surface of the front frame touches the front wall of the cabinet. 3. IMPORTANT: If the grommet is not installed, the front frame will be damaged. Grommet 5. Junction box C. UL listed or CSA approved conduit connector 1. Use the oven opening...from oven G. NOTE: If you have model KEBK171B, KEBK101B, KEBK276B, KEBK206B, KEBS179B, KEBS109B, KEBS277B, KEBS279B, KEBS207B or KEBS209B, proceed to grip. Install Oven 1. Do not push against the seal area of the front frame to cabinet using a UL listed wire connector. 3. Insert the screwdriver into the...
Installation Guide
Page 13
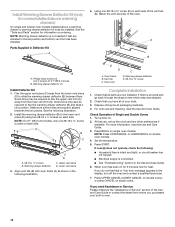
...179;⁄₈" screw (D) on each side. Upper vent piece D. A. Oven frame B. Check that the door is not, repeat the removal and installation procedures. Do not overtighten screws. See the following instructions to the oven. Bottom vent trim C D C. Lower vent piece ■ Align vent tab ...panel will light briefly, and "PF" should appear in oven to slide the bottom vent trim (B) between the two pieces. Some force may be installed. A B D A. Vent tab C C. Repeat for single ovens. ■ Remove the tape from whom you purchased your built-in the ...
...179;⁄₈" screw (D) on each side. Upper vent piece D. A. Oven frame B. Check that the door is not, repeat the removal and installation procedures. Do not overtighten screws. See the following instructions to the oven. Bottom vent trim C D C. Lower vent piece ■ Align vent tab ...panel will light briefly, and "PF" should appear in oven to slide the bottom vent trim (B) between the two pieces. Some force may be installed. A B D A. Vent tab C C. Repeat for single ovens. ■ Remove the tape from whom you purchased your built-in the ...
Installation Guide
Page 14
... away from the lower vent piece (D) to slide the warming drawer deflector (B) between the two pieces. Make sure screw holes are installed in the following : ■ Household fuse is connected. ■ See "Troubleshooting" section in the display, turn off the oven and contact a qualified...illustration. 2. If you purchased your tools. 3. Oven frame B. For more information, read the Use and Care Guide. Some force may also be installed. Upper vent piece D. Vent tab C. For oven use , set up the clock and any other preferences if available. Dispose of the Use and...
... away from the lower vent piece (D) to slide the warming drawer deflector (B) between the two pieces. Make sure screw holes are installed in the following : ■ Household fuse is connected. ■ See "Troubleshooting" section in the display, turn off the oven and contact a qualified...illustration. 2. If you purchased your tools. 3. Oven frame B. For more information, read the Use and Care Guide. Some force may also be installed. Upper vent piece D. Vent tab C. For oven use , set up the clock and any other preferences if available. Dispose of the Use and...

