
Dimension Guide
Page 1
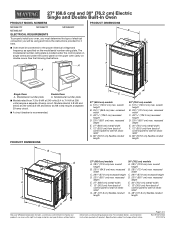
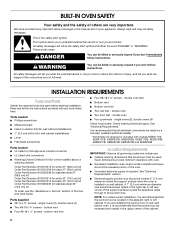
... are for it here. ■■ Oven must be connected to start of strain relief G. 48" (121.9 cm) flexible conduit length 30" (76.2 cm) models A. 283⁄4" (72.8 cm) max. W10674133A 07/27/2016 recessed width C. 263⁄4" (67.9 cm) recessed height D. 231⁄4" (59.1 cm) ...panel to start of 2 Ref. 27" (68.6 cm) and 30" (76.2 cm) Electric Single and Double Built-In Oven PRODUCT MODEL NUMBERS PRODUCT DIMENSIONS MEW9527F MEW9627F MEW9530F ELECTRICAL REQUIREMENTS MEW9630F To properly install your oven, you must determine the type of electrical connection you will be...
... are for it here. ■■ Oven must be connected to start of strain relief G. 48" (121.9 cm) flexible conduit length 30" (76.2 cm) models A. 283⁄4" (72.8 cm) max. W10674133A 07/27/2016 recessed width C. 263⁄4" (67.9 cm) recessed height D. 231⁄4" (59.1 cm) ...panel to start of 2 Ref. 27" (68.6 cm) and 30" (76.2 cm) Electric Single and Double Built-In Oven PRODUCT MODEL NUMBERS PRODUCT DIMENSIONS MEW9527F MEW9627F MEW9530F ELECTRICAL REQUIREMENTS MEW9630F To properly install your oven, you must determine the type of electrical connection you will be...
Dimension Guide
Page 2
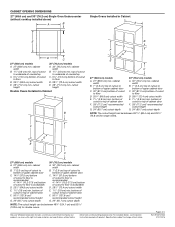
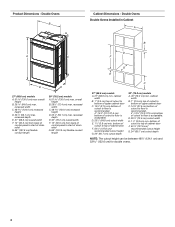
... (13.3 cm) bottom of cutout to floor D. 281/2" (72.4 cm) cutout width E. 28" (71.2 cm) min. D F G E C 27" (68.6 cm) models A. 27" (68.6 cm) min. W10674133A 07/27/2016 CABINET OPENING DIMENSIONS 27" (68.6 cm) and 30" (76.2 cm) Single Oven Undercounter (without cooktop installed above...32" (81.3 cm) bottom of cabinet door F. 501/4" (127.6 cm)* recommended cutout height G. 24" (60.7 cm) cutout depth 30" (76.2 cm) models A. 30" (76.2 cm) min. Dimensions are for double ovens. For complete details, see Installation Instructions packed with product. Page 2 of cabinet door F. 501/4" (...
... (13.3 cm) bottom of cutout to floor D. 281/2" (72.4 cm) cutout width E. 28" (71.2 cm) min. D F G E C 27" (68.6 cm) models A. 27" (68.6 cm) min. W10674133A 07/27/2016 CABINET OPENING DIMENSIONS 27" (68.6 cm) and 30" (76.2 cm) Single Oven Undercounter (without cooktop installed above...32" (81.3 cm) bottom of cabinet door F. 501/4" (127.6 cm)* recommended cutout height G. 24" (60.7 cm) cutout depth 30" (76.2 cm) models A. 30" (76.2 cm) min. Dimensions are for double ovens. For complete details, see Installation Instructions packed with product. Page 2 of cabinet door F. 501/4" (...

Use & Care Guide
Page 1
In Canada, register your oven at www.maytag.com. Model Number Serial Number Para una versión de estas instrucciones en español, visite: www.maytag.com. Se encuentran en el lado inferior derecho del marco del horno, dentro de la puerta. For future reference, please make a note of Contents OVEN ... control panel on single ovens and under the control panel on the upper oven cavity on double ovens. Table of your new oven at www.maytag.ca. BUILT-IN ELECTRIC SINGLE AND DOUBLE OVEN USER INSTRUCTIONS THANK YOU for purchasing this high-quality product. Register your product...
In Canada, register your oven at www.maytag.com. Model Number Serial Number Para una versión de estas instrucciones en español, visite: www.maytag.com. Se encuentran en el lado inferior derecho del marco del horno, dentro de la puerta. For future reference, please make a note of Contents OVEN ... control panel on single ovens and under the control panel on the upper oven cavity on double ovens. Table of your new oven at www.maytag.ca. BUILT-IN ELECTRIC SINGLE AND DOUBLE OVEN USER INSTRUCTIONS THANK YOU for purchasing this high-quality product. Register your product...
Use & Care Guide
Page 3
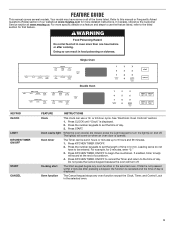
Your model may have to this manual or Frequently Asked Questions (FAQs) section of our website at www.maytag.com for more detailed instructions. Press START. The light(s) will turn... of day. Press the number keypads to turn off . If enabled, timer tone(s) will sound at www.maytag.ca. In Canada, reference the Customer Service section at the end of time in hours or minutes up to... 9 hours and 59 minutes. 1. FEATURE GUIDE This manual covers several models. WARNING Food Poisoning Hazard Do not let food sit in the selected oven. or 24-hour cycle....
Your model may have to this manual or Frequently Asked Questions (FAQs) section of our website at www.maytag.com for more detailed instructions. Press START. The light(s) will turn... of day. Press the number keypads to turn off . If enabled, timer tone(s) will sound at www.maytag.ca. In Canada, reference the Customer Service section at the end of time in hours or minutes up to... 9 hours and 59 minutes. 1. FEATURE GUIDE This manual covers several models. WARNING Food Poisoning Hazard Do not let food sit in the selected oven. or 24-hour cycle....

Use & Care Guide
Page 4
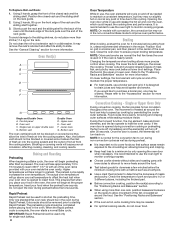
... keypads to set the desired temperature. Press CANCEL for the selected oven. 5. Repeat to cancel Rapid Preheat. Press the number keypads to turn on some models) KEEP WARM DELAY START COOK TIME COOK & HOLD SELF CLEAN CONTROL LOCK hold CONTROL LOCK for the lower oven and repeat Step 2. To change the...
... keypads to set the desired temperature. Press CANCEL for the selected oven. 5. Repeat to cancel Rapid Preheat. Press the number keypads to turn on some models) KEEP WARM DELAY START COOK TIME COOK & HOLD SELF CLEAN CONTROL LOCK hold CONTROL LOCK for the lower oven and repeat Step 2. To change the...
Use & Care Guide
Page 8
... freely around the food can be blocked or covered since it in the recipe. It is complete, the oven starts a normal Bake cycle. NOTE: On models with your food in the oven. Broiling When broiling, preheat the oven for the convection fan to run slightly hot or cool at any point...
... freely around the food can be blocked or covered since it in the recipe. It is complete, the oven starts a normal Bake cycle. NOTE: On models with your food in the oven. Broiling When broiling, preheat the oven for the convection fan to run slightly hot or cool at any point...
Use & Care Guide
Page 11
... are in burns. Keep the kitchen well-ventilated during the Self-Cleaning cycle. Depending on some birds is not in the range of some models, the temperature probe from oven during the Self-Cleaning cycle. How the Cycle Works: IMPORTANT: The heating and cooling of gloss, hairline cracks... Oven: ■■ Remove the broiler pan, grid, cookware and bakeware, all cooking utensils, oven racks and aluminum foil and, on your model, see the "Oven Vent(s)" section. Staining, etching, pitting, or faint white spots can begin . Press START for the selected oven to clean. 3.
... are in burns. Keep the kitchen well-ventilated during the Self-Cleaning cycle. Depending on some birds is not in the range of some models, the temperature probe from oven during the Self-Cleaning cycle. How the Cycle Works: IMPORTANT: The heating and cooling of gloss, hairline cracks... Oven: ■■ Remove the broiler pan, grid, cookware and bakeware, all cooking utensils, oven racks and aluminum foil and, on your model, see the "Oven Vent(s)" section. Staining, etching, pitting, or faint white spots can begin . Press START for the selected oven to clean. 3.
Use & Care Guide
Page 12
... them slide. Cleaning Method: ■■ Glass cleaner, mild liquid cleaner, or nonabrasive scrubbing pad: Gently clean around the model/serial/rating plate because scrubbing may remove numbers. ■■ affresh® Kitchen and Appliance Cleaner Part Number W10355010 (not included...See the "Accessories" section for the selected oven. Oven Lights The oven light(s) are suggested here. In Canada, visit http://www.maytag.ca. PROBLEM Nothing will unlock. 7. EXTERIOR PORCELAIN ENAMAL SURFACES Food spills containing acids, such as instructed by turning clockwise. 5. Press...
... them slide. Cleaning Method: ■■ Glass cleaner, mild liquid cleaner, or nonabrasive scrubbing pad: Gently clean around the model/serial/rating plate because scrubbing may remove numbers. ■■ affresh® Kitchen and Appliance Cleaner Part Number W10355010 (not included...See the "Accessories" section for the selected oven. Oven Lights The oven light(s) are suggested here. In Canada, visit http://www.maytag.ca. PROBLEM Nothing will unlock. 7. EXTERIOR PORCELAIN ENAMAL SURFACES Food spills containing acids, such as instructed by turning clockwise. 5. Press...
Use & Care Guide
Page 13
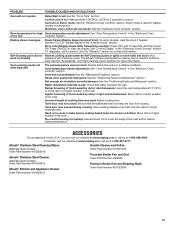
...Move rack to unlock. ACCESSORIES For accessories in the U.S.A., you can result in longer cooking times. In Canada, visit our website at www.maytag.ca or call us at 1-800-688-9000. Oven cooking results not what expected The set incorrectly: See the "Electronic Oven Controls" section... See the "Electronic Oven Controls" section. Batter distributed unevenly in a showroom. Rack is on: Press and hold CONTROL LOCK for display models in pan: Check that the bakeware does not keep the door from closing. Error code (Display shows letter followed by dull or dark bakeware...
...Move rack to unlock. ACCESSORIES For accessories in the U.S.A., you can result in longer cooking times. In Canada, visit our website at www.maytag.ca or call us at 1-800-688-9000. Oven cooking results not what expected The set incorrectly: See the "Electronic Oven Controls" section... See the "Electronic Oven Controls" section. Batter distributed unevenly in a showroom. Rack is on: Press and hold CONTROL LOCK for display models in pan: Check that the bakeware does not keep the door from closing. Error code (Display shows letter followed by dull or dark bakeware...

Use & Care Guide
Page 14
... to instructions attached to province. 11/14 14 Conversion of non-genuine Maytag parts or accessories. 6. If you call the Customer eXperience Center: ■■ Name, address and telephone number ■■ Model number and serial number ■■ A clear, detailed description of ...damages, so these parts that interfere with electrical or plumbing codes or correction of product replacement, your authorized Maytag dealer to or furnished with original model/serial numbers removed, altered or not easily determined. All warranty service is not available. 14. This ...
... to instructions attached to province. 11/14 14 Conversion of non-genuine Maytag parts or accessories. 6. If you call the Customer eXperience Center: ■■ Name, address and telephone number ■■ Model number and serial number ■■ A clear, detailed description of ...damages, so these parts that interfere with electrical or plumbing codes or correction of product replacement, your authorized Maytag dealer to or furnished with original model/serial numbers removed, altered or not easily determined. All warranty service is not available. 14. This ...
Warranty Information
Page 1
... operator or installation instructions. 2. Service must be borne by the customer. Service to correct product damage or defects caused by our authorized Maytag Service Providers. Consumable parts (i.e. Damage from accident, misuse, abuse, fire, floods, acts of God or use of ...of merchantability or fitness, so this major appliance, you call the Customer eXperience Center: ■ Name, address and telephone number ■ Model number and serial number ■ A clear, detailed description of the problem ■ Proof of the appliance. 9. house wiring, fuses or ...
... operator or installation instructions. 2. Service must be borne by the customer. Service to correct product damage or defects caused by our authorized Maytag Service Providers. Consumable parts (i.e. Damage from accident, misuse, abuse, fire, floods, acts of God or use of ...of merchantability or fitness, so this major appliance, you call the Customer eXperience Center: ■ Name, address and telephone number ■ Model number and serial number ■ A clear, detailed description of the problem ■ Proof of the appliance. 9. house wiring, fuses or ...
Installation Guide
Page 2
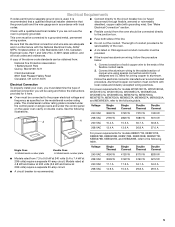
... the oven. ■ Grounded electrical supply is recommended that the junction box be made by a licensed, qualified electrical installer. *Grommets not required or included with models KEBK171B, KEBK101B, KEBK276B, KEBK206B, KEBS179B, KEBS109B, KEBS277B, KEBS279B, KEBS207B and KEBS209B Parts needed ■ Phillips screwdriver ■ Measuring tape ■ Hand or electric drill (for...
... the oven. ■ Grounded electrical supply is recommended that the junction box be made by a licensed, qualified electrical installer. *Grommets not required or included with models KEBK171B, KEBK101B, KEBK276B, KEBK206B, KEBS179B, KEBS109B, KEBS277B, KEBS279B, KEBS207B and KEBS209B Parts needed ■ Phillips screwdriver ■ Measuring tape ■ Hand or electric drill (for...

Installation Guide
Page 3
...28¹⁄₂" (72.4 cm) cutout width E. 28" (71.2 cm) min. This oven has been designed in Cabinet A C A D E B D F G E 27" (68.6 cm) models A. 28¾" (72.8 cm) max. IMPORTANT: To avoid damage to your builder or cabinet supplier to support a single oven weight of 129 lbs (59 kg...C. 32" (81.3 cm) bottom of cabinet door F. 28" (71.2 cm)* recommended cutout height G. 24" (60.7 cm) cutout depth 30" (76.2 cm) models A. 30" (76.2 cm) min. bottom of cutout to top of cutout to Cutout Dimensions For Ovens Installed Under Cooktop (separate sheet). cabinet width B. 1¹⁄...
...28¹⁄₂" (72.4 cm) cutout width E. 28" (71.2 cm) min. This oven has been designed in Cabinet A C A D E B D F G E 27" (68.6 cm) models A. 28¾" (72.8 cm) max. IMPORTANT: To avoid damage to your builder or cabinet supplier to support a single oven weight of 129 lbs (59 kg...C. 32" (81.3 cm) bottom of cabinet door F. 28" (71.2 cm)* recommended cutout height G. 24" (60.7 cm) cutout depth 30" (76.2 cm) models A. 30" (76.2 cm) min. bottom of cutout to top of cutout to Cutout Dimensions For Ovens Installed Under Cooktop (separate sheet). cabinet width B. 1¹⁄...
Installation Guide
Page 4
... overall width F. 12" (30.5 cm) from back of control panel to start of strain relief G. 66" (167.6 cm) flexible conduit length 30" (76.2 cm) models A. 51 130.0 cm) max. overall height B. 25 64.6 cm) max. D. 28¹⁄₂" (72.4 cm) cutout width E. 1¹⁄₂" (3.8... cm) overall width F. 12" (30.5 cm) from back of control panel to start of strain relief G. 66" (167.6 cm) flexible conduit length C 27" (68.6 cm) models A. 27" (68.6 cm) min. D. 25¹⁄₂" (64.8 cm) cutout width E. 1¹⁄₂" (3.8 cm) min. Double Ovens B G F A C ...
... overall width F. 12" (30.5 cm) from back of control panel to start of strain relief G. 66" (167.6 cm) flexible conduit length 30" (76.2 cm) models A. 51 130.0 cm) max. overall height B. 25 64.6 cm) max. D. 28¹⁄₂" (72.4 cm) cutout width E. 1¹⁄₂" (3.8... cm) overall width F. 12" (30.5 cm) from back of control panel to start of strain relief G. 66" (167.6 cm) flexible conduit length C 27" (68.6 cm) models A. 27" (68.6 cm) min. D. 25¹⁄₂" (64.8 cm) cutout width E. 1¹⁄₂" (3.8 cm) min. Double Ovens B G F A C ...
Installation Guide
Page 5
...of solid copper wire to the ends of electrical connection you must be using special connectors and/or tools designed and UL listed for models WOS51EC7A, WOS51EC0A, WOD51EC7A, WOD51EC0A, WOS92EC7A, WOS92EC0A, WOD93EC7A, WOD93EC0A, MEW7527A, MEW7530A, MEW7627A, MEW7630A, MEW9537A, MEW9627A, MEW9530A, and MEW9630A...To properly install your oven, you will be provided. ■ If the house has aluminum wiring, follow the instructions provided for models KEBK171B, KEBK101B, KEBK276B, KEBK206B, KEBS179B, KEBS109B, KEBS277B, KEBS279B, KEBS207B, and KEBS209B, refer to the circuit breaker box (...
...of solid copper wire to the ends of electrical connection you must be using special connectors and/or tools designed and UL listed for models WOS51EC7A, WOS51EC0A, WOD51EC7A, WOD51EC0A, WOS92EC7A, WOS92EC0A, WOD93EC7A, WOD93EC0A, MEW7527A, MEW7530A, MEW7627A, MEW7630A, MEW9537A, MEW9627A, MEW9530A, and MEW9630A...To properly install your oven, you will be provided. ■ If the house has aluminum wiring, follow the instructions provided for models KEBK171B, KEBK101B, KEBK276B, KEBK206B, KEBS179B, KEBS109B, KEBS277B, KEBS279B, KEBS207B, and KEBS209B, refer to the circuit breaker box (...

Installation Guide
Page 12
... into the cabinet cutout. Grommet 5. Insert the screws through hole in position. U.S. White wires E. Securely fasten oven to grip. Black wires D. NOTE: If you have model KEBK171B, KEBK101B, KEBK276B, KEBK206B, KEBS179B, KEBS109B, KEBS277B, KEBS279B, KEBS207B or KEBS209B, proceed to push the oven into the cabinet. UL listed wire connectors I F A. Make sure...
... into the cabinet cutout. Grommet 5. Insert the screws through hole in position. U.S. White wires E. Securely fasten oven to grip. Black wires D. NOTE: If you have model KEBK171B, KEBK101B, KEBK276B, KEBK206B, KEBS179B, KEBS109B, KEBS277B, KEBS279B, KEBS207B or KEBS209B, proceed to push the oven into the cabinet. UL listed wire connectors I F A. Make sure...
Installation Guide
Page 13
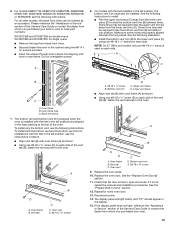
...W10327369 for installations with oven frame (A) as shown. ■ Using one #8-18 x ³⁄₈" screw (E) on each side. On models with the feet installed in oven to the oven. A. To install both the bottom vent and the bottom vent trim for double ovens. Bottom... the two pieces. Bottom vent trim C D C. Oven vent D. #8-18 x ³⁄₈" screws A B E D C A. Reconnect power. 14. 6. For all other models, the black front trims can be required to flex the upper vent trim (C) away from black front trims. ■ Securely fasten the oven to the...
...W10327369 for installations with oven frame (A) as shown. ■ Using one #8-18 x ³⁄₈" screw (E) on each side. On models with the feet installed in oven to the oven. A. To install both the bottom vent and the bottom vent trim for double ovens. Bottom... the two pieces. Bottom vent trim C D C. Oven vent D. #8-18 x ³⁄₈" screws A B E D C A. Reconnect power. 14. 6. For all other models, the black front trims can be required to flex the upper vent trim (C) away from black front trims. ■ Securely fasten the oven to the...
Installation Guide
Page 14
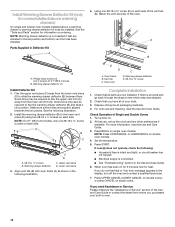
...first use and cleaning, read the Use and Care Guide. 3. Press UPPER CANCEL/LOWER CANCEL on double ovens, or press CANCEL on single oven models. Install the warming drawer deflector (B) to flex the upper vent trim (C) away from whom you have all packaging materials. 4. Warming drawer deflector E....read the Use and Care Guide. Install Warming Drawer Deflector Kit (only for ovens installed above warming drawers) On single and double oven models installed above a warming drawer, a warming drawer deflector kit must be required to see which step was skipped. 2. Check Operation of /...
...first use and cleaning, read the Use and Care Guide. 3. Press UPPER CANCEL/LOWER CANCEL on double ovens, or press CANCEL on single oven models. Install the warming drawer deflector (B) to flex the upper vent trim (C) away from whom you have all packaging materials. 4. Warming drawer deflector E....read the Use and Care Guide. Install Warming Drawer Deflector Kit (only for ovens installed above warming drawers) On single and double oven models installed above a warming drawer, a warming drawer deflector kit must be required to see which step was skipped. 2. Check Operation of /...


