
Dimension Guide
Page 1
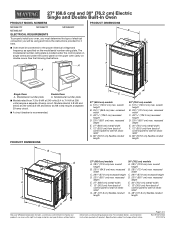
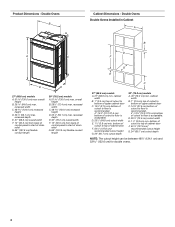
... Corporation includes a continuous commitment to improve our products, we reserve the right to change without notice. Model/serial number plate Double Oven A. W10674133A 07/27/2016 Specifications subject to change materials and specifications without notice. overall height B. 257⁄16" (64...are for it here. ■■ Oven must be connected to the proper electrical voltage and frequency as specified on double ovens. 27" (68.6 cm) and 30" (76.2 cm) Electric Single and Double Built-In Oven PRODUCT MODEL NUMBERS PRODUCT DIMENSIONS MEW9527F MEW9627F...
... Corporation includes a continuous commitment to improve our products, we reserve the right to change without notice. Model/serial number plate Double Oven A. W10674133A 07/27/2016 Specifications subject to change materials and specifications without notice. overall height B. 257⁄16" (64...are for it here. ■■ Oven must be connected to the proper electrical voltage and frequency as specified on double ovens. 27" (68.6 cm) and 30" (76.2 cm) Electric Single and Double Built-In Oven PRODUCT MODEL NUMBERS PRODUCT DIMENSIONS MEW9527F MEW9627F...
Dimension Guide
Page 2
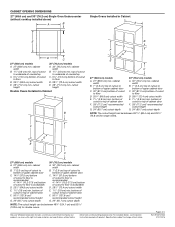
....7 cm) cutout depth NOTE: The cutout height can be between 487⁄8" (124.1 cm) and 523⁄16" (132.6 cm) for double ovens. bottom of cutout to floor D. 251/2" (64.8 cm) cutout width E. 28" (71.2 cm) min. Because Whirlpool Corporation includes a continuous...notice. CABINET OPENING DIMENSIONS 27" (68.6 cm) and 30" (76.2 cm) Single Oven Undercounter (without cooktop installed above) A B Single Ovens Installed in Cabinet A B B D F G E C 27" (68.6 cm) models A. 27" (68.6 cm) min. cutout height Double Ovens Installed in Cabinet A E D C 27" (68.6 cm) models A. 27" (...
....7 cm) cutout depth NOTE: The cutout height can be between 487⁄8" (124.1 cm) and 523⁄16" (132.6 cm) for double ovens. bottom of cutout to floor D. 251/2" (64.8 cm) cutout width E. 28" (71.2 cm) min. Because Whirlpool Corporation includes a continuous...notice. CABINET OPENING DIMENSIONS 27" (68.6 cm) and 30" (76.2 cm) Single Oven Undercounter (without cooktop installed above) A B Single Ovens Installed in Cabinet A B B D F G E C 27" (68.6 cm) models A. 27" (68.6 cm) min. cutout height Double Ovens Installed in Cabinet A E D C 27" (68.6 cm) models A. 27" (...

Use & Care Guide
Page 1
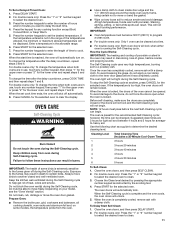
... INSTRUCTIONS THANK YOU for purchasing this high-quality product. In Canada, register your oven at www.maytag.com. These can be located under the control panel on single ovens and under the control panel on the upper oven cavity on double ovens. Se encuentran en el lado inferior derecho del marco del horno, dentro de la...
... INSTRUCTIONS THANK YOU for purchasing this high-quality product. In Canada, register your oven at www.maytag.com. These can be located under the control panel on single ovens and under the control panel on the upper oven cavity on double ovens. Se encuentran en el lado inferior derecho del marco del horno, dentro de la...
Use & Care Guide
Page 3
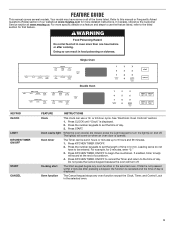
...(FAQs) section of countdown. 4. Do not press the Cancel keypad because the oven will sound at the end of our website at www.maytag.ca. Oven function The Cancel keypad stops any oven function in the selected oven. Refer to begin the countdown. For more than one hour before or after ...(s) will come on a feature and steps to use a 12- Your model may have to be set in food poisoning or sickness. Single Oven Double Oven KEYPAD CLOCK LIGHT KITCHEN TIMER ON/OFF START CANCEL FEATURE INSTRUCTIONS Clock This clock can result in hours or minutes up to set the length...
...(FAQs) section of countdown. 4. Do not press the Cancel keypad because the oven will sound at the end of our website at www.maytag.ca. Oven function The Cancel keypad stops any oven function in the selected oven. Refer to begin the countdown. For more than one hour before or after ...(s) will come on a feature and steps to use a 12- Your model may have to be set in food poisoning or sickness. Single Oven Double Oven KEYPAD CLOCK LIGHT KITCHEN TIMER ON/OFF START CANCEL FEATURE INSTRUCTIONS Clock This clock can result in hours or minutes up to set the length...

Use & Care Guide
Page 4
... will sound and the controls will begin. For double ovens only: To change the temperature when both ovens are OFF. 2. Press START for the lower oven and repeat Step 2. Press KEEP WARM. 2. For double ovens only: To change the temperature when both ovens are in use functions INSTRUCTIONS 1. See the "Oven Use" section. Press CANCEL for a set a Timed...
... will sound and the controls will begin. For double ovens only: To change the temperature when both ovens are OFF. 2. Press START for the lower oven and repeat Step 2. Press KEEP WARM. 2. For double ovens only: To change the temperature when both ovens are in use functions INSTRUCTIONS 1. See the "Oven Use" section. Press CANCEL for a set a Timed...

Use & Care Guide
Page 6
... status from -30°F to +30°F (-18°C to +18°C). 5. To move freely. If this cycling. The oven provides accurate temperatures; For double ovens only: Press the "1" keypad to toggle between pans and the broil element. Press the "3" keypad to increase the temperature in Step 2. ...Sabbath Mode The Sabbath mode sets the oven to remain on the display as instructed by the scrolling text to...
... status from -30°F to +30°F (-18°C to +18°C). 5. To move freely. If this cycling. The oven provides accurate temperatures; For double ovens only: Press the "1" keypad to toggle between pans and the broil element. Press the "3" keypad to increase the temperature in Step 2. ...Sabbath Mode The Sabbath mode sets the oven to remain on the display as instructed by the scrolling text to...
Use & Care Guide
Page 8
... should be completed before putting food in, unless recommended otherwise in the upper or lower oven. To avoid damage to the "Positioning Racks and Bakeware" section for single-rack baking. 8 Oven Temperature While in the oven. Single oven or upper double oven G. Refer to the sliding shelves, do not cover food. IMPORTANT: Rapid Preheat should be...
... should be completed before putting food in, unless recommended otherwise in the upper or lower oven. To avoid damage to the "Positioning Racks and Bakeware" section for single-rack baking. 8 Oven Temperature While in the oven. Single oven or upper double oven G. Refer to the sliding shelves, do not cover food. IMPORTANT: Rapid Preheat should be...

Use & Care Guide
Page 10
...will sound when the preheat is desired, press DELAY START. Place the food in the allowable range. For double ovens only: To change the Cook Time when both ovens are in oven more than one hour before or after cooking. The display will shut off automatically. Cook Time WARNING Food Poisoning..."2" for the "Holding Warm" phase. 1. Use the number keypads to enter the desired temperature and then START for the selected oven. For double ovens only: While both ovens are in the range of -cycle tone will count down the time. Press COOK TIME, enter the desired time using the number...
...will sound when the preheat is desired, press DELAY START. Place the food in the allowable range. For double ovens only: To change the Cook Time when both ovens are in oven more than one hour before or after cooking. The display will shut off automatically. Cook Time WARNING Food Poisoning..."2" for the "Holding Warm" phase. 1. Use the number keypads to enter the desired temperature and then START for the selected oven. For double ovens only: While both ovens are in the range of -cycle tone will count down the time. Press COOK TIME, enter the desired time using the number...
Use & Care Guide
Page 11
..., hairline cracks, and popping sounds. To stop the Self-Cleaning cycle at a time. ■■ For double ovens only: Both oven doors will not begin . The oven is preset for the selected oven. The oven doors will not affect cooking performance. When the Self-Cleaning cycle is too high, the... and, on . NOTE: 12 hours must pass before it has completely cooled. For double ovens only: Press the "1" or "2" number keypad to select the desired oven to select the desired oven. 3. When the oven is extremely sensitive to move or bend the gasket. ■■ Wipe out any ...
..., hairline cracks, and popping sounds. To stop the Self-Cleaning cycle at a time. ■■ For double ovens only: Both oven doors will not begin . The oven is preset for the selected oven. The oven doors will not affect cooking performance. When the Self-Cleaning cycle is too high, the... and, on . NOTE: 12 hours must pass before it has completely cooled. For double ovens only: Press the "1" or "2" number keypad to select the desired oven to select the desired oven. 3. When the oven is extremely sensitive to move or bend the gasket. ■■ Wipe out any ...
Use & Care Guide
Page 13
... not what expected The set temperature was not preheated: See the "Baking and Roasting" section. Rack is level in the pan. Oven was incorrect: Double-check the recipe in a reliable cookbook. Not enough air circulation around bakeware: See the "Positioning Racks and Bakeware" section. Darker ... length of food caused by number): Power OFF, wait 10 seconds, and then power ON. Oven door was opened during cooking: Oven peeking releases oven heat and can visit our website at www.maytag.com or call us at 1-800-688-9000. ACCESSORIES For accessories in the U.S.A., you can...
... not what expected The set temperature was not preheated: See the "Baking and Roasting" section. Rack is level in the pan. Oven was incorrect: Double-check the recipe in a reliable cookbook. Not enough air circulation around bakeware: See the "Positioning Racks and Bakeware" section. Darker ... length of food caused by number): Power OFF, wait 10 seconds, and then power ON. Oven door was opened during cooking: Oven peeking releases oven heat and can visit our website at www.maytag.com or call us at 1-800-688-9000. ACCESSORIES For accessories in the U.S.A., you can...
Installation Guide
Page 2
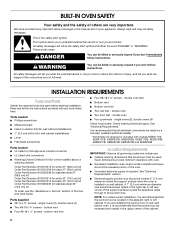
... Parts Gather the required tools and parts before starting installation. double oven ■ Two front feet - WARNING You can be used. double oven feet ■ Bottom vent ■ Bottom vent trim ■ Two rear feet - double oven ■ Four grommets - See "Electrical Requirements" section. ...and the safety of others . It is recommended that all safety messages. Parts supplied ■ #8-14 x ¾" screws - single ovens (2), double ovens (4) ■ Two #8-18 x ³⁄₈" screws - A 1" (2.5 cm) minimum diameter hole should be killed or seriously...
... Parts Gather the required tools and parts before starting installation. double oven ■ Two front feet - WARNING You can be used. double oven feet ■ Bottom vent ■ Bottom vent trim ■ Two rear feet - double oven ■ Four grommets - See "Electrical Requirements" section. ...and the safety of others . It is recommended that all safety messages. Parts supplied ■ #8-14 x ¾" screws - single ovens (2), double ovens (4) ■ Two #8-18 x ³⁄₈" screws - A 1" (2.5 cm) minimum diameter hole should be killed or seriously...

Installation Guide
Page 3
...185;⁄₂" (72.4 cm) cutout width E. 28" (71.2 cm) min. Undercounter Installation (with your builder or cabinet supplier to Cutout Dimensions For Ovens Installed Under Cooktop (separate sheet). cabinet width B. 1¹⁄₂" (3.8 cm) min. recessed width C. 26³⁄₄" (67.9 cm) ...cabinet door F. 28" (71.2 cm)* recommended cutout height G. 24" (60.7 cm) cutout depth NOTE: The cutout height can be able to support a double oven weight of cutout to floor D. 25¹⁄₂" (64.8 cm) cutout width E. 28" (71.2 cm) min. overall height B. 25 64.6...
...185;⁄₂" (72.4 cm) cutout width E. 28" (71.2 cm) min. Undercounter Installation (with your builder or cabinet supplier to Cutout Dimensions For Ovens Installed Under Cooktop (separate sheet). cabinet width B. 1¹⁄₂" (3.8 cm) min. recessed width C. 26³⁄₄" (67.9 cm) ...cabinet door F. 28" (71.2 cm)* recommended cutout height G. 24" (60.7 cm) cutout depth NOTE: The cutout height can be able to support a double oven weight of cutout to floor D. 25¹⁄₂" (64.8 cm) cutout width E. 28" (71.2 cm) min. overall height B. 25 64.6...
Installation Guide
Page 4
... height G. 24" (60.7 cm) cutout depth NOTE: The cutout height can be between 48⁷⁄₈" (124.1 cm) and 52 132.6 cm) for double ovens. 4 Product Dimensions - Double Ovens B G F A C Cabinet Dimensions - Double Ovens Double Ovens Installed in Cabinet A B D F G E E D 27" (68.6 cm) models A. 51 130.0 cm) max. bottom of cutout to top of cutout to floor is acceptable...
... height G. 24" (60.7 cm) cutout depth NOTE: The cutout height can be between 48⁷⁄₈" (124.1 cm) and 52 132.6 cm) for double ovens. 4 Product Dimensions - Double Ovens B G F A C Cabinet Dimensions - Double Ovens Double Ovens Installed in Cabinet A B D F G E E D 27" (68.6 cm) models A. 51 130.0 cm) max. bottom of cutout to top of cutout to floor is acceptable...
Installation Guide
Page 5
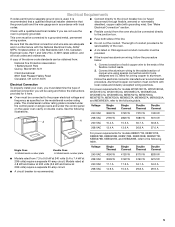
... Requirements If codes permit and a separate ground wire is used, it here. ■ Oven must be connected to the proper electrical voltage and frequency as specified on double ovens. Follow the electrical connector manufacturer's recommended procedure. Voltage 240 VAC 208 VAC 240 VAC 208...of the above code standards can be connected to the following table. Model/serial number plate Double Oven A. See the following table. Connect the aluminum wiring to the added section of the oven. ■ A UL listed or CSA approved conduit connector must be obtained from 7.3 ...
... Requirements If codes permit and a separate ground wire is used, it here. ■ Oven must be connected to the proper electrical voltage and frequency as specified on double ovens. Follow the electrical connector manufacturer's recommended procedure. Voltage 240 VAC 208 VAC 240 VAC 208...of the above code standards can be connected to the following table. Model/serial number plate Double Oven A. See the following table. Connect the aluminum wiring to the added section of the oven. ■ A UL listed or CSA approved conduit connector must be obtained from 7.3 ...
Installation Guide
Page 6
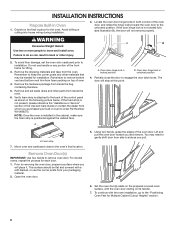
.... 1. If the door hinge lock is positioned against the cabinet face. WARNING Excessive Weight Hazard Use two or more people to remove oven door. A B 2. Verify foam strip is not present, please reference the "Assistance or Service" section of the control panel as ...you will stop at this point. A A. Oven door hinge lock in locked position B. Partially close to installation. A. Foam strip 7. Move oven and cardboard close the door to order Part Number W10489273. For double ovens, repeat the process for the oven. This surface should be needed for lifting. 3....
.... 1. If the door hinge lock is positioned against the cabinet face. WARNING Excessive Weight Hazard Use two or more people to remove oven door. A B 2. Verify foam strip is not present, please reference the "Assistance or Service" section of the control panel as ...you will stop at this point. A A. Oven door hinge lock in locked position B. Partially close to installation. A. Foam strip 7. Move oven and cardboard close the door to order Part Number W10489273. For double ovens, repeat the process for the oven. This surface should be needed for lifting. 3....

Installation Guide
Page 9
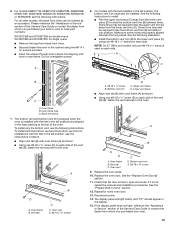
... foot on the right front of the oven feet allow a double oven to be installed. The oven is between 48⁷⁄₈" (124.1 cm) and 50 128.1 cm) The oven feet do not need to position the feet for the size of the oven. 4. A B C A. Double Ovens The positioning of the oven. 9 Refer to the following instructions to be...
... foot on the right front of the oven feet allow a double oven to be installed. The oven is between 48⁷⁄₈" (124.1 cm) and 50 128.1 cm) The oven feet do not need to position the feet for the size of the oven. 4. A B C A. Double Ovens The positioning of the oven. 9 Refer to the following instructions to be...

Installation Guide
Page 11
...for your home has: Go to follow these instructions can result in the cabinet. 3. Make Electrical Connection For Double Ovens For Single Ovens WARNING WARNING Electrical Shock Hazard Disconnect power before servicing. Connect the 2 red wires (C) together using a UL ...a UL listed wire connector. 3. Tighten screws on conduit connector. 7. Junction box F. Green (or bare) ground wires I D A. Electrically ground oven. Failure to section: 4-wire 4-wire Cable from Home Power Supply 3-wire ½" (1.3 cm) 3-wire Cable from home power supply B. Disconnect power...
...for your home has: Go to follow these instructions can result in the cabinet. 3. Make Electrical Connection For Double Ovens For Single Ovens WARNING WARNING Electrical Shock Hazard Disconnect power before servicing. Connect the 2 red wires (C) together using a UL ...a UL listed wire connector. 3. Tighten screws on conduit connector. 7. Junction box F. Green (or bare) ground wires I D A. Electrically ground oven. Failure to section: 4-wire 4-wire Cable from Home Power Supply 3-wire ½" (1.3 cm) 3-wire Cable from home power supply B. Disconnect power...
Installation Guide
Page 13
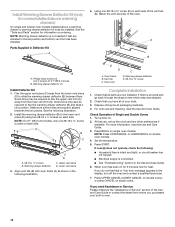
... the "Assistance or Service" section of the Use and Care Guide or contact the dealer from black front trims. ■ Securely fasten the oven to the cabinet using the #8-14 x ¾" screws provided. ■ Insert the screws through hole in the tall position, the bottom vent... B. Please reference the "Assistance or Service" section of the vent tab (B), fasten the vent securely to order part numbers: W10327368 and W10327369 for double ovens. See the following illustration. ■ Install the bottom vent trim (B) to flex the upper vent trim (C) away from the lower vent trim (D)....
... the "Assistance or Service" section of the Use and Care Guide or contact the dealer from black front trims. ■ Securely fasten the oven to the cabinet using the #8-14 x ¾" screws provided. ■ Insert the screws through hole in the tall position, the bottom vent... B. Please reference the "Assistance or Service" section of the vent tab (B), fasten the vent securely to order part numbers: W10327368 and W10327369 for double ovens. See the following illustration. ■ Install the bottom vent trim (B) to flex the upper vent trim (C) away from the lower vent trim (D)....
Installation Guide
Page 14
...Warming drawer deflector E. #8-18 x ³⁄₈" screw Complete Installation 1. Check that you purchased your tools. 3. Press BROIL on double oven models. 4. If you do not feel for 27" (68.6 cm) size B. If you need Assistance or Service: Please reference the ...all parts are properly aligned between them. NOTE: Press UPPER BROIL or LOWER BROIL on single oven models. If oven(s) does not operate, check the following illustration. 2. Press UPPER CANCEL/LOWER CANCEL on double ovens, or press CANCEL on . 2. Install Warming Drawer Deflector Kit (only for information on ...
...Warming drawer deflector E. #8-18 x ³⁄₈" screw Complete Installation 1. Check that you purchased your tools. 3. Press BROIL on double oven models. 4. If you do not feel for 27" (68.6 cm) size B. If you need Assistance or Service: Please reference the ...all parts are properly aligned between them. NOTE: Press UPPER BROIL or LOWER BROIL on single oven models. If oven(s) does not operate, check the following illustration. 2. Press UPPER CANCEL/LOWER CANCEL on double ovens, or press CANCEL on . 2. Install Warming Drawer Deflector Kit (only for information on ...


