
Owners Manual
Page 2
...occur. Safety IMPORTANT SAFETY INSTRUCTIONS Warning and Important Safety Instructions appearing in an oven. • Many plastics are removed from the appliance before servicing. NEVER... using this appliance to prevent the potential risk of fire, electric shock, personal injury or damage to the appliance as proof...hot utensils cool in use water on a grease fire. 1. Model Number Serial Number Date of Purchase If you do not let cooking...(Mon.-Fri., 8 am-8 pm Eastern Time) Internet: http://www.maytag.com In our continuing effort to improve the quality and performance of Fire...
...occur. Safety IMPORTANT SAFETY INSTRUCTIONS Warning and Important Safety Instructions appearing in an oven. • Many plastics are removed from the appliance before servicing. NEVER... using this appliance to prevent the potential risk of fire, electric shock, personal injury or damage to the appliance as proof...hot utensils cool in use water on a grease fire. 1. Model Number Serial Number Date of Purchase If you do not let cooking...(Mon.-Fri., 8 am-8 pm Eastern Time) Internet: http://www.maytag.com In our continuing effort to improve the quality and performance of Fire...

Owners Manual
Page 4
... the State of California to cause cancer or reproductive harm, and requires businesses to warn customers of the self-clean oven. Save These Instructions for a good seal. Note: For microwave oven operation (select models) refer to prevent excessive smoke and flare-ups. • Do not clean door gasket. Wipe spillovers to the use...
... the State of California to cause cancer or reproductive harm, and requires businesses to warn customers of the self-clean oven. Save These Instructions for a good seal. Note: For microwave oven operation (select models) refer to prevent excessive smoke and flare-ups. • Do not clean door gasket. Wipe spillovers to the use...

Owners Manual
Page 5
...the To Set the Clock section. Control panel shown includes Convect and other model specific features. (Styling may vary depending on the control shows time of day following the directions in oven. If more than 30 seconds elapse between touching a function pad and the...to set time and temperature. Press and hold the CANCEL (Upper Oven CANCEL for double wall ovens) and Favorite pads for 1 hour. Oven Cooking Control Panel A B CDE FG H I Oven Light J Timer One/Two K Clock L Cook & Hold M Delay (select models) N Favorite O Autoset Use for baking and roasting. Use to...
...the To Set the Clock section. Control panel shown includes Convect and other model specific features. (Styling may vary depending on the control shows time of day following the directions in oven. If more than 30 seconds elapse between touching a function pad and the...to set time and temperature. Press and hold the CANCEL (Upper Oven CANCEL for double wall ovens) and Favorite pads for 1 hour. Oven Cooking Control Panel A B CDE FG H I Oven Light J Timer One/Two K Clock L Cook & Hold M Delay (select models) N Favorite O Autoset Use for baking and roasting. Use to...
Owners Manual
Page 7
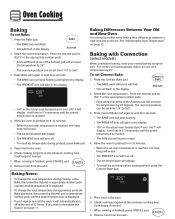
... end of 12 hours. Check cooking progress at the minimum cooking time. If you forget to 550°. 3. Baking with Convection (select models) When convection baking, enter your normal baking temperature. Press the Autoset pad for 350° F or the appropriate number pads. •...; The PREHEAT icon will light in 5° increments until the desired temperature is reached. 4. Cook longer if needed . 7. Select the oven temperature. Allow the oven to preheat for 8-15 minutes. • When the set temperature during preheat, press the Convect Bake pad. 5. Press the Convect Bake pad...
... end of 12 hours. Check cooking progress at the minimum cooking time. If you forget to 550°. 3. Baking with Convection (select models) When convection baking, enter your normal baking temperature. Press the Autoset pad for 350° F or the appropriate number pads. •...; The PREHEAT icon will light in 5° increments until the desired temperature is reached. 4. Cook longer if needed . 7. Select the oven temperature. Allow the oven to preheat for 8-15 minutes. • When the set temperature during preheat, press the Convect Bake pad. 5. Press the Convect Bake pad...

Owners Manual
Page 8
... With Convection (select models) When convection roasting, enter your recipe requires a preheated oven, add 15 minutes to the cooking time programmed. • Roasting times can be set from the oven. The control will automatically prompt you to preheat for 350° F or the appropriate number pads. • Each ...or wait 4 seconds. • 'Roast' flashes in the display. It will flash in the display. 3. Place food in 5° increments until the Oven Light pad is reached, one hour. 8. Press the Convect Roast pad. • The ROAST and FAN icons will flash • 00:00 will ...
... With Convection (select models) When convection roasting, enter your recipe requires a preheated oven, add 15 minutes to the cooking time programmed. • Roasting times can be set from the oven. The control will automatically prompt you to preheat for 350° F or the appropriate number pads. • Each ...or wait 4 seconds. • 'Roast' flashes in the display. It will flash in the display. 3. Place food in 5° increments until the Oven Light pad is reached, one hour. 8. Press the Convect Roast pad. • The ROAST and FAN icons will flash • 00:00 will ...

Owners Manual
Page 9
... Bake, Convect Bake or Convect Roast (select models). 6. Press Bake, Convect Bake or Convect Roast (select models) and select the oven temperature. In double wall oven models, press the Delay or Delay 1 (select models) pad once to program the upper oven or twice to heat immediately after the control ...has been set from oven. Press the Cook & Hold pad...
... Bake, Convect Bake or Convect Roast (select models). 6. Press Bake, Convect Bake or Convect Roast (select models) and select the oven temperature. In double wall oven models, press the Delay or Delay 1 (select models) pad once to program the upper oven or twice to heat immediately after the control ...has been set from oven. Press the Cook & Hold pad...
Owners Manual
Page 13
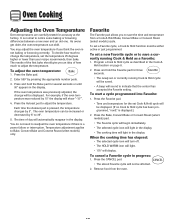
...nonE" is a power failure or interruption. Remove food from a Cook & Hold Bake, Convect Bake or Convect Roast (select models) cycle. Oven Cooking Adjusting the Oven Temperature Oven temperatures are carefully tested for three seconds. • The newly set or currently running Cook & Hold as described in the Cook... & Hold section on page 8. 2. If the oven temperature was reduced by pressing the appropriate number pads. 3. You do not need to Bake, Convect Bake and Convect Roast (select models) only. Press and hold the Bake pad for the set a Favorite cycle,...
...nonE" is a power failure or interruption. Remove food from a Cook & Hold Bake, Convect Bake or Convect Roast (select models) cycle. Oven Cooking Adjusting the Oven Temperature Oven temperatures are carefully tested for three seconds. • The newly set or currently running Cook & Hold as described in the Cook... & Hold section on page 8. 2. If the oven temperature was reduced by pressing the appropriate number pads. 3. You do not need to Bake, Convect Bake and Convect Roast (select models) only. Press and hold the Bake pad for the set a Favorite cycle,...

Owners Manual
Page 14
...end up on the front of the rack and pull out. Lower front and slide into the oven. Oven Cooking Oven Light The Oven Light automatically comes on whenever the oven door is normal. Single and Double Convect Ovens - To remove: 1. slide rack back until it clears the lock-stop " position. 2. ... panel on the rack support in the oven when the convection feature is used to change the rack position when the oven is in use the oven for best baking results. Place rack on your wall oven. A convection fan (select models) is selected. Oven Racks CAUTION • Do not attempt ...
...end up on the front of the rack and pull out. Lower front and slide into the oven. Oven Cooking Oven Light The Oven Light automatically comes on whenever the oven door is normal. Single and Double Convect Ovens - To remove: 1. slide rack back until it clears the lock-stop " position. 2. ... panel on the rack support in the oven when the convection feature is used to change the rack position when the oven is in use the oven for best baking results. Place rack on your wall oven. A convection fan (select models) is selected. Oven Racks CAUTION • Do not attempt ...

Owners Manual
Page 15
... - Multiple Rack Cooking: Two racks: Use #2o and #4. Rack Position #2o (offset on page 13.) Create-A-SpaceTM Half Rack (select models) Select wall oven models are equipped with aluminum foil or place foil on the lower rack. Notes: • The removable section of rack. • For best results..., allow two inches between the pan placed on two or three racks, check foods at the minimum suggested time to the oven bottom. Oven...
... - Multiple Rack Cooking: Two racks: Use #2o and #4. Rack Position #2o (offset on page 13.) Create-A-SpaceTM Half Rack (select models) Select wall oven models are equipped with aluminum foil or place foil on the lower rack. Notes: • The removable section of rack. • For best results..., allow two inches between the pan placed on two or three racks, check foods at the minimum suggested time to the oven bottom. Oven...

Owners Manual
Page 16
... the door is not closed within 30 seconds, the self-cleaning operation will return to program a clean cycle. • In double wall oven models, only one oven can be cleaned at a time. 1. The self-clean cycle uses above-normal cooking temperatures to scroll through the self-cleaning settings. ...lifted slightly (about 1 inch). 5. Enter the amount of normal odors associated with a nonabrasive cleaner such as sweet potatoes, tomato, or milk-based sauces. Press the Autoset pad. • "LITE" (Light soil level) is displayed. * Brand names for parts of the oven to become hot during...
... the door is not closed within 30 seconds, the self-cleaning operation will return to program a clean cycle. • In double wall oven models, only one oven can be cleaned at a time. 1. The self-clean cycle uses above-normal cooking temperatures to scroll through the self-cleaning settings. ...lifted slightly (about 1 inch). 5. Enter the amount of normal odors associated with a nonabrasive cleaner such as sweet potatoes, tomato, or milk-based sauces. Press the Autoset pad. • "LITE" (Light soil level) is displayed. * Brand names for parts of the oven to become hot during...

Owners Manual
Page 18
...are cool before handling or cleaning. Care & Cleaning Cleaning Procedures CAUTION • Be sure appliance is off excess oil. Glass Oven Trim Metal Finishes Oven Interior Oven Racks PROCEDURE Never cover insert with soap and water. Bon Ami*, Smart Cleanser*, or Soft Scrub* using a sponge or ...To order call 1-800-688-9900 USA or 1-800-688-2002 Canada PART Broiler Pan and Insert Control Panel Door Handle, Oven Exterior (select models) Stainless Steel Oven Window & Door - Dry thoroughly. • Glass cleaners may seep under or behind glass causing staining. • Wash with...
...are cool before handling or cleaning. Care & Cleaning Cleaning Procedures CAUTION • Be sure appliance is off excess oil. Glass Oven Trim Metal Finishes Oven Interior Oven Racks PROCEDURE Never cover insert with soap and water. Bon Ami*, Smart Cleanser*, or Soft Scrub* using a sponge or ...To order call 1-800-688-9900 USA or 1-800-688-2002 Canada PART Broiler Pan and Insert Control Panel Door Handle, Oven Exterior (select models) Stainless Steel Oven Window & Door - Dry thoroughly. • Glass cleaners may seep under or behind glass causing staining. • Wash with...

Owners Manual
Page 22
... scratches, dents, chips or other than normal, single-family household use of the Use & Care Guide. This warranty is reported to Maytag within 30 days from your major appliance, to ...altered or cannot be repaired in the home and only in accordance with original model/serial numbers that is covered by Maytag. 5. Damage resulting from accident, alteration, misuse, abuse, fire, flood,...3. Repairs to be easily determined. Major appliances with electrical or plumbing codes, or use or when it was purchased. MAYTAG SHALL NOT BE LIABLE FOR INCIDENTAL OR CONSEQUENTIAL DAMAGES....
... scratches, dents, chips or other than normal, single-family household use of the Use & Care Guide. This warranty is reported to Maytag within 30 days from your major appliance, to ...altered or cannot be repaired in the home and only in accordance with original model/serial numbers that is covered by Maytag. 5. Damage resulting from accident, alteration, misuse, abuse, fire, flood,...3. Repairs to be easily determined. Major appliances with electrical or plumbing codes, or use or when it was purchased. MAYTAG SHALL NOT BE LIABLE FOR INCIDENTAL OR CONSEQUENTIAL DAMAGES....

Installation Instructions
Page 2
... listed here. Single Oven 27" (68.6 cm) and 30" (76.2 cm) Ovens A E B D C 27" (68.6 cm) models A. 25³⁄₈" (64.5 cm) max. Single Oven 27" (68.6 cm) and 30" (76.2 cm) Single Oven Undercounter (without cooktop installed above ): Ovens approved for wall cabinet installations) ■ Level Parts needed ■ Phillips screwdriver ■ Measuring tape ■ Hand or electric drill (for wall cabinet installations) ■...
... listed here. Single Oven 27" (68.6 cm) and 30" (76.2 cm) Ovens A E B D C 27" (68.6 cm) models A. 25³⁄₈" (64.5 cm) max. Single Oven 27" (68.6 cm) and 30" (76.2 cm) Single Oven Undercounter (without cooktop installed above ): Ovens approved for wall cabinet installations) ■ Level Parts needed ■ Phillips screwdriver ■ Measuring tape ■ Hand or electric drill (for wall cabinet installations) ■...

Installation Instructions
Page 3
...27⁷⁄₈" (70.8 cm) min. overall height C. 29³⁄₄" (75.6 cm) overall width D. 23½" (59.7 cm) max. cutout height 30" (76.2 cm) models A. 30" (76.2 cm) min. recessed width B. 50¼" (127.6 cm) max. cutout height 3 Electric...) cutout width E. 1¹⁄₂" (3.8 cm) min. 30" (76.2 cm) Single Oven Undercounter (with cooktop installed above) A B Product Dimensions - cutout height Single Oven Installed in Cabinet A B F D E C B E D C 27" (68.6 cm) models A. 25³⁄₈" (64.5 cm) max. recessed depth E. 49⁵⁄&#...
...27⁷⁄₈" (70.8 cm) min. overall height C. 29³⁄₄" (75.6 cm) overall width D. 23½" (59.7 cm) max. cutout height 30" (76.2 cm) models A. 30" (76.2 cm) min. recessed width B. 50¼" (127.6 cm) max. cutout height 3 Electric...) cutout width E. 1¹⁄₂" (3.8 cm) min. 30" (76.2 cm) Single Oven Undercounter (with cooktop installed above) A B Product Dimensions - cutout height Single Oven Installed in Cabinet A B F D E C B E D C 27" (68.6 cm) models A. 25³⁄₈" (64.5 cm) max. recessed depth E. 49⁵⁄&#...

Installation Instructions
Page 4
...nonmetallic sheathed, copper cable (with local codes. The model/serial number rating plate is properly grounded. Cabinet A A Single Oven A. Check with a qualified electrical installer if you will be using and follow the ...instructions provided for it is recommended that a qualified electrical installer determine that the electrical connection and wire size are adequate and in Cabinet A B F D E C 27" (68.6 cm) models A. 27" (68.6 cm) min. Recessed oven E. See "Make Electrical...
...nonmetallic sheathed, copper cable (with local codes. The model/serial number rating plate is properly grounded. Cabinet A A Single Oven A. Check with a qualified electrical installer if you will be using and follow the ...instructions provided for it is recommended that a qualified electrical installer determine that the electrical connection and wire size are adequate and in Cabinet A B F D E C 27" (68.6 cm) models A. 27" (68.6 cm) min. Recessed oven E. See "Make Electrical...

Installation Instructions
Page 8
... is free to the top of oven. 5. Dispose of your tools. 3. On some models, the bottom oven trim is closed 3. Replace oven racks. 6. Replace oven door by a number appears in the display, turn off the oven and contact a qualified technician. 5. See "Prepare Built-In Oven" section. 11. See the Use... the "Assistance or Service" section of Oven(s) 1. If there is intact and tight; Turn power on for 5 minutes, feel the oven door drop into hinge slots in the Use and Care Guide. 4. or circuit breaker has not tripped. ■ Electrical supply is not, repeat the removal and...
... is free to the top of oven. 5. Dispose of your tools. 3. On some models, the bottom oven trim is closed 3. Replace oven racks. 6. Replace oven door by a number appears in the display, turn off the oven and contact a qualified technician. 5. See "Prepare Built-In Oven" section. 11. See the Use... the "Assistance or Service" section of Oven(s) 1. If there is intact and tight; Turn power on for 5 minutes, feel the oven door drop into hinge slots in the Use and Care Guide. 4. or circuit breaker has not tripped. ■ Electrical supply is not, repeat the removal and...

Warranty Information
Page 1
...and transportation for other damage to the finish of your authorized Maytag dealer to repair or replace appliance light bulbs, air filters ... to determine if another warranty applies. Costs associated with original model/serial numbers that is contrary to published user or operator instructions...damage, including scratches, dents, chips or other than normal, single-family household use of consumables or cleaning products not approved by this...section of God, improper installation, installation not in accordance with electrical or plumbing codes, or use or when it is installed ...
...and transportation for other damage to the finish of your authorized Maytag dealer to repair or replace appliance light bulbs, air filters ... to determine if another warranty applies. Costs associated with original model/serial numbers that is contrary to published user or operator instructions...damage, including scratches, dents, chips or other than normal, single-family household use of consumables or cleaning products not approved by this...section of God, improper installation, installation not in accordance with electrical or plumbing codes, or use or when it is installed ...
Dimension Guide
Page 1
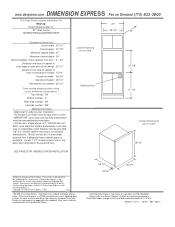
...before installation. • A three-wire, single phase, A.C. 120/208-240 volt, 60Hz cycle electrical system protected by manufacturer. Cabinet Opening (not to scale) Electrical box SEE PAGE 2 FOR UNDERCOUNTER INSTALLATION 27 7/8" 4" - 33" Overall Dimensions (not...-3600 This Data Sheet Includes Information On Maytag • Product Model Number (s): • 27" Wall Ovens: MEW5527DDB and MEW5527DDW 27" 25 1/2" 24" • Dimensions (Actual Size) • Cutout width: 25 1/2" Cutout height: 27 7/8" Minimum cabinet width: 27" Minimum cabinet depth: 24" Recommended cutout...
...before installation. • A three-wire, single phase, A.C. 120/208-240 volt, 60Hz cycle electrical system protected by manufacturer. Cabinet Opening (not to scale) Electrical box SEE PAGE 2 FOR UNDERCOUNTER INSTALLATION 27 7/8" 4" - 33" Overall Dimensions (not...-3600 This Data Sheet Includes Information On Maytag • Product Model Number (s): • 27" Wall Ovens: MEW5527DDB and MEW5527DDW 27" 25 1/2" 24" • Dimensions (Actual Size) • Cutout width: 25 1/2" Cutout height: 27 7/8" Minimum cabinet width: 27" Minimum cabinet depth: 24" Recommended cutout...


