
Owners Manual
Page 2
... in use water on the appliance door to heat. Keep sales receipt and/or canceled check as a result of improper usage of the unit. Model Number Serial Number Date of Purchase If you do not let cooking grease or other parts of the appliance. Hazards or unsafe practices which COULD result in this guide are removed from the appliance before operating it...
... in use water on the appliance door to heat. Keep sales receipt and/or canceled check as a result of improper usage of the unit. Model Number Serial Number Date of Purchase If you do not let cooking grease or other parts of the appliance. Hazards or unsafe practices which COULD result in this guide are removed from the appliance before operating it...

Owners Manual
Page 3
... air or steam escape before removing bulb to avoid electrical shock. • A fan should be contaminated. • Do not allow aluminum foil or meat probe to contact heating element. • Always turn off all broil and cleaning operations. Utensil Safety • Follow the manufacturer's directions when using oven cooking bags. • This appliance has been tested for safe performance using glass. Pressure build-up may be used as a storage area for oven service...
... air or steam escape before removing bulb to avoid electrical shock. • A fan should be contaminated. • Do not allow aluminum foil or meat probe to contact heating element. • Always turn off all broil and cleaning operations. Utensil Safety • Follow the manufacturer's directions when using oven cooking bags. • This appliance has been tested for safe performance using glass. Pressure build-up may be used as a storage area for oven service...

Owners Manual
Page 5
... display window on model.) A Bake B Broil C Convect Bake (select models) D Keep Warm E Convect Roast (select models) F Clean G CANCEL H Number Pads I J KL M N O The control panel is designed for ease in the To Set the Clock section. Control panel shown includes Convect and other model specific features. (Styling may vary depending on the control shows time of day following the directions in programming. Use to select 24 Hr; Sets the Clock. Press the Autoset pat to turn the upper or lower oven light...
... display window on model.) A Bake B Broil C Convect Bake (select models) D Keep Warm E Convect Roast (select models) F Clean G CANCEL H Number Pads I J KL M N O The control panel is designed for ease in the To Set the Clock section. Control panel shown includes Convect and other model specific features. (Styling may vary depending on the control shows time of day following the directions in programming. Use to select 24 Hr; Sets the Clock. Press the Autoset pat to turn the upper or lower oven light...

Owners Manual
Page 6
... 59 seconds (99:59). When electrical power is currently in the display. 2. The time of any touchpad. Fault Codes The BAKE or LOCK icon may flash rapidly in the display. 2. Press the Timer pad. • 00:00 and TIMER icon flash in use . To lock: 1. To recall the time of day. Clock time cannot be locked if the oven temperature is showing, press the Clock pad. At the end of day...
... 59 seconds (99:59). When electrical power is currently in the display. 2. The time of any touchpad. Fault Codes The BAKE or LOCK icon may flash rapidly in the display. 2. Press the Timer pad. • 00:00 and TIMER icon flash in use . To lock: 1. To recall the time of day. Clock time cannot be locked if the oven temperature is showing, press the Clock pad. At the end of day...

Owners Manual
Page 8
Press the Convect Roast pad. • The ROAST and FAN icons will flash • 00:00 will start to recall the cook time remaining. • At the end of the set time. Enter the roasting time using the number pads. • Time can vary with different cuts of meat. Place food in the display. It will rise in 5° increments until the Oven Light pad is reached. • The FAN icon will...
Press the Convect Roast pad. • The ROAST and FAN icons will flash • 00:00 will start to recall the cook time remaining. • At the end of the set time. Enter the roasting time using the number pads. • Time can vary with different cuts of meat. Place food in the display. It will rise in 5° increments until the Oven Light pad is reached. • The FAN icon will...

Owners Manual
Page 9
... Bake, Convect Bake or Convect Roast (select models). 6. Oven Cooking Cook & Hold When using the Cook & Hold option, the oven begins to heat immediately after the control has been set from 170° F to 550° F. 4. After one hour in the display. • The actual oven temperature will display when the oven is preheated. When using the number pads. • The HOLD icon continues to flash. • The time will light in the day. In double wall oven models...
... Bake, Convect Bake or Convect Roast (select models). 6. Oven Cooking Cook & Hold When using the Cook & Hold option, the oven begins to heat immediately after the control has been set from 170° F to 550° F. 4. After one hour in the display. • The actual oven temperature will display when the oven is preheated. When using the number pads. • The HOLD icon continues to flash. • The time will light in the day. In double wall oven models...

Owners Manual
Page 10
...; Food should be turned halfway through cooking. 7. The times may be longer when the lower broiling temperature is used . TIME SECOND SIDE 7 minutes 8 minutes 3-4 minutes 4-5 minutes 5-6 minutes 9-10 minutes 2-3 minutes LO Broil 9-11 minutes (no turning) Turn meat once about four inches (the first stop). 6. Broiling Chart FOODS RACK POSITION* APPROX. Place food in the display. After four seconds, the oven will start. • The BROIL icon will remain...
...; Food should be turned halfway through cooking. 7. The times may be longer when the lower broiling temperature is used . TIME SECOND SIDE 7 minutes 8 minutes 3-4 minutes 4-5 minutes 5-6 minutes 9-10 minutes 2-3 minutes LO Broil 9-11 minutes (no turning) Turn meat once about four inches (the first stop). 6. Broiling Chart FOODS RACK POSITION* APPROX. Place food in the display. After four seconds, the oven will start. • The BROIL icon will remain...

Owners Manual
Page 12
...-hour time limit is reached. • The BAKE icon will also be displayed if a bake cycle is in use while the oven is started . • When the Sabbath Mode is in Sabbath Mode. • All keys are inactive except CANCEL and Clock. No preheat beep will sound. • The self-clean cycle and automatic door lock do not operate during the Sabbath Mode, however a Delay Cook & Hold is set temperature, rather than the actual oven cavity temperature.
...-hour time limit is reached. • The BAKE icon will also be displayed if a bake cycle is in use while the oven is started . • When the Sabbath Mode is in Sabbath Mode. • All keys are inactive except CANCEL and Clock. No preheat beep will sound. • The self-clean cycle and automatic door lock do not operate during the Sabbath Mode, however a Delay Cook & Hold is set temperature, rather than the actual oven cavity temperature.

Owners Manual
Page 14
... to change the rack position when the oven is in the oven. 2. Rack Position #3: Most baked goods on the control panel cool. Single and Double Non-Convect Ovens - Rack Position #4o (offset rack on whenever the oven door is used to the "stop position. 3. Oven Cooking Oven Light The Oven Light automatically comes on #4): Most broiling. Place rack on your wall oven. This is opened . Single and Double Convect Ovens - Pull forward to circulate hot air in the oven when the convection feature is pressed. Oven Vent The oven vent...
... to change the rack position when the oven is in the oven. 2. Rack Position #3: Most baked goods on the control panel cool. Single and Double Non-Convect Ovens - Rack Position #4o (offset rack on whenever the oven door is used to the "stop position. 3. Oven Cooking Oven Light The Oven Light automatically comes on #4): Most broiling. Place rack on your wall oven. This is opened . Single and Double Convect Ovens - Pull forward to circulate hot air in the oven when the convection feature is pressed. Oven Vent The oven vent...

Owners Manual
Page 15
... #2: Roasting small cuts of meat, cakes in the broiling pan. The left side of meat and turkey, custard pie, dessert souffle. Rack Position #1: Large cuts of the rack can be used as an "o" after the rack position number. • When baking on two or three racks, check foods at the minimum suggested time to accommodate a large roaster on page 13.) Create-A-SpaceTM Half Rack (select models) Select wall oven models...
... #2: Roasting small cuts of meat, cakes in the broiling pan. The left side of meat and turkey, custard pie, dessert souffle. Rack Position #1: Large cuts of the rack can be used as an "o" after the rack position number. • When baking on two or three racks, check foods at the minimum suggested time to accommodate a large roaster on page 13.) Create-A-SpaceTM Half Rack (select models) Select wall oven models...

Owners Manual
Page 16
... heat during the clean cycle. 4. After four seconds, the oven will return to the time of soil to delay the cycle using the appropriate number pads. 3. Press the Autoset pad. • "LITE" (Light soil level) is not closed , beeps will sound and 'door' will flash in the display. 3. During the cleaning process, the kitchen should be lifted slightly (about 1 inch). 5. Before Self-Cleaning 1. Remove broiler pan, all pans, and oven racks from baking...
... heat during the clean cycle. 4. After four seconds, the oven will return to the time of soil to delay the cycle using the appropriate number pads. 3. Press the Autoset pad. • "LITE" (Light soil level) is not closed , beeps will sound and 'door' will flash in the display. 3. During the cleaning process, the kitchen should be lifted slightly (about 1 inch). 5. Before Self-Cleaning 1. Remove broiler pan, all pans, and oven racks from baking...

Owners Manual
Page 20
.../or lights operate but oven does not heat. • Oven may be set . (See page 5.) Oven light and/or clock does not function. • The light bulb is loose or defective. • The oven light does not work during self-cleaning process. • Oven may be in Sabbath Mode. (See page 11.) • Oven may need longer cleaning time. • Excessive spills were not removed prior to self-cleaning process. Use a self-clean cycle. Oven will not unlock. • Oven may not...
.../or lights operate but oven does not heat. • Oven may be set . (See page 5.) Oven light and/or clock does not function. • The light bulb is loose or defective. • The oven light does not work during self-cleaning process. • Oven may be in Sabbath Mode. (See page 11.) • Oven may need longer cleaning time. • Excessive spills were not removed prior to self-cleaning process. Use a self-clean cycle. Oven will not unlock. • Oven may not...

Owners Manual
Page 21
... a fault code during broiling, cleaning and some baking operations. • This is the cooling fan and is normal. If the icon flashing still continues, disconnect power to alert you may differ between old and new ovens. There are no beeps and no display. • Oven may be in Sabbath Mode. (See page 11.) Noises may be sufficient room around sides of the pans for preheating, rack position and oven temperature...
... a fault code during broiling, cleaning and some baking operations. • This is the cooling fan and is normal. If the icon flashing still continues, disconnect power to alert you may differ between old and new ovens. There are no beeps and no display. • Oven may be in Sabbath Mode. (See page 11.) Noises may be sufficient room around sides of the pans for preheating, rack position and oven temperature...

Owners Manual
Page 22
... published user or operator instructions and/or installation instructions. 4. The removal and reinstallation of your major appliance if it is void if the factory applied serial number has been altered or removed from your major appliance is contrary to the appliance. 9. Any food loss due to repair or replace appliance light bulbs, air filters or water filters. Major appliances with electrical or plumbing codes, or use of consumables or cleaning products...
... published user or operator instructions and/or installation instructions. 4. The removal and reinstallation of your major appliance if it is void if the factory applied serial number has been altered or removed from your major appliance is contrary to the appliance. 9. Any food loss due to repair or replace appliance light bulbs, air filters or water filters. Major appliances with electrical or plumbing codes, or use of consumables or cleaning products...

Installation Instructions
Page 1
... how to potential hazards that can kill or hurt you don't follow instructions. SIMPLE ET DOUBLE Table of Contents/Table des matières IBUILT-IN OVEN SAFETY 1 NSTALLATION REQUIREMENTS 2 Tools and Parts 2 Location Requirements 2 Electrical Requirements 4 INSTALLATION INSTRUCTIONS 5 Prepare Built-In Oven 5 Make Electrical Connection 6 Install Oven 7 Complete Installation 8 SÉCURITÉ DU FOUR ENCASTR 9 EXIGENCES D'INSTALLATION 9 Outillage et composants 9 Exigences d'emplacement 9 Spécifications électriques 12...
... how to potential hazards that can kill or hurt you don't follow instructions. SIMPLE ET DOUBLE Table of Contents/Table des matières IBUILT-IN OVEN SAFETY 1 NSTALLATION REQUIREMENTS 2 Tools and Parts 2 Location Requirements 2 Electrical Requirements 4 INSTALLATION INSTRUCTIONS 5 Prepare Built-In Oven 5 Make Electrical Connection 6 Install Oven 7 Complete Installation 8 SÉCURITÉ DU FOUR ENCASTR 9 EXIGENCES D'INSTALLATION 9 Outillage et composants 9 Exigences d'emplacement 9 Spécifications électriques 12...

Installation Instructions
Page 4
... oven depth C. Double or Single Oven Electrical Requirements If codes permit and a separate ground wire is used, it here. ■ Oven must be connected to the circuit breaker box (or fused disconnect) through flexible, armored or nonmetallic sheathed, copper cable (with local codes. Be sure that the ground path and the wire gauge are adequate and in accordance with grounding wire). A copy of cabinet door F. 50.0" (127.0 cm) min. The model/serial number rating plate...
... oven depth C. Double or Single Oven Electrical Requirements If codes permit and a separate ground wire is used, it here. ■ Oven must be connected to the circuit breaker box (or fused disconnect) through flexible, armored or nonmetallic sheathed, copper cable (with local codes. Be sure that the ground path and the wire gauge are adequate and in accordance with grounding wire). A copy of cabinet door F. 50.0" (127.0 cm) min. The model/serial number rating plate...

Installation Instructions
Page 5
... frame or trim for lifting. 3. Connect a section of the oven door. 3. INSTALLATION INSTRUCTIONS Prepare Built-In Oven 1. To avoid floor damage, set aside racks and other injury. C A. Decide on a covered surface. 5 IMPORTANT: Use both hands and close to installation. Using a Phillips screwdriver, remove the screw and door hinge cover plate above each door latch slot in both corners of solid copper wire to the full open position. Remove the hardware package from inside the bag...
... frame or trim for lifting. 3. Connect a section of the oven door. 3. INSTALLATION INSTRUCTIONS Prepare Built-In Oven 1. To avoid floor damage, set aside racks and other injury. C A. Decide on a covered surface. 5 IMPORTANT: Use both hands and close to installation. Using a Phillips screwdriver, remove the screw and door hinge cover plate above each door latch slot in both corners of solid copper wire to the full open position. Remove the hardware package from inside the bag...

Installation Instructions
Page 6
... Home Power Supply 3-wire ½" (1.3 cm) 3-wire Cable from the oven to the junction box. Black wires C. Install junction box cover. 6 Junction box F. Tighten screws on conduit connector. 7. Cable from the oven through a UL listed or CSA approved conduit connector. 6. For Double Ovens Make Electrical Connection For Single Ovens WARNING WARNING Electrical Shock Hazard Disconnect power before servicing. Use 12 gauge solid copper wire. This oven is present. 4. Connect the 2 red wires (C) together using a UL listed wire connector. 6. Electrically ground oven...
... Home Power Supply 3-wire ½" (1.3 cm) 3-wire Cable from the oven to the junction box. Black wires C. Install junction box cover. 6 Junction box F. Tighten screws on conduit connector. 7. Cable from the oven through a UL listed or CSA approved conduit connector. 6. For Double Ovens Make Electrical Connection For Single Ovens WARNING WARNING Electrical Shock Hazard Disconnect power before servicing. Use 12 gauge solid copper wire. This oven is present. 4. Connect the 2 red wires (C) together using a UL listed wire connector. 6. Electrically ground oven...

Installation Instructions
Page 8
... Use and Care Guide. 4. Using a Phillips screwdriver, reinstall the hinge cover plate with a screw on . If it is connected. ■ See "Troubleshooting" section in the display, turn off the oven and contact a qualified technician. 5. Check that the oven door(s) is intact and tight; Dispose of Oven(s) 1. Check Operation of /recycle all parts are now installed. The time should feel the oven door drop into hinge slots in the display. 2. Turn on for 5 minutes, feel heat...
... Use and Care Guide. 4. Using a Phillips screwdriver, reinstall the hinge cover plate with a screw on . If it is connected. ■ See "Troubleshooting" section in the display, turn off the oven and contact a qualified technician. 5. Check that the oven door(s) is intact and tight; Dispose of Oven(s) 1. Check Operation of /recycle all parts are now installed. The time should feel the oven door drop into hinge slots in the display. 2. Turn on for 5 minutes, feel heat...
Dimension Guide
Page 1
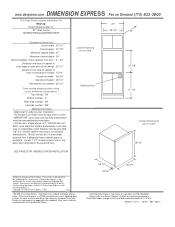
... to change on Demand (775) 833-3600 This Data Sheet Includes Information On Maytag • Product Model Number (s): • 27" Wall Ovens: MEW5527DDB and MEW5527DDW 27" 25 1/2" 24" • Dimensions (Actual Size) • Cutout width: 25 1/2" Cutout height: 27 7/8" Minimum cabinet width: 27" Minimum cabinet depth: 24" Recommended cutout location from floor : 4" - 33" Distance from face of cabinet to outer edge of open door (Door swing): 20 1/2" Distance from face of cabinet to front of closed door handle: 15...
... to change on Demand (775) 833-3600 This Data Sheet Includes Information On Maytag • Product Model Number (s): • 27" Wall Ovens: MEW5527DDB and MEW5527DDW 27" 25 1/2" 24" • Dimensions (Actual Size) • Cutout width: 25 1/2" Cutout height: 27 7/8" Minimum cabinet width: 27" Minimum cabinet depth: 24" Recommended cutout location from floor : 4" - 33" Distance from face of cabinet to outer edge of open door (Door swing): 20 1/2" Distance from face of cabinet to front of closed door handle: 15...


