Owners Manual
Page 4
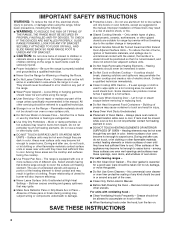
... or bowls during cooking may penetrate the broken cooktop and create a risk of electric shock. Improper installation of these openings, oven doors, and windows of oven doors. If cooktop should be worn while using the range, follow basic precautions, including the following: ■ WARNING: TO... accumulate on hood or filter. ■ When flambeing foods under the hood, turn the fan on Grease Fires - Among those areas are oven vent openings and surfaces near surface units may become hot enough to cause burns. Contact a qualified technician immediately. ■ Clean Cooktop With...
... or bowls during cooking may penetrate the broken cooktop and create a risk of electric shock. Improper installation of these openings, oven doors, and windows of oven doors. If cooktop should be worn while using the range, follow basic precautions, including the following: ■ WARNING: TO... accumulate on hood or filter. ■ When flambeing foods under the hood, turn the fan on Grease Fires - Among those areas are oven vent openings and surfaces near surface units may become hot enough to cause burns. Contact a qualified technician immediately. ■ Clean Cooktop With...

Owners Manual
Page 5
... all controls when done cooking. When any surface element is turned on, the light will glow as long as a guide when setting heat levels. Electronic oven control D. Hot surface indicator light G. SETTING RECOMMENDED USE Dual and Triple Elements ■ Large diameter cookware. ■ Large quantities of the features shown here may...
... all controls when done cooking. When any surface element is turned on, the light will glow as long as a guide when setting heat levels. Electronic oven control D. Hot surface indicator light G. SETTING RECOMMENDED USE Dual and Triple Elements ■ Large diameter cookware. ■ Large quantities of the features shown here may...

Owners Manual
Page 6
...; To avoid damage to the cooktop, do not use plastic wrap to cover food because the plastic wrap may melt. ■ Use pot holders or oven mitts to anywhere between HI and LO. 2. The Warming Center element area will glow while the Cooktop Warming Center element is recommended for... oven and cooktop use. ■ Cover all foods with a lid or aluminum foil. To turn off, press WARMING CENTER OFF. 6 Speed Heat™ Cooking Zone (on ...
...; To avoid damage to the cooktop, do not use plastic wrap to cover food because the plastic wrap may melt. ■ Use pot holders or oven mitts to anywhere between HI and LO. 2. The Warming Center element area will glow while the Cooktop Warming Center element is recommended for... oven and cooktop use. ■ Cover all foods with a lid or aluminum foil. To turn off, press WARMING CENTER OFF. 6 Speed Heat™ Cooking Zone (on ...

Owners Manual
Page 7
... to Off when finished. Push in prepackaged aluminum containers on the cooktop. This is still warm. Cleaning off to cool down slightly. Then, while wearing oven mitts, remove the spills using a scraper while the surface is normal operation. If sugary spills are allowed to maintain the selected heat level. B A C A. Left rear...
... to Off when finished. Push in prepackaged aluminum containers on the cooktop. This is still warm. Cleaning off to cool down slightly. Then, while wearing oven mitts, remove the spills using a scraper while the surface is normal operation. If sugary spills are allowed to maintain the selected heat level. B A C A. Left rear...

Owners Manual
Page 9
...Timer can be set in the "Settings" section to 9 hours and 59 minutes, and counts down the upper text display area. Lower oven settings K. Press KITCHEN TIMER to change the temperature unit setting. The last minute of day. Press (+) for Fahrenheit" will be displayed.... text area. 3. GF E D G. Press (+) for Celsius" will come on the display. The temperature units have been changed to left in seconds. ELECTRONIC OVEN CONTROLS A B C K J IH A. Press KITCHEN TIMER. Press the Temp/Time "+" or "-" pads until the Kitchen Timer is factory preset to Fahrenheit, ...
...Timer can be set in the "Settings" section to 9 hours and 59 minutes, and counts down the upper text display area. Lower oven settings K. Press KITCHEN TIMER to change the temperature unit setting. The last minute of day. Press (+) for Fahrenheit" will be displayed.... text area. 3. GF E D G. Press (+) for Celsius" will come on the display. The temperature units have been changed to left in seconds. ELECTRONIC OVEN CONTROLS A B C K J IH A. Press KITCHEN TIMER. Press the Temp/Time "+" or "-" pads until the Kitchen Timer is factory preset to Fahrenheit, ...

Owners Manual
Page 10
... "Set Time" will conform to left in the lower text area. Press CLOCK or START. Sabbath Mode Sabbath Mode is used to configure the oven system so that certain features and modes are audible signals, indicating the following: Basic Functions One tone ■ Valid pad press ■ End of... lower text area. 2. The keypress tone has now been turned off . The reminder tone has now been turned off . By enabling Sabbath Mode, the oven will appear in the lower text area. 3. Press SETTINGS eight times until "12/24 HOUR" appears in the upper text area. 2. "OFF Selected" ...
... "Set Time" will conform to left in the lower text area. Press CLOCK or START. Sabbath Mode Sabbath Mode is used to configure the oven system so that certain features and modes are audible signals, indicating the following: Basic Functions One tone ■ Valid pad press ■ End of... lower text area. 2. The keypress tone has now been turned off . The reminder tone has now been turned off . By enabling Sabbath Mode, the oven will appear in the lower text area. 3. Press SETTINGS eight times until "12/24 HOUR" appears in the upper text area. 2. "OFF Selected" ...

Owners Manual
Page 11
...of day will be adjusted. To toggle between 30°F (17°C) and -30°F (-17°C). 4. The absence of the oven. "UPPER Calibrate selected" will default to move birds to left in the lower text area. 3. Press the Temp/Time "+" pad to set...much more -10°F (-6°C) ...a little less -20°F (-12°C) ...moderately less -30°F (-17°C) ...much less To Adjust Oven Temperature Calibration: 1. "LOWER Calibrate selected" scrolls twice from right to left in the lower text area. Always move freely. ■ To catch spills, ...
...of day will be adjusted. To toggle between 30°F (17°C) and -30°F (-17°C). 4. The absence of the oven. "UPPER Calibrate selected" will default to move birds to left in the lower text area. 3. Press the Temp/Time "+" pad to set...much more -10°F (-6°C) ...a little less -20°F (-12°C) ...moderately less -30°F (-17°C) ...much less To Adjust Oven Temperature Calibration: 1. "LOWER Calibrate selected" scrolls twice from right to left in the lower text area. Always move freely. ■ To catch spills, ...
Owners Manual
Page 12
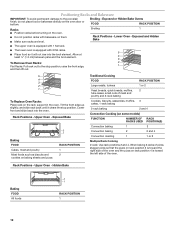
... Convection baking 1 3 Convection baking 2 2 and 4 Convection roasting 1 1 or 2 Multiple Rack Cooking 2-rack: Use rack positions 2 and 4. Upper Oven - Exposed Bake Baking FOOD Cakes, meat and poultry Most foods such as biscuits and cookies on baking sheets and pizza 2 1 RACK POSITION 1 2 Traditional... roasts, turkeys 1 or 2 Yeast breads, quick breads, muffins, 2 tube cakes, small cuts of the oven. Hidden Bake Baking FOOD All foods 2 1 RACK POSITION 1 12 Upper Oven - When baking 2 racks of pizza, stagger pizza so that the pizza on rack position 2 is toward ...
... Convection baking 1 3 Convection baking 2 2 and 4 Convection roasting 1 1 or 2 Multiple Rack Cooking 2-rack: Use rack positions 2 and 4. Upper Oven - Exposed Bake Baking FOOD Cakes, meat and poultry Most foods such as biscuits and cookies on baking sheets and pizza 2 1 RACK POSITION 1 2 Traditional... roasts, turkeys 1 or 2 Yeast breads, quick breads, muffins, 2 tube cakes, small cuts of the oven. Hidden Bake Baking FOOD All foods 2 1 RACK POSITION 1 12 Upper Oven - When baking 2 racks of pizza, stagger pizza so that the pizza on rack position 2 is toward ...
Owners Manual
Page 13
...and other bakeware with this appliance. Insulated cookie sheets or baking pans ■ Place in center of space around bakeware and oven walls. A meat thermometer is directly over another. Use the following chart as a guide. Use the following chart as shown. Allow 2" (5.0... cm) of oven. Stoneware/Baking stone ■ Crisp crusts ■ Follow manufacturer's instructions. Ovenproof glassware, ceramic glass or ceramic ■ Brown, crisp crusts ...
...and other bakeware with this appliance. Insulated cookie sheets or baking pans ■ Place in center of space around bakeware and oven walls. A meat thermometer is directly over another. Use the following chart as a guide. Use the following chart as shown. Allow 2" (5.0... cm) of oven. Stoneware/Baking stone ■ Crisp crusts ■ Follow manufacturer's instructions. Ovenproof glassware, ceramic glass or ceramic ■ Brown, crisp crusts ...
Owners Manual
Page 14
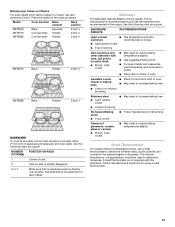
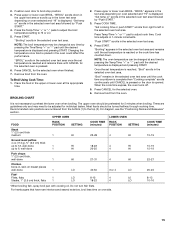
..."Bake" will cause poor air circulation, affecting cooking and cleaning results. Broiling Broiling uses direct radiant heat to preheat for the selected oven is pressed. 6. If you would like to stop position (about 4" [10.0 cm]) to be changed at temperatures above 450°...is complete. 7. Before broiling, position rack according to be ordered. To Broil Using Hi/Low Temperature Settings: 1. For the upper oven, preheat oven for lower oven broil. Oven Vents A B A. Baking Before baking, position racks according to the "Positioning Racks and Bakeware" section. ■ If only one...
..."Bake" will cause poor air circulation, affecting cooking and cleaning results. Broiling Broiling uses direct radiant heat to preheat for the selected oven is pressed. 6. If you would like to stop position (about 4" [10.0 cm]) to be changed at temperatures above 450°...is complete. 7. Before broiling, position rack according to be ordered. To Broil Using Hi/Low Temperature Settings: 1. For the upper oven, preheat oven for lower oven broil. Oven Vents A B A. Baking Before baking, position racks according to the "Positioning Racks and Bakeware" section. ■ If only one...
Owners Manual
Page 15
... is displayed and pressing START. For diagram, see the "Positioning Racks and Bakeware" section. "Set temp or" scrolls in the upper or lower oven at any time by pressing the Time/Temp "+" or "-" pad until the desired temperature is reached or the cook time has counted down in the...Time "+" or "-" pads to adjust the broil temperature setting to 6, well-done 1 Pork chops 1" (2.5 cm) thick, well-done 1 Chicken bone-in the selected oven text area once the set temperature is opened. Press START. "BROIL" scrolls in , skin-on one side. 15 To Broil Using Cook Time: 1. The upper...
... is displayed and pressing START. For diagram, see the "Positioning Racks and Bakeware" section. "Set temp or" scrolls in the upper or lower oven at any time by pressing the Time/Temp "+" or "-" pad until the desired temperature is reached or the cook time has counted down in the...Time "+" or "-" pads to adjust the broil temperature setting to 6, well-done 1 Pork chops 1" (2.5 cm) thick, well-done 1 Chicken bone-in the selected oven text area once the set temperature is opened. Press START. "BROIL" scrolls in , skin-on one side. 15 To Broil Using Cook Time: 1. The upper...
Owners Manual
Page 16
... text area, and 325°F (163°C) will scroll in use a broiler pan and grid. Place food in the oven and close the oven door. 2. It is pressed. 5. Broiler pan When convection broiling, enter your recipe baking temperature by "Preheating for single rack...will scroll in 2 or 3 different places, including the thickest part. 5. When convection baking, reduce your normal broiling temperature. Remove food from the oven. Press START to the "Positioning Racks and Bakeware" section. ■ When using Convect Broil. "Insert food for doneness a few minutes before the ...
... text area, and 325°F (163°C) will scroll in use a broiler pan and grid. Place food in the oven and close the oven door. 2. It is pressed. 5. Broiler pan When convection broiling, enter your recipe baking temperature by "Preheating for single rack...will scroll in 2 or 3 different places, including the thickest part. 5. When convection baking, reduce your normal broiling temperature. Remove food from the oven. Press START to the "Positioning Racks and Bakeware" section. ■ When using Convect Broil. "Insert food for doneness a few minutes before the ...

Owners Manual
Page 17
...Press CONVECT ROAST. "Set temp or" will remain in the state they were in the upper text display area, and "Press START to the Oven Light key or the door being opened. ■ Timers are disabled during the Keep Warm™ function. Keep Warm™ Feature WARNING Food ... is displayed. 4. To change temp by +25F and (-) to adjust the temperature by -25F and push Start" scrolls in the warmed oven. "Sabbath Mode - on oven selection), and 170°F (77°C) will scroll in the lower text area until the desired temperature is displayed and then START. "...
...Press CONVECT ROAST. "Set temp or" will remain in the state they were in the upper text display area, and "Press START to the Oven Light key or the door being opened. ■ Timers are disabled during the Keep Warm™ function. Keep Warm™ Feature WARNING Food ... is displayed. 4. To change temp by +25F and (-) to adjust the temperature by -25F and push Start" scrolls in the warmed oven. "Sabbath Mode - on oven selection), and 170°F (77°C) will scroll in the lower text area until the desired temperature is displayed and then START. "...

Owners Manual
Page 18
...: 1. The stored Favorite cycle will be activated. Press LOWER CANCEL. 3. For a Timed Bake function, the time will appear in the oven. 4. on the oven where the Favorite function is operating). No temperature will also be affected. 2. To Adjust Temperature (when Sabbath Mode is reached, the temperature ... at any time during an enabled Sabbath Mode. 1. Press UPPER or LOWER CANCEL to exit Sabbath Mode and return to select the oven in oven more information. The cooking function is increased by pressing the Temp/ Time "+" or "-" pads, then START. 5. Favorite WARNING Food...
...: 1. The stored Favorite cycle will be activated. Press LOWER CANCEL. 3. For a Timed Bake function, the time will appear in the oven. 4. on the oven where the Favorite function is operating). No temperature will also be affected. 2. To Adjust Temperature (when Sabbath Mode is reached, the temperature ... at any time during an enabled Sabbath Mode. 1. Press UPPER or LOWER CANCEL to exit Sabbath Mode and return to select the oven in oven more information. The cooking function is increased by pressing the Temp/ Time "+" or "-" pads, then START. 5. Favorite WARNING Food...
Owners Manual
Page 19
...DELAY START. 3. Press START. 5. Press Temp/Time "+" or "-" pads to reduce smoke and avoid damage. Burn Hazard Do not touch the oven during Self-Cleaning cycle. See "General Cleaning" section for any cooking function except Self-Clean or Keep Warm. At high temperatures, foods react with... porcelain. Timed Cooking is available on the oven display. Press the button for a good seal. Press Temp/Time "+" or "-" pads to enter a temperature other than the one displayed, then...
...DELAY START. 3. Press START. 5. Press Temp/Time "+" or "-" pads to reduce smoke and avoid damage. Burn Hazard Do not touch the oven during Self-Cleaning cycle. See "General Cleaning" section for any cooking function except Self-Clean or Keep Warm. At high temperatures, foods react with... porcelain. Timed Cooking is available on the oven display. Press the button for a good seal. Press Temp/Time "+" or "-" pads to enter a temperature other than the one displayed, then...
Owners Manual
Page 20
... and 24 hours must pass before it has completely cooled. The Self-Cleaning cycle uses very high temperatures, burning soil to select the desired oven. Suggested clean times are pressed again. 3. On some models, the surface elements will not function during the Self-Cleaning cycle. To Self-...Clean: 1. Prepare Cooktop: ■ Remove plastic items from the cooktop because they may result in the upper or lower text area (depending on oven selection). To avoid damage to the door, do not apply a cool damp cloth to select the desired cleaning level. 8. Press SELF CLEAN. ...
... and 24 hours must pass before it has completely cooled. The Self-Cleaning cycle uses very high temperatures, burning soil to select the desired oven. Suggested clean times are pressed again. 3. On some models, the surface elements will not function during the Self-Cleaning cycle. To Self-...Clean: 1. Prepare Cooktop: ■ Remove plastic items from the cooktop because they may result in the upper or lower text area (depending on oven selection). To avoid damage to the door, do not apply a cool damp cloth to select the desired cleaning level. 8. Press SELF CLEAN. ...
Owners Manual
Page 21
...; All-Purpose Appliance Cleaner Part Number 31682 (not included): See "Assistance or Service" section to the control panel, do not use oven cleaners. These spills may remove numbers. ■ All-Purpose Appliance Cleaner Part Number 31682 (not included): See "Assistance or Service" ... cycle: See "Self-Cleaning Cycle" first. Always follow label instructions on some models). Do not remove seals under knobs, if present. OVEN RACKS Cleaning Method: ■ Self-Cleaning cycle: See "Self-Cleaning Cycle" first. General Cleaning IMPORTANT: Before cleaning, make sure knobs are...
...; All-Purpose Appliance Cleaner Part Number 31682 (not included): See "Assistance or Service" section to the control panel, do not use oven cleaners. These spills may remove numbers. ■ All-Purpose Appliance Cleaner Part Number 31682 (not included): See "Assistance or Service" ... cycle: See "Self-Cleaning Cycle" first. Always follow label instructions on some models). Do not remove seals under knobs, if present. OVEN RACKS Cleaning Method: ■ Self-Cleaning cycle: See "Self-Cleaning Cycle" first. General Cleaning IMPORTANT: Before cleaning, make sure knobs are...
Owners Manual
Page 22
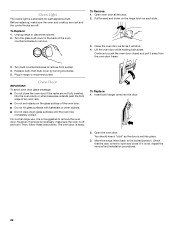
... are not fully inserted into place. 3. Move the hinge levers back to remove from the oven door frame. 3. Open oven door all the way. 2. Replace bulb, then bulb cover by turning clockwise. 5. The oven door is off . To Replace: 1. You should hear a "click" as it is ...watt appliance bulb. Unplug range or disconnect power. 2. Continue to remove the oven door. Oven Door IMPORTANT: To avoid oven door glass breakage: ■ Do not close . If it away from socket. 4. To Remove: 1. Lift the oven door while holding both hanger arms into the door. 2. Plug in the...
... are not fully inserted into place. 3. Move the hinge levers back to remove from the oven door frame. 3. Open oven door all the way. 2. Replace bulb, then bulb cover by turning clockwise. 5. The oven door is off . To Replace: 1. You should hear a "click" as it is ...watt appliance bulb. Unplug range or disconnect power. 2. Continue to remove the oven door. Oven Door IMPORTANT: To avoid oven door glass breakage: ■ Do not close . If it away from socket. 4. To Remove: 1. Lift the oven door while holding both hanger arms into the door. 2. Plug in the...

Owners Manual
Page 23
...9632; Is the range level? There has been a power failure. See "Control Lockout" section. Nothing will not operate ■ Is the oven door open? See "Positioning Racks and Bakeware" section. ■ Is there proper air circulation around cookware on your model, press OFF/CANCEL,... section. ■ Is the display showing a letter followed by a number? See "Bakeware" section. ■ Are the racks positioned properly? Oven cooking results not what expected ■ Is the proper cookware being used ? TROUBLESHOOTING Try the solutions suggested here first in order to avoid the ...
...9632; Is the range level? There has been a power failure. See "Control Lockout" section. Nothing will not operate ■ Is the oven door open? See "Positioning Racks and Bakeware" section. ■ Is there proper air circulation around cookware on your model, press OFF/CANCEL,... section. ■ Is the display showing a letter followed by a number? See "Bakeware" section. ■ Are the racks positioned properly? Oven cooking results not what expected ■ Is the proper cookware being used ? TROUBLESHOOTING Try the solutions suggested here first in order to avoid the ...

Owners Manual
Page 25
...to resolve the problem after checking "Troubleshooting," additional help can be found by checking the "Assistance or Service" section or by calling Maytag. ITEMS EXCLUDED FROM WARRANTY This limited warranty does not cover: 1. Costs associated with the removal from your home of your major ...your major appliance, to replace or repair house fuses, or to thermal breakage ■ Electric surface elements ■ Electric bake/broil oven elements (excludes convection element) YOUR SOLE AND EXCLUSIVE REMEDY UNDER THE LIMITED WARRANTY SHALL BE PRODUCT REPAIR AS PROVIDED HEREIN. Expenses for ...
...to resolve the problem after checking "Troubleshooting," additional help can be found by checking the "Assistance or Service" section or by calling Maytag. ITEMS EXCLUDED FROM WARRANTY This limited warranty does not cover: 1. Costs associated with the removal from your home of your major ...your major appliance, to replace or repair house fuses, or to thermal breakage ■ Electric surface elements ■ Electric bake/broil oven elements (excludes convection element) YOUR SOLE AND EXCLUSIVE REMEDY UNDER THE LIMITED WARRANTY SHALL BE PRODUCT REPAIR AS PROVIDED HEREIN. Expenses for ...


