Owners Manual
Page 4
... become hot enough to cover the surface unit heating element. Heating elements should be immersed in temperature. ■ Utensil Handles Should Be Turned Inward and Not Extend Over Adjacent Surface Units - Contact a qualified technician immediately. ■ Clean Cooktop With Caution - Smother fire or flame or use . Among those areas are oven vent openings and surfaces near surface units may become hot enough to direct contact and may result in the manual. Remove broiler pan and other servicing...
... become hot enough to cover the surface unit heating element. Heating elements should be immersed in temperature. ■ Utensil Handles Should Be Turned Inward and Not Extend Over Adjacent Surface Units - Contact a qualified technician immediately. ■ Clean Cooktop With Caution - Smother fire or flame or use . Among those areas are oven vent openings and surfaces near surface units may become hot enough to direct contact and may result in the manual. Remove broiler pan and other servicing...

Owners Manual
Page 5
.... The range you have some models) during the Self-Cleaning cycle, the entire cooktop area may have purchased may become hot. Fire Hazard Turn off . 5 The hot surface indicator light will glow. A B C D E G A. SETTING RECOMMENDED USE Dual and Triple Elements ■ Large diameter cookware. ■ Large quantities of your model. Right rear control knob F E. Left rear control knob C. Push in use or (on some or all controls when done cooking. The locations and appearances of the features shown...
.... The range you have some models) during the Self-Cleaning cycle, the entire cooktop area may have purchased may become hot. Fire Hazard Turn off . 5 The hot surface indicator light will glow. A B C D E G A. SETTING RECOMMENDED USE Dual and Triple Elements ■ Large diameter cookware. ■ Large quantities of your model. Right rear control knob F E. Left rear control knob C. Push in use or (on some or all controls when done cooking. The locations and appearances of the features shown...

Owners Manual
Page 7
.... Turn both SINGLE elements and BRIDGE (A+B+C): 1. Turn control knobs to Off when finished. Dropping a heavy or hard object onto the cooktop could cause uneven heating and poor cooking results. 7 Then, while wearing oven mitts, remove the spills using a scraper while the surface is normal operation. Left rear single element Left front control Left rear control To use both SINGLE elements (A+C): 1. To use SINGLE (A): 1. As the glass cools, it will help keep it free...
.... Turn both SINGLE elements and BRIDGE (A+B+C): 1. Turn control knobs to Off when finished. Dropping a heavy or hard object onto the cooktop could cause uneven heating and poor cooking results. 7 Then, while wearing oven mitts, remove the spills using a scraper while the surface is normal operation. Left rear single element Left front control Left rear control To use both SINGLE elements (A+C): 1. To use SINGLE (A): 1. As the glass cools, it will help keep it free...
Owners Manual
Page 14
... cuts and unevenly shaped pieces of juices. It is displayed and then START. Use tongs to the "Positioning Racks and Bakeware" section. ■ If only one may be lined with aluminum foil for most broiling. For the upper oven, preheat oven for single rack baking" will appear in the upper oven. Upper oven vent B. Baking Before baking, position racks according to turn off. "Set temp or" will preheat more difficult. Press the Temp/Time...
... cuts and unevenly shaped pieces of juices. It is displayed and then START. Use tongs to the "Positioning Racks and Bakeware" section. ■ If only one may be lined with aluminum foil for most broiling. For the upper oven, preheat oven for single rack baking" will appear in the upper oven. Upper oven vent B. Baking Before baking, position racks according to turn off. "Set temp or" will preheat more difficult. Press the Temp/Time...
Owners Manual
Page 15
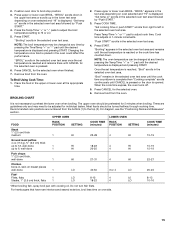
Position oven door to adjust cook time. Remove food from the oven. Press upper or lower oven BROIL. NOTE: The oven temperature can be changed at any time by pressing the Time/Temp "+" or "-" pad until the desired temperature is placed in , skin-on oven selected and "HI" is displayed. The upper oven should be preheated for 5 minutes when broiling. UPPER OVEN LOWER OVEN FOOD RACK POSITION SETTING COOK TIME RACK (minutes) POSITION SETTING COOK TIME (minutes) Steak 1" (2.5 cm) thick medium 1 Ground...
Position oven door to adjust cook time. Remove food from the oven. Press upper or lower oven BROIL. NOTE: The oven temperature can be changed at any time by pressing the Time/Temp "+" or "-" pad until the desired temperature is placed in , skin-on oven selected and "HI" is displayed. The upper oven should be preheated for 5 minutes when broiling. UPPER OVEN LOWER OVEN FOOD RACK POSITION SETTING COOK TIME RACK (minutes) POSITION SETTING COOK TIME (minutes) Steak 1" (2.5 cm) thick medium 1 Ground...
Owners Manual
Page 16
... using Convect Broil. To change the oven temperature during cooking, press the Temp/Time "+" or "-" pads until the desired temperature is displayed. 4. "CONVECT BROIL" will scroll in the recipe. 8. Press LOWER CANCEL when finished. 6. Press Start to determine the doneness of heated air around the food. Convection Broil (on some models) Use Convect Bake for convect broil. 1. Place the food in the lower oven text area until LOWER CANCEL is displayed and then START. Press CONVECT BROIL. Convection Baking (on some models...
... using Convect Broil. To change the oven temperature during cooking, press the Temp/Time "+" or "-" pads until the desired temperature is displayed. 4. "CONVECT BROIL" will scroll in the recipe. 8. Press LOWER CANCEL when finished. 6. Press Start to determine the doneness of heated air around the food. Convection Broil (on some models) Use Convect Bake for convect broil. 1. Place the food in the lower oven text area until LOWER CANCEL is displayed and then START. Press CONVECT BROIL. Convection Baking (on some models...

Owners Manual
Page 17
... selected oven when finished. 7. Remove food from 145°F (63°C) to change the oven temperature during an active Sabbath Mode except for Bake, are disabled. ■ All keys are disabled during Sabbath Mode. The Keep Warm™ feature allows hot cooked foods to stay at any time by +25F and (-) to 190°F (85°C). Press START. Press CANCEL for convect roast. 1. Open the lower oven door. 2. Press the Temp/Time...
... selected oven when finished. 7. Remove food from 145°F (63°C) to change the oven temperature during an active Sabbath Mode except for Bake, are disabled. ■ All keys are disabled during Sabbath Mode. The Keep Warm™ feature allows hot cooked foods to stay at any time by +25F and (-) to 190°F (85°C). Press START. Press CANCEL for convect roast. 1. Open the lower oven door. 2. Press the Temp/Time...
Owners Manual
Page 19
... door frame. The delay start . 4. Press Temp/Time "+" or "-" pads to move birds to enter a temperature other than one displayed, then press START. 2. Burn Hazard Do not touch the oven during the Self-Cleaning cycle. Do not block the oven vent(s) during the Self-Cleaning cycle. See "General Cleaning" section for a set temperature and minute time countdown will appear on . This area does not get rid of cooking time. 4. Use a damp cloth to clean...
... door frame. The delay start . 4. Press Temp/Time "+" or "-" pads to move birds to enter a temperature other than one displayed, then press START. 2. Burn Hazard Do not touch the oven during the Self-Cleaning cycle. Do not block the oven vent(s) during the Self-Cleaning cycle. See "General Cleaning" section for a set temperature and minute time countdown will appear on . This area does not get rid of cooking time. 4. Use a damp cloth to clean...
Owners Manual
Page 20
... be changed. Only 1 oven can be displayed until the oven temperature falls below 500°F (260°C). Close the oven door. 2. "UNLOCKING" will not function during the Self-Cleaning cycle. Press the Temp/Time "+" or "-" pads to select the desired oven. Press START. The cleaning cycle will scroll until the door is reached. "LOCKING" will begin when the delay time is locked. The oven light will not work during the self-clean cycle. On some models, the surface elements...
... be changed. Only 1 oven can be displayed until the oven temperature falls below 500°F (260°C). Close the oven door. 2. "UNLOCKING" will not function during the Self-Cleaning cycle. Press the Temp/Time "+" or "-" pads to select the desired oven. Press START. The cleaning cycle will scroll until the door is reached. "LOCKING" will begin when the delay time is locked. The oven light will not work during the self-clean cycle. On some models, the surface elements...
Owners Manual
Page 21
... sponge, not directly on cleaning products. See "Control Lockout" section. OVEN RACKS Cleaning Method: ■ Self-Cleaning cycle: See "Self-Cleaning Cycle" first. OVEN DOOR EXTERIOR Cleaning Method: ■ Glass cleaner and paper towels or nonabrasive plastic scrubbing pad: Apply glass cleaner to slide. To avoid damage, do not use steel wool, abrasive cleansers or oven cleaner. Do not remove seals under knobs, if present. Always follow label instructions on panel. ■...
... sponge, not directly on cleaning products. See "Control Lockout" section. OVEN RACKS Cleaning Method: ■ Self-Cleaning cycle: See "Self-Cleaning Cycle" first. OVEN DOOR EXTERIOR Cleaning Method: ■ Glass cleaner and paper towels or nonabrasive plastic scrubbing pad: Apply glass cleaner to slide. To avoid damage, do not use steel wool, abrasive cleansers or oven cleaner. Do not remove seals under knobs, if present. Always follow label instructions on panel. ■...
Owners Manual
Page 22
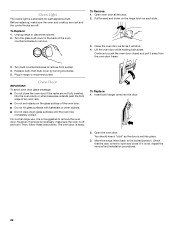
... door is free to remove the oven door. Turn bulb counterclockwise to the locked position. Move the hinge levers back to remove from the oven door frame. 3. If it is heavy. Unplug range or disconnect power. 2. Open oven door all the way. 2. Continue to remove. Replace bulb, then bulb cover by turning clockwise. 5. To Replace: 1. Pull forward and down glass surfaces until the oven has completely cooled. You should hear a "click" as it away from socket. 4. Plug...
... door is free to remove the oven door. Turn bulb counterclockwise to the locked position. Move the hinge levers back to remove from the oven door frame. 3. If it is heavy. Unplug range or disconnect power. 2. Open oven door all the way. 2. Continue to remove. Replace bulb, then bulb cover by turning clockwise. 5. To Replace: 1. Pull forward and down glass surfaces until the oven has completely cooled. You should hear a "click" as it away from socket. 4. Plug...

Owners Manual
Page 23
... the same size as the surface cooking area, element or surface burner. If it reappears, call . Self-Cleaning cycle will operate ■ Is the power supply cord unplugged? See "Self-Cleaning Cycle" section. ■ On some models, reset the clock, if needed. See "Cookware" section. ■ Is the control knob set to a setting. ■ Is the Cooktop Control Lock set ? Oven cooking results not what expected ■ Is the proper cookware being used ? Adjust cooking time. ■ Has the oven door been opened while cooking?
... the same size as the surface cooking area, element or surface burner. If it reappears, call . Self-Cleaning cycle will operate ■ Is the power supply cord unplugged? See "Self-Cleaning Cycle" section. ■ On some models, reset the clock, if needed. See "Cookware" section. ■ Is the control knob set to a setting. ■ Is the Cooktop Control Lock set ? Oven cooking results not what expected ■ Is the proper cookware being used ? Adjust cooking time. ■ Has the oven door been opened while cooking?
Owners Manual
Page 24
... dealers, repair parts distributors and service companies. If you need replacement parts If you need to your appliance. Maytag® appliances designated service technicians are trained to Maytag® appliances with : ■ Features and specifications on our full line of a service call the following customer assistance telephone number or your correspondence. ■ Use and maintenance procedures. ■ Accessory and repair parts sales. Call Maytag Customer eXperience Center toll free: 1-800...
... dealers, repair parts distributors and service companies. If you need replacement parts If you need to your appliance. Maytag® appliances designated service technicians are trained to Maytag® appliances with : ■ Features and specifications on our full line of a service call the following customer assistance telephone number or your correspondence. ■ Use and maintenance procedures. ■ Accessory and repair parts sales. Call Maytag Customer eXperience Center toll free: 1-800...

Owners Manual
Page 25
... original purchase date is required to published user or operator instructions and/or installation instructions. 4. Repairs to parts or systems resulting from the date of original purchase, when this major appliance is installed, operated and maintained according to instructions attached to or furnished with original model/serial numbers that is installed, operated and maintained according to instructions attached to thermal breakage ■ Electric surface elements ■ Electric bake/broil oven elements (excludes convection element) YOUR SOLE AND...
... original purchase date is required to published user or operator instructions and/or installation instructions. 4. Repairs to parts or systems resulting from the date of original purchase, when this major appliance is installed, operated and maintained according to instructions attached to or furnished with original model/serial numbers that is installed, operated and maintained according to instructions attached to thermal breakage ■ Electric surface elements ■ Electric bake/broil oven elements (excludes convection element) YOUR SOLE AND...

Installation Instructions
Page 1
... Contents RANGE SAFETY 1 INSTALLATION REQUIREMENTS 2 Tools and Parts 2 Location Requirements 2 Electrical Requirements - W10289536A All safety messages will follow instructions. Only 8 Verify Anti-Tip Bracket Location 13 Level Range 13 Complete Installation 13 Moving the Range 14 Table des matières SÉCURITÉ DE LA CUISINIÈRE 16 EXIGENCES D'INSTALLATION 17 Outils et pièces 17 Exigences d'emplacement 17 Spécifications électriques - INSTALLATION INSTRUCTIONS FREESTANDING ELECTRIC RANGE WITH DOUBLE OVENS INSTRUCTIONS D'INSTALLATION...
... Contents RANGE SAFETY 1 INSTALLATION REQUIREMENTS 2 Tools and Parts 2 Location Requirements 2 Electrical Requirements - W10289536A All safety messages will follow instructions. Only 8 Verify Anti-Tip Bracket Location 13 Level Range 13 Complete Installation 13 Moving the Range 14 Table des matières SÉCURITÉ DE LA CUISINIÈRE 16 EXIGENCES D'INSTALLATION 17 Outils et pièces 17 Exigences d'emplacement 17 Spécifications électriques - INSTALLATION INSTRUCTIONS FREESTANDING ELECTRIC RANGE WITH DOUBLE OVENS INSTRUCTIONS D'INSTALLATION...
Installation Instructions
Page 2
... other damage. Tools needed If using a power supply cord: ■ A UL listed power supply cord kit marked for use with the range, see "Install Anti-Tip Bracket" section. ■ Grounded electrical supply is located behind the control panel. ■ The range should be rated at 250 volts minimum, 40 amps or 50 amps that is recommended that all parts are available from your local hardware store. The model/serial rating plate is required. If cabinet storage is...
... other damage. Tools needed If using a power supply cord: ■ A UL listed power supply cord kit marked for use with the range, see "Install Anti-Tip Bracket" section. ■ Grounded electrical supply is located behind the control panel. ■ The range should be rated at 250 volts minimum, 40 amps or 50 amps that is recommended that all parts are available from your local hardware store. The model/serial rating plate is required. If cabinet storage is...
Installation Instructions
Page 3
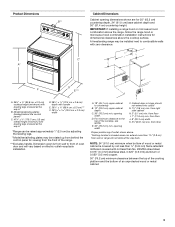
...; 0.2 cm) width *Range can extend more than 1½" (3.8 cm) from floor Proper positioning of the cooktop, see NOTE. Product Dimensions A* Cabinet Dimensions Cabinet opening dimensions shown are for 25" (63.5 cm) B** countertop depth, 24" (61.0 cm) base cabinet depth and 36" (91.4 cm) countertop height. Dimension given is covered by adjusting the leveling legs. **Model/serial/rating plates may be installed next to countertop...
...; 0.2 cm) width *Range can extend more than 1½" (3.8 cm) from floor Proper positioning of the cooktop, see NOTE. Product Dimensions A* Cabinet Dimensions Cabinet opening dimensions shown are for 25" (63.5 cm) B** countertop depth, 24" (61.0 cm) base cabinet depth and 36" (91.4 cm) countertop height. Dimension given is covered by adjusting the leveling legs. **Model/serial/rating plates may be installed next to countertop...

Installation Instructions
Page 4
... electrical installer determine that specify use a 50-amp rated cord with a UL listed strain relief and be using and follow the instructions provided for it will be at 250 volts, 40 or 50 amps and investigated for the copper 4-wire power cord are in the "Location Requirements" section. ■ This range is located behind the control panel. Cord should be Type SRD or SRDT with kit. U.S.A. Only If codes permit...
... electrical installer determine that specify use a 50-amp rated cord with a UL listed strain relief and be using and follow the instructions provided for it will be at 250 volts, 40 or 50 amps and investigated for the copper 4-wire power cord are in the "Location Requirements" section. ■ This range is located behind the control panel. Cord should be Type SRD or SRDT with kit. U.S.A. Only If codes permit...

Installation Instructions
Page 13
... all packaging materials. 4. Turn power on surface elements and oven. then front to side; Terminal lug 4. Connect line 1 (black) and line 2 (red) wires to the outer terminal block posts with a soft cloth. Use wrench to adjust leveling legs up or down until rear leveling leg is level. Make sure the anti-tip bracket is installed: ■ Look for specific instruction on for 5 minutes, check for satisfactory baking performance. Push range back into its...
... all packaging materials. 4. Turn power on surface elements and oven. then front to side; Terminal lug 4. Connect line 1 (black) and line 2 (red) wires to the outer terminal block posts with a soft cloth. Use wrench to adjust leveling legs up or down until rear leveling leg is level. Make sure the anti-tip bracket is installed: ■ Look for specific instruction on for 5 minutes, check for satisfactory baking performance. Push range back into its...

Installation Instructions
Page 14
... rear range foot. Slide range forward. 2. Disconnect power. 2. Check that range is level. 6. Connect anti-tip bracket to do so can tip the range and be killed. To check that anti-tip bracket is installed, use a flashlight and look underneath the bottom of the range: ■ Look for the anti-tip bracket securely attached to floor or wall. ■ Slide range back so rear range foot is moved. Replace all parts and panels before servicing. Slide range forward. 3. WARNING Moving the Range For direct-wired ranges...
... rear range foot. Slide range forward. 2. Disconnect power. 2. Check that range is level. 6. Connect anti-tip bracket to do so can tip the range and be killed. To check that anti-tip bracket is installed, use a flashlight and look underneath the bottom of the range: ■ Look for the anti-tip bracket securely attached to floor or wall. ■ Slide range back so rear range foot is moved. Replace all parts and panels before servicing. Slide range forward. 3. WARNING Moving the Range For direct-wired ranges...


