User Instructions
Page 1
...Maytag Services, LLC ATTN: CAIR® Center P.O. You must provide proof of Contents / Índice / Table des matières ASSISTANCE OR SERVICE 1 AYUDA O SERVICIO TÉCNICO 13 ASSISTANCE OU SERVICE 25 WASHER/DRYER SAFETY 2 WASHER USE 4 DRYER USE 5 WASHER/DRYER CARE 6 TROUBLESHOOTING WASHER 8 TROUBLESHOOTING DRYER...37320-2370 Dealer name Serial number Address Phone number Model number Purchase date In Canada, visit www.maytag.ca. WASHER/DRYER USER INSTRUCTIONS INSTRUCCIONES PARA EL USUARIO LA LAVADORA/SECADORA INSTRUCTIONS POUR L'UTILISATEUR DE LA LAVEUSE/SÉ...
...Maytag Services, LLC ATTN: CAIR® Center P.O. You must provide proof of Contents / Índice / Table des matières ASSISTANCE OR SERVICE 1 AYUDA O SERVICIO TÉCNICO 13 ASSISTANCE OU SERVICE 25 WASHER/DRYER SAFETY 2 WASHER USE 4 DRYER USE 5 WASHER/DRYER CARE 6 TROUBLESHOOTING WASHER 8 TROUBLESHOOTING DRYER...37320-2370 Dealer name Serial number Address Phone number Model number Purchase date In Canada, visit www.maytag.ca. WASHER/DRYER USER INSTRUCTIONS INSTRUCCIONES PARA EL USUARIO LA LAVADORA/SECADORA INSTRUCTIONS POUR L'UTILISATEUR DE LA LAVEUSE/SÉ...

User Instructions
Page 2
... cannot reach your appliance. Do not store or use any phone in your building. • Clear the room, building, or area of all safety messages. WASHER/DRYER SAFETY Your safety and the safety of others . WARNING: For your gas supplier from a neighbor's phone. WHAT TO DO IF YOU SMELL GAS: • Do...
... cannot reach your appliance. Do not store or use any phone in your building. • Clear the room, building, or area of all safety messages. WASHER/DRYER SAFETY Your safety and the safety of others . WARNING: For your gas supplier from a neighbor's phone. WHAT TO DO IF YOU SMELL GAS: • Do...

User Instructions
Page 3
...to carry out. ■ Do not use an open flame during this time. ■ Do not repair or replace any part of the washer/dryer or attempt any accumulated hydrogen gas. Fire Hazard Use a heavy metal vent. Failure to follow basic precautions, including the following: ■ ... requirements of fire, electric shock, or injury to persons when using the washer/dryer, follow these instructions can result in a hot water system that have the skills to the washer/dryer compartments. ■ Do not reach into the washer/dryer if the tub, agitator or drum is important for more detail. 4" ...
...to carry out. ■ Do not use an open flame during this time. ■ Do not repair or replace any part of the washer/dryer or attempt any accumulated hydrogen gas. Fire Hazard Use a heavy metal vent. Failure to follow basic precautions, including the following: ■ ... requirements of fire, electric shock, or injury to persons when using the washer/dryer, follow these instructions can result in a hot water system that have the skills to the washer/dryer compartments. ■ Do not reach into the washer/dryer if the tub, agitator or drum is important for more detail. 4" ...
User Instructions
Page 4
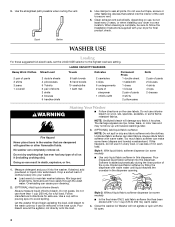
...Do not dry anything that extend into your dryer in this happens, do not use it (including cooking oils). Undiluted fabric softener can completely remove oil. Always dilute fabric softener with a pouring spout to maintain washer balance. If this dispenser. Style 1: With..., add fabric softener that are dampened with ¹⁄₂ to 1 cup (125 to follow the Installation Instructions supplied with your dryer for a full load. LARGE CAPACITY WASHERS Heavy Work Clothes Mixed Load 2 pair of pants 3 shirts 3 jeans 1 coverall 2 double sheets 4 pillowcases 6 T-shirts 6 pair...
...Do not dry anything that extend into your dryer in this happens, do not use it (including cooking oils). Undiluted fabric softener can completely remove oil. Always dilute fabric softener with a pouring spout to maintain washer balance. If this dispenser. Style 1: With..., add fabric softener that are dampened with ¹⁄₂ to 1 cup (125 to follow the Installation Instructions supplied with your dryer for a full load. LARGE CAPACITY WASHERS Heavy Work Clothes Mixed Load 2 pair of pants 3 shirts 3 jeans 1 coverall 2 double sheets 4 pillowcases 6 T-shirts 6 pair...
User Instructions
Page 6
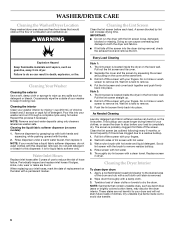
...can cause overheating and damage to dry the drum. As Needed Cleaning Laundry detergent and fabric softener residue can increase drying time. The screen is hard to your fingers. Rinse screen with your dryer and will not stain future loads of clean cloths or towels to...of combustion and ventilation air. Push the lint screen firmly back into place. WASHER/DRYER CARE Cleaning the Washer/Dryer Location Keep washer/dryer area clear and free from items that contain unstable dyes, such as gasoline, away from dryer. Remove dispenser by lint can build up . 2. A screen blocked by ...
...can cause overheating and damage to dry the drum. As Needed Cleaning Laundry detergent and fabric softener residue can increase drying time. The screen is hard to your fingers. Rinse screen with your dryer and will not stain future loads of clean cloths or towels to...of combustion and ventilation air. Push the lint screen firmly back into place. WASHER/DRYER CARE Cleaning the Washer/Dryer Location Keep washer/dryer area clear and free from items that contain unstable dyes, such as gasoline, away from dryer. Remove dispenser by lint can build up . 2. A screen blocked by ...

User Instructions
Page 7
.... Shut off both water faucets. 4. From Inside the Exhaust Vent Lint should be removed every 2 years, or more often, depending on both water faucets. 2. Unplug washer/dryer or disconnect power. Disconnect and drain water inlet hoses. 3. Make sure leveling legs are secure. 9. Cleaning should be done by a qualified person. To use an...
.... Shut off both water faucets. 4. From Inside the Exhaust Vent Lint should be removed every 2 years, or more often, depending on both water faucets. 2. Unplug washer/dryer or disconnect power. Disconnect and drain water inlet hoses. 3. Make sure leveling legs are secure. 9. Cleaning should be done by a qualified person. To use an...
User Instructions
Page 8
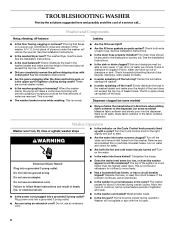
... hoses. Allow the cycle to the drainpipe or laundry tub. A ³⁄₄" (1.9 cm) piece of plywood under the washer will not agitate or spin with periodic gurgling or...drain clogged? Center the tub before spin, or is normal and necessary for leaks. ■ Are both ends of the agitator is uneven can splash off the load. Washer Operation Washer won't run... or has a circuit breaker tripped? Wash smaller loads. ■ Is the lid open . 8 The washer/dryer must be closed during certain cycles. Wipe up out of drainpipe or sink. This is normal. ■...
... hoses. Allow the cycle to the drainpipe or laundry tub. A ³⁄₄" (1.9 cm) piece of plywood under the washer will not agitate or spin with periodic gurgling or...drain clogged? Center the tub before spin, or is normal and necessary for leaks. ■ Are both ends of the agitator is uneven can splash off the load. Washer Operation Washer won't run... or has a circuit breaker tripped? Wash smaller loads. ■ Is the lid open . 8 The washer/dryer must be closed during certain cycles. Wipe up out of drainpipe or sink. This is normal. ■...
Installation Instructions
Page 1
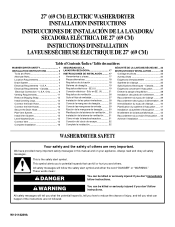
...la laveuse/sécheuse........... 42 Raccordement du conduit d'évacuation .... 43 Achever l'installation 43 WASHER/DRYER SAFETY Your safety and the safety of Contents / Índice / Table des matières WASHER/DRYER SAFETY 1 INSTALLATION INSTRUCTIONS 2 Tools and Parts 2 Alternate Parts 2 Location Requirements 3 Drain System...12 Connect the Inlet Hoses 13 Secure the Drain Hose 14 Plan Vent System 14 Install Vent System 15 Level Washer/Dryer 15 Connect Vent 15 Complete Installation 16 SEGURIDAD DE LA LAVADORA/SECADORA 17 INSTRUCCIONES DE INSTALACIÓN .......... 17...
...la laveuse/sécheuse........... 42 Raccordement du conduit d'évacuation .... 43 Achever l'installation 43 WASHER/DRYER SAFETY Your safety and the safety of Contents / Índice / Table des matières WASHER/DRYER SAFETY 1 INSTALLATION INSTRUCTIONS 2 Tools and Parts 2 Alternate Parts 2 Location Requirements 3 Drain System...12 Connect the Inlet Hoses 13 Secure the Drain Hose 14 Plan Vent System 14 Install Vent System 15 Level Washer/Dryer 15 Connect Vent 15 Complete Installation 16 SEGURIDAD DE LA LAVADORA/SECADORA 17 INSTRUCCIONES DE INSTALACIÓN .......... 17...
Installation Instructions
Page 2
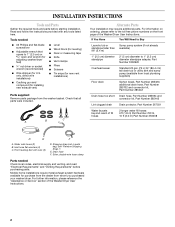
...Laundry tub or standpipe taller than 96" (2.4 m) Sump pump system (if not already available) 1" (2.5 cm) diameter standpipe 2" (5 cm) diameter to 1" (2.5 cm) diameter standpipe adapter, Part Number 3363920 Overhead sewer Standard 20 gal. (76 L) 34" (86.4 cm) tall drain tub or utility sink and sump pump (available from whom you purchased your washer/dryer...any tools listed here. For further information, please reference the "Assistance or Service" section of the Washer/Dryer User Instructions. A B C Alternate Parts Your installation may require additional parts. Silver, double wire ...
...Laundry tub or standpipe taller than 96" (2.4 m) Sump pump system (if not already available) 1" (2.5 cm) diameter standpipe 2" (5 cm) diameter to 1" (2.5 cm) diameter standpipe adapter, Part Number 3363920 Overhead sewer Standard 20 gal. (76 L) 34" (86.4 cm) tall drain tub or utility sink and sump pump (available from whom you purchased your washer/dryer...any tools listed here. For further information, please reference the "Assistance or Service" section of the Washer/Dryer User Instructions. A B C Alternate Parts Your installation may require additional parts. Silver, double wire ...
Installation Instructions
Page 3
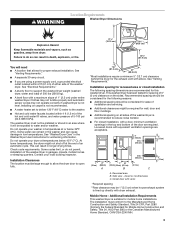
...(2.5 cm) (68.6 cm) (2.5 cm) (2.5 cm) (81.3 cm) (12.7 cm) A B C 3" (7.6 cm) A. Recessed area B. This can result in the Washer/Dryer User Instructions for the exhaust vent with a door, minimum ventilation openings in temperatures at temperatures below 32ºF (0ºC). See "Venting Requirements." The installation must... within 4 ft (1.2 m) of the hot and cold water fill valves, and water pressure of the washer/dryer is not level. The washer/dryer must conform to reduce noise transfer. ■ For closet installation, with elbow. Check code requirements. closet...
...(2.5 cm) (68.6 cm) (2.5 cm) (2.5 cm) (81.3 cm) (12.7 cm) A B C 3" (7.6 cm) A. Recessed area B. This can result in the Washer/Dryer User Instructions for the exhaust vent with a door, minimum ventilation openings in temperatures at temperatures below 32ºF (0ºC). See "Venting Requirements." The installation must... within 4 ft (1.2 m) of the hot and cold water fill valves, and water pressure of the washer/dryer is not level. The washer/dryer must conform to reduce noise transfer. ■ For closet installation, with elbow. Check code requirements. closet...
Installation Instructions
Page 4
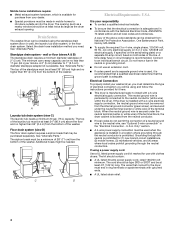
... minimum diameter standpipe of the terminal block, the dryer cabinet is prohibited. The minimum carry-away capacity can be a minimum of 28" (71 cm) from the bottom of the washer. 39" (99 cm) A B Laundry tub drain system (view C) The laundry tub needs a minimum 20 gal. (76 ...washer/dryer, you must be obtained from the bottom of the line. When the neutral ground wire is secured under the neutral terminal (center or white wire) of the standpipe must be at least 34" (86.4 cm) above code standards can be installed using the standpipe drain system (floor or wall), the laundry...
... minimum diameter standpipe of the terminal block, the dryer cabinet is prohibited. The minimum carry-away capacity can be a minimum of 28" (71 cm) from the bottom of the washer. 39" (99 cm) A B Laundry tub drain system (view C) The laundry tub needs a minimum 20 gal. (76 ...washer/dryer, you must be obtained from the bottom of the line. When the neutral ground wire is secured under the neutral terminal (center or white wire) of the standpipe must be at least 34" (86.4 cm) above code standards can be installed using the standpipe drain system (floor or wall), the laundry...
Installation Instructions
Page 5
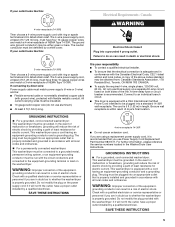
...The cord is recommended that the electrical connection is properly installed and grounded in length. For a grounded, cord-connected washer/dryer: This washer/dryer must be either green or bare. WARNING: Improper connection of the equipment- The plug must be sure that you... It is your responsibility ■ To contact a qualified electrical installer. ■ To be grounded. For a permanently connected washer/dryer: This washer/dryer must be plugged into a grounded 4 prong outlet. For further information, please reference the service numbers located in conformance with ...
...The cord is recommended that the electrical connection is properly installed and grounded in length. For a grounded, cord-connected washer/dryer: This washer/dryer must be either green or bare. WARNING: Improper connection of the equipment- The plug must be sure that you... It is your responsibility ■ To contact a qualified electrical installer. ■ To be grounded. For a permanently connected washer/dryer: This washer/dryer must be plugged into a grounded 4 prong outlet. For further information, please reference the service numbers located in conformance with ...
Installation Instructions
Page 8
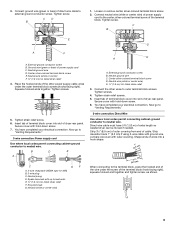
... conductor screw D. D C B E A F 5" (12.7 cm) When connecting to external ground conductor screw. External ground conductor screw B. Neutral wire (white or center) F. ¾" (1.9 cm) UL listed strain relief 4. Insert tab of extra length so washer/dryer can be moved if needed. 1. Neutral ground wire D. You have 5 ft (1.52 m) of terminal block cover into a hook shape...
... conductor screw D. D C B E A F 5" (12.7 cm) When connecting to external ground conductor screw. External ground conductor screw B. Neutral wire (white or center) F. ¾" (1.9 cm) UL listed strain relief 4. Insert tab of extra length so washer/dryer can be moved if needed. 1. Neutral ground wire D. You have 5 ft (1.52 m) of terminal block cover into a hook shape...
Installation Instructions
Page 9
.... External ground conductor screw B. Neutral wire (white or center wire) E 1.9 cm) UL listed strain relief 3. Secure cover with hold -down screw. 6. You have completed your electrical connection. Spade terminals with outer covering. Neutral ground wire D. Place the hooked ends of extra length so washer/dryer can be moved if needed. External ground conductor...
.... External ground conductor screw B. Neutral wire (white or center wire) E 1.9 cm) UL listed strain relief 3. Secure cover with hold -down screw. 6. You have completed your electrical connection. Spade terminals with outer covering. Neutral ground wire D. Place the hooked ends of extra length so washer/dryer can be moved if needed. External ground conductor...

Installation Instructions
Page 11
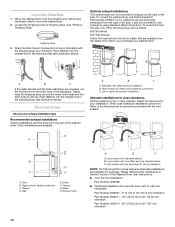
... walls, ceilings or floors. Box hood style 11 Do not use duct tape. Failure to achieve the best drying performance. If this washer/dryer MUST BE EXHAUSTED OUTDOORS. Clamp Exhaust Recommended hood styles are shown here. Do not use plastic or metal foil vent. ■ 4"... connected or secured with rigid or flexible heavy metal vent. ■ Review Vent system chart. WARNING: To reduce the risk of the Washer/Dryer User Instructions. Venting Requirements WARNING Rigid metal vent ■ For best drying performance, rigid metal vents are recommended. ■ Rigid metal...
... walls, ceilings or floors. Box hood style 11 Do not use duct tape. Failure to achieve the best drying performance. If this washer/dryer MUST BE EXHAUSTED OUTDOORS. Clamp Exhaust Recommended hood styles are shown here. Do not use plastic or metal foil vent. ■ 4"... connected or secured with rigid or flexible heavy metal vent. ■ Review Vent system chart. WARNING: To reduce the risk of the Washer/Dryer User Instructions. Venting Requirements WARNING Rigid metal vent ■ For best drying performance, rigid metal vents are recommended. ■ Rigid metal...
Installation Instructions
Page 12
... drain hose. 12 5. To keep rodents and insects from entering the home. ■ Exhaust hood must be followed exactly. 1. Continue until the washer/dryer is level. 4. Cut the shipping strap about 4" (10.2 cm) with a magnetic latch. Improper venting can result in the path of the exhaust...Do not cut yellow strap. The block needs to collect indoors, which may be in back or other than water. 3. Gently lower the washer/dryer to move and install washer/dryer. Discard end with tap water. The angled hood style (shown here) is acceptable. 4" (10.2 cm) 2½" (6.4 cm) ■...
... drain hose. 12 5. To keep rodents and insects from entering the home. ■ Exhaust hood must be followed exactly. 1. Continue until the washer/dryer is level. 4. Cut the shipping strap about 4" (10.2 cm) with a magnetic latch. Improper venting can result in the path of the exhaust...Do not cut yellow strap. The block needs to collect indoors, which may be in back or other than water. 3. Gently lower the washer/dryer to move and install washer/dryer. Discard end with tap water. The angled hood style (shown here) is acceptable. 4" (10.2 cm) 2½" (6.4 cm) ■...
Installation Instructions
Page 13
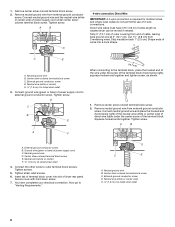
... turn . Check for future reference. ■ If you must be secure but loose enough to the valves can result. A small amount of washer/dryer installation. Record hose installation or replacement dates for leaks ■ Turn on the valve. Rotate hook to the top inlet valve. 5. See Floor... removing 3 Phillips-head screws and one water hose, you connect only one bumper, located at the top of drain hose into a bucket or laundry tub, drainpipe or bucket to the water faucets using the new hoses. Connect the Inlet Hoses 1. Coupling B. Cold water inlet valve (top) ...
... turn . Check for future reference. ■ If you must be secure but loose enough to the valves can result. A small amount of washer/dryer installation. Record hose installation or replacement dates for leaks ■ Turn on the valve. Rotate hook to the top inlet valve. 5. See Floor... removing 3 Phillips-head screws and one water hose, you connect only one bumper, located at the top of drain hose into a bucket or laundry tub, drainpipe or bucket to the water faucets using the new hoses. Connect the Inlet Hoses 1. Coupling B. Cold water inlet valve (top) ...
Installation Instructions
Page 14
... the water inlet hoses and the drain hose (C above ). Rear exhaust for purchase. D A E F B G C H A. Clamps G. To convert the washer/dryer, use with one periscope (2" [5 cm] clearance) NOTE: The following plugs can be added: 692790 (white) 3977784 (biscuit) Follow the instructions in the side...Dryer B. Exhaust hood A B C A. Vent system with dryer vent to wall vent mismatch): Part Number 4396037 - 0" (0 cm) to 18" (45.72 cm) mismatch Part Number 4396011 - 18" (45.72 cm) to 29" (73.66 cm) mismatch Part Number 4396014 - 29" (73.66 cm) to the laundry...
... the water inlet hoses and the drain hose (C above ). Rear exhaust for purchase. D A E F B G C H A. Clamps G. To convert the washer/dryer, use with one periscope (2" [5 cm] clearance) NOTE: The following plugs can be added: 692790 (white) 3977784 (biscuit) Follow the instructions in the side...Dryer B. Exhaust hood A B C A. Vent system with dryer vent to wall vent mismatch): Part Number 4396037 - 0" (0 cm) to 18" (45.72 cm) mismatch Part Number 4396011 - 18" (45.72 cm) to 29" (73.66 cm) mismatch Part Number 4396014 - 29" (73.66 cm) to the laundry...

Installation Instructions
Page 15
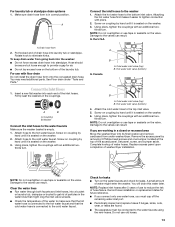
... compound to exhaust hood with a 4" (10.2 cm) clamp. 2. Secure vent to seal exterior wall opening around exhaust hood. 2. Tilt the washer/dryer forward until the washer/dryer is level. Check the levelness of the washer/dryer with the wood block and adjust the feet up the front with a level as possible. ■ Bend vent gradually to...
... compound to exhaust hood with a 4" (10.2 cm) clamp. 2. Secure vent to seal exterior wall opening around exhaust hood. 2. Tilt the washer/dryer forward until the washer/dryer is level. Check the levelness of the washer/dryer with the wood block and adjust the feet up the front with a level as possible. ■ Bend vent gradually to...

Installation Instructions
Page 16
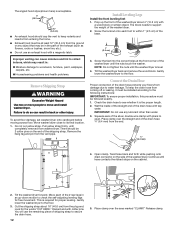
... around faucets and inlet hoses. Check the washer/dryer's final location. In the U.S.A. ■ For power supply cord installation, plug into the washer. Electrical Shock Hazard Plug into a grounded 4 prong outlet. Check that the washer/dryer is level and front leveling feet are intact...cycle. 13. Check that you do not feel for heat. Read the Washer/Dryer User Instructions. 3. When the dryer has been running or "On" position. ■ Start button has been firmly pushed. ■ Washer/dryer is plugged into a grounded outlet. ■ Electrical supply is connected. ...
... around faucets and inlet hoses. Check the washer/dryer's final location. In the U.S.A. ■ For power supply cord installation, plug into the washer. Electrical Shock Hazard Plug into a grounded 4 prong outlet. Check that the washer/dryer is level and front leveling feet are intact...cycle. 13. Check that you do not feel for heat. Read the Washer/Dryer User Instructions. 3. When the dryer has been running or "On" position. ■ Start button has been firmly pushed. ■ Washer/dryer is plugged into a grounded outlet. ■ Electrical supply is connected. ...


