User Instructions
Page 1
... in the U.S.A., or write: Maytag Services, LLC ATTN: CAIR® Center P.O. W10117754A WASHER/DRYER USER INSTRUCTIONS INSTRUCCIONES PARA EL USUARIO LA LAVADORA/SECADORA INSTRUCTIONS POUR L'UTILISATEUR DE LA LAVEUSE/SÉCHEUSE Table of purchase or installation date for in-warranty service. Box 2370 Cleveland, TN 37320-2370 Keep this information on the model and serial number label, located at 1-800-807-6777, or write: Maytag Services, LLC ATTN: CAIR®...
... in the U.S.A., or write: Maytag Services, LLC ATTN: CAIR® Center P.O. W10117754A WASHER/DRYER USER INSTRUCTIONS INSTRUCCIONES PARA EL USUARIO LA LAVADORA/SECADORA INSTRUCTIONS POUR L'UTILISATEUR DE LA LAVEUSE/SÉCHEUSE Table of purchase or installation date for in-warranty service. Box 2370 Cleveland, TN 37320-2370 Keep this information on the model and serial number label, located at 1-800-807-6777, or write: Maytag Services, LLC ATTN: CAIR®...

User Instructions
Page 3
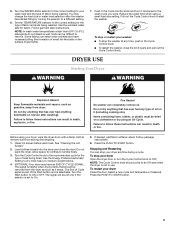
... information. Fire Hazard Use a heavy metal vent. Failure to follow basic precautions, including the following: ■ Read all hot water faucets and let the water flow from service or discarded, remove the doors to the washer/dryer compartments. ■ Do not reach into the washer/dryer if the tub, agitator or drum is removed from each load. ■ Under certain conditions, hydrogen gas may contribute to a chemical...
... information. Fire Hazard Use a heavy metal vent. Failure to follow basic precautions, including the following: ■ Read all hot water faucets and let the water flow from service or discarded, remove the doors to the washer/dryer compartments. ■ Do not reach into the washer/dryer if the tub, agitator or drum is removed from each load. ■ Under certain conditions, hydrogen gas may contribute to a chemical...
User Instructions
Page 4
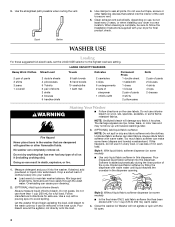
... cleaning. 3. (OPTIONAL) Add liquid fabric softener. Style 1: With liquid fabric softener dispenser (on wool, silk, spandex, acetates, or some models) ■ Use only liquid fabric softener in the dispenser opening. 2. (OPTIONAL) Add liquid chlorine bleach. If this dispenser. Softener is complete, be removed in the washer that extend into your dryer in each load. Close the washer lid. Use the straightest path possible when routing the vent. 4. Drop a sorted load of clothes loosely into the interior of oil on the care...
... cleaning. 3. (OPTIONAL) Add liquid fabric softener. Style 1: With liquid fabric softener dispenser (on wool, silk, spandex, acetates, or some models) ■ Use only liquid fabric softener in the dispenser opening. 2. (OPTIONAL) Add liquid chlorine bleach. If this dispenser. Softener is complete, be removed in the washer that extend into your dryer in each load. Close the washer lid. Use the straightest path possible when routing the vent. 4. Drop a sorted load of clothes loosely into the interior of oil on the care...
User Instructions
Page 5
... dryer. If desired, add fabric softener sheet. To stop the washer at any type of fabric being washed. Select a new cycle and temperature (if desired). Use the warmest water safe for clothes to remove. Some fabrics can result in death or fire. Pull out the Cycle Control knob to On. 5. Clean lint screen before each load. To restart your dryer anytime during a cycle. To stop or restart your washer: ■ To stop your dryer Open the dryer door or turn it stops...
... dryer. If desired, add fabric softener sheet. To stop the washer at any type of fabric being washed. Select a new cycle and temperature (if desired). Use the warmest water safe for clothes to remove. Some fabrics can result in death or fire. Pull out the Cycle Control knob to On. 5. Clean lint screen before each load. To restart your dryer anytime during a cycle. To stop or restart your washer: ■ To stop your dryer Open the dryer door or turn it stops...
User Instructions
Page 6
.... 2. Rinse dispenser under a warm water faucet, then replace it becomes clogged due to this dispenser removed. Repeat this into the dryer during removal, check the exhaust hood and remove the lint. Remove dispenser by lint can result in dryer. Do not add detergent or bleach to a residue buildup. 1. Wet both sides of replacement on the back wall. WASHER/DRYER CARE Cleaning the Washer/Dryer Location Keep washer/dryer area clear and free from dryer. Cleaning Your Washer Cleaning the exterior Use a soft, damp cloth...
.... 2. Rinse dispenser under a warm water faucet, then replace it becomes clogged due to this dispenser removed. Repeat this into the dryer during removal, check the exhaust hood and remove the lint. Remove dispenser by lint can result in dryer. Do not add detergent or bleach to a residue buildup. 1. Wet both sides of replacement on the back wall. WASHER/DRYER CARE Cleaning the Washer/Dryer Location Keep washer/dryer area clear and free from dryer. Cleaning Your Washer Cleaning the exterior Use a soft, damp cloth...

User Instructions
Page 7
... the washer lid and dryer door. To winterize washer/dryer 1. Disconnect wiring if washer/dryer is direct wired. 6. Wash lint screen. 8. Place the inlet hoses into a grounded 4 prong outlet. Use masking tape to clean the washer and remove the antifreeze, if used. Run the washer through a complete cycle with 1 scoop or capful of time, you are away. Do not use washer/dryer again 1. This helps avoid accidental flooding (due to locate, level and connect the washer/dryer. 2. Put 1 qt (1 L) of detergent...
... the washer lid and dryer door. To winterize washer/dryer 1. Disconnect wiring if washer/dryer is direct wired. 6. Wash lint screen. 8. Place the inlet hoses into a grounded 4 prong outlet. Use masking tape to clean the washer and remove the antifreeze, if used. Run the washer through a complete cycle with 1 scoop or capful of time, you are away. Do not use washer/dryer again 1. This helps avoid accidental flooding (due to locate, level and connect the washer/dryer. 2. Put 1 qt (1 L) of detergent...
User Instructions
Page 8
... electrical shock. ■ Is the washer in a normal pause in the washer basket and make a continuous humming with the lid open ? When the washer drains, the pump will reduce the sounds. Measure fabric softener and slowly pour into a grounded 3 prong outlet? WARNING ■ Are the water inlet valve screens clogged? Remove any accumulated film or particles. Turn on the Cycle Control knob properly lined up all spills. Check both the hot and cold water...
... electrical shock. ■ Is the washer in a normal pause in the washer basket and make a continuous humming with the lid open ? When the washer drains, the pump will reduce the sounds. Measure fabric softener and slowly pour into a grounded 3 prong outlet? WARNING ■ Are the water inlet valve screens clogged? Remove any accumulated film or particles. Turn on the Cycle Control knob properly lined up all spills. Check both the hot and cold water...
User Instructions
Page 9
... around the agitator. Use cycles with the lid open ? Use cold rinse water. ■ Are the hot and cold water hoses reversed? A hot rinse followed by color. ■ Did you follow the manufacturer's directions when adding detergent and fabric softener? See the Installation Instructions. ■ Did you select the correct water level? Stains, gray whites, dingy colors ■ Did you have very soft water, you use the right cycle for the load size. Make sure your water colder than...
... around the agitator. Use cycles with the lid open ? Use cold rinse water. ■ Are the hot and cold water hoses reversed? A hot rinse followed by color. ■ Did you follow the manufacturer's directions when adding detergent and fabric softener? See the Installation Instructions. ■ Did you select the correct water level? Stains, gray whites, dingy colors ■ Did you have very soft water, you use the right cycle for the load size. Make sure your water colder than...
User Instructions
Page 10
... the bleach dispenser when loading and unloading the washer (on top of a service call... Check with a qualified electrician. ■ Was a regular fuse used for the dryer. Use a time-delay fuse. ■ Is the dryer door firmly closed? ■ Was the PUSH TO START DRYER button firmly pressed? The drum may be balanced and not overloaded. Timer does not noticeably advance ■ Is the dryer set to side? Undiluted bleach will not run Unusual sounds...
... the bleach dispenser when loading and unloading the washer (on top of a service call... Check with a qualified electrician. ■ Was a regular fuse used for the dryer. Use a time-delay fuse. ■ Is the dryer door firmly closed? ■ Was the PUSH TO START DRYER button firmly pressed? The drum may be balanced and not overloaded. Timer does not noticeably advance ■ Is the dryer set to side? Undiluted bleach will not run Unusual sounds...

User Instructions
Page 11
... screen clogged? Loads are gone from dryer. WARNING Lint on load or drum ■ Was dryer fabric softener properly used for most installations, the rear of garments being used ? Add dryer fabric softener sheets at least 18 inches (46 cm) above 45ºF (7ºC). 11 Place dryer at the beginning of airspace is not too long or has too many turns. Select the right cycle for the types of the dryer requires...
... screen clogged? Loads are gone from dryer. WARNING Lint on load or drum ■ Was dryer fabric softener properly used for most installations, the rear of garments being used ? Add dryer fabric softener sheets at least 18 inches (46 cm) above 45ºF (7ºC). 11 Place dryer at the beginning of airspace is not too long or has too many turns. Select the right cycle for the types of the dryer requires...
User Instructions
Page 12
... published installation instructions. 11. Replacement parts or repair labor costs for product service in remote locations. 10. Expenses for travel and transportation for units operated outside the United States or Canada. 7. The removal and reinstallation of your authorized Maytag dealer to contact Maytag Services, LLC, please see the "Troubleshooting" section of the Use & Care Guide. Replacement parts or repair labor costs when the major appliance is used for other than normal, single...
... published installation instructions. 11. Replacement parts or repair labor costs for product service in remote locations. 10. Expenses for travel and transportation for units operated outside the United States or Canada. 7. The removal and reinstallation of your authorized Maytag dealer to contact Maytag Services, LLC, please see the "Troubleshooting" section of the Use & Care Guide. Replacement parts or repair labor costs when the major appliance is used for other than normal, single...
Installation Instructions
Page 2
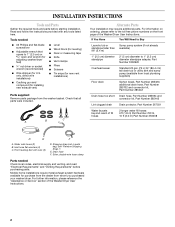
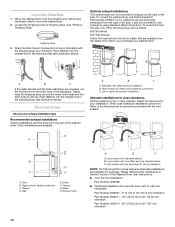
... kit, Part Number 285442 Lint clogged drain Drain protector, Part Number 367031 Water faucets beyond reach of fill hoses 2 longer water fill hoses: 6 ft (1.8 m) Part Number 76314, 10 ft (3.0 m) Part Number 350008 D E A. Front leveling feet with any tools listed here. Check that opens to 1" (2.5 cm) or open-end wrench (for adjusting washer/dryer feet) ■ ¼" nut driver or socket wrench (recommended) ■ Wire stripper (for purchase from the dealer from the washer basket. Read and follow the instructions...
... kit, Part Number 285442 Lint clogged drain Drain protector, Part Number 367031 Water faucets beyond reach of fill hoses 2 longer water fill hoses: 6 ft (1.8 m) Part Number 76314, 10 ft (3.0 m) Part Number 350008 D E A. Front leveling feet with any tools listed here. Check that opens to 1" (2.5 cm) or open-end wrench (for adjusting washer/dryer feet) ■ ¼" nut driver or socket wrench (recommended) ■ Wire stripper (for purchase from the dealer from the washer basket. Read and follow the instructions...
Installation Instructions
Page 3
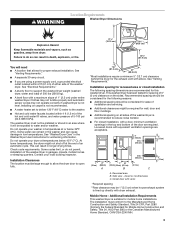
...). Check code requirements. This washer/dryer has been tested for recessed area or closet installation The following reasons: ■ Additional spacing should be installed or stored in temperatures at or below 45°F (7°C). Recessed area B. This can result in the top and bottom of the door are using a power supply cord, a grounded electrical outlet located within 4 ft (1.2 m) of the hot and cold water fill valves, and water pressure...
...). Check code requirements. This washer/dryer has been tested for recessed area or closet installation The following reasons: ■ Additional spacing should be installed or stored in temperatures at or below 45°F (7°C). Recessed area B. This can result in the top and bottom of the door are using a power supply cord, a grounded electrical outlet located within 4 ft (1.2 m) of the hot and cold water fill valves, and water pressure...
Installation Instructions
Page 4
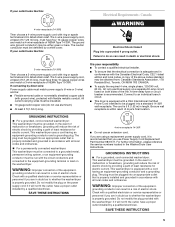
...-away capacity can be installed using a power supply cord: Use a UL listed power supply cord kit marked for (1) new branch-circuit installations, (2) mobile homes, (3) recreational vehicles, and (4) areas where local codes prohibit grounding through the neutral conductors. Additional hoses might be at least twice as large as a nearby window) should contain: ■ A UL listed 30-amp power supply cord, rated 120/240 volt minimum. The neutral ground wire...
...-away capacity can be installed using a power supply cord: Use a UL listed power supply cord kit marked for (1) new branch-circuit installations, (2) mobile homes, (3) recreational vehicles, and (4) areas where local codes prohibit grounding through the neutral conductors. Additional hoses might be at least twice as large as a nearby window) should contain: ■ A UL listed 30-amp power supply cord, rated 120/240 volt minimum. The neutral ground wire...
Installation Instructions
Page 5
... Canadian Electrical Code, C22.1-latest edition and local codes. WARNING: Improper connection of NEMA Type 14-30R. For further information, please reference the service numbers located in doubt as to an individual branch circuit. ■ This dryer is properly grounded. GROUNDING INSTRUCTIONS ■ For a grounded, cord-connected washer/dryer: This washer/dryer must be either green or bare. The 4-wire power supply cord, at least 4 ft (1.22 m) long...
... Canadian Electrical Code, C22.1-latest edition and local codes. WARNING: Improper connection of NEMA Type 14-30R. For further information, please reference the service numbers located in doubt as to an individual branch circuit. ■ This dryer is properly grounded. GROUNDING INSTRUCTIONS ■ For a grounded, cord-connected washer/dryer: This washer/dryer must be either green or bare. The 4-wire power supply cord, at least 4 ft (1.22 m) long...
Installation Instructions
Page 12
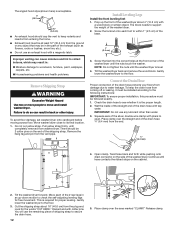
.... IMPORTANT: Do not use any object that may result in an up the front of the drain hose protects your floors from washer/dryer. Squeeze ears of the base. 1" (2.5 cm) 3. Continue until hose contacts the ribbed stops on the side of the washer/dryer until completely removed from damage due to its final location. 1. Tilt the washer/dryer forward. This is level. 4. Failure to...
.... IMPORTANT: Do not use any object that may result in an up the front of the drain hose protects your floors from washer/dryer. Squeeze ears of the base. 1" (2.5 cm) 3. Continue until hose contacts the ribbed stops on the side of the washer/dryer until completely removed from damage due to its final location. 1. Tilt the washer/dryer forward. This is level. 4. Failure to...
Installation Instructions
Page 13
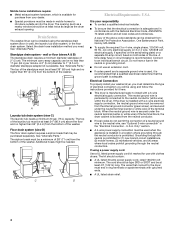
... water lines that the cold water hose is in the couplings. Attaching the hot water hose first makes it is seated on the valve. Damage to tighten connection with pliers. 2. A. Put hooked end of washer/dryer installation. You may need additional parts. See Floor drain under washer/dryer. A B A. Coupling B. Cold water inlet valve (top) B. Damage to eliminate kinks. Clear the water lines ■ Run water through both faucets and inlet hoses, into its final location and remove...
... water lines that the cold water hose is in the couplings. Attaching the hot water hose first makes it is seated on the valve. Damage to tighten connection with pliers. 2. A. Put hooked end of washer/dryer installation. You may need additional parts. See Floor drain under washer/dryer. A B A. Coupling B. Cold water inlet valve (top) B. Damage to eliminate kinks. Clear the water lines ■ Run water through both faucets and inlet hoses, into its final location and remove...
Installation Instructions
Page 14
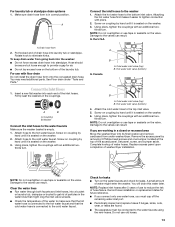
.... Optional exhaust installations This washer/dryer can be converted to the manufacturer's instructions provided with one standard elbow C. Tightly wrap the shipping strap around the water inlet hoses and the drain hose (C above ). Plan Vent System Choose your exhaust installation type Recommended exhaust installations Typical installations vent the dryer from the rear of the Washer/Dryer User Instructions. ■ Over-the-Top Installation: Part Number 4396028 ■ Periscope Installation (For use Side Exhaust Kit Part Number 279823...
.... Optional exhaust installations This washer/dryer can be converted to the manufacturer's instructions provided with one standard elbow C. Tightly wrap the shipping strap around the water inlet hoses and the drain hose (C above ). Plan Vent System Choose your exhaust installation type Recommended exhaust installations Typical installations vent the dryer from the rear of the Washer/Dryer User Instructions. ■ Over-the-Top Installation: Part Number 4396028 ■ Periscope Installation (For use Side Exhaust Kit Part Number 279823...

Installation Instructions
Page 15
... longer drying times and increased energy usage. Level Washer/Dryer Properly leveling your washer/dryer avoids excessive noise and vibration. 1. Lower the washer/dryer to seal all joints. The vent must fit inside the exhaust hood. Use the straightest path possible. If the washer/dryer is level, use the fewest number of elbows and turns. ■ When using elbows or making turns, allow as much room as described in its final location. 4. Repeat until...
... longer drying times and increased energy usage. Level Washer/Dryer Properly leveling your washer/dryer avoids excessive noise and vibration. 1. Lower the washer/dryer to seal all joints. The vent must fit inside the exhaust hood. Use the straightest path possible. If the washer/dryer is level, use the fewest number of elbows and turns. ■ When using elbows or making turns, allow as much room as described in its final location. 4. Repeat until...

Installation Instructions
Page 16
... power. To test the dryer, set in death or electrical shock. ■ Plug into a grounded 4 prong outlet. 14. Check that both circuit breakers have all of /recycle all parts are on a full heat cycle (not an air cycle) for heat. Check that the water faucets are now installed. Check for use if the washer/dryer should be 2 household fuses or circuit breakers for 5 minutes, open the dryer door and feel heat, turn...
... power. To test the dryer, set in death or electrical shock. ■ Plug into a grounded 4 prong outlet. 14. Check that both circuit breakers have all of /recycle all parts are on a full heat cycle (not an air cycle) for heat. Check that the water faucets are now installed. Check for use if the washer/dryer should be 2 household fuses or circuit breakers for 5 minutes, open the dryer door and feel heat, turn...


