Owners Manual
Page 2
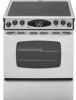
...Safety Instructions To check if device is properly installed, look underneath range with this guide. To Prevent Fire or Smoke Damage Be sure...) (Mon.-Fri., 8 am-8 pm Eastern Time) Internet: http://www.maytag.com In our continuing effort to the appliance as proof of our cooking ...pick up or move a flaming pan. 3. Turn off appliance to heat. Model Number Serial Number Date of the oven door, the appliance must be stored in...properly engaged in this appliance to prevent the potential risk of fire, electric shock, personal injury or damage to improve the quality and performance ...
...Safety Instructions To check if device is properly installed, look underneath range with this guide. To Prevent Fire or Smoke Damage Be sure...) (Mon.-Fri., 8 am-8 pm Eastern Time) Internet: http://www.maytag.com In our continuing effort to the appliance as proof of our cooking ...pick up or move a flaming pan. 3. Turn off appliance to heat. Model Number Serial Number Date of the oven door, the appliance must be stored in...properly engaged in this appliance to prevent the potential risk of fire, electric shock, personal injury or damage to improve the quality and performance ...

Owners Manual
Page 5
... above 140°F without continuing to reheat cold food. Some elements offer an even higher speed for melting chocolate and butter. Flex-ChoiceTM Element (select models) The Flex-ChoiceTM element is a fully functioning element that are chosen. The knobs can also be set the knob for cooking operations. After cooking, turn...
... above 140°F without continuing to reheat cold food. Some elements offer an even higher speed for melting chocolate and butter. Flex-ChoiceTM Element (select models) The Flex-ChoiceTM element is a fully functioning element that are chosen. The knobs can also be set the knob for cooking operations. After cooking, turn...
Owners Manual
Page 6
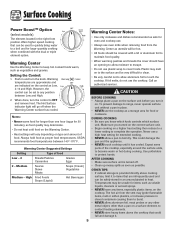
...items, especially plastic items, on to the surface and be very difficult to clean. • Be very careful not to allow aluminum foil to range, never operate surface unit without a pan in place. • NEVER use the cooktop as food quality may ignite flammable items, melt or soften ... 2 - OTHER TIPS • If cabinet storage is turned off when the Warming Center surface has cooled. Surface Cooking Power BoostTM Option (select models) The element located in the right front position offers higher speed cooking that could damage the pan and the appliance. • NEVER touch cooktop ...
...items, especially plastic items, on to the surface and be very difficult to clean. • Be very careful not to allow aluminum foil to range, never operate surface unit without a pan in place. • NEVER use the cooktop as food quality may ignite flammable items, melt or soften ... 2 - OTHER TIPS • If cabinet storage is turned off when the Warming Center surface has cooled. Surface Cooking Power BoostTM Option (select models) The element located in the right front position offers higher speed cooking that could damage the pan and the appliance. • NEVER touch cooktop ...
Owners Manual
Page 9
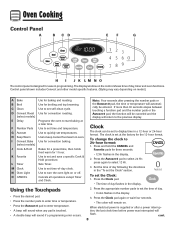
... programming error occurs. 2. Press the appropriate number pads to turn the oven light on the control shows time of -day clock. When electrical power is set self-clean cycle. The display window on or off. Use to start baking at the factory for baking and roasting....flashes in programming. Use for ease in the display. Use to select 12 Hr. 3. Oven Cooking Control Panel A B CD E F G H I Convect Bake (select models) J Cook & Hold K Favorite L Timer M Clock N Oven Light O CANCEL Use for the 12-hour format. Use to enter temperature. • A beep will sound...
... programming error occurs. 2. Press the appropriate number pads to turn the oven light on the control shows time of -day clock. When electrical power is set self-clean cycle. The display window on or off. Use to start baking at the factory for baking and roasting....flashes in programming. Use for ease in the display. Use to select 12 Hr. 3. Oven Cooking Control Panel A B CD E F G H I Convect Bake (select models) J Cook & Hold K Favorite L Timer M Clock N Oven Light O CANCEL Use for the 12-hour format. Use to enter temperature. • A beep will sound...

Owners Manual
Page 11
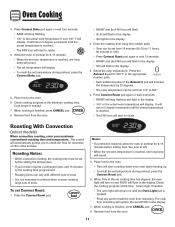
...° to turn off the oven, it will increase the temperature by 25 degrees. • The oven temperature can be displayed. Baking with Convection (select models) When using convection, enter your normal baking temperature. Press Bake pad again or wait four seconds. • BAKE will be set temperature during preheat, press...
...° to turn off the oven, it will increase the temperature by 25 degrees. • The oven temperature can be displayed. Baking with Convection (select models) When using convection, enter your normal baking temperature. Press Bake pad again or wait four seconds. • BAKE will be set temperature during preheat, press...
Owners Manual
Page 12
.... 8. Enter the roasting time using the number pads. • Time can be set from 10 minutes (00:10) to 550°. 4. Roasting With Convection (select models) When convection roasting, enter your recipe requires a preheated oven, add 15 minutes to the cooking time programmed. • Roasting times can be set cooking time...
.... 8. Enter the roasting time using the number pads. • Time can be set from 10 minutes (00:10) to 550°. 4. Roasting With Convection (select models) When convection roasting, enter your recipe requires a preheated oven, add 15 minutes to the cooking time programmed. • Roasting times can be set cooking time...

Owners Manual
Page 13
... will keep the food warm for a specified length of day will display when the oven is still flashing, press Bake, Convect Bake (select models) or Convect Roast (select models) and select the oven temperature. Select the amount of time you are in the display. • Time can be displayed during preheat. •...
... will keep the food warm for a specified length of day will display when the oven is still flashing, press Bake, Convect Bake (select models) or Convect Roast (select models) and select the oven temperature. Select the amount of time you are in the display. • Time can be displayed during preheat. •...

Owners Manual
Page 14
... the Autoset 0 pad or the appropriate number pads. • 350° will light when Autoset 0 pad is active. Press Bake, Convect Bake (select models) or Convect Roast (select models). 6. Keep Warm For safely keeping hot foods warm in oven. - Press the Cook & Hold pad. • HOLD and DELAY flash in the display...
... the Autoset 0 pad or the appropriate number pads. • 350° will light when Autoset 0 pad is active. Press Bake, Convect Bake (select models) or Convect Roast (select models). 6. Keep Warm For safely keeping hot foods warm in oven. - Press the Cook & Hold pad. • HOLD and DELAY flash in the display...

Owners Manual
Page 17
...Hold as described in the display. Program a Cook & Hold cycle as a Favorite: 1. Press Bake, Convect Bake (select models) or Convect Roast (select models). • The Favorite cycle will begin immediately. • The selected cycle word will light in the display. • The... decreasing the oven temperature (-35, -30, . . . -5). 5. Press the Bake pad. 2. Continuing to Bake, Convect Bake (select models) and Convect Roast (select models) only. To start a cycle programmed into Favorite: 1. For example, if the oven temperature was previously adjusted, the change the temperature, set...
...Hold as described in the display. Program a Cook & Hold cycle as a Favorite: 1. Press Bake, Convect Bake (select models) or Convect Roast (select models). • The Favorite cycle will begin immediately. • The selected cycle word will light in the display. • The... decreasing the oven temperature (-35, -30, . . . -5). 5. Press the Bake pad. 2. Continuing to Bake, Convect Bake (select models) and Convect Roast (select models) only. To start a cycle programmed into Favorite: 1. For example, if the oven temperature was previously adjusted, the change the temperature, set...
Owners Manual
Page 18
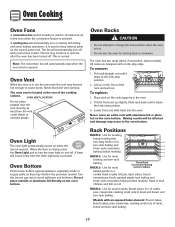
...on a cookie sheet or jelly roll pan, layer cakes, frozen convenience foods, general single-rack baking and three-rack convection baking (select models). Lower front and slide back into the oven. The fan will automatically turn off . The oven has two racks (three if convection, select... models). To replace: 1. A cooling fan will automatically turn on when the door is opened . Never block the vent opening as they may ...
...on a cookie sheet or jelly roll pan, layer cakes, frozen convenience foods, general single-rack baking and three-rack convection baking (select models). Lower front and slide back into the oven. The fan will automatically turn off . The oven has two racks (three if convection, select... models). To replace: 1. A cooling fan will automatically turn on when the door is opened . Never block the vent opening as they may ...

Owners Manual
Page 19
...on the lower rack. Notes: • The removable section of the rack can be used as shown for regular or convection baking (select models). Models with an exposed bake element. Baking Layer Cakes on Two Racks For best results when baking cakes on two or three racks, check foods ... the rack can be removed to accommodate a large roaster on the rack as a roasting rack in a broiling pan. Create-A-SpaceTM Half Rack Select range models are equipped with a hidden bake element. Place the cakes on the rack and the oven side wall. • Use caution when removing items from...
...on the lower rack. Notes: • The removable section of the rack can be used as shown for regular or convection baking (select models). Models with an exposed bake element. Baking Layer Cakes on Two Racks For best results when baking cakes on two or three racks, check foods ... the rack can be removed to accommodate a large roaster on the rack as a roasting rack in a broiling pan. Create-A-SpaceTM Half Rack Select range models are equipped with a hidden bake element. Place the cakes on the rack and the oven side wall. • Use caution when removing items from...
Owners Manual
Page 23
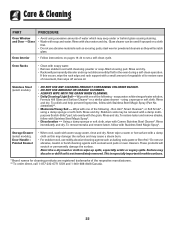
... ALWAYS WIPE WITH THE GRAIN WHEN CLEANING. • Daily Cleaning/Light Soil -- using a damp sponge or soft cloth. Rinse immediately and dry. Storage Drawer (select models), Door Handle - Glass • Avoid using excessive amounts of movement, then wipe off excess oil. Oven Racks • Clean with soapy water. • Remove ...• Wash with one of the respective manufacturers. ** To order direct, call 1-877-232-6771 USA and 1-800-688-8408 Canada. 22 Surface may not slide smoothly if left in the oven during a self-clean operation. This is not immediately removed.
... ALWAYS WIPE WITH THE GRAIN WHEN CLEANING. • Daily Cleaning/Light Soil -- using a damp sponge or soft cloth. Rinse immediately and dry. Storage Drawer (select models), Door Handle - Glass • Avoid using excessive amounts of movement, then wipe off excess oil. Oven Racks • Clean with soapy water. • Remove ...• Wash with one of the respective manufacturers. ** To order direct, call 1-877-232-6771 USA and 1-800-688-8408 Canada. 22 Surface may not slide smoothly if left in the oven during a self-clean operation. This is not immediately removed.

Owners Manual
Page 24
... on or stand on hinges. If accidentally hit, the hinge will fall if not held in place. Grasp door at each side. 2. Slide the door down on the top corners of the door to prevent fusing of breakage at each side. Scratching, hitting, jarring or stressing the...before touching. Reset clock. Hinge arms are in place while removing wire retainer. Oven Light (style varies by model) CAUTION • Disconnect power to range before replacing light bulb. • Allow oven to range. Remove bulb cover and light bulb. This could injure your fingers. To remove: 1. Do not use ....
... on or stand on hinges. If accidentally hit, the hinge will fall if not held in place. Grasp door at each side. 2. Slide the door down on the top corners of the door to prevent fusing of breakage at each side. Scratching, hitting, jarring or stressing the...before touching. Reset clock. Hinge arms are in place while removing wire retainer. Oven Light (style varies by model) CAUTION • Disconnect power to range before replacing light bulb. • Allow oven to range. Remove bulb cover and light bulb. This could injure your fingers. To remove: 1. Do not use ....
Owners Manual
Page 25
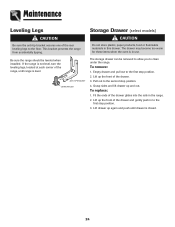
... of the drawer and gently push in to the first stop position. 2. This bracket prevents the range from accidentally tipping. To remove: 1. Maintenance Leveling Legs Storage Drawer (select models) CAUTION CAUTION Be sure the anti-tip bracket secures one of the drawer glides into the rails ...in the range. 2. Fit the ends of the rear leveling legs to clean under the range. Do not store plastic, paper products, food ...
... of the drawer and gently push in to the first stop position. 2. This bracket prevents the range from accidentally tipping. To remove: 1. Maintenance Leveling Legs Storage Drawer (select models) CAUTION CAUTION Be sure the anti-tip bracket secures one of the drawer glides into the rails ...in the range. 2. Fit the ends of the rear leveling legs to clean under the range. Do not store plastic, paper products, food ...
Owners Manual
Page 28
... service, first see the "Troubleshooting" section of the Use & Care Guide. Costs associated with electrical or plumbing codes, or use of consumables or cleaning products not approved by this warranty. 8. DISCLAIMER... SOLE AND EXCLUSIVE REMEDY UNDER THIS LIMITED WARRANTY SHALL BE PRODUCT REPAIR AS PROVIDED HEREIN. MAYTAG SHALL NOT BE LIABLE FOR INCIDENTAL OR CONSEQUENTIAL DAMAGES. If outside the 50 United States ...it is installed in an inaccessible location or is not installed in accordance with original model/serial numbers that is void if the factory applied serial number has been altered ...
... service, first see the "Troubleshooting" section of the Use & Care Guide. Costs associated with electrical or plumbing codes, or use of consumables or cleaning products not approved by this warranty. 8. DISCLAIMER... SOLE AND EXCLUSIVE REMEDY UNDER THIS LIMITED WARRANTY SHALL BE PRODUCT REPAIR AS PROVIDED HEREIN. MAYTAG SHALL NOT BE LIABLE FOR INCIDENTAL OR CONSEQUENTIAL DAMAGES. If outside the 50 United States ...it is installed in an inaccessible location or is not installed in accordance with original model/serial numbers that is void if the factory applied serial number has been altered ...


