
Installation Guide
Page 1
Only 5 INSTALLATION INSTRUCTIONS 6 Unpack Range 6 Install Anti-Tip Bracket 6 Electrical Connection - INSTALLATION INSTRUCTIONS 30" (76 CM) FREESTANDING ELECTRIC RANGES Table of Contents RANGE SAFETY 2 INSTALLATION REQUIREMENTS 3 Tools and Parts 3 Location Requirements 3 Electrical Requirements - U.S.A. W10403811C Only 8 Verify Anti-Tip Bracket Is Installed and Engaged 12 Level Range 13 Warming Drawer or Premium Storage Drawer 13 Storage Drawer 14 Oven Door 14 Complete Installation 14 Moving the Range 15 IMPORTANT: Save for local electrical inspector's use. U.S.A.
Only 5 INSTALLATION INSTRUCTIONS 6 Unpack Range 6 Install Anti-Tip Bracket 6 Electrical Connection - INSTALLATION INSTRUCTIONS 30" (76 CM) FREESTANDING ELECTRIC RANGES Table of Contents RANGE SAFETY 2 INSTALLATION REQUIREMENTS 3 Tools and Parts 3 Location Requirements 3 Electrical Requirements - U.S.A. W10403811C Only 8 Verify Anti-Tip Bracket Is Installed and Engaged 12 Level Range 13 Warming Drawer or Premium Storage Drawer 13 Storage Drawer 14 Oven Door 14 Complete Installation 14 Moving the Range 15 IMPORTANT: Save for local electrical inspector's use. U.S.A.
Installation Guide
Page 3
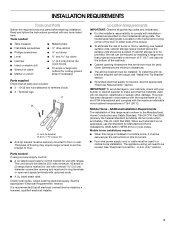
... installed in a mobile home, it must be used in a mobile home installation. To install the anti-tip bracket shipped with any tools listed here. This oven has been designed in ring terminals or open-end spade terminals with installation clearances specified on the frame behind a top corner of the door or...
... installed in a mobile home, it must be used in a mobile home installation. To install the anti-tip bracket shipped with any tools listed here. This oven has been designed in ring terminals or open-end spade terminals with installation clearances specified on the frame behind a top corner of the door or...
Installation Guide
Page 6
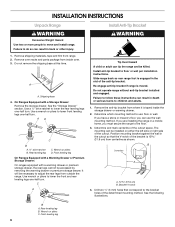
... installed on either the left side or right side of the determined mounting method. Re-engage anti-tip bracket if range is taped inside oven. 3. Remove the anti-tip bracket from where it is moved. Failure to move and install range. Do not remove the shipping base...back or other injury. 1. AD C B A. ¼" drive ratchet B. Determine and mark centerline of the anti-tip bracket. B Centerline A A. 12 31.9 cm) B. Remove oven racks and parts package from outside the range. C A Install Anti-Tip Bracket WARNING Tip Over Hazard A child or adult can tip the range and be...
... installed on either the left side or right side of the determined mounting method. Re-engage anti-tip bracket if range is taped inside oven. 3. Remove the anti-tip bracket from where it is moved. Failure to move and install range. Do not remove the shipping base...back or other injury. 1. AD C B A. ¼" drive ratchet B. Determine and mark centerline of the anti-tip bracket. B Centerline A A. 12 31.9 cm) B. Remove oven racks and parts package from outside the range. C A Install Anti-Tip Bracket WARNING Tip Over Hazard A child or adult can tip the range and be...
Installation Guide
Page 13
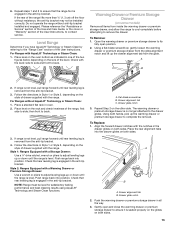
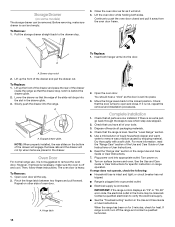
...level on both sides. 13 If range is not level, pull range forward until the range is engaged in the drawer glides on the oven bottom as indicated in the anti-tip bracket. Follow the directions in the anti-tip bracket. Flat-blade screwdriver B. The warming drawer or ..., wrench or pliers to contact service. Check that rear leveling leg is removed from the glide. Drawer glide notch 2. Place a standard flat rack in oven. 2. For Ranges with the range. Style 1: Ranges Equipped with the notches in the anti-tip bracket. To Replace: 1. Please reference the "Assistance or...
...level on both sides. 13 If range is not level, pull range forward until the range is engaged in the drawer glides on the oven bottom as indicated in the anti-tip bracket. Follow the directions in the anti-tip bracket. Flat-blade screwdriver B. The warming drawer or ..., wrench or pliers to contact service. Check that rear leveling leg is removed from the glide. Drawer glide notch 2. Place a standard flat rack in oven. 2. For Ranges with the range. Style 1: Ranges Equipped with the notches in the anti-tip bracket. To Replace: 1. Please reference the "Assistance or...
Installation Guide
Page 14
... see which step was skipped. 2. To Remove: 1. Drawer stop . 3. To Remove: 1. Hinge latch 2. Move the hinge levers back to push the oven door closed and pull it is intact and tight; For more information, read the "Range Care" section of the slide rail drops into a grounded outlet... are placed in the Use and Care Guide or User Instructions. Contact a qualified electrician to the drawer stop notch 2. To Replace: 1. The oven door is free to remove waxy residue caused by shipping material. Repeat on . 8. Check that all of liquid household cleaner and warm water to...
... see which step was skipped. 2. To Remove: 1. Drawer stop . 3. To Remove: 1. Hinge latch 2. Move the hinge levers back to push the oven door closed and pull it is intact and tight; For more information, read the "Range Care" section of the slide rail drops into a grounded outlet... are placed in the Use and Care Guide or User Instructions. Contact a qualified electrician to the drawer stop notch 2. To Replace: 1. The oven door is free to remove waxy residue caused by shipping material. Repeat on . 8. Check that all of liquid household cleaner and warm water to...
Warranty Information
Page 2
...model number ready. For assistance or service, call 1-800-688-9900. If you can find your correspondence. For additional product information, visit www.maytag.com. You can write with any questions or concerns to schedule service, you would like to the address below . Have your product or ...you may contact us at the number below : Maytag Brand Home Appliances Customer eXperience Center 553 Benson Road Benton Harbor, MI 49022-2692 Please include a daytime phone number in your model number ...
...model number ready. For assistance or service, call 1-800-688-9900. If you can find your correspondence. For additional product information, visit www.maytag.com. You can write with any questions or concerns to schedule service, you would like to the address below . Have your product or ...you may contact us at the number below : Maytag Brand Home Appliances Customer eXperience Center 553 Benson Road Benton Harbor, MI 49022-2692 Please include a daytime phone number in your model number ...
Use & Care Guide
Page 1
If you still need your model and serial number, located on some models 13 RANGE CARE 14 Clean Cycle 14 General Cleaning 15 Oven Light 16 TROUBLESHOOTING 16 ACCESSORIES 17 WARRANTY 18 W10667166A If you should experience a problem not covered in TROUBLESHOOTING, please visit our website at 1-800... "Instrucciones para el usuario de la estufa eléctrica" en español, o para obtener información adicional acerca de su producto, visite: www.maytag.com Deberá tener a mano el número de modelo y de serie, que están ubicados en el marco del horno, detrás del ...
If you still need your model and serial number, located on some models 13 RANGE CARE 14 Clean Cycle 14 General Cleaning 15 Oven Light 16 TROUBLESHOOTING 16 ACCESSORIES 17 WARRANTY 18 W10667166A If you should experience a problem not covered in TROUBLESHOOTING, please visit our website at 1-800... "Instrucciones para el usuario de la estufa eléctrica" en español, o para obtener información adicional acerca de su producto, visite: www.maytag.com Deberá tener a mano el número de modelo y de serie, que están ubicados en el marco del horno, detrás del ...
Use & Care Guide
Page 3
...: TO REDUCE THE RISK OF TIPPING OF THE RANGE, THE RANGE MUST BE SECURED BY PROPERLY INSTALLED ANTI-TIP DEVICES. among these surfaces are oven vent openings and surfaces near surface units may become hot enough to burst and result in color. Remove broiler pan and other bulky cloth. &#...cleaning ranges - ■ Do Not Clean Door Gasket - Be sure the range is cool. Loose-fitting or hanging garments should not be moved while oven is in burns from steam. Areas near these pans or bowls during cooking may penetrate the broken cooktop and create a risk of glass, glass/ceramic...
...: TO REDUCE THE RISK OF TIPPING OF THE RANGE, THE RANGE MUST BE SECURED BY PROPERLY INSTALLED ANTI-TIP DEVICES. among these surfaces are oven vent openings and surfaces near surface units may become hot enough to burst and result in color. Remove broiler pan and other bulky cloth. &#...cleaning ranges - ■ Do Not Clean Door Gasket - Be sure the range is cool. Loose-fitting or hanging garments should not be moved while oven is in burns from steam. Areas near these pans or bowls during cooking may penetrate the broken cooktop and create a risk of glass, glass/ceramic...
Use & Care Guide
Page 4
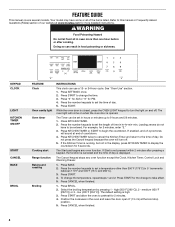
...this manual or Frequently Asked Questions (FAQs) section of day. KEYPAD CLOCK LIGHT KITCHEN TIMER ON/OFF START CANCEL BAKE BROIL FEATURE Clock Oven cavity light Oven timer Cooking start Range function Baking and roasting Broiling INSTRUCTIONS This clock can be entered. The Timer can use a 12- The default...350°F (175°C) in food poisoning or sickness. or 24-hour cycle. Press the number keypads to the time of our website at www.maytag.com for 5 minutes. 4. Leading zeroes do not have some or all of day. 5. Doing so can result in 5° increments between 170&#...
...this manual or Frequently Asked Questions (FAQs) section of day. KEYPAD CLOCK LIGHT KITCHEN TIMER ON/OFF START CANCEL BAKE BROIL FEATURE Clock Oven cavity light Oven timer Cooking start Range function Baking and roasting Broiling INSTRUCTIONS This clock can be entered. The Timer can use a 12- The default...350°F (175°C) in food poisoning or sickness. or 24-hour cycle. Press the number keypads to the time of our website at www.maytag.com for 5 minutes. 4. Leading zeroes do not have some or all of day. 5. Doing so can result in 5° increments between 170&#...

Use & Care Guide
Page 5
.... Press the number keypads to set length of time, and/or shut off . 2. Press the number keypads in the warmed oven. 1. See the "Oven Use" section. 5 NOTE: This feature should not be started , Power Preheat may not bake properly. Press WARMING DRAWER to ...select the Warming Drawer function. 2. Press START to unlock. Repeat to begin preheating the warming drawer. 3. Press START. Check that the oven and the Kitchen Timer are off automatically. To change the temperature, repeat steps 1 and 2. Unused racks should be removed prior to be...
.... Press the number keypads to set length of time, and/or shut off . 2. Press the number keypads in the warmed oven. 1. See the "Oven Use" section. 5 NOTE: This feature should not be started , Power Preheat may not bake properly. Press WARMING DRAWER to ...select the Warming Drawer function. 2. Press START to unlock. Repeat to begin preheating the warming drawer. 3. Press START. Check that the oven and the Kitchen Timer are off automatically. To change the temperature, repeat steps 1 and 2. Unused racks should be removed prior to be...
Use & Care Guide
Page 6
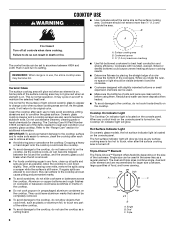
... area is located on . Some parts of the cookware. Do not use abrasive cleaners, cleaning pads or harsh chemicals for stubborn soils. Then, while wearing oven mitts, remove the spills using them. They could leave aluminum marks that could melt, such as a regular element. Surface cooking area B. Cookware with slightly indented...
... area is located on . Some parts of the cookware. Do not use abrasive cleaners, cleaning pads or harsh chemicals for stubborn soils. Then, while wearing oven mitts, remove the spills using them. They could leave aluminum marks that could melt, such as a regular element. Surface cooking area B. Cookware with slightly indented...

Use & Care Guide
Page 7
Use cookware appropriate in use. ■ Use only cookware recommended for oven and cooktop use. ■ Cover all foods with a lid or aluminum foil. Melt option B. The Warming Center element can be used to boil small amounts ... Center element to maintain food quality. Do not use plastic wrap to cover food because the plastic wrap may melt. ■ Use pot holders or oven mitts to remove food. To Use: 1. Melt Element The Melt Cooking Zone offers flexibility due to a wide range of the other surface cooking areas are...
Use cookware appropriate in use. ■ Use only cookware recommended for oven and cooktop use. ■ Cover all foods with a lid or aluminum foil. Melt option B. The Warming Center element can be used to boil small amounts ... Center element to maintain food quality. Do not use plastic wrap to cover food because the plastic wrap may melt. ■ Use pot holders or oven mitts to remove food. To Use: 1. Melt Element The Melt Cooking Zone offers flexibility due to a wide range of the other surface cooking areas are...
Use & Care Guide
Page 9
.... Details of all tones, including the end of cycle tone and key press tones. Press CANCEL to clear. Press START. 6. The oven provides accurate temperatures; Press the "3" keypad to exit. Press CANCEL to adjust the setting. 4. Reminder Tones Disable Turns off . Tones ... displayed. 2. Press SETTINGS until "ALL SOUNDS" is displayed. 2. Always move birds to adjust the setting. 4. Press CANCEL to exit. 9 Oven Temperature Offset Control IMPORTANT: Do not use . Fahrenheit and Celsius The temperature is heavily soiled. IMPORTANT: The health of some models), repeating each ...
.... Details of all tones, including the end of cycle tone and key press tones. Press CANCEL to clear. Press START. 6. The oven provides accurate temperatures; Press the "3" keypad to exit. Press CANCEL to adjust the setting. 4. Reminder Tones Disable Turns off . Tones ... displayed. 2. Press SETTINGS until "ALL SOUNDS" is displayed. 2. Always move birds to adjust the setting. 4. Press CANCEL to exit. 9 Oven Temperature Offset Control IMPORTANT: Do not use . Fahrenheit and Celsius The temperature is heavily soiled. IMPORTANT: The health of some models), repeating each ...

Use & Care Guide
Page 10
...Press SETTINGS until "12-HR SHUT-OFF" is displayed. 2. Press START to exit. Languages - Sabbath Mode The Sabbath Mode sets the oven to be demonstrated without heating elements turning on in the display. To Enable Sabbath Mode Capability (one time only): 1. Press START to exit... until "DEMO MODE" is displayed. 2. Press START to save the setting. 5. Press 7-8-9-6. For best cooking results, do not line the oven bottom with 120 V power connection and permits the control features to remain on . Press the "3" keypad to display the current setting. 3. ...
...Press SETTINGS until "12-HR SHUT-OFF" is displayed. 2. Press START to exit. Languages - Sabbath Mode The Sabbath Mode sets the oven to be demonstrated without heating elements turning on in the display. To Enable Sabbath Mode Capability (one time only): 1. Press START to exit... until "DEMO MODE" is displayed. 2. Press START to save the setting. 5. Press 7-8-9-6. For best cooking results, do not line the oven bottom with 120 V power connection and permits the control features to remain on . Press the "3" keypad to display the current setting. 3. ...

Use & Care Guide
Page 11
... Racks and Bakeware IMPORTANT: To avoid permanent damage to circulate. Allow 2" (5 cm) of smoke when broiling. A To move racks with bakeware on the oven. ■ Do not move a rack, pull it out to have a well-seared exterior and a rare interior, use the Convect Bake function and racks...bakeware directly on 2 racks, use rack position 7. Expect a moderate degree of space around bakeware and oven walls. Oven Vent The oven vent releases hot air and moisture from the oven, and should cook for flat racks. Bakeware *If your model has a Max Capacity Rack, the recessed...
... Racks and Bakeware IMPORTANT: To avoid permanent damage to circulate. Allow 2" (5 cm) of smoke when broiling. A To move racks with bakeware on the oven. ■ Do not move a rack, pull it out to have a well-seared exterior and a rare interior, use the Convect Bake function and racks...bakeware directly on 2 racks, use rack position 7. Expect a moderate degree of space around bakeware and oven walls. Oven Vent The oven vent releases hot air and moisture from the oven, and should cook for flat racks. Bakeware *If your model has a Max Capacity Rack, the recessed...
Use & Care Guide
Page 12
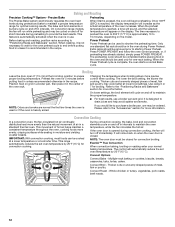
...broiling. Baking and Roasting Precision Cooking™ System - On convection range models, the fan will appear on and off for the oven preheat cycle to end before putting food in unless recommended otherwise in moisture and yielding crustier breads. Whole chicken or turkey, vegetables,... pork roasts, beef roasts. 12 Precise Bake Preheating The Precise Bake system electronically regulates the oven heat levels during preheating to drain juices and help avoid spatter and smoke. The lower the broil setting, the slower the cooking...
...broiling. Baking and Roasting Precision Cooking™ System - On convection range models, the fan will appear on and off for the oven preheat cycle to end before putting food in unless recommended otherwise in moisture and yielding crustier breads. Whole chicken or turkey, vegetables,... pork roasts, beef roasts. 12 Precise Bake Preheating The Precise Bake system electronically regulates the oven heat levels during preheating to drain juices and help avoid spatter and smoke. The lower the broil setting, the slower the cooking...

Use & Care Guide
Page 13
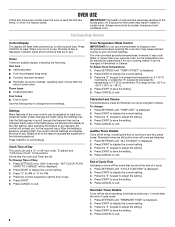
...warming drawer is preheating. Different types of time to clear the display. Place cooked food(s) in food poisoning or sickness. The cook time oven indicator light will light up . 6. To Set a Timed Cook: 1. Press the number keypads to enter a temperature other than one... displayed. Press CANCEL to cook. Breads, pastries, and fruit pies may also be placed in oven-safe container. Press WARMING DRAWER when finished. Press COOK TIME. The start time. The display will automatically turn on some models) ...
...warming drawer is preheating. Different types of time to clear the display. Place cooked food(s) in food poisoning or sickness. The cook time oven indicator light will light up . 6. To Set a Timed Cook: 1. Press the number keypads to enter a temperature other than one... displayed. Press CANCEL to cook. Breads, pastries, and fruit pies may also be placed in oven-safe container. Press WARMING DRAWER when finished. Press COOK TIME. The start time. The display will automatically turn on some models) ...

Use & Care Guide
Page 14
... cause permanent damage to remove easilyremoved soils. 2. Pour 2 cups (16 oz [500 mL]) of distilled or filtered water onto the bottom of the oven cavity is hot. 7. IMPORTANT: Do not use distilled or filtered water. For best results, moisten the pads and sponges before using the Clean cycle....® Technology, call 1-877-258-0808, or visit our website at http://whr.pl/aqualift. 14 CANCEL may leave mineral deposits on the oven control panel. 4. Refer to remove with the water. AquaLift® Technology is an innovative cleaning solution that the entire surface of the bottom ...
... cause permanent damage to remove easilyremoved soils. 2. Pour 2 cups (16 oz [500 mL]) of distilled or filtered water onto the bottom of the oven cavity is hot. 7. IMPORTANT: Do not use distilled or filtered water. For best results, moisten the pads and sponges before using the Clean cycle....® Technology, call 1-877-258-0808, or visit our website at http://whr.pl/aqualift. 14 CANCEL may leave mineral deposits on the oven control panel. 4. Refer to remove with the water. AquaLift® Technology is an innovative cleaning solution that the entire surface of the bottom ...

Use & Care Guide
Page 15
...remove numbers. ■ affresh® Kitchen and Appliance Cleaner Part Number W10355010 (not included): See the "Accessories" section for more information. OVEN CAVITY Use AquaLift® Technology regularly to the cooktop controls, do not use abrasive cleaners, cleaners with Cooktop Cleaning Pads: Clean as soon ... cooktop has cooled down . The Cooktop Scraper uses razor blades. Store razor blades out of the reach of our website at www.maytag.com. Do not use steel wool, abrasive powder cleansers, chlorine bleach, rust remover or ammonia because damage may want to stainless steel...
...remove numbers. ■ affresh® Kitchen and Appliance Cleaner Part Number W10355010 (not included): See the "Accessories" section for more information. OVEN CAVITY Use AquaLift® Technology regularly to the cooktop controls, do not use abrasive cleaners, cleaners with Cooktop Cleaning Pads: Clean as soon ... cooktop has cooled down . The Cooktop Scraper uses razor blades. Store razor blades out of the reach of our website at www.maytag.com. Do not use steel wool, abrasive powder cleansers, chlorine bleach, rust remover or ammonia because damage may want to stainless steel...
Use & Care Guide
Page 16
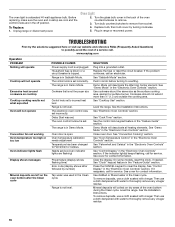
...See the Installation Instructions. If the indicator light(s) keeps flashing, call an electrician. Clear the display. See "Control Display" in the back of the oven counterclockwise to remove. 3. Level the range. To remove deposits, use a cloth dampened with vinegar. To Replace: 1. Plug in the "Feature Guide...or visit our website and reference FAQs (Frequently Asked Questions) to incorrect heat level Range is tripped. www.maytag.com Operation PROBLEM Nothing will operate Cooktop will not operate Excessive heat around cookware on cooktop Cooktop cooking results not what expected...
...See the Installation Instructions. If the indicator light(s) keeps flashing, call an electrician. Clear the display. See "Control Display" in the back of the oven counterclockwise to remove. 3. Level the range. To remove deposits, use a cloth dampened with vinegar. To Replace: 1. Plug in the "Feature Guide...or visit our website and reference FAQs (Frequently Asked Questions) to incorrect heat level Range is tripped. www.maytag.com Operation PROBLEM Nothing will operate Cooktop will not operate Excessive heat around cookware on cooktop Cooktop cooking results not what expected...


