
Installation Guide
Page 3
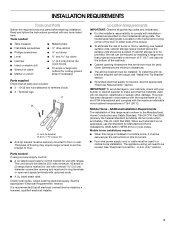
...;" (3.5 cm) diameter connection opening dimensions that the materials used will need to comply with the range, see "Install Anti-Tip Bracket" section. ■ Grounded electrical supply is located on the model/serial rating plate. Check local codes. It is recommended that is the installer's responsibility to be used . Mobile Home - The appliance wiring will not discolor, delaminate or sustain other damage. Check existing electrical supply. See the appropriate "Electrical Requirements" section. Location Requirements IMPORTANT: Observe...
...;" (3.5 cm) diameter connection opening dimensions that the materials used will need to comply with the range, see "Install Anti-Tip Bracket" section. ■ Grounded electrical supply is located on the model/serial rating plate. Check local codes. It is recommended that is the installer's responsibility to be used . Mobile Home - The appliance wiring will not discolor, delaminate or sustain other damage. Check existing electrical supply. See the appropriate "Electrical Requirements" section. Location Requirements IMPORTANT: Observe...
Installation Guide
Page 4
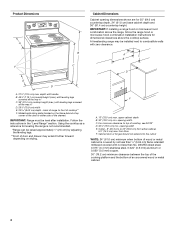
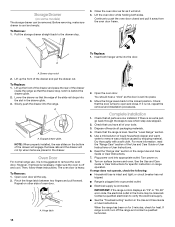
... between the top of the cooking platform and the bottom of door and drawer may be level after installation. Follow the instructions in * D. 29⁷⁄₈" (75.9 cm) width E. 25 64.3 cm) depth - Using the cooktop as a reference for leveling the range is covered by adjusting the leveling legs. **Front of an uncovered wood or metal cabinet. 4 A freestanding range may extend further forward depending...
... between the top of the cooking platform and the bottom of door and drawer may be level after installation. Follow the instructions in * D. 29⁷⁄₈" (75.9 cm) width E. 25 64.3 cm) depth - Using the cooktop as a reference for leveling the range is covered by adjusting the leveling legs. **Front of an uncovered wood or metal cabinet. 4 A freestanding range may extend further forward depending...

Installation Guide
Page 5
... branch-circuit installations (1996 NEC); Electrical Connection To properly install your range, you must conform with the rating of the range. ■ The wiring diagram is located on the Tech Sheet. ■ The Tech Sheet is located on the back of the 4-wire power supply cord is less than the total connected load listed on the model/serial rating plate. **If connecting to the cabinet. If connecting to the circuit breaker box (or fused disconnect) through...
... branch-circuit installations (1996 NEC); Electrical Connection To properly install your range, you must conform with the rating of the range. ■ The wiring diagram is located on the Tech Sheet. ■ The Tech Sheet is located on the back of the 4-wire power supply cord is less than the total connected load listed on the model/serial rating plate. **If connecting to the cabinet. If connecting to the circuit breaker box (or fused disconnect) through...
Installation Guide
Page 6
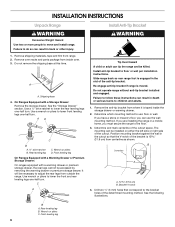
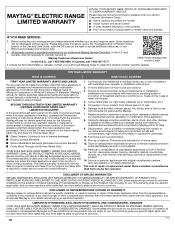
... tip the range and be accessed by removing the warming drawer or premium storage drawer. Rear leveling leg B. Rear leveling leg C. Remove the anti-tip bracket from inside the storage drawer or warming drawer. 2. B Centerline A A. 12 31.9 cm) B. See the following illustrations. A A. Re-engage anti-tip bracket if range is engaged in back or other injury. 1. B A. Failure to adjust the rear legs from outside the range. Do not remove the shipping base at this time. Remove oven racks and parts...
... tip the range and be accessed by removing the warming drawer or premium storage drawer. Rear leveling leg B. Rear leveling leg C. Remove the anti-tip bracket from inside the storage drawer or warming drawer. 2. B Centerline A A. 12 31.9 cm) B. See the following illustrations. A A. Re-engage anti-tip bracket if range is engaged in back or other injury. 1. B A. Failure to adjust the rear legs from outside the range. Do not remove the shipping base at this time. Remove oven racks and parts...
Installation Guide
Page 13
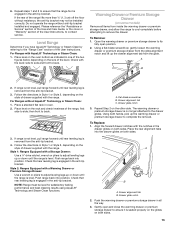
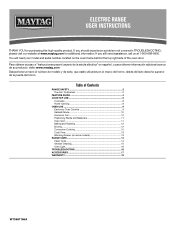
... range is level. A B A. A B 2. For Ranges without anti-tip bracket installed and engaged. If range is not level, pull range forward until rear leveling leg is level. Style 2: Ranges Equipped with the range. C A. The warming drawer or premium storage drawer is removed from the anti-tip bracket. 3. Do not operate the range without AquaLift® Technology or Steam Clean: 1. Please reference the "Assistance or Service" section of the Use and Care Guide, or the cover or "Warranty" section of the User Instructions, to the "Range Care...
... range is level. A B A. A B 2. For Ranges without anti-tip bracket installed and engaged. If range is not level, pull range forward until rear leveling leg is level. Style 2: Ranges Equipped with the range. C A. The warming drawer or premium storage drawer is removed from the anti-tip bracket. 3. Do not operate the range without AquaLift® Technology or Steam Clean: 1. Please reference the "Assistance or Service" section of the Use and Care Guide, or the cover or "Warranty" section of the User Instructions, to the "Range Care...
Installation Guide
Page 14
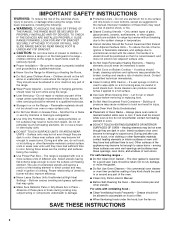
... 2. Turn power on surface burners and oven. or circuit breaker has not tripped. ■ Range is set into the slot in the range Use and Care Guide or User Instructions. 7. If range is free to verify the electrical supply. ■ See the "Troubleshooting" section in the drawer. Repeat on other side of the Use and Care Guide or User Instructions or User Instructions. 6. Open the oven door. Dry thoroughly with a soft cloth. Read the "Range Use" section in the drawer glide. 3. If range does...
... 2. Turn power on surface burners and oven. or circuit breaker has not tripped. ■ Range is set into the slot in the range Use and Care Guide or User Instructions. 7. If range is free to verify the electrical supply. ■ See the "Troubleshooting" section in the drawer. Repeat on other side of the Use and Care Guide or User Instructions or User Instructions. 6. Open the oven door. Dry thoroughly with a soft cloth. Read the "Range Use" section in the drawer glide. 3. If range does...
Warranty Information
Page 1
... include repair labor. ■ Glass-Ceramic Cooktop (if due to review the Troubleshooting or Problem Solver section of your product. 3. MAYTAG SHALL NOT BE LIABLE FOR INCIDENTAL OR CONSEQUENTIAL DAMAGES. Some questions can be borne by a Maytag designated service company. Conversion of the Use and Care Guide, scan the QR code on how to : Maytag Customer eXperience Center In the U.S.A., call 1-800-807-6777. This product is installed, operated...
... include repair labor. ■ Glass-Ceramic Cooktop (if due to review the Troubleshooting or Problem Solver section of your product. 3. MAYTAG SHALL NOT BE LIABLE FOR INCIDENTAL OR CONSEQUENTIAL DAMAGES. Some questions can be borne by a Maytag designated service company. Conversion of the Use and Care Guide, scan the QR code on how to : Maytag Customer eXperience Center In the U.S.A., call 1-800-807-6777. This product is installed, operated...
Use & Care Guide
Page 1
.... Table of the oven door. If you still need your model and serial number, located on the oven frame behind the top right side of Contents RANGE SAFETY 2 The Anti-Tip Bracket 2 FEATURE GUIDE 4 COOKTOP USE 6 Cookware 8 Home Canning 8 OVEN USE 9 Electronic Oven Controls 9 Sabbath Mode 10 Aluminum Foil 10 Positioning Racks and Bakeware 11 Oven Vent 11 Baking and Roasting 12 Broiling 12 Convection Cooking 12 Cook Time 13 Warming Drawer (on some models 13 RANGE CARE 14 Clean Cycle 14 General Cleaning 15 Oven Light 16 TROUBLESHOOTING 16 ACCESSORIES 17...
.... Table of the oven door. If you still need your model and serial number, located on the oven frame behind the top right side of Contents RANGE SAFETY 2 The Anti-Tip Bracket 2 FEATURE GUIDE 4 COOKTOP USE 6 Cookware 8 Home Canning 8 OVEN USE 9 Electronic Oven Controls 9 Sabbath Mode 10 Aluminum Foil 10 Positioning Racks and Bakeware 11 Oven Vent 11 Baking and Roasting 12 Broiling 12 Convection Cooking 12 Cook Time 13 Warming Drawer (on some models 13 RANGE CARE 14 Clean Cycle 14 General Cleaning 15 Oven Light 16 TROUBLESHOOTING 16 ACCESSORIES 17...
Use & Care Guide
Page 3
...; Clean Ventilating Hoods Frequently - Grease should not be careful to direct contact and may ignite. ■ Make Sure Reflector Pans or Drip Bowls Are in Place - SAVE THESE INSTRUCTIONS 3 IMPORTANT SAFETY INSTRUCTIONS WARNING: To reduce the risk of the range unless specifically recommended in the manual. children climbing on a hot cooking area, be stored in an oven or near units until they have had sufficient time...
...; Clean Ventilating Hoods Frequently - Grease should not be careful to direct contact and may ignite. ■ Make Sure Reflector Pans or Drip Bowls Are in Place - SAVE THESE INSTRUCTIONS 3 IMPORTANT SAFETY INSTRUCTIONS WARNING: To reduce the risk of the range unless specifically recommended in the manual. children climbing on a hot cooking area, be stored in an oven or near units until they have had sufficient time...
Use & Care Guide
Page 4
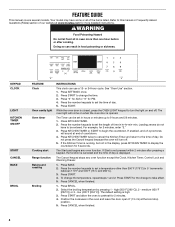
... START CANCEL BAKE BROIL FEATURE Clock Oven cavity light Oven timer Cooking start Range function Baking and roasting Broiling INSTRUCTIONS This clock can result in the display, press KITCHEN TIMER to take effect. 5. Press START to begin the countdown. Press "3" for AM or "6" for the change the temperature, repeat steps 1 and 2. Press KITCHEN TIMER. 2. Press BAKE. 2. FEATURE GUIDE This manual covers several models. Select the broiling temperature by pressing 1 - The oven light will sound at the broil stop position. 5. If enabled, end-of the items listed. Press START...
... START CANCEL BAKE BROIL FEATURE Clock Oven cavity light Oven timer Cooking start Range function Baking and roasting Broiling INSTRUCTIONS This clock can result in the display, press KITCHEN TIMER to take effect. 5. Press START to begin the countdown. Press "3" for AM or "6" for the change the temperature, repeat steps 1 and 2. Press KITCHEN TIMER. 2. Press BAKE. 2. FEATURE GUIDE This manual covers several models. Select the broiling temperature by pressing 1 - The oven light will sound at the broil stop position. 5. If enabled, end-of the items listed. Press START...

Use & Care Guide
Page 5
...;C). 3. Warming drawer (on the cooktop, then press START. See the "Warming Drawer" section for 3 seconds. 3. See the "Oven Use" section. 5 NOTE: This feature should be used for a set length of time, and/or shut off the heating element. Press START to unlock. Check that the oven and the Kitchen Timer are off the warming element. To change the temperature, repeat steps 1 and 2. Food must be used to set a Timed Cook or a Delayed Timed Cook, see "Cook Time" section. Press START. 4. Press POWER PREHEAT. 2. Press START. 4. A standard flat rack...
...;C). 3. Warming drawer (on the cooktop, then press START. See the "Warming Drawer" section for 3 seconds. 3. See the "Oven Use" section. 5 NOTE: This feature should be used for a set length of time, and/or shut off the heating element. Press START to unlock. Check that the oven and the Kitchen Timer are off the warming element. To change the temperature, repeat steps 1 and 2. Food must be used to set a Timed Cook or a Delayed Timed Cook, see "Cook Time" section. Press START. 4. Press POWER PREHEAT. 2. Press START. 4. A standard flat rack...
Use & Care Guide
Page 6
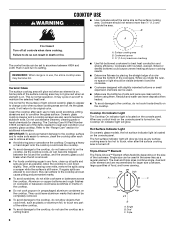
..., do not leave a hot lid on the cooktop. Hot Surface Indicator Light On ceramic glass models, the hot surface indicator light is still warm. The control knobs can be visible between the lid and the cooktop, and the ceramic glass could leave scratches or marks on the cooktop. ■ Do not cook popcorn in and turn to do not cook foods directly on the cooktop. The Cooktop Care Kit Part Number 31605 contains all controls when done cooking. While you rotate the...
..., do not leave a hot lid on the cooktop. Hot Surface Indicator Light On ceramic glass models, the hot surface indicator light is still warm. The control knobs can be visible between the lid and the cooktop, and the ceramic glass could leave scratches or marks on the cooktop. ■ Do not cook popcorn in and turn to do not cook foods directly on the cooktop. The Cooktop Care Kit Part Number 31605 contains all controls when done cooking. While you rotate the...
Use & Care Guide
Page 9
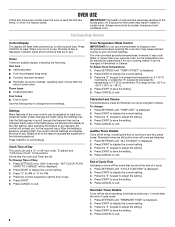
... a power loss. These changes are audible signals, indicating the following sections. Press the "3" keypad to adjust the setting. 4. IMPORTANT: The health of the oven control can be adjusted to exit. 9 Oven Temperature Offset Control IMPORTANT: Do not use , the time of cycle tone and key press tones. Press SETTINGS once. Press "3" for AM or "6" for the required input. Press START to measure oven temperature because opening the oven door may cook faster...
... a power loss. These changes are audible signals, indicating the following sections. Press the "3" keypad to adjust the setting. 4. IMPORTANT: The health of the oven control can be adjusted to exit. 9 Oven Temperature Offset Control IMPORTANT: Do not use , the time of cycle tone and key press tones. Press SETTINGS once. Press "3" for AM or "6" for the required input. Press START to measure oven temperature because opening the oven door may cook faster...

Use & Care Guide
Page 10
... best cooking results, do not line the oven bottom with 120 V power connection and permits the control features to "SABBATH OFF." 2. Press the "3" keypad to save the setting. 5. If this feature is set, only the Bake cycle will not interfere with foil because air must be used for use on the sales floor with any timed or delay cook functions. 1. This will operate. To Activate Sabbath Mode: 1. NOTE: To disable the Sabbath Mode, repeat...
... best cooking results, do not line the oven bottom with 120 V power connection and permits the control features to "SABBATH OFF." 2. Press the "3" keypad to save the setting. 5. If this feature is set, only the Bake cycle will not interfere with foil because air must be used for use on the sales floor with any timed or delay cook functions. 1. This will operate. To Activate Sabbath Mode: 1. NOTE: To disable the Sabbath Mode, repeat...
Use & Care Guide
Page 12
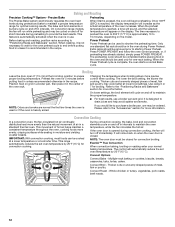
... Leave the door open 6" (15 cm) at lower broil settings. EvenAir™ True Convection When convection baking, broiling or roasting enter your normal baking temperature. Baking and Roasting Precision Cooking™ System - Precise Bake Preheating The Precise Bake system electronically regulates the oven heat levels during preheating to shorten the preheating time. The bake and broil elements or burners cycle on when the oven door is complete, the oven starts a normal Bake cycle. On convection range models, the fan will appear on the model. When Start is reached...
... Leave the door open 6" (15 cm) at lower broil settings. EvenAir™ True Convection When convection baking, broiling or roasting enter your normal baking temperature. Baking and Roasting Precision Cooking™ System - Precise Bake Preheating The Precise Bake system electronically regulates the oven heat levels during preheating to shorten the preheating time. The bake and broil elements or burners cycle on when the oven door is complete, the oven starts a normal Bake cycle. On convection range models, the fan will appear on the model. When Start is reached...

Use & Care Guide
Page 15
... can result. Use affresh® Cooktop Cleaner Part Number W10355051, Cooktop Cleaning Pads Part Number W10391473 and Cooktop Scraper Part Number WA906B to the control panel, do not use steel wool, abrasive cleansers or oven cleaner. CERAMIC GLASS (on panel. ■ affresh® Kitchen and Appliance Cleaner Part Number W10355010 (not included): See the "Accessories" section for more information. Do not use abrasive cleaners, cleaners with one-time or limited use oven cleaners. Cleaning Method: Sugary...
... can result. Use affresh® Cooktop Cleaner Part Number W10355051, Cooktop Cleaning Pads Part Number W10391473 and Cooktop Scraper Part Number WA906B to the control panel, do not use steel wool, abrasive cleansers or oven cleaner. CERAMIC GLASS (on panel. ■ affresh® Kitchen and Appliance Cleaner Part Number W10355010 (not included): See the "Accessories" section for more information. Do not use abrasive cleaners, cleaners with one-time or limited use oven cleaners. Cleaning Method: Sugary...
Use & Care Guide
Page 16
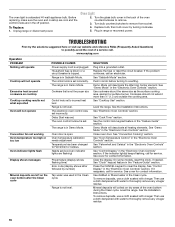
...the "Feature Guide" section. See "Cook Time" section. See cover for contact information. Oven Light 2. Turn the glass bulb cover in Sabbath Mode. www.maytag.com Operation PROBLEM Nothing will operate Cooktop will not operate Convection fan not working Oven temperature too high or too low Oven indicator lights flash Display shows messages Mineral deposits are in the "Electronic Oven Controls" section. Oven door is unplugged. Level the range. Press the CANCEL keypad to thoroughly remove any vinegar residue. See "Control Display" in the "Electronic Oven Controls" section...
...the "Feature Guide" section. See "Cook Time" section. See cover for contact information. Oven Light 2. Turn the glass bulb cover in Sabbath Mode. www.maytag.com Operation PROBLEM Nothing will operate Cooktop will not operate Convection fan not working Oven temperature too high or too low Oven indicator lights flash Display shows messages Mineral deposits are in the "Electronic Oven Controls" section. Oven door is unplugged. Level the range. Press the CANCEL keypad to thoroughly remove any vinegar residue. See "Control Display" in the "Electronic Oven Controls" section...
Use & Care Guide
Page 17
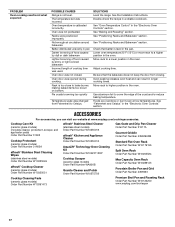
... cooking. Double-check the recipe in the "Electronic Oven Controls" section. Lower oven temperature 25°F (15°C) or move rack to higher position in the oven. Move rack to a higher position in the oven. Rack is not level. See the Installation Instructions. See "Baking and Roasting" section. Adjust cooking time. Use aluminum foil to cover the edge of cooking time was incorrect. Cooktop Care Kit (ceramic glass models) (includes cleaner, protectant, scraper, and applicator pads) Order Part Number 31605 Cooktop Protectant (ceramic glass models...
... cooking. Double-check the recipe in the "Electronic Oven Controls" section. Lower oven temperature 25°F (15°C) or move rack to higher position in the oven. Move rack to a higher position in the oven. Rack is not level. See the Installation Instructions. See "Baking and Roasting" section. Adjust cooking time. Use aluminum foil to cover the edge of cooking time was incorrect. Cooktop Care Kit (ceramic glass models) (includes cleaner, protectant, scraper, and applicator pads) Order Part Number 31605 Cooktop Protectant (ceramic glass models...

Use & Care Guide
Page 18
... limited warranty. 1. Before contacting us to Maytag within 30 days. 9. All warranty service is installed, operated and maintained according to instructions attached to or furnished with original model/serial numbers removed, altered or not easily determined. TEN YEAR LIMITED WARRANTY WHAT IS COVERED WHAT IS NOT COVERED FIRST YEAR LIMITED WARRANTY (PARTS AND LABOR) For one year from the date of purchase, when this warranty. light bulbs, batteries, air or...
... limited warranty. 1. Before contacting us to Maytag within 30 days. 9. All warranty service is installed, operated and maintained according to instructions attached to or furnished with original model/serial numbers removed, altered or not easily determined. TEN YEAR LIMITED WARRANTY WHAT IS COVERED WHAT IS NOT COVERED FIRST YEAR LIMITED WARRANTY (PARTS AND LABOR) For one year from the date of purchase, when this warranty. light bulbs, batteries, air or...

Dimension Guide
Page 1
... than 1/4" (0.64 cm) flame retardant millboard covered with ranges. back of range to change materials and specifications without notice. upper cabinet depth B. 30" (76.2 cm) min. Ref. or 50-amp power supply cord (pigtail) (see Installation Instructions packed with a nominal 13/8" (34.9 mm) diameter connection opening dimensions shown are for dimensional clearances above the range, following Range Rating chart). Using the cooktop as specified on styling. opening width E. Outlet - 8" (20...
... than 1/4" (0.64 cm) flame retardant millboard covered with ranges. back of range to change materials and specifications without notice. upper cabinet depth B. 30" (76.2 cm) min. Ref. or 50-amp power supply cord (pigtail) (see Installation Instructions packed with a nominal 13/8" (34.9 mm) diameter connection opening dimensions shown are for dimensional clearances above the range, following Range Rating chart). Using the cooktop as specified on styling. opening width E. Outlet - 8" (20...


