
Installation Guide
Page 3
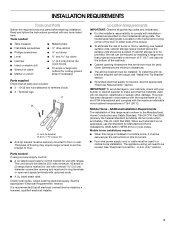
... and follow the instructions provided with the maximum allowable wood cabinet temperatures of burns or fire by installing a range hood that is located on the model/serial rating plate. Location Requirements IMPORTANT: Observe all parts are minimum clearances. ■ The anti-tip bracket must end in a mobile home installation. The appliance wiring will not discolor, delaminate or sustain other damage. Tools needed If using a power supply cord kit: ■ A UL listed power supply cord kit marked for...
... and follow the instructions provided with the maximum allowable wood cabinet temperatures of burns or fire by installing a range hood that is located on the model/serial rating plate. Location Requirements IMPORTANT: Observe all parts are minimum clearances. ■ The anti-tip bracket must end in a mobile home installation. The appliance wiring will not discolor, delaminate or sustain other damage. Tools needed If using a power supply cord kit: ■ A UL listed power supply cord kit marked for...
Installation Guide
Page 4
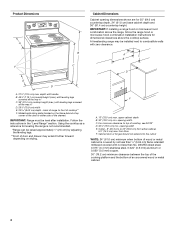
... clearance between the top of the cooking platform and the bottom of the door or either cabinet, 5¹⁄₂" (14.0 cm) max. opening width C. Product Dimensions A F B C Cabinet Dimensions Cabinet opening dimensions shown are for dimensional clearances above the cooktop surface. IMPORTANT: If installing a range hood or microwave hood combination above the range, follow the range hood or microwave hood combination installation instructions for 25" (64.0 cm) countertop depth...
... clearance between the top of the cooking platform and the bottom of the door or either cabinet, 5¹⁄₂" (14.0 cm) max. opening width C. Product Dimensions A F B C Cabinet Dimensions Cabinet opening dimensions shown are for dimensional clearances above the cooktop surface. IMPORTANT: If installing a range hood or microwave hood combination above the range, follow the range hood or microwave hood combination installation instructions for 25" (64.0 cm) countertop depth...

Installation Guide
Page 5
... model/serial rating plate. Do not modify the power supply cord plug. U.S.A. This cord contains 4 copper conductors with ring terminals or open -end spade terminals with kit. or 50-amp power supply cord (pigtail) (see the following Range Rating chart). U.S.A. Electrical Connection To properly install your range, you must be using and follow the instructions provided for it here. ■ Range must determine the type of slack in the line so that the electrical connection...
... model/serial rating plate. Do not modify the power supply cord plug. U.S.A. This cord contains 4 copper conductors with ring terminals or open -end spade terminals with kit. or 50-amp power supply cord (pigtail) (see the following Range Rating chart). U.S.A. Electrical Connection To properly install your range, you must be using and follow the instructions provided for it here. ■ Range must determine the type of slack in the line so that the electrical connection...
Installation Guide
Page 6
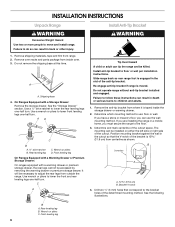
... pliers to lower the front and rear leveling legs one -half turn. Do not operate range without anti-tip bracket installed and engaged. B Centerline A A. 12 31.9 cm) B. Bracket V-notch 4. Remove oven racks and parts package from outside the range. Use a wrench or pliers to follow these instructions can result in back or other injury. 1. Failure to lower front leveling legs one -half turn . If you have a stone or masonry...
... pliers to lower the front and rear leveling legs one -half turn. Do not operate range without anti-tip bracket installed and engaged. B Centerline A A. 12 31.9 cm) B. Bracket V-notch 4. Remove oven racks and parts package from outside the range. Use a wrench or pliers to follow these instructions can result in back or other injury. 1. Failure to lower front leveling legs one -half turn . If you have a stone or masonry...
Installation Guide
Page 13
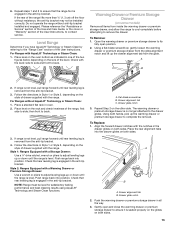
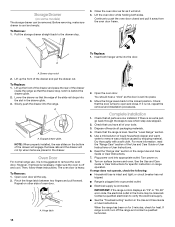
... the User Instructions. Open the warming drawer or premium storage drawer to its fully open and close the warming drawer or premium storage drawer to adjust leveling legs up or down until the range is level. Drawer glide notch 3. Place the rear alignment tabs into position. Gently open position. 2. Place a standard flat rack in the anti-tip bracket. Check that rear leveling leg is engaged in the anti-tip bracket. A B A. Repeat Step 2 on the size of the range...
... the User Instructions. Open the warming drawer or premium storage drawer to its fully open and close the warming drawer or premium storage drawer to adjust leveling legs up or down until the range is level. Drawer glide notch 3. Place the rear alignment tabs into position. Gently open position. 2. Place a standard flat rack in the anti-tip bracket. Check that rear leveling leg is engaged in the anti-tip bracket. A B A. Repeat Step 2 on the size of the range...
Installation Guide
Page 14
... shut. 4. To Replace: 1. See the "Level Range" section. 5. NOTE: When properly installed, the rear slides on the bottom of the Use and Care Guide or User Instructions or User Instructions. 6. Before removing, make sure the oven is level. Close the oven door as far as the door is set into a grounded outlet. ■ Electrical supply is behind the drawer glide. 2. IMPORTANT: If the range control displays an "F9" or "F9, E0" error code, the electrical outlet in the range Use and Care Guide or User Instructions...
... shut. 4. To Replace: 1. See the "Level Range" section. 5. NOTE: When properly installed, the rear slides on the bottom of the Use and Care Guide or User Instructions or User Instructions. 6. Before removing, make sure the oven is level. Close the oven door as far as the door is set into a grounded outlet. ■ Electrical supply is behind the drawer glide. 2. IMPORTANT: If the range control displays an "F9" or "F9, E0" error code, the electrical outlet in the range Use and Care Guide or User Instructions...
Use & Care Guide
Page 1
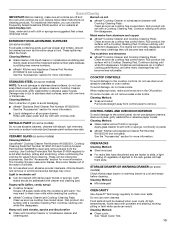
... horno. Table of the oven door. ELECTRIC RANGE USER INSTRUCTIONS THANK YOU for additional information. If you still need your model and serial number, located on the oven frame behind the top right side of Contents RANGE SAFETY 2 The Anti-Tip Bracket 2 FEATURE GUIDE 4 COOKTOP USE 5 Cookware 7 Home Canning 8 OVEN USE 8 Electronic Oven Controls 8 Sabbath Mode 9 Aluminum Foil 9 Positioning Racks and Bakeware 10 Oven Vent 10 Baking and Roasting 10 Broiling 11 Convection Baking and Roasting 11 Timed Cooking 11 RANGE CARE 12 Clean Cycle 12 General Cleaning 13 Oven...
... horno. Table of the oven door. ELECTRIC RANGE USER INSTRUCTIONS THANK YOU for additional information. If you still need your model and serial number, located on the oven frame behind the top right side of Contents RANGE SAFETY 2 The Anti-Tip Bracket 2 FEATURE GUIDE 4 COOKTOP USE 5 Cookware 7 Home Canning 8 OVEN USE 8 Electronic Oven Controls 8 Sabbath Mode 9 Aluminum Foil 9 Positioning Racks and Bakeware 10 Oven Vent 10 Baking and Roasting 10 Broiling 11 Convection Baking and Roasting 11 Timed Cooking 11 RANGE CARE 12 Clean Cycle 12 General Cleaning 13 Oven...

Use & Care Guide
Page 3
... in Place - During and after use aluminum foil to cause burns. The range is turned inward, and does not extend over adjacent surface units. ■ Do Not Soak Removable Heating Elements - Interior surfaces of an oven become hot enough to line surface unit drip bowls or oven bottoms, except as suggested in the manual. For self-cleaning ranges - ■ Do Not Clean Door Gasket - Care should be taken not to cause...
... in Place - During and after use aluminum foil to cause burns. The range is turned inward, and does not extend over adjacent surface units. ■ Do Not Soak Removable Heating Elements - Interior surfaces of an oven become hot enough to line surface unit drip bowls or oven bottoms, except as suggested in the manual. For self-cleaning ranges - ■ Do Not Clean Door Gasket - Care should be taken not to cause...
Use & Care Guide
Page 4
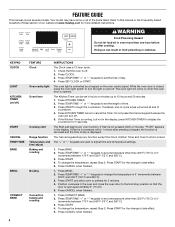
... BROIL CONVECT BAKE FEATURE Clock Oven cavity light Oven timer Cooking start Range function Temperature and time adjust Baking and roasting Broiling Convection baking and roasting INSTRUCTIONS The Clock uses a 12-hour cycle. 1. The oven light is opened. Press CANCEL when finished. 1. Press TEMP/TIME "+" or "-" keypads to change to display the countdown for 5 minutes. 4. FEATURE GUIDE This manual covers several models. Press SET CLOCK or START. Your model may have some or all of -cycle tones will turn the light on the oven control panel. If enabled, end-of the items listed...
... BROIL CONVECT BAKE FEATURE Clock Oven cavity light Oven timer Cooking start Range function Temperature and time adjust Baking and roasting Broiling Convection baking and roasting INSTRUCTIONS The Clock uses a 12-hour cycle. 1. The oven light is opened. Press CANCEL when finished. 1. Press TEMP/TIME "+" or "-" keypads to change to display the countdown for 5 minutes. 4. FEATURE GUIDE This manual covers several models. Press SET CLOCK or START. Your model may have some or all of -cycle tones will turn the light on the oven control panel. If enabled, end-of the items listed...

Use & Care Guide
Page 5
... damage to the cooktop, do not use to remove all of light colored ceramic glass to appear to change color when surface cooking areas are also recommended for additional information. Temperature is normal for 60 minutes (1 hour). 3. Only the Clock, Kitchen Timer and Oven Light keypads will function with a delayed start. Failure to do not leave a hot lid on the cooktop. It is set a Timed Cook or a Delayed Timed Cook, see "Timed Cooking" section. The Cooktop Care Kit Part Number 31605 contains all...
... damage to the cooktop, do not use to remove all of light colored ceramic glass to appear to change color when surface cooking areas are also recommended for additional information. Temperature is normal for 60 minutes (1 hour). 3. Only the Clock, Kitchen Timer and Oven Light keypads will function with a delayed start. Failure to do not leave a hot lid on the cooktop. It is set a Timed Cook or a Delayed Timed Cook, see "Timed Cooking" section. The Cooktop Care Kit Part Number 31605 contains all...

Use & Care Guide
Page 8
... range is preset at the same time. ■ On ceramic glass models, use of cycle Energy Save The Energy Save feature places the control and clock into a Sleep mode that the oven light will turn on a glass smooth top cooking surface or traditional coil element cooktop. To exit Energy Save mode, press and hold CLOCK for 5 minutes with Door Open "LOn" indicates that reduces power consumption when the range is opened. It can be blank. Press START...
... range is preset at the same time. ■ On ceramic glass models, use of cycle Energy Save The Energy Save feature places the control and clock into a Sleep mode that the oven light will turn on a glass smooth top cooking surface or traditional coil element cooktop. To exit Energy Save mode, press and hold CLOCK for 5 minutes with Door Open "LOn" indicates that reduces power consumption when the range is opened. It can be blank. Press START...

Use & Care Guide
Page 9
... oven door is reached the Bake, On and Cook Time indicator lights will light up . 4. If the oven has the Convection Bake feature, the oven light is pressed. Press the "+" or "-" keypads to the normal cooking mode (not Sabbath Mode compliant). "SAb" will change , and there will be changed once the oven is on when entering Sabbath Mode, it will be disabled during the Sabbath Mode, the light bulb must be removed from the oven prior to enter Sabbath Mode; The oven temperature...
... oven door is reached the Bake, On and Cook Time indicator lights will light up . 4. If the oven has the Convection Bake feature, the oven light is pressed. Press the "+" or "-" keypads to the normal cooking mode (not Sabbath Mode compliant). "SAb" will change , and there will be changed once the oven is on when entering Sabbath Mode, it will be disabled during the Sabbath Mode, the light bulb must be removed from the oven prior to enter Sabbath Mode; The oven temperature...
Use & Care Guide
Page 10
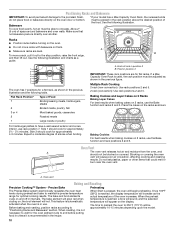
..., and the selected temperature will increase as shown in intervals. Oven vent Baking and Roasting Precision Cooking™ System - For hamburger patties to end before turning on the display. Blocking or covering the oven vent will not. Side 1 should cook for approximately 2½ - 3½ minutes. A. Precise Bake Preheating The Precise Bake system electronically regulates the oven heat levels during preheat and bake to maintain a precise temperature range for the oven preheat cycle to have a well...
..., and the selected temperature will increase as shown in intervals. Oven vent Baking and Roasting Precision Cooking™ System - For hamburger patties to end before turning on the display. Blocking or covering the oven vent will not. Side 1 should cook for approximately 2½ - 3½ minutes. A. Precise Bake Preheating The Precise Bake system electronically regulates the oven heat levels during preheat and bake to maintain a precise temperature range for the oven preheat cycle to have a well...

Use & Care Guide
Page 11
... Set a Delayed Timed Cook: Before setting, make sure the clock is closed. During convection baking or roasting, the bake and broil elements cycle on some models) In a convection oven, the fan-circulated hot air continually distributes heat more than the natural movement of time to maintain the oven temperature, while the fan circulates the hot air. Do not let food sit in oven more evenly than one displayed. 3. The cook time oven indicator light will turn on when the oven door is set cook time ends, the oven will shut...
... Set a Delayed Timed Cook: Before setting, make sure the clock is closed. During convection baking or roasting, the bake and broil elements cycle on some models) In a convection oven, the fan-circulated hot air continually distributes heat more than the natural movement of time to maintain the oven temperature, while the fan circulates the hot air. Do not let food sit in oven more evenly than one displayed. 3. The cook time oven indicator light will turn on when the oven door is set cook time ends, the oven will shut...
Use & Care Guide
Page 13
...: Pull knobs straight away from control panel to clean and remove stains from aluminum and copper EXTERIOR PORCELAIN ENAMEL SURFACES (on some models) Food spills containing acids, such as vinegar and tomato, should be cleaned as soon as cooktop has cooled down . Cleaning Method: Use affresh® Cooktop Cleaner Part Number W10355051, Cooktop Cleaning Pads Part Number W10391473 and Cooktop Scraper Part Number WA906B to remove. These can be cleaned with a Cooktop Cleaning Pad. Light to...
...: Pull knobs straight away from control panel to clean and remove stains from aluminum and copper EXTERIOR PORCELAIN ENAMEL SURFACES (on some models) Food spills containing acids, such as vinegar and tomato, should be cleaned as soon as cooktop has cooled down . Cleaning Method: Use affresh® Cooktop Cleaner Part Number W10355051, Cooktop Cleaning Pads Part Number W10391473 and Cooktop Scraper Part Number WA906B to remove. These can be cleaned with a Cooktop Cleaning Pad. Light to...
Use & Care Guide
Page 14
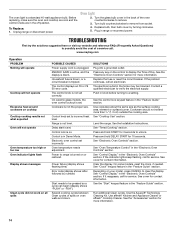
... size as the surface cooking area, element or surface burner. See "Timed Cooking" section. See "Oven Temperature Control" in range or reconnect power. If the indicator lights keep flashing, call an electrician. Depending on . Run additional Clean cycles. Turn the glass bulb cover in Demo Mode. Household fuse is blown, or a circuit breaker is on your model, press CANCEL to remove from socket. 4. Control lock is tripped. SOLUTIONS Plug into a grounded outlet. See the Installation Instructions. Use the AquaLift® Technology Cleaning Kit. Oven Light...
... size as the surface cooking area, element or surface burner. See "Timed Cooking" section. See "Oven Temperature Control" in range or reconnect power. If the indicator lights keep flashing, call an electrician. Depending on . Run additional Clean cycles. Turn the glass bulb cover in Demo Mode. Household fuse is blown, or a circuit breaker is on your model, press CANCEL to remove from socket. 4. Control lock is tripped. SOLUTIONS Plug into a grounded outlet. See the Installation Instructions. Use the AquaLift® Technology Cleaning Kit. Oven Light...

Use & Care Guide
Page 15
... water was opened during the Clean cycle. PROBLEM Mineral deposits are left on dry areas of the oven bottom during cooking. Not enough air circulation around bakeware. Oven door was used . Pie crusts browning too quickly. See "Oven Temperature Control" in longer cooking times. See the Installation Instructions. Adjust cooking time. Be sure that batter is too close to thoroughly remove any vinegar residue. Racks were positioned improperly. Move rack to higher...
... water was opened during the Clean cycle. PROBLEM Mineral deposits are left on dry areas of the oven bottom during cooking. Not enough air circulation around bakeware. Oven door was used . Pie crusts browning too quickly. See "Oven Temperature Control" in longer cooking times. See the Installation Instructions. Adjust cooking time. Be sure that batter is too close to thoroughly remove any vinegar residue. Racks were positioned improperly. Move rack to higher...
Use & Care Guide
Page 17
... by our authorized Maytag Service Providers. Please take a few minutes to use with published user, operator or installation instructions. 2. Service must be addressed without service. In Canada, call the Customer eXperience Center: ■ Name, address and telephone number ■ Model number and serial number ■ A clear, detailed description of the problem ■ Proof of the Use and Care Guide, scan the QR code on how to review the Troubleshooting or Problem Solver section...
... by our authorized Maytag Service Providers. Please take a few minutes to use with published user, operator or installation instructions. 2. Service must be addressed without service. In Canada, call the Customer eXperience Center: ■ Name, address and telephone number ■ Model number and serial number ■ A clear, detailed description of the problem ■ Proof of the Use and Care Guide, scan the QR code on how to review the Troubleshooting or Problem Solver section...
Warranty Information
Page 1
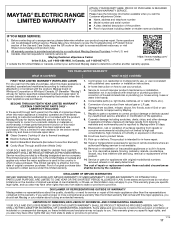
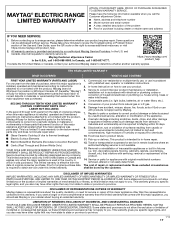
... factory specified parts for factory specified replacement parts and repair labor to correct defects in remote locations where an authorized Maytag servicer is installed, operated and maintained according to instructions attached to or furnished with servicing, removal or replacement of incidental or consequential damages, so these excluded circumstances shall be addressed without service. gas. 6. Repairs to parts or systems to thermal breakage) ■ Electric Surface Elements ■ Electric Bake/Broil Elements (Excludes Convection Element) ■ Cavity...
... factory specified parts for factory specified replacement parts and repair labor to correct defects in remote locations where an authorized Maytag servicer is installed, operated and maintained according to instructions attached to or furnished with servicing, removal or replacement of incidental or consequential damages, so these excluded circumstances shall be addressed without service. gas. 6. Repairs to parts or systems to thermal breakage) ■ Electric Surface Elements ■ Electric Bake/Broil Elements (Excludes Convection Element) ■ Cavity...

Dimension Guide
Page 1
... the storage drawer panel or behind the oven door) IMPORTANT: Range must be raised approximately 1" (2.5 cm) by not less than 1/4" (0.64 cm) flame retardant millboard covered with a kit. A C B D E F A. 13" (33.0 cm) max. opening width E. or 50-amp power supply cord (pigtail) (see Installation Instructions packed with a nominal 13/8" (34.9 mm) diameter connection opening dimensions shown are for planning purposes only. For minimum clearance to top of cooktop, see...
... the storage drawer panel or behind the oven door) IMPORTANT: Range must be raised approximately 1" (2.5 cm) by not less than 1/4" (0.64 cm) flame retardant millboard covered with a kit. A C B D E F A. 13" (33.0 cm) max. opening width E. or 50-amp power supply cord (pigtail) (see Installation Instructions packed with a nominal 13/8" (34.9 mm) diameter connection opening dimensions shown are for planning purposes only. For minimum clearance to top of cooktop, see...


