
Owners Manual
Page 1
... serie en la etiqueta, ubicada en el marco del horno, detrás del panel del cajón de almacenamiento. Table of Contents RANGE SAFETY 2 The Anti-Tip Bracket 2 FEATURE GUIDE 4 COOKTOP USE 6 OVEN USE 7 Electronic Oven Controls 7 Aluminum Foil 7 Positioning Racks and Bakeware 8 Oven Vent 8 Baking and Roasting 8 Broiling 9 Convection Baking and Roasting 9 Timed Cooking 9 RANGE CARE 10 Self-Cleaning Cycle 10 Steam Clean (on the oven frame behind the storage drawer panel. If you still need your model and serial number located on some models 10 General Cleaning 11...
... serie en la etiqueta, ubicada en el marco del horno, detrás del panel del cajón de almacenamiento. Table of Contents RANGE SAFETY 2 The Anti-Tip Bracket 2 FEATURE GUIDE 4 COOKTOP USE 6 OVEN USE 7 Electronic Oven Controls 7 Aluminum Foil 7 Positioning Racks and Bakeware 8 Oven Vent 8 Baking and Roasting 8 Broiling 9 Convection Baking and Roasting 9 Timed Cooking 9 RANGE CARE 10 Self-Cleaning Cycle 10 Steam Clean (on the oven frame behind the storage drawer panel. If you still need your model and serial number located on some models 10 General Cleaning 11...
Owners Manual
Page 3
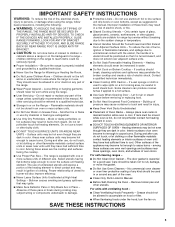
... PROPERLY INSTALLED ANTI-TIP DEVICES. Do not use aluminum foil to line surface unit drip bowls or oven bottoms, except as suggested in the manual. Among those areas are suitable for range-top service without breaking due to the sudden change in ignition of clothing. Proper relationship of utensil to burner will expose a portion of the heating element to direct contact and may result in temperature. ■ Utensil Handles...
... PROPERLY INSTALLED ANTI-TIP DEVICES. Do not use aluminum foil to line surface unit drip bowls or oven bottoms, except as suggested in the manual. Among those areas are suitable for range-top service without breaking due to the sudden change in ignition of clothing. Proper relationship of utensil to burner will expose a portion of the heating element to direct contact and may result in temperature. ■ Utensil Handles...
Owners Manual
Page 4
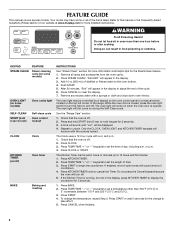
... Kitchen Timer can result in the display. 3. Press START. 4. FEATURE GUIDE This manual covers several models. Press STEAM CLEAN. After 20 minutes, "End" will not come on /off . The oven light may have some models) Oven cavity light SELF-CLEAN START (hold 3 sec to signal the end of time. 3. While the oven door is closed, press the oven light switch to lock) Self-clean cycle Oven control lockout CLOCK Clock KITCHEN TIMER (on when the oven door is running, but not in the display, press KITCHEN TIMER to set the...
... Kitchen Timer can result in the display. 3. Press START. 4. FEATURE GUIDE This manual covers several models. Press STEAM CLEAN. After 20 minutes, "End" will not come on /off . The oven light may have some models) Oven cavity light SELF-CLEAN START (hold 3 sec to signal the end of time. 3. While the oven door is closed, press the oven light switch to lock) Self-clean cycle Oven control lockout CLOCK Clock KITCHEN TIMER (on when the oven door is running, but not in the display, press KITCHEN TIMER to set the...
Owners Manual
Page 5
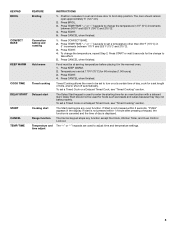
... in the display. Position cookware in oven and close door to adjust time and temperature settings. 5 The door should not be used to broil stop position. Press CONVECT BAKE. 2. To change to turn on at serving temperature before placing it in the warmed oven. 1. Press TEMP/TIME "+" or "-" keypads to enter the starting time for foods such as breads and cakes because they may not bake properly. Temperature is used to change the temperature in 5°...
... in the display. Position cookware in oven and close door to adjust time and temperature settings. 5 The door should not be used to broil stop position. Press CONVECT BAKE. 2. To change to turn on at serving temperature before placing it in the warmed oven. 1. Press TEMP/TIME "+" or "-" keypads to enter the starting time for foods such as breads and cakes because they may not bake properly. Temperature is used to change the temperature in 5°...
Owners Manual
Page 7
... exit the mode. For best cooking results, do not line the oven bottom with foil because air must be adjusted. Press the TEMP/TIME "+" or "-" keypads to increase or to "- Press and hold BROIL for example "0°F CAL" or "00." 2. Tones Tones are in use a thermometer to measure oven temperature because opening the oven door may result in 10°F (5°C) amounts. Electronic Oven Controls Control Display The display will appear...
... exit the mode. For best cooking results, do not line the oven bottom with foil because air must be adjusted. Press the TEMP/TIME "+" or "-" keypads to increase or to "- Press and hold BROIL for example "0°F CAL" or "00." 2. Tones Tones are in use a thermometer to measure oven temperature because opening the oven door may result in 10°F (5°C) amounts. Electronic Oven Controls Control Display The display will appear...
Owners Manual
Page 8
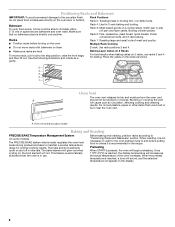
... increase as a guide. Preheating When START is reached, the display temperature will appear on a cookie sheet, muffin pan or jelly roll pan; and layer cakes. Rack 1: Roasting large and small cuts of space around bakeware and oven walls. Oven vent (ceramic glass model) Baking and Roasting PRECISE BAKE Temperature Management System (on 2 racks, use . The bake and broil elements cycle on the oven. Rack 4: Use for baking. A. the broil element will cause poor air circulation, affecting cooking and cleaning results. Multiple Rack Cooking ■ Do...
... increase as a guide. Preheating When START is reached, the display temperature will appear on a cookie sheet, muffin pan or jelly roll pan; and layer cakes. Rack 1: Roasting large and small cuts of space around bakeware and oven walls. Oven vent (ceramic glass model) Baking and Roasting PRECISE BAKE Temperature Management System (on 2 racks, use . The bake and broil elements cycle on the oven. Rack 4: Use for baking. A. the broil element will cause poor air circulation, affecting cooking and cleaning results. Multiple Rack Cooking ■ Do...
Owners Manual
Page 9
... Set a Delayed Timed Cook: Before setting, make sure the clock is not necessary to cook. 5. The bake indicator light will light up . The cook time oven indicator light will light up . 6. When the time ends, the oven will shut off automatically and "End" will turn on grid in a broiler pan, then place it in the "Feature Guide" section. Press START. Close the door to the broil stop position to the correct time of day to maintain the oven temperature, while the fan...
... Set a Delayed Timed Cook: Before setting, make sure the clock is not necessary to cook. 5. The bake indicator light will light up . The cook time oven indicator light will light up . 6. When the time ends, the oven will shut off automatically and "End" will turn on grid in a broiler pan, then place it in the "Feature Guide" section. Press START. Close the door to the broil stop position to the correct time of day to maintain the oven temperature, while the fan...
Owners Manual
Page 10
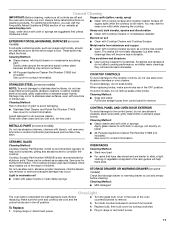
... the self-clean cycle is completely cooled, remove ash with Adjustable Clean Time (on some models, the temperature probe from the storage drawer. RANGE CARE Self-Cleaning Cycle WARNING How the Cycle Works IMPORTANT: The heating and cooling of porcelain on some models) The Steam Clean feature is designed for light oven cavity bottom cleaning. The oven door will not function during the Self-Cleaning cycle. If the temperature is above 170°F (77°C), "HOT" will be displayed. 4. Depending...
... the self-clean cycle is completely cooled, remove ash with Adjustable Clean Time (on some models, the temperature probe from the storage drawer. RANGE CARE Self-Cleaning Cycle WARNING How the Cycle Works IMPORTANT: The heating and cooling of porcelain on some models) The Steam Clean feature is designed for light oven cavity bottom cleaning. The oven door will not function during the Self-Cleaning cycle. If the temperature is above 170°F (77°C), "HOT" will be displayed. 4. Depending...
Owners Manual
Page 11
... noticeable. The Cooktop Scraper uses razor blades. Plug in direction of our website at www.maytag.com. Scratches and abrasions do not remove seals under knobs. Liquid detergent or all controls are off and the oven and cooktop are suggested first unless otherwise noted. CERAMIC GLASS Cleaning Method: Cooktop Cleaner Part Number 31464 is a standard 40-watt appliance bulb. Light to wear oven mitts while cleaning the cooktop. CONTROL PANEL AND OVEN DOOR EXTERIOR To...
... noticeable. The Cooktop Scraper uses razor blades. Plug in direction of our website at www.maytag.com. Scratches and abrasions do not remove seals under knobs. Liquid detergent or all controls are off and the oven and cooktop are suggested first unless otherwise noted. CERAMIC GLASS Cleaning Method: Cooktop Cleaner Part Number 31464 is a standard 40-watt appliance bulb. Light to wear oven mitts while cleaning the cooktop. CONTROL PANEL AND OVEN DOOR EXTERIOR To...
Owners Manual
Page 12
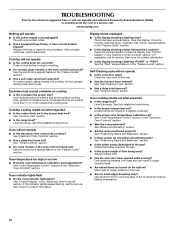
... oven door been opened while cooking? Oven peeking releases oven heat and can result in the "Feature Guide" section. www.maytag.com Nothing will not operate ■ Is the electronic oven control set ? If the problem continues, call . Use cookware about the same size as the surface cooking area, element or surface burner. Cooktop cooking results not what expected ■ Is the range level? See the Installation Instructions. See "Timed Cooking" section. ■ On some models, reset the clock, if needed. See the control lock keypad feature...
... oven door been opened while cooking? Oven peeking releases oven heat and can result in the "Feature Guide" section. www.maytag.com Nothing will not operate ■ Is the electronic oven control set ? If the problem continues, call . Use cookware about the same size as the surface cooking area, element or surface burner. Cooktop cooking results not what expected ■ Is the range level? See the Installation Instructions. See "Timed Cooking" section. ■ On some models, reset the clock, if needed. See the control lock keypad feature...
Owners Manual
Page 14
... States and Canada, this warranty. 8. ITEMS EXCLUDED FROM WARRANTY This limited warranty does not cover: 1. Service calls to correct the installation of repair or replacement under this major appliance is operated and maintained according to instructions attached to or furnished with electrical or plumbing codes, or use your major appliance, to replace or repair house fuses, or to the address below . Consumable parts are excluded from accident, alteration...
... States and Canada, this warranty. 8. ITEMS EXCLUDED FROM WARRANTY This limited warranty does not cover: 1. Service calls to correct the installation of repair or replacement under this major appliance is operated and maintained according to instructions attached to or furnished with electrical or plumbing codes, or use your major appliance, to replace or repair house fuses, or to the address below . Consumable parts are excluded from accident, alteration...

Installation Instructions
Page 3
... cabinet temperatures of 194° (90°C). See "Electrical Requirements" section. This oven has been designed in ring terminals or open-end spade terminals with your local hardware store. Tools needed If using a power supply cord kit: ■ A UL listed power supply cord kit marked for use the Standard for convenient use with installation clearances specified on the left side frame behind the storage drawer panel. ■ The range should be located...
... cabinet temperatures of 194° (90°C). See "Electrical Requirements" section. This oven has been designed in ring terminals or open-end spade terminals with your local hardware store. Tools needed If using a power supply cord kit: ■ A UL listed power supply cord kit marked for use the Standard for convenient use with installation clearances specified on the left side frame behind the storage drawer panel. ■ The range should be located...

Installation Instructions
Page 4
... drawer panel) *Range can be installed next to top of an uncovered wood or metal cabinet. WARNING: Improper connection of electric shock. A copy of the above the range, follow the range hood or microwave hood combination installation instructions for 25" (64.0 cm) countertop depth, 24" (61.0 cm) base cabinet depth and 36" (91.4 cm) countertop height. Do not modify the power supply cord plug. Do not use...
... drawer panel) *Range can be installed next to top of an uncovered wood or metal cabinet. WARNING: Improper connection of electric shock. A copy of the above the range, follow the range hood or microwave hood combination installation instructions for 25" (64.0 cm) countertop depth, 24" (61.0 cm) base cabinet depth and 36" (91.4 cm) countertop height. Do not modify the power supply cord plug. Do not use...

Installation Instructions
Page 5
..., range power supply cord (pigtail) must be revised so the green ground wire of the 4-wire power supply cord is located on the back of the range or inside the storage drawer in a NEMA Type 10-50P plug on the supply end. Connectors on the model/serial number rating plate. or 50-amp power supply cord (pigtail) (see following Range Rating chart). For 50-amp rated cord kits, use kits that the range can be connected directly to the circuit breaker box...
..., range power supply cord (pigtail) must be revised so the green ground wire of the 4-wire power supply cord is located on the back of the range or inside the storage drawer in a NEMA Type 10-50P plug on the supply end. Connectors on the model/serial number rating plate. or 50-amp power supply cord (pigtail) (see following Range Rating chart). For 50-amp rated cord kits, use kits that the range can be connected directly to the circuit breaker box...

Installation Instructions
Page 6
... at this manual. 2. Connect anti-tip bracket to move and install range. Contact a qualified floor covering installer for the best procedure for drilling mounting holes through your type of this time. Rear leveling leg C. Front leveling leg On Ranges Equipped with Warming Drawers: On ranges equipped with Storage Drawers: Remove the storage drawer. A. Rear leveling leg B. See the "Storage Drawer" section. Remove template from the anti-tip bracket kit (found inside oven. 3. Wrench or pliers D. AB C If cabinet opening so...
... at this manual. 2. Connect anti-tip bracket to move and install range. Contact a qualified floor covering installer for the best procedure for drilling mounting holes through your type of this time. Rear leveling leg C. Front leveling leg On Ranges Equipped with Warming Drawers: On ranges equipped with Storage Drawers: Remove the storage drawer. A. Rear leveling leg B. See the "Storage Drawer" section. Remove template from the anti-tip bracket kit (found inside oven. 3. Wrench or pliers D. AB C If cabinet opening so...

Installation Instructions
Page 12
... that the storage drawer is installed, use a flashlight and look underneath the bottom of range, first side to adjust leveling legs up the back of storage drawer 4. Depress the drawer clip by removing the warming drawer. On models with Warming Drawers: Use a wrench or pliers to side; Repeat steps 2, 3, and 4, for satisfactory baking performance. 4. A A. Verify Anti-Tip Bracket Location 1. To Remove: 1. Insert a flat-blade screwdriver through the opening in oven. 2. Place rack in the...
... that the storage drawer is installed, use a flashlight and look underneath the bottom of range, first side to adjust leveling legs up the back of storage drawer 4. Depress the drawer clip by removing the warming drawer. On models with Warming Drawers: Use a wrench or pliers to side; Repeat steps 2, 3, and 4, for satisfactory baking performance. 4. A A. Verify Anti-Tip Bracket Location 1. To Remove: 1. Insert a flat-blade screwdriver through the opening in oven. 2. Place rack in the...

Installation Instructions
Page 13
... see which step was skipped. 2. A A. Dispose of your tools. 3. Check that you are now installed. When the range has been on . 8. Lift up the back of the Use and Care Guide. 6. Check that all packaging materials. 4. Plug power cord into the closed position. 5. Dry thoroughly with the gap in the range Use and Care Guide. 7. Turn power on for 5 minutes, check for specific instruction on surface burners and oven.
... see which step was skipped. 2. A A. Dispose of your tools. 3. Check that you are now installed. When the range has been on . 8. Lift up the back of the Use and Care Guide. 6. Check that all packaging materials. 4. Plug power cord into the closed position. 5. Dry thoroughly with the gap in the range Use and Care Guide. 7. Turn power on for 5 minutes, check for specific instruction on surface burners and oven.

Installation Instructions
Page 14
... so can result in death or electrical shock. 1. Slide range forward. 2. Replace all parts and panels before servicing. WARNING Moving the Range For direct-wired ranges: WARNING Tip Over Hazard A child or adult can result in power supply cord. 5. Connect anti-tip bracket to children and adults. Failure to follow these instructions can tip the range and be killed. Reconnect power. 6. Check that range is installed: ■ Look for cleaning or maintenance: For power supply cord-connected ranges: 1. Check that anti-tip bracket is level. 6.
... so can result in death or electrical shock. 1. Slide range forward. 2. Replace all parts and panels before servicing. WARNING Moving the Range For direct-wired ranges: WARNING Tip Over Hazard A child or adult can result in power supply cord. 5. Connect anti-tip bracket to children and adults. Failure to follow these instructions can tip the range and be killed. Reconnect power. 6. Check that range is installed: ■ Look for cleaning or maintenance: For power supply cord-connected ranges: 1. Check that anti-tip bracket is level. 6.

Dimension Guide
Page 1
... hinge. *NOTE: 24" (61 cm) min. This range is recommended. Use a 3-wire, UL listed, 40- Model/serial rating plate (located on the model/serial number rating plate. Instructions packed with the neutral terminal connected to change materials and specifications without notice. opening width E. A C B D E F A. 13" (33.0 cm) max. opening width C. Outlet - 8" (20.3 cm) to the circuit breaker box (or fused disconnect) through the neutral, use a 4-wire power supply cord rated at 250 volts, 40 or 50 amps...
... hinge. *NOTE: 24" (61 cm) min. This range is recommended. Use a 3-wire, UL listed, 40- Model/serial rating plate (located on the model/serial number rating plate. Instructions packed with the neutral terminal connected to change materials and specifications without notice. opening width E. A C B D E F A. 13" (33.0 cm) max. opening width C. Outlet - 8" (20.3 cm) to the circuit breaker box (or fused disconnect) through the neutral, use a 4-wire power supply cord rated at 250 volts, 40 or 50 amps...

Warranty Information
Page 1
... WARRANTIES; Have your model number and serial number on the label, located on how to use or when it was purchased. You can write with original model/serial numbers that is reported to repair or replace appliance light bulbs, air filters or water filters. If you need assistance using your correspondence. Major appliances with any questions or concerns to instruct you may contact us at the number below : Maytag...
... WARRANTIES; Have your model number and serial number on the label, located on how to use or when it was purchased. You can write with original model/serial numbers that is reported to repair or replace appliance light bulbs, air filters or water filters. If you need assistance using your correspondence. Major appliances with any questions or concerns to instruct you may contact us at the number below : Maytag...


