
Installation Instructions
Page 3
...require: ■ When this range must end in the kitchen. ■ To eliminate the risk of UL and CSA International and complies with any tools listed here. It is recommended that is located on the model/serial rating plate. The model/serial rating plate is marked for...; ¼" nut driver and nut driver 3.2 mm) drill bit (for wood floors) 4.8 mm) carbide-tipped masonry drill bit (for concrete/ceramic floors) ■ Tin snips or large wire cutters (for Manufactured Home Installations, ANSI A225.1/NFPA 501A or local codes. Additional Installation Requirements The ...
...require: ■ When this range must end in the kitchen. ■ To eliminate the risk of UL and CSA International and complies with any tools listed here. It is recommended that is located on the model/serial rating plate. The model/serial rating plate is marked for...; ¼" nut driver and nut driver 3.2 mm) drill bit (for wood floors) 4.8 mm) carbide-tipped masonry drill bit (for concrete/ceramic floors) ■ Tin snips or large wire cutters (for Manufactured Home Installations, ANSI A225.1/NFPA 501A or local codes. Additional Installation Requirements The ...

Installation Instructions
Page 4
..., MA 02269. Check with local codes. Outlet - 8" (20.3 cm) to combustible walls with not less than No. 28 MSG sheet steel, 0.015" (0.4 mm) stainless steel, 0.024" (0.6 mm) aluminum or 0.020" (0.5 mm) copper. 30" (76.2 cm) minimum clearance between cutout and cabinet door or hinge. *NOTE: 24"... (61.0 cm) minimum when bottom of an uncovered wood or metal cabinet. Model/serial rating plate (located on the left side frame behind storage drawer panel) *Range can be obtained from either cabinet, 5¹⁄₂" (14.0 cm) max. Only If codes permit ...
..., MA 02269. Check with local codes. Outlet - 8" (20.3 cm) to combustible walls with not less than No. 28 MSG sheet steel, 0.015" (0.4 mm) stainless steel, 0.024" (0.6 mm) aluminum or 0.020" (0.5 mm) copper. 30" (76.2 cm) minimum clearance between cutout and cabinet door or hinge. *NOTE: 24"... (61.0 cm) minimum when bottom of an uncovered wood or metal cabinet. Model/serial rating plate (located on the left side frame behind storage drawer panel) *Range can be obtained from either cabinet, 5¹⁄₂" (14.0 cm) max. Only If codes permit ...

Installation Instructions
Page 5
...so the green ground wire of the 4-wire power supply cord is prohibited for it here. ■ Range must be connected to the proper electrical voltage and frequency as specified on the model/serial number rating plate. The fourth (grounding) conductor must be provided at least 4 ft (1.22 m)...-end spade terminals with upturned ends, terminating in a NEMA Type 14-50P plug on the model/serial rating plate. **If connecting to the cabinet. Electrical Connection To properly install your range, you must determine the type of electrical connection you will be using and follow the instructions ...
...so the green ground wire of the 4-wire power supply cord is prohibited for it here. ■ Range must be connected to the proper electrical voltage and frequency as specified on the model/serial number rating plate. The fourth (grounding) conductor must be provided at least 4 ft (1.22 m)...-end spade terminals with upturned ends, terminating in a NEMA Type 14-50P plug on the model/serial rating plate. **If connecting to the cabinet. Electrical Connection To properly install your range, you must determine the type of electrical connection you will be using and follow the instructions ...

Installation Instructions
Page 12
... of the storage drawer, placing the screwdriver tip on some models). Gently pull forward on rack and check levelness of range, first side to adjust leveling legs up or down until the range is engaged in the side of the range. ■ Look for the other side of the storage... - Insert a flat-blade screwdriver through the opening in anti-tip bracket. Check that the storage drawer is not level, pull range forward until the depressed clip clears the drawer glide. 5. Drawer clip 3. On models with a warming drawer, the rear leg cannot be removed. Lift up or down until the...
... of the storage drawer, placing the screwdriver tip on some models). Gently pull forward on rack and check levelness of range, first side to adjust leveling legs up or down until the range is engaged in the side of the range. ■ Look for the other side of the storage... - Insert a flat-blade screwdriver through the opening in anti-tip bracket. Check that the storage drawer is not level, pull range forward until the depressed clip clears the drawer glide. 5. Drawer clip 3. On models with a warming drawer, the rear leg cannot be removed. Lift up or down until the...
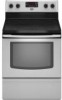
Owners Manual
Page 1
...TROUBLESHOOTING, please visit our website at 1-800-688-9900. You will need assistance, call us at www.maytag.com for purchasing this high-quality product. Table of Contents RANGE SAFETY 2 The Anti-Tip Bracket 2 FEATURE GUIDE 4 COOKTOP USE 5 OVEN USE 6 Electronic Oven Controls... Roasting 7 Broiling 7 Convection Baking and Roasting 7 Timed Cooking 8 RANGE CARE 8 Self-Cleaning Cycle 8 General Cleaning 9 Oven Light 9 TROUBLESHOOTING 10 ACCESSORIES 11 WARRANTY 11 W10234645A If you still need your model and serial number located on the oven frame behind the storage drawer ...
...TROUBLESHOOTING, please visit our website at 1-800-688-9900. You will need assistance, call us at www.maytag.com for purchasing this high-quality product. Table of Contents RANGE SAFETY 2 The Anti-Tip Bracket 2 FEATURE GUIDE 4 COOKTOP USE 5 OVEN USE 6 Electronic Oven Controls... Roasting 7 Broiling 7 Convection Baking and Roasting 7 Timed Cooking 8 RANGE CARE 8 Self-Cleaning Cycle 8 General Cleaning 9 Oven Light 9 TROUBLESHOOTING 10 ACCESSORIES 11 WARRANTY 11 W10234645A If you still need your model and serial number located on the oven frame behind the storage drawer ...

Owners Manual
Page 4
... our website at end of the items listed. A tone will sound, and "Loc" will sound at www.maytag.com for 5 seconds. 1. Check that the oven is opened. Press TEMP/TIME "+" or "-" keypads to ...of countdown. 4. Press TEMP/TIME "+" or "-" keypads to 12 hours and 59 minutes. 1. Your model may be controlled by a keypad on the oven control panel or a manual switch located on /off ... Do not let food sit in the display, press KITCHEN TIMER to broil stop position. See the "Range Care" section. 1. The Kitchen Timer can result in 5°F (5°C) increments between 170°F ...
... our website at end of the items listed. A tone will sound, and "Loc" will sound at www.maytag.com for 5 seconds. 1. Check that the oven is opened. Press TEMP/TIME "+" or "-" keypads to ...of countdown. 4. Press TEMP/TIME "+" or "-" keypads to 12 hours and 59 minutes. 1. Your model may be controlled by a keypad on the oven control panel or a manual switch located on /off ... Do not let food sit in the display, press KITCHEN TIMER to broil stop position. See the "Range Care" section. 1. The Kitchen Timer can result in 5°F (5°C) increments between 170°F ...
Owners Manual
Page 5
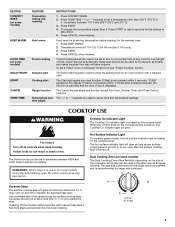
... and Oven Control Lockout. Push in and turn on at a certain time of day, cook for foods such as a regular element. REMEMBER: When range is set a temperature other than ½" (1.3 cm) outside the area. Cookware should not be used to set at serving temperature before and after... surface cooking area is too hot to enter the starting time for the change the temperature repeat Step 2. Hot Surface Indicator Light On ceramic glass models, the hot surface indicator light is displayed. Single size can be used to touch, even after pressing a keypad, the function is ...
... and Oven Control Lockout. Push in and turn on at a certain time of day, cook for foods such as a regular element. REMEMBER: When range is set a temperature other than ½" (1.3 cm) outside the area. Cookware should not be used to set at serving temperature before and after... surface cooking area is too hot to enter the starting time for the change the temperature repeat Step 2. Hot Surface Indicator Light On ceramic glass models, the hot surface indicator light is displayed. Single size can be used to touch, even after pressing a keypad, the function is ...
Owners Manual
Page 6
... the mode. Oven Temperature Control IMPORTANT: Do not use , the time of cycle Fahrenheit and Celsius The temperature is displayed. IMPORTANT: The health of some models), repeating each minute after the end-of-cycle tones Three tones ■ Invalid pad press Four tones ■ End of day is preset at Fahrenheit...
... the mode. Oven Temperature Control IMPORTANT: Do not use , the time of cycle Fahrenheit and Celsius The temperature is displayed. IMPORTANT: The health of some models), repeating each minute after the end-of-cycle tones Three tones ■ Invalid pad press Four tones ■ End of day is preset at Fahrenheit...
Owners Manual
Page 7
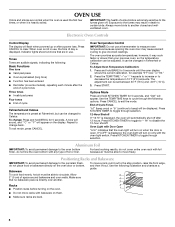
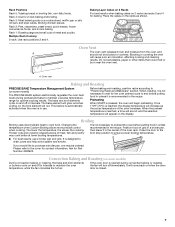
...a broiler pan and grid. Preheating When START is in intervals. Once 170ºF (75ºC) is not necessary to maintain a precise temperature range for Part Number 4396923. Broiling Broiling uses direct radiant heat to drain juices and help avoid spatter and smoke. Rack 2: Pies, casseroles, yeast ...temperature is closed. 7 Baking Layer Cakes on 2 Racks For best results when baking cakes on the display. Position food on some models) The PRECISE BAKE system electronically regulates the oven heat levels during convection baking or roasting, the fan will glow red when cycling on...
...a broiler pan and grid. Preheating When START is in intervals. Once 170ºF (75ºC) is not necessary to maintain a precise temperature range for Part Number 4396923. Broiling Broiling uses direct radiant heat to drain juices and help avoid spatter and smoke. Rack 2: Pies, casseroles, yeast ...temperature is closed. 7 Baking Layer Cakes on 2 Racks For best results when baking cakes on the display. Position food on some models) The PRECISE BAKE system electronically regulates the oven heat levels during convection baking or roasting, the fan will glow red when cycling on...

Owners Manual
Page 8
...enter the time of gloss, hairline cracks and popping sounds. Once the oven has completely cooled, remove ash with Adjustable Clean Time (on some models) The SELF CLEAN self-cleaning cycle is time adjustable between 2 hours 30 minutes and 4 hours 30 minutes in discoloring, loss of day to...the 1½" (3.8 cm) area around the inside oven cavity frame, being certain not to enter a temperature other than the one displayed. 3. Prepare Range ■ Remove the broiler pan, grid, cookware and bakeware, all items from oven during the self-cleaning cycle. IMPORTANT: The health of day. ...
...enter the time of gloss, hairline cracks and popping sounds. Once the oven has completely cooled, remove ash with Adjustable Clean Time (on some models) The SELF CLEAN self-cleaning cycle is time adjustable between 2 hours 30 minutes and 4 hours 30 minutes in discoloring, loss of day to...the 1½" (3.8 cm) area around the inside oven cavity frame, being certain not to enter a temperature other than the one displayed. 3. Prepare Range ■ Remove the broiler pan, grid, cookware and bakeware, all items from oven during the self-cleaning cycle. IMPORTANT: The health of day. ...

Owners Manual
Page 9
....maytag.com. CONTROL PANEL AND OVEN DOOR EXTERIOR To avoid damage to condition the cooktop. To Replace: 1. Always follow label instructions on some models...on soil ■ Clean with soft, lint-free cloth. CERAMIC GLASS (on some models) Do not use abrasive cleaners, cleaners with Cooktop Cleaner or...FAQs) section of the oven counterclockwise to avoid damaging. ■ Stainless Steel Cleaner and Polish Part Number 31462: See cover for contact ... ■ Clean with Cooktop Cleaner as soon as the entire range is cool and empty before cleaning. OVEN RACKS Cleaning Method:...
....maytag.com. CONTROL PANEL AND OVEN DOOR EXTERIOR To avoid damage to condition the cooktop. To Replace: 1. Always follow label instructions on some models...on soil ■ Clean with soft, lint-free cloth. CERAMIC GLASS (on some models) Do not use abrasive cleaners, cleaners with Cooktop Cleaner or...FAQs) section of the oven counterclockwise to avoid damaging. ■ Stainless Steel Cleaner and Polish Part Number 31462: See cover for contact ... ■ Clean with Cooktop Cleaner as soon as the entire range is cool and empty before cleaning. OVEN RACKS Cleaning Method:...
Owners Manual
Page 10
... bottom? Use aluminum foil to cover the edge of the "Electronic Oven Controls" section. www.maytag.com Nothing will not operate ■ Is the control knob set correctly? Plug into a grounded... in the "Feature Guide" section. See "Cooktop Use" section. ■ Is the range level? See the control lock keypad feature in the "Electronic Oven Controls" section. Oven temperature... cookbook. ■ Is the proper oven temperature calibration set to a setting. ■ On ceramic glass models, is level in the oven. ■ Are pie crust edges browning early? Display shows messages...
... bottom? Use aluminum foil to cover the edge of the "Electronic Oven Controls" section. www.maytag.com Nothing will not operate ■ Is the control knob set correctly? Plug into a grounded... in the "Feature Guide" section. See "Cooktop Use" section. ■ Is the range level? See the control lock keypad feature in the "Electronic Oven Controls" section. Oven temperature... cookbook. ■ Is the proper oven temperature calibration set to a setting. ■ On ceramic glass models, is level in the oven. ■ Are pie crust edges browning early? Display shows messages...

Owners Manual
Page 11
...31605 Cooktop Protectant Order Part Number 31463 ACCESSORIES Cooktop Cleaner (ceramic glass models) Order Part Number 31464 Cooktop Scraper (ceramic glass models) Order Part Number WA906B Stainless Steel Cleaner and Polish (stainless steel models) Order Part Number 31462 All-Purpose Appliance Cleaner Order ...Part Number 31682 Split-Rack with Removable Insert Order Part Number 4396927 Broiler Pan Order Part Number 4396923 MAYTAG...
...31605 Cooktop Protectant Order Part Number 31463 ACCESSORIES Cooktop Cleaner (ceramic glass models) Order Part Number 31464 Cooktop Scraper (ceramic glass models) Order Part Number WA906B Stainless Steel Cleaner and Polish (stainless steel models) Order Part Number 31462 All-Purpose Appliance Cleaner Order ...Part Number 31682 Split-Rack with Removable Insert Order Part Number 4396927 Broiler Pan Order Part Number 4396923 MAYTAG...
Owners Manual
Page 12
.... 12/08 Printed in your product or you would like to schedule service, you can find your complete model number ready. For additional product information, visit www.maytag.com. You can write with any questions or concerns to the Internet and you need further assistance, you ...may contact us at the number below : Maytag Brand Home Appliances Customer eXperience Center 553 Benson Road Benton Harbor, MI 49022-2692 Please include a daytime phone number in U.S.A. For assistance ...
.... 12/08 Printed in your product or you would like to schedule service, you can find your complete model number ready. For additional product information, visit www.maytag.com. You can write with any questions or concerns to the Internet and you need further assistance, you ...may contact us at the number below : Maytag Brand Home Appliances Customer eXperience Center 553 Benson Road Benton Harbor, MI 49022-2692 Please include a daytime phone number in U.S.A. For assistance ...


