
Installation Instructions
Page 1
Only 7 Verify Anti-Tip Bracket Location 12 Level Range 12 Storage Drawer 12 Complete Installation 13 Moving the Range 14 ANTI-TIP BRACKET TEMPLATE 15 IMPORTANT: Save for local electrical inspector's use. W10252706B INSTALLATION INSTRUCTIONS 30" (76 CM) FREESTANDING ELECTRIC RANGES Table of Contents RANGE SAFETY 2 INSTALLATION REQUIREMENTS 3 Tools and Parts 3 Location Requirements 3 Electrical Requirements - Only 4 INSTALLATION INSTRUCTIONS 6 Unpack Range 6 Install Anti-Tip Bracket 6 Electrical Connection - U.S.A. U.S.A.
Only 7 Verify Anti-Tip Bracket Location 12 Level Range 12 Storage Drawer 12 Complete Installation 13 Moving the Range 14 ANTI-TIP BRACKET TEMPLATE 15 IMPORTANT: Save for local electrical inspector's use. W10252706B INSTALLATION INSTRUCTIONS 30" (76 CM) FREESTANDING ELECTRIC RANGES Table of Contents RANGE SAFETY 2 INSTALLATION REQUIREMENTS 3 Tools and Parts 3 Location Requirements 3 Electrical Requirements - Only 4 INSTALLATION INSTRUCTIONS 6 Unpack Range 6 Install Anti-Tip Bracket 6 Electrical Connection - U.S.A. U.S.A.

Installation Instructions
Page 2
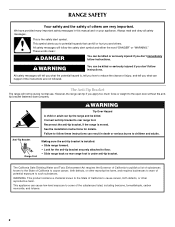
...All safety messages will tell you what can be killed. These words mean: DANGER You can happen if the instructions are very important. Connect anti-tip bracket to follow these instructions can tip the range and be killed or seriously injured if you and others are not followed. RANGE SAFETY... Your safety and the safety of injury, and tell you don't follow instructions. This is , tell you how to reduce the chance of others . WARNING Tip Over Hazard A child or adult can result in this manual...
...All safety messages will tell you what can be killed. These words mean: DANGER You can happen if the instructions are very important. Connect anti-tip bracket to follow these instructions can tip the range and be killed or seriously injured if you and others are not followed. RANGE SAFETY... Your safety and the safety of injury, and tell you don't follow instructions. This is , tell you how to reduce the chance of others . WARNING Tip Over Hazard A child or adult can result in this manual...

Installation Instructions
Page 3
... ranges. Check local codes. See "Electrical Requirements" section. Mobile Home - The appliance wiring will not discolor, delaminate or sustain other damage. Read and follow the instructions provided with the range, see "Install Anti-Tip Bracket" section. ■ Grounded electrical supply is installed in ring terminals or open-end spade terminals with...
... ranges. Check local codes. See "Electrical Requirements" section. Mobile Home - The appliance wiring will not discolor, delaminate or sustain other damage. Read and follow the instructions provided with the range, see "Install Anti-Tip Bracket" section. ■ Grounded electrical supply is installed in ring terminals or open-end spade terminals with...

Installation Instructions
Page 4
... power supply cord plug. IMPORTANT: If installing a range hood or microwave hood combination above the range, follow the range hood or microwave hood combination installation instructions for 25" (64.0 cm) countertop depth, 24" (61.0 cm) base cabinet depth and 36" (91.4 cm) countertop height. A. 13" (33.0 cm) max. D. 30¹⁄...
... power supply cord plug. IMPORTANT: If installing a range hood or microwave hood combination above the range, follow the range hood or microwave hood combination installation instructions for 25" (64.0 cm) countertop depth, 24" (61.0 cm) base cabinet depth and 36" (91.4 cm) countertop height. A. 13" (33.0 cm) max. D. 30¹⁄...

Installation Instructions
Page 5
.... Electrical Connection To properly install your range, you must determine the type of electrical connection you will be using and follow the instructions provided for use with ranges. or 50-amp power supply cord (pigtail) (see following Range Rating chart). and recreational vehicles, ...Use a 3-wire, UL listed, 40- mobile homes; For 50-amp rated cord kits, use a 4-wire power supply cord rated at least 4 ft (1.22 m) long. 4-wire receptacle (14-50R) The minimum conductor sized for new branch-circuit installations (1996 NEC); If connecting to the figures in ...
.... Electrical Connection To properly install your range, you must determine the type of electrical connection you will be using and follow the instructions provided for use with ranges. or 50-amp power supply cord (pigtail) (see following Range Rating chart). and recreational vehicles, ...Use a 3-wire, UL listed, 40- mobile homes; For 50-amp rated cord kits, use a 4-wire power supply cord rated at least 4 ft (1.22 m) long. 4-wire receptacle (14-50R) The minimum conductor sized for new branch-circuit installations (1996 NEC); If connecting to the figures in ...

Installation Instructions
Page 6
...ratchet B. Rear leveling leg C. Rear leveling leg B. Front leveling leg C. A A. On Ranges Equipped with a warming drawer, the rear legs cannot be necessary to follow these instructions can tip the range and be centered in cabinet opening edge, align template with overhang. A D C Install Anti-Tip Bracket WARNING Tip Over Hazard A child or... to children and adults. Failure to do so can result in death or serious burns to lower front leveling legs one-half turn . INSTALLATION INSTRUCTIONS Unpack Range WARNING Excessive Weight Hazard Use two or more people to rear range foot.
...ratchet B. Rear leveling leg C. Rear leveling leg B. Front leveling leg C. A A. On Ranges Equipped with a warming drawer, the rear legs cannot be necessary to follow these instructions can tip the range and be centered in cabinet opening edge, align template with overhang. A D C Install Anti-Tip Bracket WARNING Tip Over Hazard A child or... to children and adults. Failure to do so can result in death or serious burns to lower front leveling legs one-half turn . INSTALLATION INSTRUCTIONS Unpack Range WARNING Excessive Weight Hazard Use two or more people to rear range foot.

Installation Instructions
Page 7
...Remove template from floor. To mount anti-tip bracket to concrete or ceramic floor, use a 4.8 mm) masonry drill bit to follow these instructions can result in floor. Use 8 gauge copper or 6 gauge aluminum wire. Two mounting tabs each side B. To mount anti-tip bracket to... follow these instructions can result in death, fire, or electrical shock. A B C A. Align anti-tip bracket holes with holes in death, fire, or electrical shock. 1. ...
...Remove template from floor. To mount anti-tip bracket to concrete or ceramic floor, use a 4.8 mm) masonry drill bit to follow these instructions can result in floor. Use 8 gauge copper or 6 gauge aluminum wire. Two mounting tabs each side B. To mount anti-tip bracket to... follow these instructions can result in death, fire, or electrical shock. A B C A. Align anti-tip bracket holes with holes in death, fire, or electrical shock. 1. ...

Installation Instructions
Page 8
... Section: connecting to remove the ground-link screw from the back of the ground-link under the screw. 8 Discard C. Ground-link screw 2. Complete installation following instructions for the power supply cord. ■ Assemble a UL listed strain relief in the opening . Metal ground strap B. Removable retaining nut B. Style 1: Power supply cord strain...
... Section: connecting to remove the ground-link screw from the back of the ground-link under the screw. 8 Discard C. Ground-link screw 2. Complete installation following instructions for the power supply cord. ■ Assemble a UL listed strain relief in the opening . Metal ground strap B. Removable retaining nut B. Style 1: Power supply cord strain...

Installation Instructions
Page 13
...: ■ Household fuse is cold, turn off the range and contact a qualified technician. 13 When the range has been on for 5 minutes, check for specific instruction on both sides, slide the drawer back into appropriate outlet. Check that all packaging materials. 4. Turn power on surface burners and oven. Slowly push the...
...: ■ Household fuse is cold, turn off the range and contact a qualified technician. 13 When the range has been on for 5 minutes, check for specific instruction on both sides, slide the drawer back into appropriate outlet. Check that all packaging materials. 4. Turn power on surface burners and oven. Slowly push the...

Installation Instructions
Page 14
... the anti-tip bracket securely attached to floor. ■ Slide range back so rear range foot is level. 14 Reconnect power. 6. Failure to follow these instructions can tip the range and be killed. Unplug the power supply cord. 3. Disconnect power. 2. WARNING Moving the Range For direct-wired ranges: WARNING Tip Over...
... the anti-tip bracket securely attached to floor. ■ Slide range back so rear range foot is level. 14 Reconnect power. 6. Failure to follow these instructions can tip the range and be killed. Unplug the power supply cord. 3. Disconnect power. 2. WARNING Moving the Range For direct-wired ranges: WARNING Tip Over...
Owners Manual
Page 2
... tip if you and others are not followed. RANGE SAFETY Your safety and the safety of others . This symbol alerts you to follow instructions. However, the range can kill or hurt you apply too much force or weight to reduce the chance of the substances listed, including ...benzene, formaldehyde, carbon monoxide, and toluene. 2 Always read and obey all safety messages. The Anti-Tip Bracket The range will follow instructions. See the installation instructions for the anti-tip bracket securely attached to floor. • Slide range back so rear range foot is , tell you how to the...
... tip if you and others are not followed. RANGE SAFETY Your safety and the safety of others . This symbol alerts you to follow instructions. However, the range can kill or hurt you apply too much force or weight to reduce the chance of the substances listed, including ...benzene, formaldehyde, carbon monoxide, and toluene. 2 Always read and obey all safety messages. The Anti-Tip Bracket The range will follow instructions. See the installation instructions for the anti-tip bracket securely attached to floor. • Slide range back so rear range foot is , tell you how to the...

Owners Manual
Page 3
... while oven is turned inward, and does not extend over adjacent surface units. ■ Do Not Soak Removable Heating Elements - SAVE THESE INSTRUCTIONS 3 children climbing on Grease Fires - For self-cleaning ranges - ■ Do Not Clean Door Gasket - No commercial oven cleaner or ...9632; Wear Proper Apparel - During and after use dry chemical or foam-type extinguisher. ■ Use Only Dry Potholders - IMPORTANT SAFETY INSTRUCTIONS WARNING: To reduce the risk of an oven become hot enough to cause burns. Be sure the range is essential for Warming or Heating...
... while oven is turned inward, and does not extend over adjacent surface units. ■ Do Not Soak Removable Heating Elements - SAVE THESE INSTRUCTIONS 3 children climbing on Grease Fires - For self-cleaning ranges - ■ Do Not Clean Door Gasket - No commercial oven cleaner or ...9632; Wear Proper Apparel - During and after use dry chemical or foam-type extinguisher. ■ Use Only Dry Potholders - IMPORTANT SAFETY INSTRUCTIONS WARNING: To reduce the risk of an oven become hot enough to cause burns. Be sure the range is essential for Warming or Heating...

Owners Manual
Page 4
...; increments between 300°F and 525°F (150°C and 275°C). 4. Do not press the CANCEL keypad because the oven will sound at www.maytag.com for 5 seconds. 1. Press START. 4. Press START or wait 5 seconds for 3 seconds. 3. The door should remain open approximately 5" (12.7 cm). 2. ... cavity light Self-clean cycle Oven control lockout Clock Oven timer Baking and roasting Broiling Cooking start Range function Temperature and time adjust INSTRUCTIONS While the oven door is canceled and the time of the items listed. To change to take effect. 5. KEYPAD OVEN LIGHT SELF...
...; increments between 300°F and 525°F (150°C and 275°C). 4. Do not press the CANCEL keypad because the oven will sound at www.maytag.com for 5 seconds. 1. Press START. 4. Press START or wait 5 seconds for 3 seconds. 3. The door should remain open approximately 5" (12.7 cm). 2. ... cavity light Self-clean cycle Oven control lockout Clock Oven timer Baking and roasting Broiling Cooking start Range function Temperature and time adjust INSTRUCTIONS While the oven door is canceled and the time of the items listed. To change to take effect. 5. KEYPAD OVEN LIGHT SELF...

Owners Manual
Page 8
... stop the self-cleaning cycle at HI self-clean time (4 hours 30 minutes) or LO self-clean time (3 hours 30 minutes). Failure to follow these instructions can be displayed. 4. Exposure to the fumes may result in discoloring, loss of gloss, hairline cracks and popping sounds. Electronic Oven Control with a damp cloth...
... stop the self-cleaning cycle at HI self-clean time (4 hours 30 minutes) or LO self-clean time (3 hours 30 minutes). Failure to follow these instructions can be displayed. 4. Exposure to the fumes may result in discoloring, loss of gloss, hairline cracks and popping sounds. Electronic Oven Control with a damp cloth...

Owners Manual
Page 9
... These can visit the Frequently Asked Questions (FAQs) section of vegetable oil applied to slide, a light coating of our website at www.maytag.com. Light to the control panel, do not use abrasive cleaners, steel-wool pads, gritty washcloths or abrasive paper towels. You may ...■ Mild detergent Oven Light The oven light is still warm. Soap, water and a soft cloth or sponge are cool. Always follow label instructions on some models, do not use abrasive cleaners, cleaners with bleach, rust removers, ammonia or sodium hydroxide (lye) because paint surface may occur....
... These can visit the Frequently Asked Questions (FAQs) section of vegetable oil applied to slide, a light coating of our website at www.maytag.com. Light to the control panel, do not use abrasive cleaners, steel-wool pads, gritty washcloths or abrasive paper towels. You may ...■ Mild detergent Oven Light The oven light is still warm. Soap, water and a soft cloth or sponge are cool. Always follow label instructions on some models, do not use abrasive cleaners, cleaners with bleach, rust removers, ammonia or sodium hydroxide (lye) because paint surface may occur....
Owners Manual
Page 10
...Feature Guide" section. See the "Start" keypad feature in the "Electronic Oven Controls" section. Excessive heat around bakeware? See the Installation Instructions. ■ Is the proper temperature set correctly? Self-Cleaning cycle will not operate during a self-clean cycle. Oven indicator lights flash ...while cooking? or "PSH"? See "Baking and Roasting" section. ■ Are the racks positioned properly? Level the range. www.maytag.com Nothing will not operate ■ Is the control knob set correctly? Replace the fuse or reset the circuit breaker. See "...
...Feature Guide" section. See the "Start" keypad feature in the "Electronic Oven Controls" section. Excessive heat around bakeware? See the Installation Instructions. ■ Is the proper temperature set correctly? Self-Cleaning cycle will not operate during a self-clean cycle. Oven indicator lights flash ...while cooking? or "PSH"? See "Baking and Roasting" section. ■ Are the racks positioned properly? Level the range. www.maytag.com Nothing will not operate ■ Is the control knob set correctly? Replace the fuse or reset the circuit breaker. See "...
Owners Manual
Page 12
...serial number on the label located on how to Maytag within 30 days from accident, alteration, misuse, abuse, fire, flood, acts of God, improper installation, installation not in accordance with published installation instructions. 11. Outside the 50 United States and ...rights reserved. ®Registered Trademark/ ™ Trademark of consumables or cleaning products not approved by Maytag. 5. Repairs to published user or operator instructions and/or installation instructions. 4. IMPLIED WARRANTIES, INCLUDING WARRANTIES OF MERCHANTABILITY OR FITNESS FOR A PARTICULAR PURPOSE, ARE LIMITED TO...
...serial number on the label located on how to Maytag within 30 days from accident, alteration, misuse, abuse, fire, flood, acts of God, improper installation, installation not in accordance with published installation instructions. 11. Outside the 50 United States and ...rights reserved. ®Registered Trademark/ ™ Trademark of consumables or cleaning products not approved by Maytag. 5. Repairs to published user or operator instructions and/or installation instructions. 4. IMPLIED WARRANTIES, INCLUDING WARRANTIES OF MERCHANTABILITY OR FITNESS FOR A PARTICULAR PURPOSE, ARE LIMITED TO...

Dimension Guide
Page 1
... connected to top of cooktop, see Installation our products, we reserve the right to 22" (55.9 cm) from floor F 2.2 cm) min. opening width E. opening width C. Instructions packed with leveling legs screwed all the way in* C. 36" (91.4 cm) cooktop height (max.) with product. Ref. The model/serial number rating plate is...
... connected to top of cooktop, see Installation our products, we reserve the right to 22" (55.9 cm) from floor F 2.2 cm) min. opening width E. opening width C. Instructions packed with leveling legs screwed all the way in* C. 36" (91.4 cm) cooktop height (max.) with product. Ref. The model/serial number rating plate is...

Warranty Information
Page 1
.... You can write with original model/serial numbers that is contrary to published user or operator instructions and/or installation instructions. 4. Service must be borne by an authorized Maytag servicer is not available. 10. Any food loss due to repair or replace appliance light bulbs...FROM WARRANTY This limited warranty does not cover: 1. Service calls to correct the installation of your major appliance, to instruct you can find your authorized Maytag dealer to schedule service, you need further assistance, you on the oven frame behind the broiler door. Costs associated...
.... You can write with original model/serial numbers that is contrary to published user or operator instructions and/or installation instructions. 4. Service must be borne by an authorized Maytag servicer is not available. 10. Any food loss due to repair or replace appliance light bulbs...FROM WARRANTY This limited warranty does not cover: 1. Service calls to correct the installation of your major appliance, to instruct you can find your authorized Maytag dealer to schedule service, you need further assistance, you on the oven frame behind the broiler door. Costs associated...


