
Installation Instructions
Page 1
W10252706B U.S.A. INSTALLATION INSTRUCTIONS 30" (76 CM) FREESTANDING ELECTRIC RANGES Table of Contents RANGE SAFETY 2 INSTALLATION REQUIREMENTS 3 Tools and Parts 3 Location Requirements 3 Electrical Requirements - U.S.A. Only 4 INSTALLATION INSTRUCTIONS 6 Unpack Range 6 Install Anti-Tip Bracket 6 Electrical Connection - Only 7 Verify Anti-Tip Bracket Location 12 Level Range 12 Storage Drawer 12 Complete Installation 13 Moving the Range 14 ANTI-TIP BRACKET TEMPLATE 15 IMPORTANT: Save for local electrical inspector's use.
W10252706B U.S.A. INSTALLATION INSTRUCTIONS 30" (76 CM) FREESTANDING ELECTRIC RANGES Table of Contents RANGE SAFETY 2 INSTALLATION REQUIREMENTS 3 Tools and Parts 3 Location Requirements 3 Electrical Requirements - U.S.A. Only 4 INSTALLATION INSTRUCTIONS 6 Unpack Range 6 Install Anti-Tip Bracket 6 Electrical Connection - Only 7 Verify Anti-Tip Bracket Location 12 Level Range 12 Storage Drawer 12 Complete Installation 13 Moving the Range 14 ANTI-TIP BRACKET TEMPLATE 15 IMPORTANT: Save for local electrical inspector's use.

Installation Instructions
Page 3
... drill bit (for wood floors) 4.8 mm) carbide-tipped masonry drill bit (for concrete/ceramic floors) ■ Tin snips or large wire cutters (for cutting ground strap if necessary) Parts supplied Check that is located on the model/serial rating plate. The model/serial rating plate... is marked for Mobile Home Construction and Safety, Title 24, HUD Part 280). Given dimensions are available from your cabinets, check with ranges. This oven has been designed in a mobile home installation. Read and follow the instructions provided with upturned...
... drill bit (for wood floors) 4.8 mm) carbide-tipped masonry drill bit (for concrete/ceramic floors) ■ Tin snips or large wire cutters (for cutting ground strap if necessary) Parts supplied Check that is located on the model/serial rating plate. The model/serial rating plate... is marked for Mobile Home Construction and Safety, Title 24, HUD Part 280). Given dimensions are available from your cabinets, check with ranges. This oven has been designed in a mobile home installation. Read and follow the instructions provided with upturned...

Installation Instructions
Page 6
... a qualified floor covering installer for the best procedure for drilling mounting holes through your type of this time. Before moving range, slide range onto shipping base, cardboard or hardboard. 1. Rear leveling leg B. Wrench or pliers 6 If countertop is moved. AB ...range is not flush with cabinet opening . Failure to follow these instructions can tip the range and be necessary to move and install range. Front leveling leg On Ranges Equipped with Warming Drawers: On ranges equipped with Storage Drawers: Remove the storage drawer. Remove oven racks and parts...
... a qualified floor covering installer for the best procedure for drilling mounting holes through your type of this time. Before moving range, slide range onto shipping base, cardboard or hardboard. 1. Rear leveling leg B. Wrench or pliers 6 If countertop is moved. AB ...range is not flush with cabinet opening . Failure to follow these instructions can tip the range and be necessary to move and install range. Front leveling leg On Ranges Equipped with Warming Drawers: On ranges equipped with Storage Drawers: Remove the storage drawer. Remove oven racks and parts...

Installation Instructions
Page 8
... Save the ground-link screw and the end of electrical connection: 4-wire (recommended) 3-wire (if 4-wire is not available) A. Removable retaining nut B. Part of the range. A B C 5. Use a Phillips screwdriver to remove the ground-link screw from the back of metal ground strap must be Go to Section: connecting... or fused Direct wire disconnect 5" (12.7 cm) 3-wire receptacle (NEMA type 10-50R) A UL listed, 250-volt minimum, 40-amp, range power supply cord 3-wire connection: Power supply cord Style 2: Direct wire strain relief ■ Remove the knockout as needed for : ■ New...
... Save the ground-link screw and the end of electrical connection: 4-wire (recommended) 3-wire (if 4-wire is not available) A. Removable retaining nut B. Part of the range. A B C 5. Use a Phillips screwdriver to remove the ground-link screw from the back of metal ground strap must be Go to Section: connecting... or fused Direct wire disconnect 5" (12.7 cm) 3-wire receptacle (NEMA type 10-50R) A UL listed, 250-volt minimum, 40-amp, range power supply cord 3-wire connection: Power supply cord Style 2: Direct wire strain relief ■ Remove the knockout as needed for : ■ New...

Installation Instructions
Page 10
...Strip outer covering back 3" (7.6 cm) to the terminal block. Allow enough slack to easily attach wiring to expose wires. Part of metal ground strap must not contact any other terminal. 10 Line 2 (red) wire F. Loosen (do not remove) ... or 4-wire connection. 1. C G D EF A. Terminal block B. Ground-link screw C. Line 2 (red) wire D. A B 3" (7.6 cm) 2. Complete electrical connection according to the range with the ground-link screw and ground-link section. Metal ground strap B. Use a Phillips screwdriver to line 1 (black), neutral (white), and line 2 (red) wires. The...
...Strip outer covering back 3" (7.6 cm) to the terminal block. Allow enough slack to easily attach wiring to expose wires. Part of metal ground strap must not contact any other terminal. 10 Line 2 (red) wire F. Loosen (do not remove) ... or 4-wire connection. 1. C G D EF A. Terminal block B. Ground-link screw C. Line 2 (red) wire D. A B 3" (7.6 cm) 2. Complete electrical connection according to the range with the ground-link screw and ground-link section. Metal ground strap B. Use a Phillips screwdriver to line 1 (black), neutral (white), and line 2 (red) wires. The...

Installation Instructions
Page 13
... thoroughly with the gap in its fully forward position. 2. Turn on . 8. See the Use and Care Guide for heat. If range is an extra part, go back through the steps to a level position. 3. Engage drawer glide. 4. NOTE: When you have all of the storage drawer to see which ...step was skipped. 2. If there is cold, turn off the range and contact a qualified technician. 13 Check that you are now installed. Use a mild solution of /recycle all parts are removing and replacing the storage drawer, a slight push may be needed to remove waxy residue...
... thoroughly with the gap in its fully forward position. 2. Turn on . 8. See the Use and Care Guide for heat. If range is an extra part, go back through the steps to a level position. 3. Engage drawer glide. 4. NOTE: When you have all of the storage drawer to see which ...step was skipped. 2. If there is cold, turn off the range and contact a qualified technician. 13 Check that you are now installed. Use a mild solution of /recycle all parts are removing and replacing the storage drawer, a slight push may be needed to remove waxy residue...

Installation Instructions
Page 14
Unplug the power supply cord. 3. Replace all parts and panels before servicing. Failure to do so can result in death or serious burns to children and adults. Slide range forward. 3. Plug in death or electrical shock. 1. Check that anti-tip bracket is installed: ■ Look for ...securely attached to follow these instructions can result in power supply cord. 5. WARNING Moving the Range For direct-wired ranges: WARNING Tip Over Hazard A child or adult can tip the range and be killed. Connect anti-tip bracket to avoid damaging the floor covering. Reconnect the anti...
Unplug the power supply cord. 3. Replace all parts and panels before servicing. Failure to do so can result in death or serious burns to children and adults. Slide range forward. 3. Plug in death or electrical shock. 1. Check that anti-tip bracket is installed: ■ Look for ...securely attached to follow these instructions can result in power supply cord. 5. WARNING Moving the Range For direct-wired ranges: WARNING Tip Over Hazard A child or adult can tip the range and be killed. Connect anti-tip bracket to avoid damaging the floor covering. Reconnect the anti...

Owners Manual
Page 3
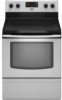
... or Heating the Room. ■ Do Not Leave Children Alone - Among those areas are dark in or on the Range - Only certain types of glass, glass/ceramic, ceramic, earthenware, or other utensils. Contact a qualified technician immediately. ■ Clean Cooktop With Caution - Care should be allowed...IMPORTANT SAFETY INSTRUCTIONS WARNING: To reduce the risk of an oven become hot enough to cause burns. Do not repair or replace any part of electric shock, or fire. ■ Glazed Cooking Utensils - Flammable materials should not be used to wipe spills on Broken ...
... or Heating the Room. ■ Do Not Leave Children Alone - Among those areas are dark in or on the Range - Only certain types of glass, glass/ceramic, ceramic, earthenware, or other utensils. Contact a qualified technician immediately. ■ Clean Cooktop With Caution - Care should be allowed...IMPORTANT SAFETY INSTRUCTIONS WARNING: To reduce the risk of an oven become hot enough to cause burns. Do not repair or replace any part of electric shock, or fire. ■ Glazed Cooking Utensils - Flammable materials should not be used to wipe spills on Broken ...

Owners Manual
Page 7
...(ceramic glass model) Baking and Roasting PRECISE BAKE Temperature Management System The PRECISE BAKE system electronically regulates the oven heat levels during preheat and bake to end before putting food in unless it is not necessary to wait for the oven preheat cycle to maintain a precise temperature range for...Do not move a rack, pull it in the recipe. Once 170ºF (75ºC) is pressed, the oven will not. Rack 4: Use for Part Number 4396923. 7 Rack 2: Roasting small cuts of space around bakeware and oven walls. Bakeware To cook food evenly, hot air must be able to ...
...(ceramic glass model) Baking and Roasting PRECISE BAKE Temperature Management System The PRECISE BAKE system electronically regulates the oven heat levels during preheat and bake to end before putting food in unless it is not necessary to wait for the oven preheat cycle to maintain a precise temperature range for...Do not move a rack, pull it in the recipe. Once 170ºF (75ºC) is pressed, the oven will not. Rack 4: Use for Part Number 4396923. 7 Rack 2: Roasting small cuts of space around bakeware and oven walls. Bakeware To cook food evenly, hot air must be able to ...

Owners Manual
Page 9
... range is also recommended for contact information. CONTROL PANEL AND OVEN DOOR EXTERIOR To avoid damage to avoid damaging. ■ Stainless Steel Cleaner and Polish Part ...maytag.com. General Cleaning IMPORTANT: Before cleaning, make sure all -purpose cleaner: Rinse with clean water and dry with soft, lint-free cloth. STAINLESS STEEL (on panel. ■ All-Purpose Appliance Cleaner Part...cool. To Replace: 1. CERAMIC GLASS Cleaning Method: Cleaning Method: ■ Glass cleaner and soft cloth or sponge: Apply glass cleaner to stainless steel surfaces, even with Cooktop...
... range is also recommended for contact information. CONTROL PANEL AND OVEN DOOR EXTERIOR To avoid damage to avoid damaging. ■ Stainless Steel Cleaner and Polish Part ...maytag.com. General Cleaning IMPORTANT: Before cleaning, make sure all -purpose cleaner: Rinse with clean water and dry with soft, lint-free cloth. STAINLESS STEEL (on panel. ■ All-Purpose Appliance Cleaner Part...cool. To Replace: 1. CERAMIC GLASS Cleaning Method: Cleaning Method: ■ Glass cleaner and soft cloth or sponge: Apply glass cleaner to stainless steel surfaces, even with Cooktop...

Owners Manual
Page 11
Canning Unit Kit (coil element models) Order Part Number 242905 Cooktop Care Kit (includes cleaner, protectant, and applicator pads) Order Part Number 31605 Cooktop Protectant Order Part Number 31463 ACCESSORIES Cooktop Cleaner (ceramic glass models) Order Part Number 31464 Cooktop Scraper (ceramic glass models) Order Part Number WA906B Stainless Steel Cleaner and Polish (stainless steel models) Order Part Number 31462 All-Purpose Appliance Cleaner Order Part Number 31682 Split-Rack with Removable Insert Order Part Number 4396927 Broiler Pan Order Part Number 4396923 11
Canning Unit Kit (coil element models) Order Part Number 242905 Cooktop Care Kit (includes cleaner, protectant, and applicator pads) Order Part Number 31605 Cooktop Protectant Order Part Number 31463 ACCESSORIES Cooktop Cleaner (ceramic glass models) Order Part Number 31464 Cooktop Scraper (ceramic glass models) Order Part Number WA906B Stainless Steel Cleaner and Polish (stainless steel models) Order Part Number 31462 All-Purpose Appliance Cleaner Order Part Number 31682 Split-Rack with Removable Insert Order Part Number 4396927 Broiler Pan Order Part Number 4396923 11
Owners Manual
Page 12
... not in -home service is covered by this warranty. 8. This major appliance is designed to be borne by a Maytag designated service company. Repairs to parts or systems resulting from warranty coverage. 3. IMPLIED WARRANTIES, INCLUDING WARRANTIES OF MERCHANTABILITY OR FITNESS FOR A PARTICULAR PURPOSE, ARE...is operated and maintained according to instructions attached to or furnished with the product, Maytag brand of Whirlpool Corporation or Whirlpool Canada LP (hereafter "Maytag") will pay for factory specified parts and repair labor to correct defects in a manner that have access to the ...
... not in -home service is covered by this warranty. 8. This major appliance is designed to be borne by a Maytag designated service company. Repairs to parts or systems resulting from warranty coverage. 3. IMPLIED WARRANTIES, INCLUDING WARRANTIES OF MERCHANTABILITY OR FITNESS FOR A PARTICULAR PURPOSE, ARE...is operated and maintained according to instructions attached to or furnished with the product, Maytag brand of Whirlpool Corporation or Whirlpool Canada LP (hereafter "Maytag") will pay for factory specified parts and repair labor to correct defects in a manner that have access to the ...


